Probably everyone who has anything to do with computers has heard about wireless networks. Wireless networks, also called Wi-Fi or WLAN (Wireless LAN) networks, have significant advantages over traditional wired networks, the main one, of course, being ease of deployment. Thus, a wireless network does not require cabling (which often requires wall cutting); it's hard to argue with such merits wireless network, such as the mobility of users in its coverage area and the ease of connecting new users to it. At the same time, wireless networks are not without certain disadvantages. First of all, this is a low, by today's standards, connection speed, which, at the same time, seriously depends on the presence of obstacles and on the distance between the receiver and transmitter; poor scalability, and also, when it comes to using a wireless network indoors, a rather limited network range. There are also some challenges associated with securing a wireless network. However, despite all the problems characteristic of wireless networks (the number of which, by the way, is decreasing year by year), they are rapidly developing and have already become firmly established in our lives.
The use of wireless networks in public places (so-called hot spots), such as airports, train stations, cafes, hotels, exhibitions, has already become the norm for European countries and the United States and is gradually spreading throughout Russia. Wireless networks are no less widely used at home. Indeed, instead of hammering into the walls and laying cables in them, planning in advance the stationary places for installing the PC, how much easier it is to install one (at least two) access points in the apartment, turning the home into one wireless zone! In addition, this creates shared Internet access for all computers on the wireless network, and if you use mobile PCs (laptops) in your apartment, you will no longer need to be tied to a stationary location that has access to the network.
In this article, we will talk in detail about how to deploy and configure a wireless network at home, step by step.
What you need to deploy a wireless network
So, to build a wireless network you will need an access point (Access Point) and computers (laptops) equipped with wireless adapters. It should be noted that there are two operating modes of wireless networks: Infrastructure mode and Ad Hoc mode.
In Infrastructure Mode, network end nodes (computers with wireless adapters) communicate with each other through an access point. In this case, the access point acts as a coordinating node, ensuring the sharing of the data transmission medium by all wireless adapters. Two Infrastructure modes are considered: the main mode BSS (Basic Service Set) and the extended mode ESS (Extended Service Set). In BSS mode, all network nodes communicate with each other only through one access point, which can also serve as a bridge to an external network. In advanced ESS mode, there is an infrastructure of multiple BSS networks, with the access points themselves communicating with each other, allowing traffic to be transferred from one BSS to another. Access points are connected to each other using either cable network segments or radio bridges.
In addition to the wireless network architecture with an access point (Infrastructure mode), there is also an architecture that does not have an access point (Ad Hoc mode). In Ad Hoc mode, also called Independent Basic Service Set (IBSS) or Peer to Peer mode, network nodes communicate directly with each other. This mode requires minimal equipment: each station must be equipped wireless adapter. With this configuration, no network infrastructure is required. The main disadvantages of Ad Hoc mode are the limited range of the resulting network and the inability to connect to an external network (for example, the Internet).
In the future, we will talk about the architecture of wireless networks based on an access point.
Selecting wireless equipment
There are several types of wireless standards: 802.11a, 802.11b and 802.11g. In accordance with these standards, there are different types of equipment. The wireless network standards of the 802.11 family differ from each other primarily in the maximum possible transmission speed. Thus, the 802.11b standard implies a maximum transfer speed of up to 11 Mbit/s, and the 802.11a and 802.11g standards mean a maximum transfer speed of up to 54 Mbit/s. Additionally, 802.11b and 802.11g use the same frequency range from 2.4 to 2.4835 GHz, while 802.11a covers the same frequency range from 5.15 to 5.35 GHz.
Equipment of the 802.11a standard, due to the frequency range it uses, is not certified in Russia. This, of course, does not prevent you from using it at home. However, purchasing such equipment is problematic. That is why in the future we will focus on considering the 802.11b and 802.11g standards.
Please note that the 802.11g standard is fully compatible with the 802.11b standard, that is, the 802.11b standard is a subset of the 802.11g standard, so wireless networks based on 802.11g equipment can also work with clients equipped with an 802.11b wireless adapter. The reverse is also true: in wireless networks based on 802.11b equipment, clients equipped with an 802.11b wireless adapter can work. However, there is one pitfall hidden in such mixed networks: if we are dealing with a mixed network, that is, with a network in which there are clients with both 802.11b wireless adapters and 802.11g wireless adapters, then all clients on the network will work according to 802.11b protocol. Moreover, if all clients on the network use the same protocol, such as 802.11b, then this network is homogeneous and the data transfer speed in it is higher than in a mixed network where there are both 802.11g and 802.11b clients. The fact is that 802.11b clients do not “hear” 802.11g clients. Therefore, in order to ensure shared access to the data transmission medium of clients using different protocols, access points in such mixed networks must implement a certain security mechanism. Without going into details of the implementation of these mechanisms, we will only note that as a result of the use of protection mechanisms in mixed networks, the actual transmission speed becomes even lower.
Therefore, when choosing equipment for a wireless home network, it is worth choosing equipment of one standard. The 802.11b protocol is now outdated, and the actual data transfer speed when using this standard may be unacceptably low. So optimal choice 802.11g standard equipment.
Some manufacturers offer equipment of the 802.11g+ (SuperG) standard, and on the boxes of their products (access points and wireless adapters), in addition to the inscription “802.11g+”, they also indicate speeds of 100, 108 or even 125 Mbit/s.
In fact, there is no 802.11g+ protocol, and all that is hidden behind this mysterious protocol is an extension of the base 802.11g standard.
In fact, all wireless chipset manufacturers (Intersil, Texas Instruments, Atheros, Broadcom and Agere) have implemented 802.11g+ enhanced mode in one form or another. However, the problem is that they did it differently and there is no guarantee that solutions from different manufacturers will be able to interact with each other. Therefore, when purchasing an 802.11g+ access point, you should make sure that the wireless adapters also support this standard.
Access point or wireless router?
The main element of any wireless network is the access point. The latter can be either a separate device or integrated into a wireless router. Thus, first of all, it is necessary to establish which equipment is optimal for a particular wireless network. The answer to this question depends on what tasks this wireless network is designed to solve. Let's consider several typical situations.
In the simplest case (Fig. 1), several computers are combined into a wireless network solely for the exchange of data between PCs. In this case, the ideal choice would be an access point that connects to one of the PCs on the network (and the PC to which the access point is connected should not be equipped with a wireless adapter).
![]()
Rice. 1. The simplest type of wireless network based on an access point
The second option (Fig. 2) assumes that in addition to exchanging data between computers connected in a wireless network, it is necessary to implement shared Internet access for all computers using an analog modem (a modem that connects to a telephone line). In this case, the modem is connected to one of the computers on the wireless network, and the Internet connection is configured in shared access mode. An access point is connected to the same computer, and all computers on the wireless network are configured to access the Internet in LAN access mode. It is clear that the optimal solution in the considered case is to use an access point.
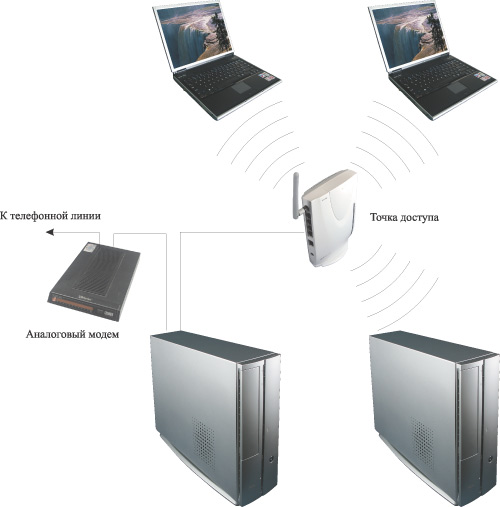
Rice. 2. Wireless network with Internet access using an analog modem
And finally, the last option for a wireless network topology is the use of high-speed Internet access using DSL, cable modem or Ethernet connection (Fig. 3). In this case, the best option is to use a wireless access point built into the router.
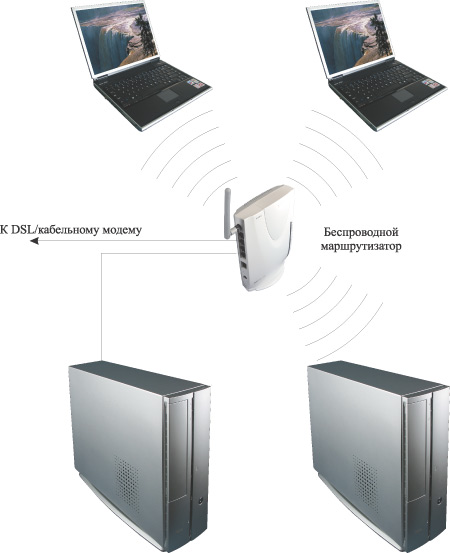
Rice. 3. Wireless network with Internet access using a DSL/cable modem
Routers are network edge devices, that is, devices installed at the border between two networks or between a local network and the Internet, and in this sense they act as a network gateway. From a design point of view, they must have at least two ports, one of which is connected to the local network (this port is called the internal LAN port), and the second is connected to the external network, that is, the Internet (this port is called the external WAN port). As a rule, SOHO class routers have one WAN port and several (from one to four) internal LAN ports, which are combined into a switch. In most cases, the WAN port of the switch has a 10/100Base-TX interface and an xDSL modem with the appropriate interface or an Ethernet network cable can be connected to it.
The wireless access point integrated into the router allows you to organize a wireless network segment, which for the router refers to the internal network, and in this sense, computers connected to the router wirelessly are no different from those connected to the LAN port.
Using a wireless router instead of an access point is beneficial not only because it allows you to save on the purchase of an additional Ethernet network controller or mini-switch, but also because routers provide additional means of protecting your internal network from unauthorized access. Thus, almost all modern SOHO class routers have built-in hardware firewalls, which are also called firewalls or firewalls.
Setting up an access point/wireless router
To deploy a wireless network, you first need to configure an access point (wireless router). We will look at the process of setting up an access point integrated into the Gigabyte B49G wireless router. It is assumed that all computers on the wireless network are using the Windows XP Professional SP2 (English version) operating system. Configuring other access points is done in the same way.
So, the first thing you need to find out is the IP address of the access point and the default password. Any access point or router, being a network device, has its own network address (IP address). In order to find out the IP address and password, you will have to scroll through the user manual. Let's assume that the default IP address of the access point is 192.168.1.254.
Next, the access point must be connected to the computer using a traditional Ethernet network interface (for this, an Ethernet network controller must be installed on the computer). If you use a wireless router, the computer is connected through the LAN port of the router.
To configure an access point, it is necessary that the computer to which the access point is connected and the access point itself have IP addresses belonging to the same subnet. Since in our case the access point has an IP address of 192.168.1.254, the computer must be assigned a static IP address of 192.168.1.x (for example, 192.168.1.100) with a subnet mask of 255.255.255.0.
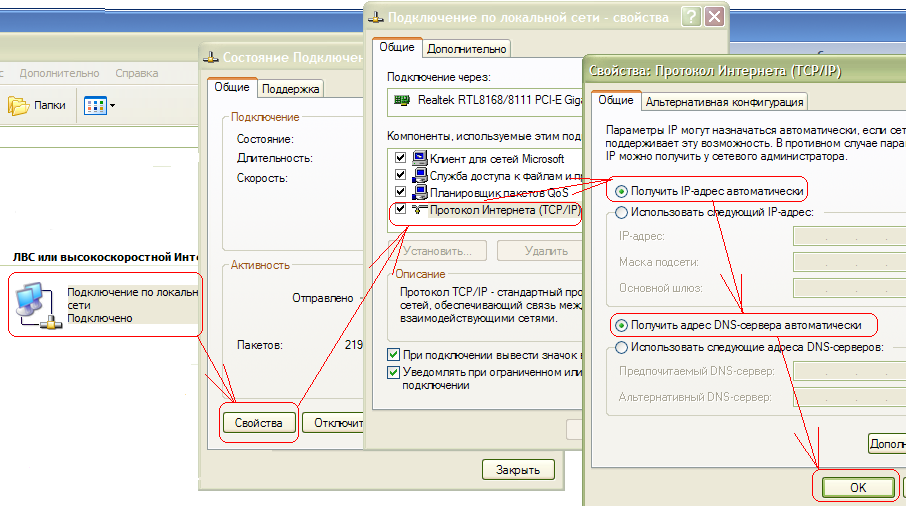
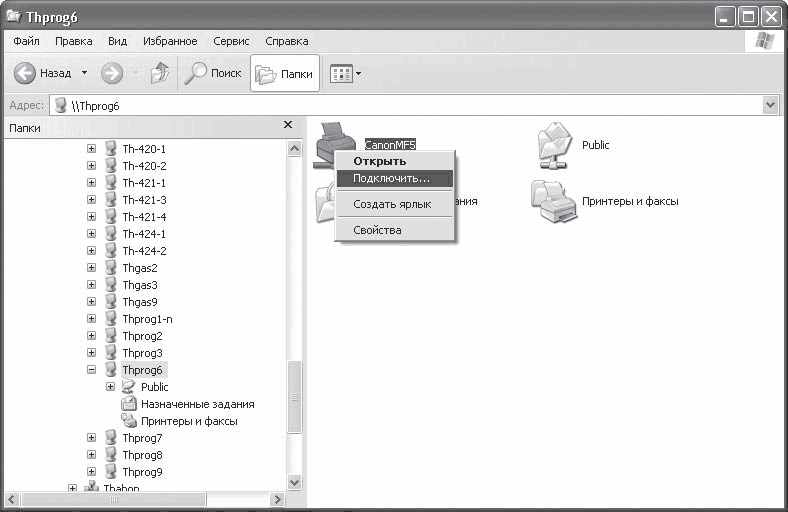
To assign a static IP address to your computer, click the icon My Network Places Properties Network Connection Local Area Connection(Local Network) and right-click on it and go to Properties again. After this, a dialog box should open Local Area Connection Properties(Properties network connection), allowing you to customize network adapter(Fig. 4).
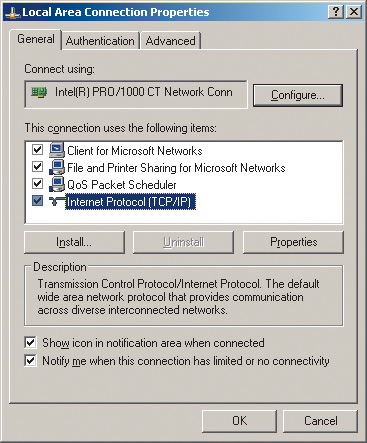
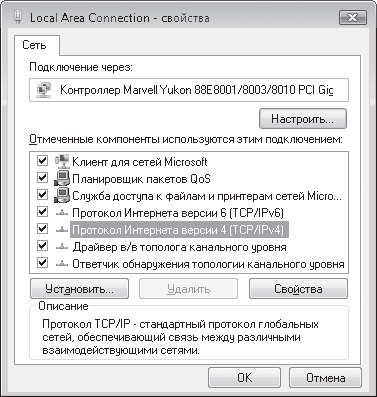
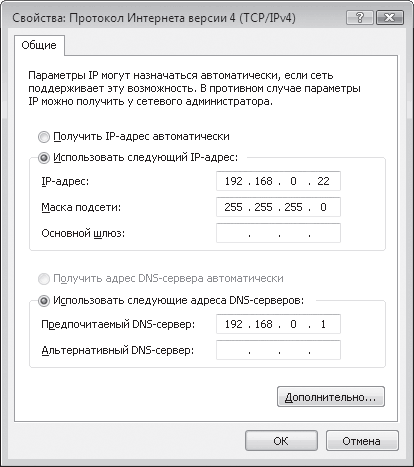
On the General tab, highlight the protocol Internet Protocol (TCP/IP) and click on the button Properties. A dialog box will open in front of you, allowing you to set the computer's IP address and subnet mask. Check the box in this dialog box Use the following IP address: and enter the IP address and subnet mask in the appropriate text fields (Fig. 5).
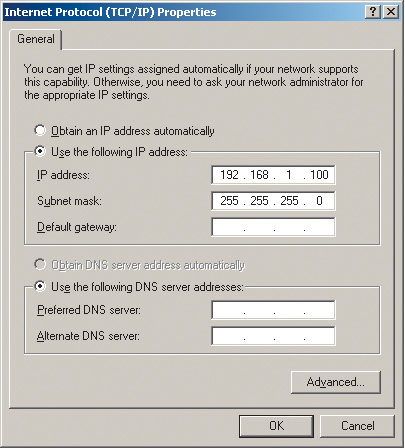
Rice. 5. Setting a static IP address and subnet mask
After you have set a static IP address for your computer, you can directly access the settings of the access point itself. To do this, enter the IP address of the access point (192.168.1.254) in the address field of your Web browser. If everything is done correctly, the access point (router) settings dialog box will open in front of you (Fig. 6). You may first need to enter your username and password (they are available in the documentation).
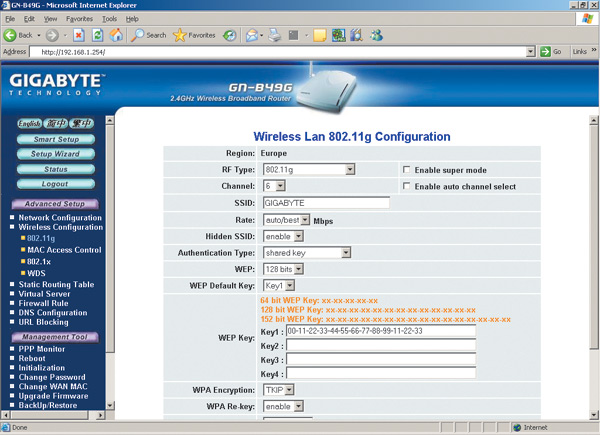
Using the settings dialog box, you can change the IP address of the access point (for example, this will have to be done to implement shared Internet access using an analog modem), as well as set up a wireless network.
To set up a wireless network, you need to set the following parameters:
- wireless network type. If the access point supports multiple wireless standards, you must explicitly specify the wireless network standard (for example, 802.11g);
- channel number. For wireless connection access points with network clients can use different frequency channels. For example, in the case of the 802.11g protocol, you can use channels from the first to the thirteenth. You can explicitly specify which channel will be used to establish a connection, or you can set automatic channel selection ( Enable auto channel select);
- SSID. Each wireless network has its own unique SSID, which is the conventional name of the wireless network. In our case, the name Gigabyte is used;
- Rate. The access point allows you to explicitly specify the speed of the connection being established. However, this is not recommended and it is best to set automatic detection of connection speed (auto/best).
So, after all the basic settings of the access point have been made, you can begin setting up wireless adapters on network clients.
Setting up wireless adapters
The configuration of a specific wireless adapter, of course, depends on the version of the driver and management utility used. However, the configuration principles themselves remain the same for all types of adapters. In addition, there is a general method, independent of the type of management utility for a specific adapter: to use the Microsoft client (the wireless adapter configuration utility built into the Windows XP operating system) to configure the wireless adapter. Let's take a closer look at both configuration methods. In addition, given the popularity of laptops based on mobile technology Intel Centrino, an integral part of which is the presence of a module wireless communication, we will describe setting up a wireless connection using an example Intel drivers PROSet/Wireless (version 9.0.1.9), used in laptops based on Intel Centrino technology.
So, first of all, you need to install the wireless adapter driver. In the case of a laptop based on Intel Centrino mobile technology, open the Intel PROSet/Wireless dialog box (the icon for this window is located in the system tray), which will be used to create a profile for a new wireless connection (Fig. 7).
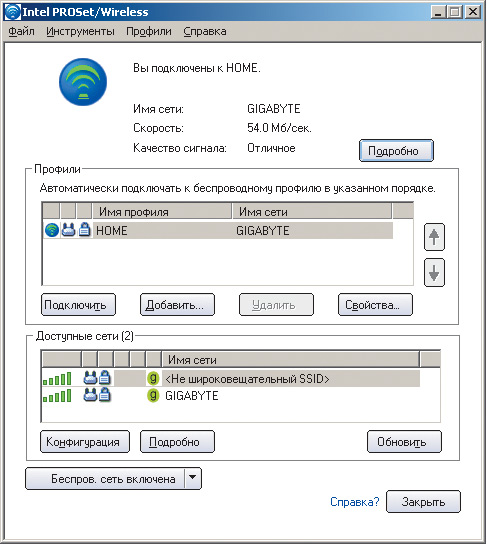
Rice. 7. Wireless connection setup dialog box
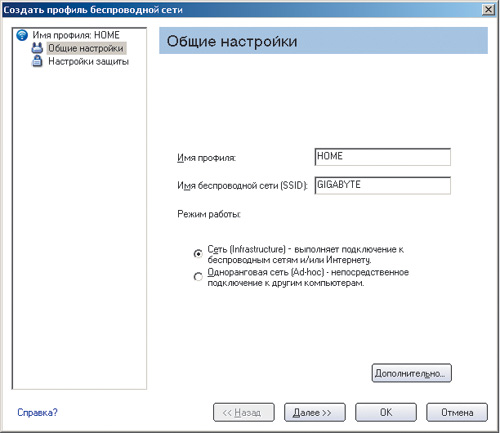
Click on the button Add to create a profile for a new wireless connection. In the dialog box that opens Create a wireless network profile(Fig. 8) enter the profile name (for example, HOME) and the wireless network name (SSID) that was specified when setting up the access point (Gigabyte).
When using the Microsoft client to configure a wireless adapter (a universal method that works for all wireless adapters), you should first make sure that you are not using another adapter management utility.
Click on the icon My Network Places(Network Neighborhood) right-click and select the item in the list that opens Properties(Properties). In the window that opens Network Connection(Network Connections) select the icon Wireless Network Connection(Wireless Connections) and right-click on it, go to the item again Properties. After this, a dialog box (Wireless network connection properties) should open, allowing you to configure the wireless network adapter (Fig. 9).
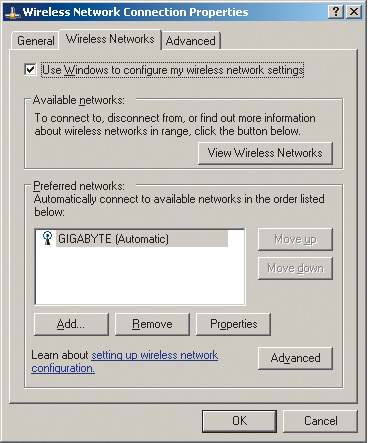
By going to the tab Wireless Networks(wireless networks), press the button Add…(add) and in the dialog box that opens Wireless network properties(wireless connection properties) enter the name of the wireless network (SSID) in our case Gigabyte (Fig. 10). Leave the remaining fields (security settings) unchanged for now.
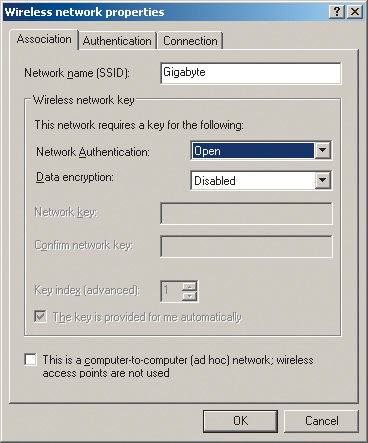
Rice. 10. Setting up a wireless connection profile
Regardless of which of the following methods is used to create a wireless connection profile, once it is created, the wireless adapter should automatically establish a connection with the access point.
Wireless communication
If, after setting up an access point and wireless adapters on network computers, you try to access data stored on another PC from one PC, then most likely you will not succeed. The fact is that the data to which you need to organize network access must be located in a shared folder or even on a logical drive. Therefore, on those computers between which it is supposed to exchange data, it is necessary to create shared network resources.
To do this, left-click on the icon My Computer(My Computer) and in the window that opens, select the logical drive (or folder) that you want to make available to network users. By right-clicking on it, select the item in the list that opens Sharing and Security…. In the dialog box that opens (Fig. 11), go to the tab Sharing.
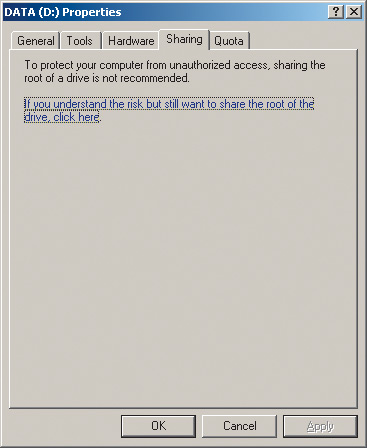
Rice. 11. Dialog box for creating a shared logical drive
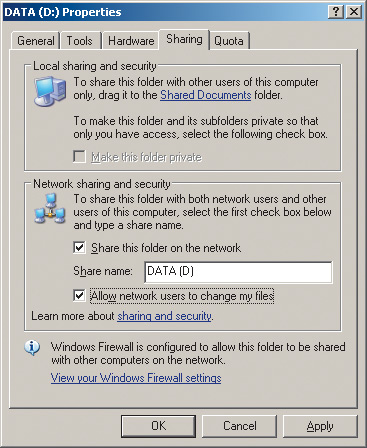
There is only one option in this dialog box: if you understand the risk but still want to share the root of the drive, click here. This is nothing more than a warning about the risk of partitioning a logical drive. If, in spite of everything, you want to make this disk available to network users, then just click on this inscription. The dialog box will change its appearance, and in the new window (Fig. 12) you will need to select the item Share this folder on the network(make this folder (disk) accessible to network users). In addition, if you want network users to be able to change (and not just download) the data of the shared disk, then you must additionally select the option Allow network users to change my files(allow network users to modify files).
Implementation of shared Internet access using an analog modem
The next important aspect to consider is the implementation of shared Internet access using an analog modem. To do this, you first need to assign a static IP address to the computer to which the modem is connected.
The computer's IP address should be 192.168.0.1 and the subnet mask should be 255.255.255.0. Using a different IP address when creating shared Internet access is not allowed. As a last resort, if you specify a different IP address, then when shared access is activated, you will be sent a notification about the automatic change of the server IP address.
Once your computer has been assigned a static IP address, click the My Network Places(Network Neighborhood) right-click and select the item in the list that opens Properties(Properties). In the window that opens Network Connection(Network connections) select the icon with the name of the Internet connection (the name of this connection is set arbitrarily when setting up the Internet connection). Right-click on it and go to Properties and in the dialog box that opens Internet Properties(Internet Connection Properties) go to the tab Advanced.
In Group Internet Connection Sharing(Shared Internet access) check the box Allow other network users to connect through this computer’s Internet connection(Allow users local network use the Internet connection through this computer). Thus, you activate shared Internet access for all computers on your local network. The next two items will automatically be marked in this dialog box. The first of them ( Establish a dial-up connection whenever a computer on my network attempts to access the Internet) allows you to establish an on-demand connection to the Internet from any computer on your network. Even if there is currently no direct connection to the Internet on the server, if there is a corresponding request from any computer on the network, the modem will begin dialing the provider's number and establish a connection to the Internet.
Second point ( Allow other networks users to control or disable the shared Internet connection) allows all network users to manage shared Internet access.
After shared Internet access is activated on your computer, you need to check network settings on all other computers on the network. Unlike the server, all other computers on the network should not have a static IP address. To make sure that this is indeed the case, repeat the procedure for assigning an IP address on all computers on the network, but in the dialog box Internet Protocol (TCP/IP) Properties check the box Obtain an IP address automatically. In this case, all computers on the local network (except the server) will automatically receive dynamic IP addresses.
Without delving into all the intricacies of dynamic network configuration, we only note that a special DHCP service will be launched on the server, which will automatically distribute IP addresses in the range of the same subnet as the server, that is, in the range 192.168.0.x .
After setting up the server and all computers on the network, you will be able to use shared Internet access.
Setting up wireless security
If the initial testing of the created wireless network is successful, you can move on to the second stage - setting up network security to prevent unauthorized access to your network, at least from neighbors. Of course, if your grandmother lives behind the wall - God's dandelion, who knows nothing about computer technologies, then you don’t have to do this, but if your grandmother has grandchildren, then it’s still better to protect yourself.
First of all, we note that the wireless network we created is peer-to-peer, that is, all computers on this network have equal rights and there is no dedicated server that regulates the operation of the network. Therefore, relying on a system security policy in such a network is pointless, since such a policy simply does not exist there. Unfortunately, through operating system Windows XP Professional on such a network will not be able to configure the list of users authorized to access the network. But there is still a way out. To do this, you need to take advantage of the capabilities of an access point or wireless router, that is, implement network protection at the hardware level.
Filtering by MAC addresses
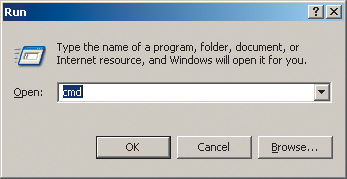
On the first “line of defense”, it is advisable to configure filtering by MAC addresses. MAC address is a unique (in the sense that no two can be the same) identifier of a particular network equipment, such as a wireless adapter or access point. The MAC address is written in hexadecimal format. For example, the MAC address can be written as 00-0F-EA-91-77-9B. To find out the MAC address of the installed wireless adapter, click Start(Start) and in the list that appears, select Run...(Run). In the window that opens, type the command cmd(Fig. 13), which will launch a command prompt window.
At the command line, type the command ipconfig/all(Fig. 14).
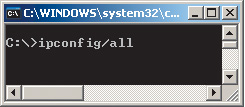
This will allow you to find out the IP address of the wireless adapter and its MAC address.
Once the MAC addresses of all computers on the network have been determined, you need to configure a MAC address filtering table on the access point. Almost any access point and router provides a similar feature. Setting up this table comes down to, firstly, the need to enable filtering by MAC addresses, and secondly, to entering the allowed MAC addresses of wireless adapters into the table (Fig. 15).
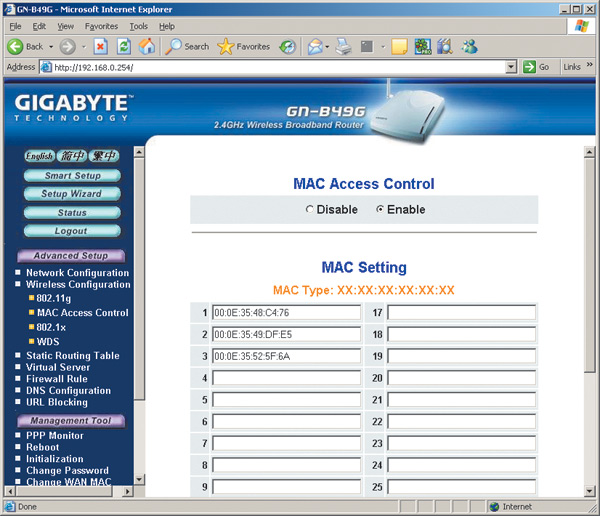
After setting up the MAC address filtering table, any attempt to log into the network using a wireless adapter whose MAC address is not included in the table will be rejected by the access point.
Setting up encryption and user authentication
Any access point, and especially a wireless router, provides users with the ability to configure encryption of network traffic when it is transmitted over an open environment.
But before moving on to directly setting up encryption modes on a wireless network, we will make a short theoretical digression to familiarize readers with the basic concepts and terminology.
The first standard used to encrypt data on wireless networks was WEP (Wired Equivalent Privacy). In accordance with this standard, encryption is carried out using a 40- or 104-bit key (some models of wireless equipment support longer keys), and the key itself is a set of ASCII characters with a length of 5 (for 40-bit) or 13 (for 104-bit). -bit key) characters. The set of these characters is translated into a sequence of hexadecimal digits, which are the key. It is also permissible to use directly instead of a set of ASCII characters hexadecimal values(same length).
As a rule, wireless equipment configuration utilities indicate not 40- or 104-bit keys, but 64- or 128-bit keys. The fact is that 40 or 104 bits are the static part of the key, to which is added a 24-bit initialization vector necessary to randomize the static part of the key. The initialization vector is chosen randomly and changes dynamically during operation. As a result, taking into account the initialization vector, the total key length is equal to 64 (40+24) or 128 (104+24) bits.
The WEP encryption protocol, even with a 128-bit key, is considered not very strong, so 802.11g devices support the improved WPA Wi-Fi Protected Access encryption algorithm, which includes 802.1x, EAP, TKIP and MIC protocols.
The 802.1x protocol is a user authentication protocol. For its operation, this protocol requires a dedicated RADIUS server, which, of course, does not exist on the home network. Therefore, it will not be possible to use this protocol at home.
TKIP (Temporal Key Integrity Protocol) is an implementation of dynamic encryption keys. Encryption keys are 128 bits long and are generated using a complex algorithm, and the total number of possible key options reaches hundreds of billions, and they change very often.
MIC (Message Integrity Check) protocol is a packet integrity check protocol. The protocol allows packets that have been “inserted” into the channel by a third party to be discarded.
In addition to the protocols mentioned, many wireless equipment manufacturers build into their solutions support for the AES (Advanced Encryption Standard) standard, which replaced TKIP.
So, after a short excursion into the basic concepts of encryption technology and network user authentication, let’s begin setting up our wireless equipment. In doing so, we will adhere to the following recommendations whenever possible. If all devices on the network support WPA-based encryption, we will use this method (otherwise, we should choose WEP encryption with a 128-bit key). Well, if all devices on the network support AES encryption, then we will use it.
Let's start by setting up a wireless access point. First of all, select the authentication type (Authentication) (Fig. 16). The following options are possible in the authentication type list:
Open System (open);
Shared Key (general);
WPA Pre-shared key.
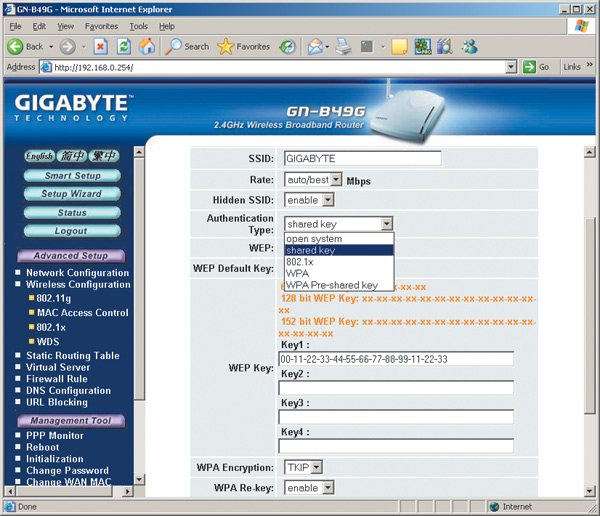
Rice. 16. Setting the authentication type
Open System (default mode) - This is actually a mode that does not have network authentication. When you select this mode, you only need to know the network identifier (SSID) to log into the wireless network.
In Shared Key mode, as in Open System mode, it is possible to use WEP traffic encryption. The difference between Shared Key and Open System is that in the first case, in order to enter the network, you also need to install a WEP encryption key common to the entire network.
WEP encryption example
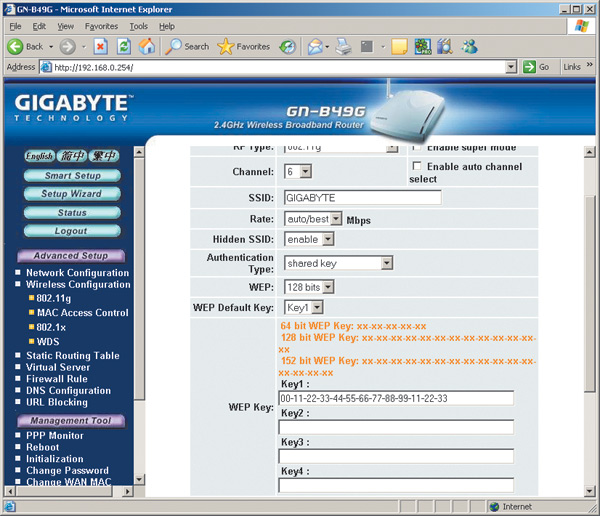
If for some reason you decide to use WEP encryption, you must set the Shared Key authentication type. Next, you should set the key size (recommended value 128 bits) and enter the key itself (in our example, the key is used in hexadecimal format). In total, it is possible to set up to four key values, and if several keys are specified, you must specify which one is used (Fig. 17).
Next, you need to implement similar settings on all wireless adapters of network computers. This is done either using a management utility (in our case, Intel PROSet/Wireless) or through a Microsoft client. If you are using the Intel PROSet/Wireless utility, open the main window of the utility, select the connection profile and click the button Properties…. In the dialog box that opens (Fig. 18), go to the tab Setting up protection and select the network authentication type General(this corresponds to the Shared Key type). Next, select the WEP encryption type, set the key length to 128 bits and enter the encryption key.
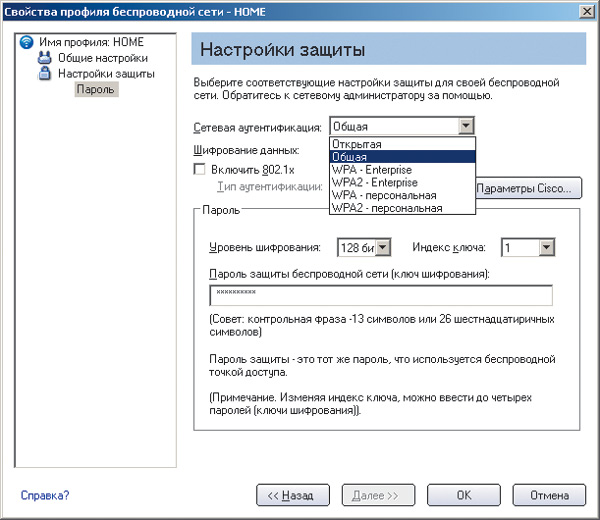
If you are using a Microsoft client adapter to configure, open the dialog box Wireless Network Connection Properties(Wireless Network Connection Properties) and on the Wireless Networks(wireless networks) select the desired wireless connection profile. Click on the button Properties(Properties) and in the dialog box that opens (Fig. 19), set the network authentication type (Network Authentication) Shared, the encryption type (Data encryption) WEP and enter exactly the same encryption key that was specified when setting up the access point.

Rice. 19. Setting WEP encryption settings on a wireless adapter using the Microsoft client
WPA encryption example
If it is possible to use WPA encryption (that is, if all devices on the network support it), then it is recommended to select this type of encryption.
There are two types of WPA encryption: standard WPA mode (sometimes called WPA-Enterprise) and WPA Pre-shared key, or WPA-personal.
WPA-Enterprise mode is used in corporate networks, since it requires a RADIUS server. Naturally, you won’t be able to use this mode at home.
But the WPA Pre-shared key mode is intended for personal use. This mode involves the use of predefined encryption keys (access password), the same for all network devices, and primary user authentication is carried out using this key.
There is also WPA2 (the next version of the WPA protocol). If all wireless network devices support this mode, then you can use it. The settings in this case are carried out in exactly the same way as in the case of WPA mode.
When using the WPA standard, you can select TKIP or AES as encryption algorithms.
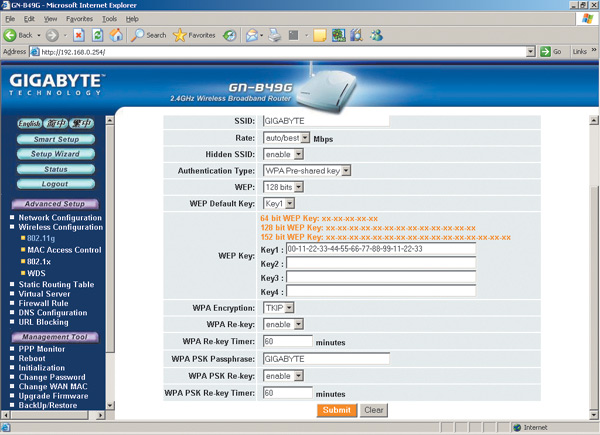
To configure WPA encryption on the access point, in the main settings window, select the WPA Pre-shared key authentication type and set the encryption type to TKIP or AES (Fig. 20). Then you need to set the encryption key (WPA PSK Passphrase). In our example, the key is the word Gigabyte.
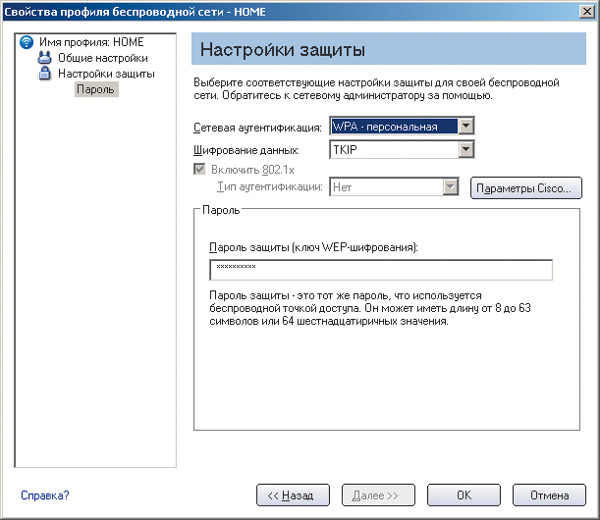
Next, you need to implement similar settings on all wireless adapters of network computers. This is done in exactly the same way as in the case of the WEP encryption we have already discussed. An example of setting up a wireless adapter using the Intel PROSet/Wireless management utility is shown in Fig. 21.
To determine the impact of various encryption algorithms on data transfer speeds, we tested the wireless communication channel between the Gigabyte B49G access point and a wireless adapter integrated into a laptop based on Intel Centrino mobile technology with an Intel Pentium M 1.6 GHz processor.
To generate maximum network traffic, we used the NetIQ Chariot 5.0 package. The test results are presented in the table.
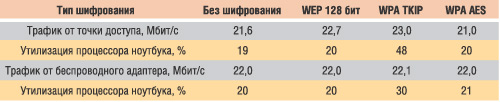
Results of testing the wireless communication channel for various traffic encryption modes
As the test results show, network traffic is absolutely independent of the encryption algorithm used, and the only thing that changes for different algorithms is the degree of processor utilization on a laptop with a wireless adapter. The TKIP encryption algorithm turns out to be the most resource-intensive in this sense. So, in case of using Intel processor Pentium M with a clock frequency of 1.6 GHz, its average utilization rate was 48% for incoming traffic and 30% for outgoing traffic. Thus, it is advisable to use this encryption algorithm only when all network computers equipped with fairly powerful processors.
1.Connecting a computer to the ZyXel Keenetic Lite router:
Before setting upZyxelKeeneticLite, You plug the Internet center's power adapter into an electrical outlet, connect the provider's cable to WAN router interface, and one of LAN ports, connect the yellow patch cord to the network card of your computer. Then you need to change the settings TCP/IP on the network card to automatically obtain values(DHCP client). You can do this as follows:
Windows XP: Start - Control Panel - Network Connections - (right click on) Local Area Connection (if there is no “Local Area Connection” icon (see Figure 1) then this indicates either that it has been renamed or the network driver has not been installed map.) - Properties - Internet Protocol(TCP/IP) -Properties- further see fig. 1
rice. 1
Windows 7 : Start —> Control Panel —> Network and Internet —> Network and Control Center shared access-> (left column) Changing adapter parameters -> (right click on) Local area connection -> Properties -> Internet Protocol version 4 -> Properties ->further see fig. 2

rice. 2
After that, open your browser (Opera, Internet Explorer, Mozilla, ...), in the address bar go to: http://192.168.1.1, a window should appear:
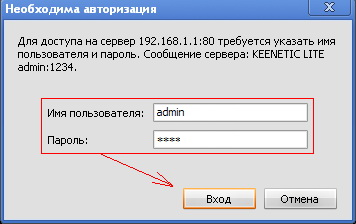
Fig.3
username: admin, password:1234
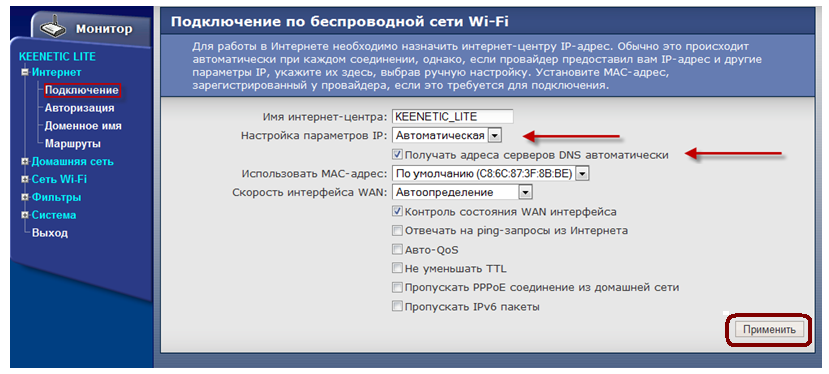
2. Configuring the WAN interface (that part of the router that “looks” towards the provider):
3. Setting up Wi-Fi connection:
Router setup:
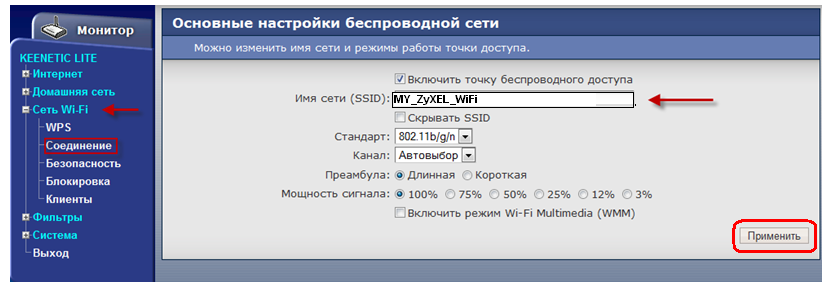
Network name (SSID) - the name of your wi-fi network. An arbitrary name written in Latin letters, for example as in the picture MY_ZyXEL_WiFi.
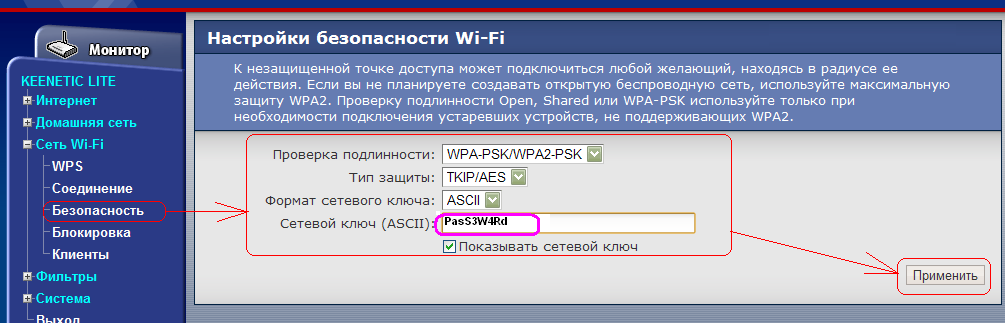
Network key (ASCII) a password you randomly created (written in the English layout), which you need to write down in the future, it will come in handy. Click Apply. The Wi-Fi router setup is complete. All that remains is to configure the wireless card of your computer (laptop).
Setting up a wi-fi card:
WindowsXP: Start - Control Panel - Network Connections.
Windows 7 : Start —> Control Panel -> Network and Internet -> Network and Sharing Center -> (left column) Changing adapter settings.
Make sure that you have the “Wireless Network Connection” icon (if there is no icon, this indicates either that it has been renamed or the driver for the wi-fi card is not installed.)

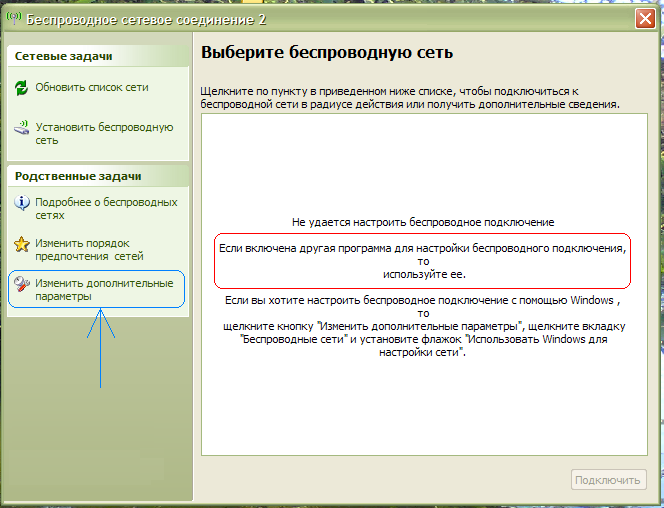
If you have Windows XP:
Next, you need to understand which application in Windows XP is responsible for connecting to WiFi networks. This may be a special utility from the manufacturer WiFi module that comes with the wireless adapter driver, or maybe Windows itself. The point is that such special utilities intercept control of the wireless communication module from the operating system, then Windows XP just won't see the wireless ones WiFi networks, which the system will not hesitate to inform you about:
In principle, you can return control of wireless networks back to the operating system, for this you need in the window in Fig. click on the link on the left Change advanced settings. Next, open the tab “ Wireless network" and check the box there "Use Windows to configure the network" :
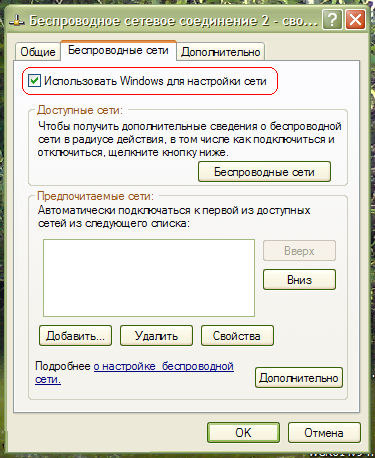
click "OK".
To connect to your wireless network (MY_ZyXEL_WiFi) from wi-fi router in Windows XP You need to do the following: Start- (settings) - Control Panel - Network connections- then double click on the icon Wireless network connection. Next, select yours from the list of networksand click on it twice with the left button, see fig.
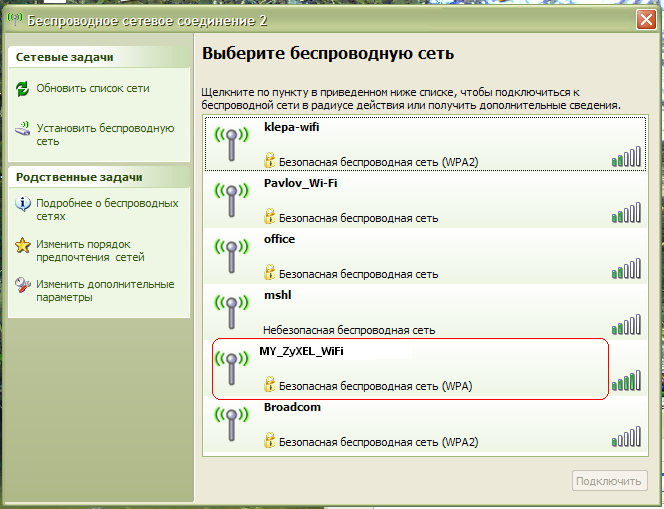
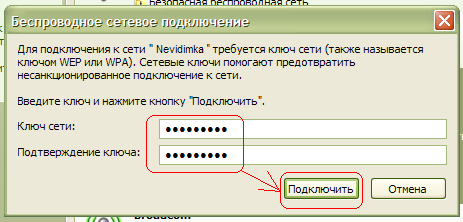
After which Windows XP will ask you for a password to connect to the wireless wi-fi networks(see picture). Here you need to indicate which is used to secure the wi-fi network in your router. Enter the key, its confirmation (i.e. the same key is entered again) below and press To plug.
The setup is complete.
If you have Windows 7:
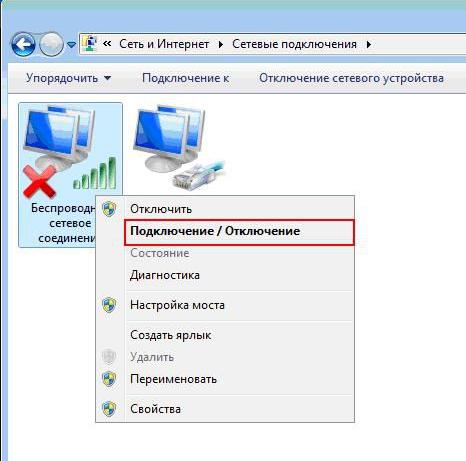
Click: Start —> Control Panel —> Network and Internet —> Network and Sharing Center —> (left column) Changing adapter settings—>"Wireless network connection":
Then right click on , select the item "Connect/Disconnect" :
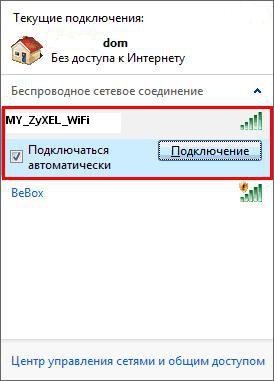
In the list of found wireless networks, find and select your network - MY_ZyXEL_WiFi. Then press the button "Connection" .
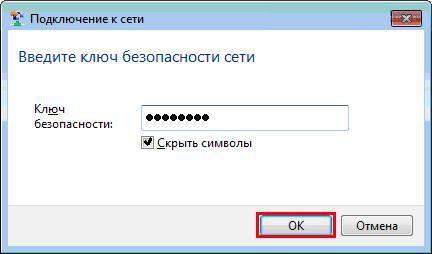
In the next window you need to enter , which was invented when setting up wi-fi in the router. Enter the key and press the button "Ok" .
Upon successful connection "Wireless Network Connection" will look like this.

The setup is complete.
Check using your browser. Is the Internet working? If the Internet works, then as a result of the setup you have received a configured router with a secure Wi-Fi channel.
If it is unclear which cipher type to choose, it is better to leave this to the access point itself and set the Cipher Type field to Auto.
If you are not planning a RADIUS server on your wireless network, but still want to take advantage of the capabilities of the WPA protocol, then select WPA-PSK as the Authentication parameter. In this case, you will also need to decide on the type of cipher and specify the encryption phrase.
Reducing transmitter powerAs you know, to transmit data over the air, each wireless device is equipped with a radio wave receiver and transmitter. The radius of the wireless network depends on the power of the transmitter, and the quality of signal reception depends on the sensitivity of the receiver. Since radio waves are an uncontrollable thing and you can never predict who can receive them, a good option for protecting the network is to select a transmitter power that is sufficient to cover all devices on the network. This can cut off all ill-wishers who can “attach” to the network, for example, behind the wall of a neighboring house or in a car in a parking lot near the office.
Another advantage of such an enterprise is energy savings, which is critical for portable computers and devices.
To select the signal strength level, you need to launch the access point configuration utility and go to the Wireless tab (Fig. 15.34).
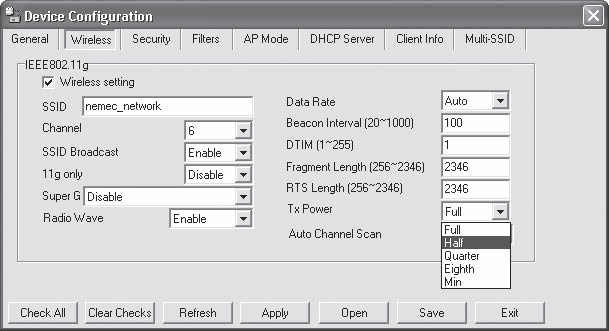
Rice. 15.34. Adjusting the transmitter power
This tab contains the Tx Power field, in which you can select the following values: Full, Half, Quarter, Eighth, or Min.
You should not immediately set the power too low, as this can “cut off” the connection with some remote computers. Therefore, reduce the power gradually, but do not set it to the threshold at which the device operates, since under certain conditions the signal may weaken further, which, again, will lead to the shutdown of some remote computers.
Chapter 16
Setting up a network in Windows XP
As practice has shown, the operating system Microsoft Windows XP is used much more often than other operating systems. Good security and fault tolerance, ease of use, extensive capabilities and much more - users like all this. Because this operating system is used for networking, you must know and be able to install and configure protocols, services, etc. You should also be able to create, connect to, and use shares.
Connect to a domain or workgroup
The first step is to configure your network settings by using your network's IP addressing information and your workgroup or domain name(s).
To get started, set up a domain or working group By right-clicking on the My Computer icon and selecting Properties from the menu that appears, the system properties window will open (Fig. 16.1), containing several tabs.
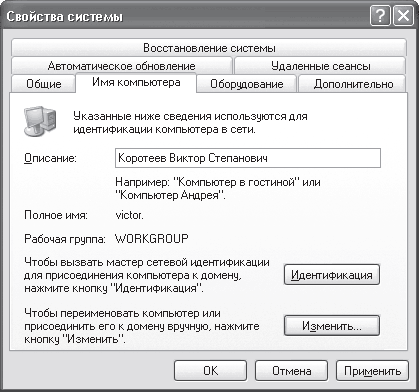
Rice. 16.1. Contents of the Computer Name tab
We are interested in the Computer name tab, where in the Description field you can change the description of the computer, which will be displayed in the Explorer window next to the name of the computer on the network.
There are two ways to connect a computer to a domain or workgroup: simple and complex. At the same time, the simple way is suitable for users who have already encountered this type of action more than once. The complex path is replete with rather confusing steps and incomprehensible words, so novice users often prefer the simple setup path. On the other hand, if you already have all the necessary data for registering online, then it is better to choose the first option, since it is more understandable. On the Computer name tab, click the Change button - a window will open (Fig. 16.2), in which you will need to specify the necessary data.
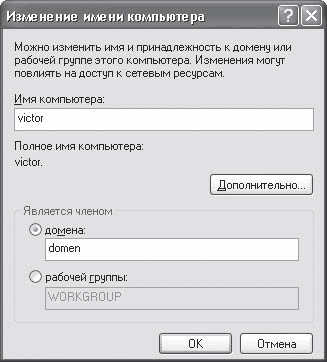
Rice. 16.2. Specify the domain or group name
So, if there is a domain on the network, you will need to indicate that the computer is a member of the domain and enter the domain name. Otherwise, you need to indicate that the computer belongs to a workgroup and specify the group name. However, first of all, if necessary, you should change the name of the computer under which it will be visible on the network.
If used domain system, then after clicking the OK button, a window will appear asking you to enter the login and access password of the user who has the right to connect to the domain (Fig. 16.3). This means that the user must already be registered in Active Directory. If you are not registered yet, you can connect to the domain using any other account, for example, ask your network administrator for this service.
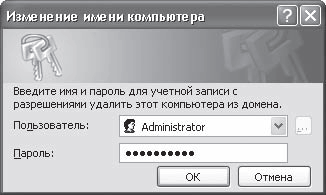
Rice. 16.3. Connecting to the domain
If the entered data is correct, then in a few seconds you will find yourself in the domain, as indicated by the corresponding message (Fig. 16.4).

Rice. 16.4. Successful connection to the network domain
If you connect to a workgroup, no additional windows will appear, and as a result a message will appear that you have connected to the group with the specified name.
To fully log into a domain or group, you need to restart the computer, which will be indicated by the message at the bottom of the window (see Fig. 16.1).
Setting up the protocol and checking communication
By setting up a connection to a domain or group, you are preparing your computer to join a network workgroup, but nothing more. If the network has static addressing, then you will not be able to fully log into it and work. To do this, you will have to additionally configure the IP protocol.
First of all, you need to open the network connection properties window, for which you should right-click on the Network Neighborhood icon located on the Desktop and select Properties from the menu that appears - a window with a list of network connections will appear (Fig. 16.5).
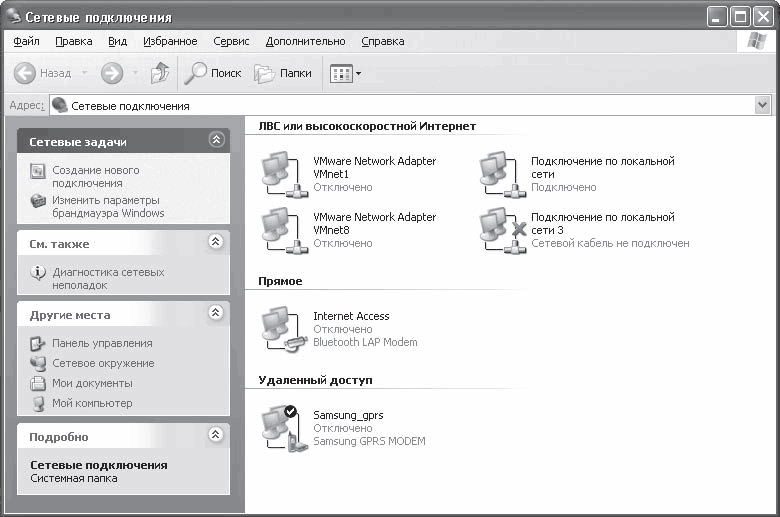
Rice. 16.5. List of network connections
Note
If there is no Network Neighborhood icon on the Desktop, then select Start > Control Panel and double-click the Network Connections icon in the window that opens.
The number of network connections may vary depending on how the computer was connected to the network or another computer. For example, network connections are created automatically if a Bluetooth adapter is connected, Internet access is used via a modem, or the user connects to another computer using any type of connection. Therefore, do not be surprised if, when you open the Network Connections window, you see several network connections, including inactive ones.
Note
If no network devices were connected to the computer and no connections were made to other computers, then in the network connections window there will be only one network connection.
If you right-click on an active network connection and select Properties from the menu that appears, the properties window for this connection will open (Fig. 16.6).
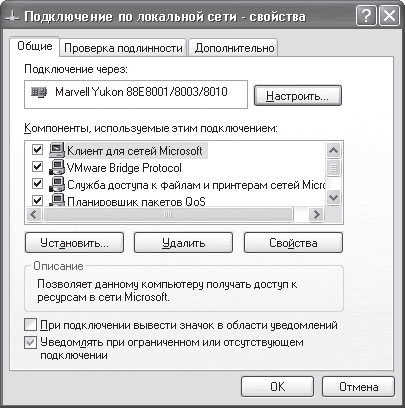
Rice. 16.6. Properties of the selected network connection
To configure the IP protocol, you need to find it (Internet Protocol (TCP/IP)) in the list among other protocols and connection services and double-click on it or click the Properties button - the protocol properties window will open (Fig. 16.7).
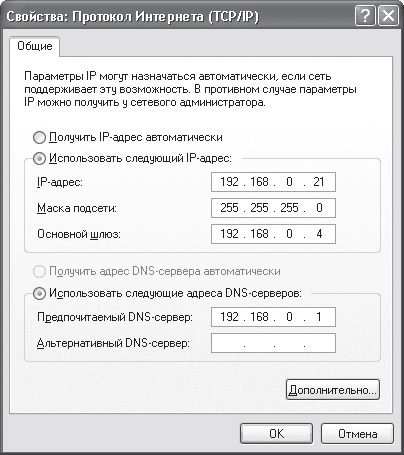
Rice. 16.7. Configure the IP address, subnet mask and other parameters
To enter the IP address and subnet mask, use the IP address and Subnet mask fields.
If a DNS server is configured on the network, then you need to set the switch to the Use the following DNS server addresses position and enter the IP address of the DNS server in the Preferred DNS server field.
If a DHCP server is configured on a network with a domain and addresses are issued automatically, then you need to set the switch to the Obtain an IP address automatically position.
In principle, the protocol settings can be completed here, since they are quite sufficient for normal operation on a local network. If required, you can also add gateway (router) addresses, if any, which will allow you to access network segments with different addressing. To do this, use the Advanced button and enter the required IP addresses using the Add button.
After connecting your computer to the network and configuring the network settings, you may find that after restarting the computer you will not be able to connect to it. This could be due to a network configuration error or a physical network error, such as an incorrectly crimped cable, a broken cable, a faulty port on a hub or switch, etc.
The easiest way to check the connection is to use the ping system utility.
First of all, you need to open the command prompt by going to Start > All Programs > Accessories > Command line and typing the following in the line: ping 192.168.0.1 (Fig. 16.8).

Rice. 16.8. Successful command execution
Attention!
The address in the example is the address of the network domain. You can also enter any other address used on your network, such as the address of the switch you are connected to.
If a physical connection with the specified address exists, that is, the cable is not damaged and the equipment is working properly, then the result will be positive. By default, the program sends only four packets to the specified IP address, which is quite enough to check the connection. If there is a connection, the response time in this example is less than 1 ms. It is also possible that this indicator fluctuates within a wide range. This means that there is a connection, but it is far from the most stable and fast, which, in turn, means that the segment length is too long or there are collisions in the network. In this case, you can try connecting the cable to a different port on the hub or switch.
If there is no connection with the specified device, the result will be negative (Fig. 16.9).
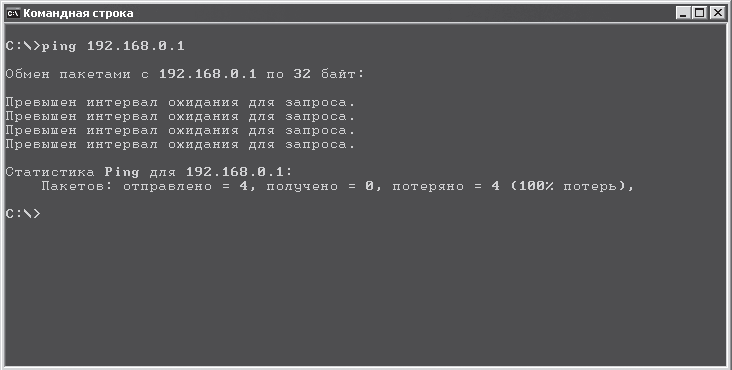
Rice. 16.9. Command execution failed
In this case, you need to check the following:
IP address;
Subnet mask;
Workgroup or domain;
Correct installation of the network card (use Device Manager);
If the network card is not integrated, then a contact in the slot with the adapter or a port (if a USB adapter is used);
The adapter is working (the connection indicator on the rear panel should be lit);
Correct crimping of connectors on the cable;
The status of all ports used to connect the computer.
Access to file resources
Regardless of what type of network you have - peer-to-peer or server-based, sooner or later you will need to set up shared access to some folders on your hard drive. Of course, if the network is server-based, then it is better to resort to the help of a file server. However, if you post necessary files on file server If it doesn’t work or is impossible, you will have to set up shared access to the computer.
To make the computer's file resources publicly available, Windows XP has a special service that starts automatically when a network card is installed. All you need to know is to correctly create a resource and configure access rights.
First of all, open an Explorer window. In the Windows XP system, shared access is set separately for each folder, so you immediately need to decide which folders need to be “torn to pieces” by network users.
Having selected the folder that you want to share, you need to right-click on it and select Sharing and Security from the menu that appears - a window containing several tabs will open.
To control access, use the Access tab. Depending on whether you are connected to a domain or not, the contents of this tab may vary. Let's consider both cases.
Without using a domain(Fig. 16.10).
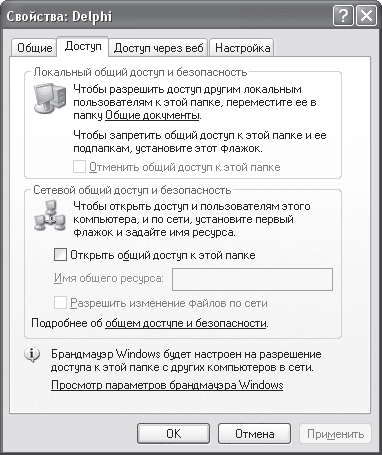
Rice. 16.10. Setting up access to a file resource on a network without a domain
To control network access, use the Network Sharing and Security pane. To share a folder, you need to select the Share this folder checkbox. If the resource must be modifiable, then be sure to check the Allow modification of files over the network checkbox. After pressing the 0K button, the operating system will begin to change the access rights to the folder, which will be indicated by the appearance of a small window with animated content.
Using a domain(Fig. 16.11).
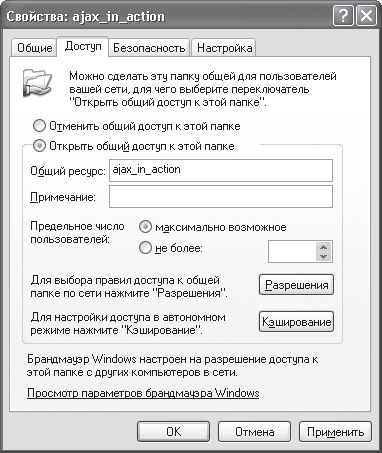
Rice. 16.11. Setting up access to a file resource on a network with a domain
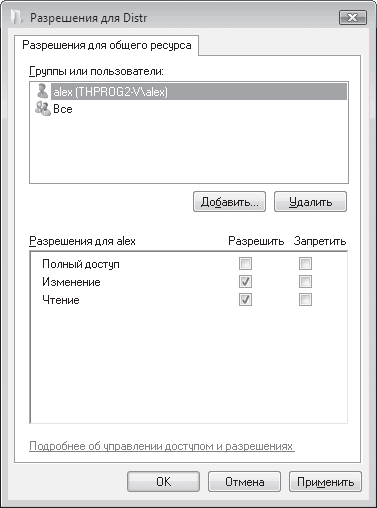
On the Access tab, which is open by default, you need to set the switch to the Share this folder position and specify access rights to this resource by clicking the Permissions button. By default, access to the folder is open to all users with the same rights - read only (Fig. 16.12).

Rice. 16.12. List of users with access to the resource
If you are satisfied with this, then you do not need to perform any further actions. If you want to configure different permissions for individual users, then click the Add button - the window for adding users from the domain will open (see Chapter 14, section “Configuring access to file resources”, Fig. 14.29).
To cancel sharing a resource, in the file resource access windows (see Fig. 16.10 and Fig. 16.11), you need to uncheck the Share this folder option and set the switch to Cancel sharing this folder, respectively.
Similarly, you can set shared access to any number of folders.
Access to printers
Often someone needs to print information, but does not have a printer at hand. If you are connected to the network and have a printer, then you can be a real lifesaver if you share it with others. Moreover, it is not difficult to do this. The main thing is not to overdo it with print permissions.
First of all, you should run the Start > Control Panel command, click on the Printers and Faxes icon, right-click on the printer and select Sharing from the menu that appears (Fig. 16.13) - a window with several tabs will open.
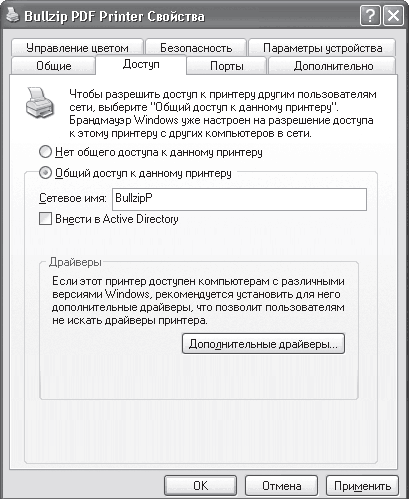
Rice. 16.13. Access tab in the printer properties window
To set up access to the printer, use the Access tab, the contents of which may also differ depending on whether you are connected to a domain.
So, if the domain system is not used, then just check the Printer sharing checkbox and specify its name.
If a domain is used on the network, then you need to set the switch to the Share this printer position and enter the name under which this printer will be displayed in the network environment. You can also specify that the printer information should be added to Active Directory by selecting the Add to Active Directory check box.
Note
Information from Active Directory is sometimes required when connecting a network printer. However, the most commonly used option is to connect directly to a computer, so checking the Add to Active Directory checkbox is not so important or critical.
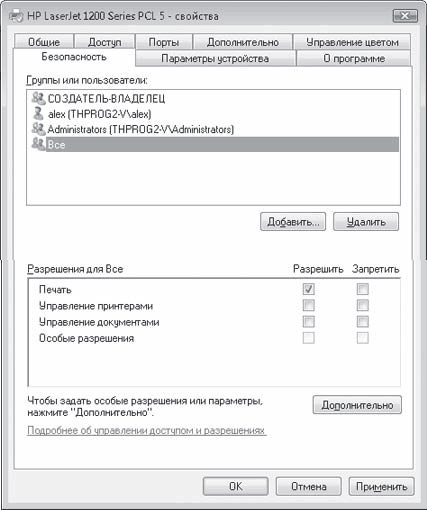
If you need to configure access rights to the printer, you should go to the Security tab.
By default, everyone can use the printer, with one limitation - users will not be able to manage other people's print jobs. You can also assign different rights to users by first adding them to the printer user group (for how to do this, see Chapter 14, section “Setting up access to file resources”).
At this point, setting up printer sharing can be considered complete.
Let's say you recently learned that on your network - corporate, office or home - there is a computer on which there is a shared folder with a batch of new films, and you really want to watch them. So what's the deal?
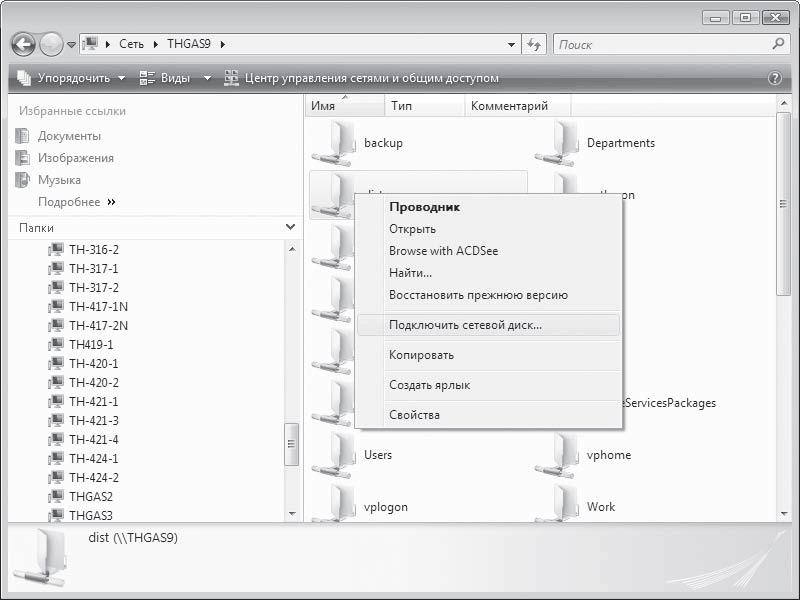
Open File Explorer and select Network Places on the left side. Knowing the name of the desired computer, find it in your network environment and select it. In this case, on the right side of the Explorer window, all the resources that this computer provides for public use will be displayed.
Presumably the folder with movies will be called Video. Right-click on it and select Connect from the menu that appears network drive– the window for connecting a network drive will open (Fig. 16.14).
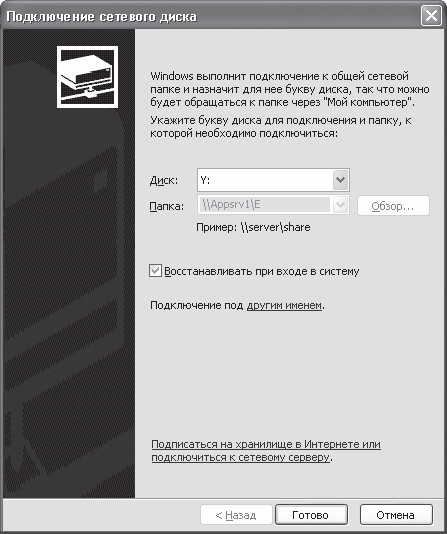
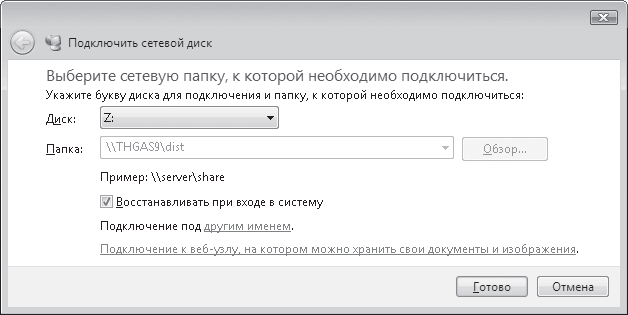
Rice. 16.14. Connecting a network drive
This window asks you to select a drive letter under which the contents of the Video folder you have selected will be displayed. If you want this drive to be connected every time you log into Windows, then check the Recover at logon checkbox.
That's all - enjoy watching your favorite movies.
Connecting to a network printer
If you need to print some information, but the printer is not connected to the computer, then you do not have to run to your neighbor with the disk if a network is established between your computers. It is enough to connect its printer as a network printer. Of course, provided that the neighbor's printer is shared (see the “Granting access to printers” section of this chapter above).
The easiest way to connect a network printer is as follows. Open Network Neighborhood in Explorer and position the mouse pointer on the computer that provides access to the printer. Then double-click on the printer in the right side of the Explorer window or right-click on the printer and select Connect from the menu that appears (Fig. 16.15).
Rice. 16.15. Connecting a network printer
After this, the printer will be connected.
Chapter 17
Setting up a network in Windows Vista
operating system Windows Vista begins to take root on users’ computers, and it is no longer possible to stop it. Anyone who has enough powerful computer, even just for fun, installs this system and tries to work with it. Those who have been using this system for a long time are accustomed to it and are not going to part with it.
If you have an operating room Windows system Vista in any version, then you need to know and be able to connect a computer to the network and learn how to use shared resources and provide your resources for public use.
Connecting to the network and setting up the protocol
It is worth saying that as soon as you connect to the computer network cable and turn on your computer, Vista immediately detects the network and saves information about it. However, she will not want to connect to it right away and will offer to go through a certain connection path. Now let's talk about everything in order.
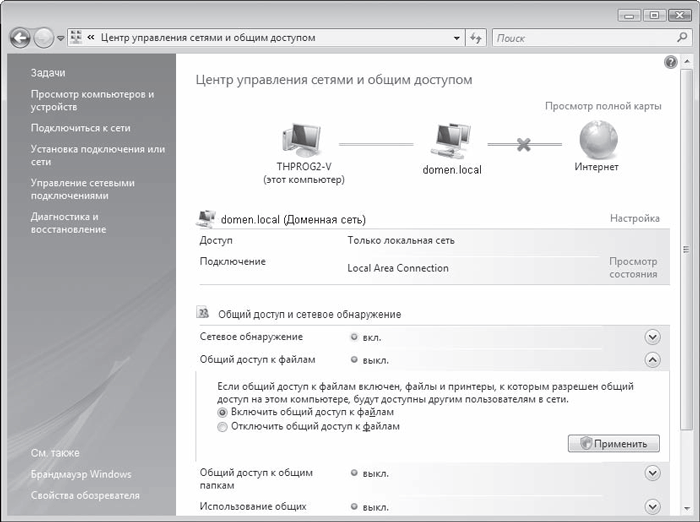
First of all, run the Start > Control Panel command, find the Network and Internet icon and click on the View network status and tasks link - a window will open (Fig. 17.1), which displays the current connection status to the found network. Also here are mechanisms for configuring access to the computer’s file resources and its printers.

Rice. 17.1. Network and Sharing Center
The next step is to configure the IP protocol by specifying the computer's IP address, subnet mask, DNS server IP address, etc. Of course, if you are using a network with dynamic address allocation, then such settings may not be necessary.
If configuration is still needed, then to change the specified parameters, you need to click on the Manage network connections link - a window with a list of network connections will open.
By right-clicking on the desired connection, select Properties in the menu that appears - the properties window for the selected network connection will open (Fig. 17.2).
Rice. 17.2. Properties of the selected network connection
Unlike a similar window in Windows XP, this window contains many more protocols and services, but this does not change the matter.
We will be interested in the position Internet Protocol version 4 (TCP/lpv4), double-clicking on which will open the IP protocol settings window (Fig. 17.3). Having all the necessary data in hand, we enter them into the appropriate positions.
Rice. 17.3. Enter the required data
By entering the information and clicking OK, you can fully join the domain or workgroup.
Setting up network discovery
Even though your network connection is already configured, you still won't be able to see the computers on the network. To make this possible, you need to additionally configure your network environment.
Need to go back to dialog box network and sharing management (see Fig. 17.1) and click the arrow button next to Sharing and network discovery - this position will expand and two parameters will appear. To allow the computer to see other machines on the network and, in turn, allow itself to be seen, set the switch to the Enable network discovery position (Fig. 17.4) and click the Apply button. The service will begin its work, as indicated by the green indicator on. opposite the inscription Network discovery.
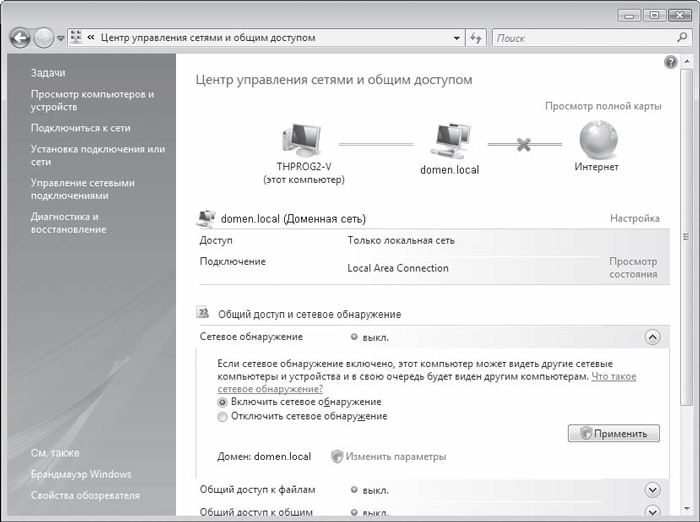
Rice. 17.4. Activating the network discovery service
This completes the network setup.
If, after setting up the operating network, you cannot access the network, it means that you entered incorrect data when setting up the protocol or there is some kind of physical damage.
The presence of a connection with a server or other network device is checked in the same way as in the Windows XP operating system (see Chapter 16, section “Configuring the protocol and checking communication”).
Setting up access to file resources
By default, even if you are already connected to the network, the ability to access your resources is blocked, which is done for the sake of increased system security.
To share a file resource, you must do the following:
Run the command Start > Control Panel > Network and Internet > Network and Sharing Center - a window will open (Fig. 17.5), in which you should click the arrow button next to File Sharing.
Rice. 17.5. Setting up file sharing
As a result, the required section will expand, resulting in two parameters. To activate the file sharing function, you need to set the switch to the Enable file sharing position and click the Apply button - this function is activated, as indicated by the green light of the indicator next to the File Sharing inscription.
Let's look at how to set up shared access to a specific folder.
Using Explorer, locate the folder you plan to share. By right-clicking on it, in the menu that appears, select Sharing - a window will open (Fig. 17.6) that displays the users and groups with access to your resource.
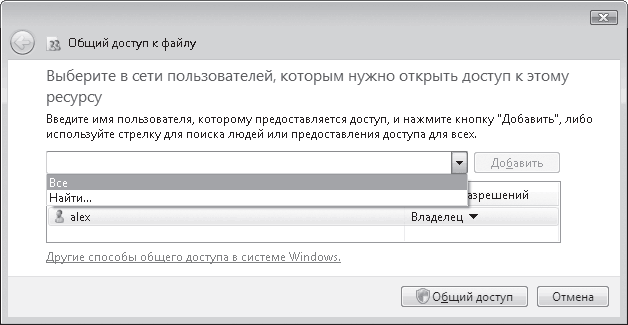
Rice. 17.6. Adding access rights
By default, no one except the computer owner has access, but this is very easy to fix. For example, when you open the list, you can select the Everyone group, which will allow everyone to see your access. To add this group to the list, use the Add button.
It is not clear why, but the creators of Windows Vista do not allow you to configure rights in this window in a clearer way than by selecting one of the access options: Reader, Contributor or Co-Owner. However, this can be done later. By default, a group or user is added with Reader rights. If you already know in more detail what each of the options means, then you can change the permissions right here by right-clicking on the group or user.
After clicking the Share button, the system will perform some manipulations, as a result of which the folder will be shared, as indicated by the window that appears (Fig. 17.7).
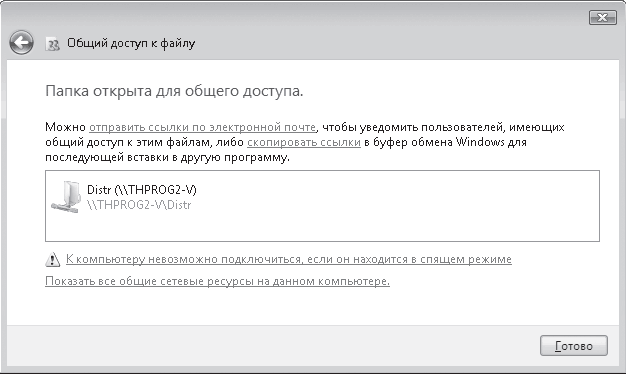
Rice. 17.7. The folder is shared
If you need to configure the rights of some users more precisely, you need to use Explorer again by right-clicking on the desired folder and selecting Properties in the menu that appears, a window will open in which you should click the Additional access button (Fig. 17.8).
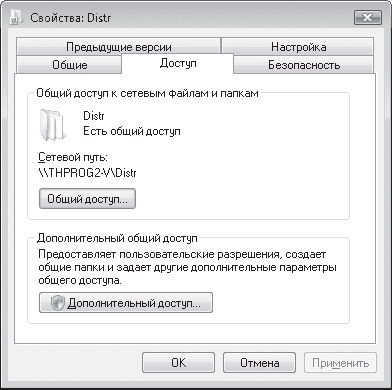
Rice. 17.8. Setting up additional access
As a result, a window will appear (Fig. 17.9) in which you can configure permissions for each of the users and groups that are allowed access to this folder.

Rice. 17.9. Setting access permissions
Before you configure these rights, note that you can limit the number of simultaneous connections. This option will come in handy when you see noticeable slowdown on your computer, which means the resource is being abused. In this case, simply reduce the number of simultaneous connections to a minimum, for example to two or three people.
To configure permissions for specific users or groups, use the Permissions button - a window will open (Fig. 17.10) containing a list of all users who are allowed access to this resource.
Rice. 17.10. Setting permissions for each position
To add new users, you need to click the Add button. For information about the process of adding users, see Chapter 14, section “Setting up access to file resources.”
Disable access to shared folder possible in several ways. For example, uncheck the Share this folder box (see Fig. 17.9) or click the Share button (see Fig. 17.8) - the sharing window will open (Fig. 17.11), in which you will need to select the Stop access option.
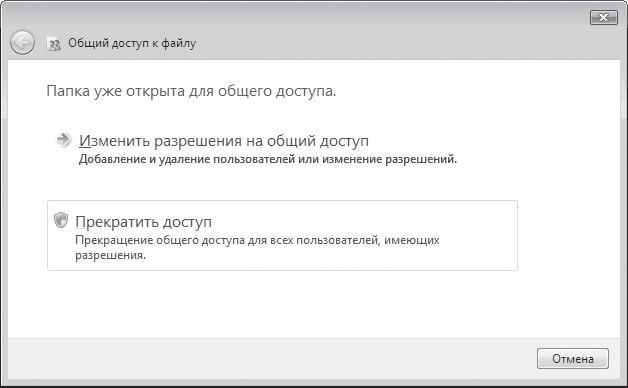
Rice. 17.11. Disable access to the folder
Setting up access to printers
As with file shares, printer sharing is also done in two steps. First of all, you need to activate the appropriate feature and only then add rights to use the printer.
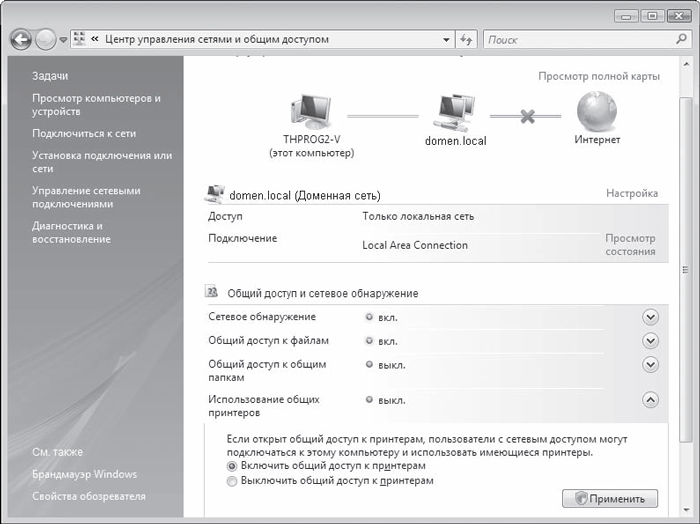
Select Start > Control Panel > Network and Internet > Network and Sharing Center. A window will open (Fig. 17.12), in which you need to click the arrow button opposite the inscription Use shared printers, set the switch to Enable printer sharing and click Apply.
Rice. 17.12. Allow printer sharing
The system will perform necessary settings and activates printer sharing, which will be indicated by a green indicator next to the inscription Using shared printers.
The next step is setting up access rights. To do this, open the Printers group, right-click on the desired printer and select Sharing from the menu that appears (Fig. 17.13).
Rice. 17.13. Select Sharing
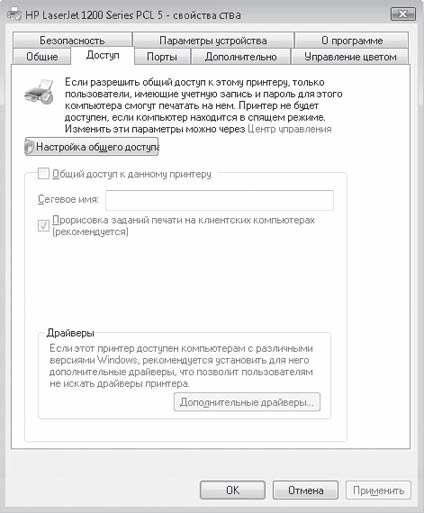
As a result, a window with printer settings will appear (Fig. 17.14), opened on the Access tab. If the computer is not connected to a domain, the contents of this tab are blocked and become accessible only after clicking the Sharing Settings button. After using this button you can change network name printer.
Rice. 17.14. Printer settings window
If the computer is connected to a domain, the contents of the tab are active and the necessary changes can be made immediately.
On the Security tab, you can add or remove users who can use the printer, as well as configure their rights (Fig. 17.15).
Rice. 17.15. Setting up user and group rights
To configure rights, just check or uncheck the corresponding boxes located at the bottom of this tab. To add users, use the Add button (for the process of adding users, see Chapter 14, section “Setting up access to file resources”).
Connecting to a file share
The process of connecting to a file share is very simple and has several options. Most often, Explorer is used for this.
So, if you need to temporarily connect to network folder To open a file or rewrite a movie, just open the Network group on the left side of Explorer and mark the desired computer. In the right part of this window, select the desired object and simply drag it using the mouse button and holding down the Alt key.
If you plan to use this file resource constantly, then it will be easier to connect it as a network drive, so as not to search for this computer and the data on it every time.
You should right-click on the desired folder and in the menu that appears, select Map network drive (Fig. 17.16).
Rice. 17.16. Select Map network drive
As a result, a window will open where you need to specify the drive letter that will be used to connect the network resource (Fig. 17.17). In addition, to always automatically connect the disk when you log in, you need to check the Recover at logon checkbox.
Rice. 17.17. Specifying network drive connection parameters
Connecting to a printer
Network printer in the Windows Vista operating system it is connected in the same way as in Windows versions HR.
You need to open Explorer, right-click on the printer and in the menu that appears, click the Connect button or double-click on the printer image.
Since the number of computers on the network with the Windows Vista operating system installed is still too small, you may need to manually install its drivers to connect the printer. You'll have to look for a printer driver for Windows Vista.
Chapter 18
Connecting the network to the Internet
Connecting a local network to the Internet is a matter of time, and, as a rule, this time comes very quickly. The fact is that the main and main source of new information is the Internet, so connecting it to a local network is absolutely justified. In addition, almost all “home” networks are created precisely in order to first of all charge for using the Internet, and only secondarily for everything else.
The Internet is a network - a global network, which began with the connection of several computers, and ended with millions and the pinnacle of success in the development of the network, therefore, considering its organization and capabilities is one of the mandatory tasks of this book.
A little about the Internet
What is the Internet? More than two decades ago, work began on creating an experimental ARPAnet network. The idea belonged to the US Department of Defense. The main task set before the developers was to achieve network stability against any damage.
At that time, there was a “cold war” between the United States and the Soviet Union, which at any moment could develop into a third world war. Considering that aerial bombing can affect and destroy vast industrial (and other) areas, the network developed by scientists had to ensure uninterrupted operation. This was supposed to be achieved by keeping at least one of the computers running, which could be connected to using another computer.
The communicating computers (not just the network itself) were also given the responsibility of establishing and maintaining communications. The basic principle was that any computer could communicate with another as peer to peer. The International Organization for Standardization (ISO) began developing a standard for such a network.
The idea for the network was clear, and everyone began to develop it, including many computer hobbyists, which was possible due to long delays in the adoption of the standard. Gradually software, which served the network, was improved and distributed. Many users began to use it. Gradually the network was brought under control and everything became strictly standardized.
A little later, the World Wide Web (WWW) appeared - “ The World Wide Web", and everyone rushed to conquer the Internet.
Countless resources of diverse nature have turned the Internet into an information mechanism of unprecedented power. The prospects for its development are unforeseen, which makes it even more attractive.
The Internet is being integrated into life at a rapid pace and will sooner or later reach the 100 percent mark.
To become a member of the Internet lovers club, you need very little - desire and money. The global network is such a well-oiled mechanism that even an inexperienced user can work in it. Why not try it and maybe you'll like it?
Internet access options
To use the Internet, you need to connect to it, that is, gain access. To do this, you will have to enter into an agreement with one of the providers (an organization with direct access to the Internet).
Providers are primary and secondary.
Primary providers - large organizations with high-speed terrestrial or satellite channel on the Internet, allowing you to receive and transmit data at speeds much higher than the speed of a conventional modem, for example more than 100 Mbps. Only large companies with one or more servers serving their websites and databases can afford access to such a channel.
Secondary providers are usually small organizations that have entered into an agreement to lease a channel from the primary provider to them. The speed of such a channel depends on the level and quality of the equipment owned by the secondary provider. As a rule, it does not exceed 10 Mbit/s. Access to a secondary provider's channel is usually several times cheaper than access to a primary provider's channel. This is due to the fact that the channel speed is quickly consumed due to the large number of connections and, as a rule, an ordinary user gets a channel with a speed of up to 1–2 Mbit/s.
Today, the most popular Internet connection options are:
Using an analog-digital modem;
Using an xDSL modem;
Via a dedicated line;
Via frame relay;
Via wireless modem;
Through cable TV.
Since sooner or later a local network, no matter how large it may be, will have to be connected to the Internet, it is worth at least briefly considering each of these options.
Connection using an analog-to-digital modemAs follows from of this type connection, to connect to the Internet, that is, to the Internet provider, a conventional analog-digital modem is used, which appeared a good ten years ago. For more information about modems, see Chapter 6, “Modem” section.
Once upon a time, this connection method was the most profitable and simple - you just had to purchase a modem, configure the connection properties - and you were already on the Internet. Today, this method is also common, but it is already beginning to lose its ground.
To connect to the Internet provider, the telephone cable available in every home, designed for communication via telephone, is used. In order to receive your signal, the provider is forced to keep a similar modem on its side, which is designed, roughly speaking, for a point-to-point connection (which is why the name “session connection method” or dial-up access is often found). This means that in order to simultaneously serve hundreds of users, the provider must have at its disposal a hundred lines and a hundred modems (pool modems). However, this is not the worst thing. The main disadvantage of connecting via a modem is low speed, which, given today’s methods of designing resources on the Internet, does not provide good display speed. In addition, you don’t even have to think about watching live video, listening to Internet radio, communicating via a webcam, via an Internet messenger, etc.
As mentioned earlier, the theoretical speed of such a connection is no more than 56 Kbps. However, this connection method is often used when the existing analog telephone line does not allow the use of more advanced data transmission technologies.
Organizing access to the Internet using an analog-digital modem is only suitable for a local network with two or three computers, no more, otherwise you will only get a portion of adrenaline from indignation at the low speed.
Connection using xDSL modemAs is the case with analog-digital modems, a regular telephone line is used to connect to the Internet using an xDSL modem. However, thanks to a completely different signal transmission technology, the data transfer speed is much higher than that achieved with a conventional analog-to-digital modem. So, most often, for example, at home, speeds from 64 Kbps to 512 Kbps are used. In this case, the speed can be adjusted within a fairly wide range, in both directions, that is, for transmitting and receiving information.
Today, ADSL modems are most widely used, the main advantage of which is high data transfer speed and a telephone line that is free for use. Thus, the maximum data receiving speed for ADSL 2+ modems is 24 Mbit/s, which, you see, is enough for any needs. Even if the speed is only 1 Mbit/s, you can easily listen to the radio, watch movies and exchange information with high speed in a short time.
Using an xDSL modem to connect to the Internet is quite often practiced in local networks of an enterprise or large office. Nothing prevents them from being used in “home” networks, however, as practice has shown, in this case other options are used, for example, a dedicated line.
Connection via dedicated lineA leased line, no matter what type it is - telephone cable or fiber optic, allows you to connect directly to the provider's equipment, so you can be sure that the line is used in full and only by a specific user.
Data transfer speed depends on the equipment used. If optical fiber is used as a carrier, then nothing prevents the exchange of data at a speed of 10-100 Mbit/s.
The disadvantage of connecting using a leased line is its high cost, which makes its use possible only for enterprises and large organizations. Nevertheless, a leased line is very often used in “home” networks, as it allows you to get guaranteed Internet access regardless of many conditions.
Connection via frame relayConnection using frame relay (approximate translation - “variable structure”) has been used for a long time. The main point of such a connection is to dynamically change the speed depending on the needs of the users, that is, the minimum data transfer rate is initially determined, which then automatically changes depending on the conditions. The maximum data transfer rate can be approximately 2 Mbit/s, depending on the line quality.
This connection method is often used in enterprises to organize communications with remote areas. This method is not always suitable for accessing the Internet. So, in the case of “home” networks, the line load will almost always be 100%. Therefore, it is more profitable to take a dedicated line with a certain data transfer speed: it may be more expensive, but it is of better quality.
Connection via wireless modemRecently, the use of radio air for data transmission has become increasingly common. The advantages are obvious: fairly high speed and, most importantly, mobility.
To connect to the Internet, you just need to install a directional antenna and a radio modem by connecting it to your router. The data transmission/reception speed can be quite high, for example 2 Mbit/s. However, it may fluctuate, as it is directly dependent on the distance to the provider and weather conditions.
Also, do not forget about satellite Internet, since it also involves the use of radio air, only at much higher frequencies. Connecting to the Internet via satellite has a number of features that do not allow it to become very popular. The first and most important drawback is the high cost of such a connection, since to use such Internet you will need to purchase an expensive satellite dish and a special modem. There are symmetric and asymmetric satellite Internet.
The first of them involves the use of cheaper equipment, but also requires an additional terrestrial Internet connection. This is due to the fact that simple satellite antenna It only allows you to receive data, but to transmit information you need another type of communication.
The asymmetric Internet does not have this drawback, but the cost satellite equipment in this case exceeds all reasonable limits. Nevertheless, the use of asymmetric Internet is the only option for connecting remote villages and isolated from civilization to the Internet.
Another drawback satellite Internet– response time is too long. This means that even if you have a connection with a speed of, for example, 2 Mbps, you receive information with a delay.
Another wireless connection option is to use existing GSM networks, that is, networks that serve mobile phones. In this case, you just need to connect mobile phone any available way to the computer (cable, infrared port, Bluetooth), configure the connection in a certain way and use its modem to access the Internet. The data transfer speed does not stand up to criticism, so this type of stationary method of connecting to the Internet is used quite rarely.
The use of wireless technologies to connect a local network to the Internet should be considered carefully and only if other connection options are not satisfactory.
Connection via cable TVAnother rapidly growing way to connect to the Internet is to use existing cable television systems. A television is a device that is found in almost every home, and very often cable television is used to watch programs. Its advantages are obvious: a large number of programs for every taste and every viewer.
Using an existing TV cable for transmitting data from the Internet is quite attractive and efficient, since it does not require the organization of separate wire lines. The data transfer speed is quite high and can reach 30 Mbit/s. However, use cable connection It is justified only at home, and for organizing access to the Internet for a local network of even a small size, this method is absolutely not suitable.
Organization of public Internet access
There are several proven mechanisms by which you can connect a local network to the Internet.
The general idea of connecting a network to the Internet is simple. It is enough to organize the connection of one of the computers and teach it to “share” this connection with other users. Using a computer for these purposes is quite convenient, as it allows you to adjust resolutions visually.
You can also use a router with a modem connected to it for these purposes, which is more advantageous because it eliminates an unnecessary “weak link.”
The only thing that complicates the implementation of this idea is that you need to organize control over the use of the Internet by other computers and monitor the security of their connection.
For an office network consisting of more than 20 computers, a separate computer is usually set up - an Internet gateway, to which a high-speed modem is connected, the necessary software is installed, and which is intended only to serve the users connected to it.
If you cannot select a separate computer, then you can use any other one in use. Of course, in this case, some additional requirements must be placed on it - at a minimum, it must be constantly turned on, not to mention the fact that it is necessary to eliminate the situation of freezing.
Using standard Windows components XPLet's look at how to organize shared Internet access using the capabilities of the Microsoft Windows XP Professional operating system. This situation often occurs in small offices and small home networks. To share Internet access, they use a special Internet sharing service called ICS (Internet Connection Sharing).
To implement this plan, the computer that will act as the main one must already have a configured connection to the Internet of any type, through which shared access to the Global Network will be organized.
Attention!
Use standard means It is impossible to organize a general Internet connection when the computer is on a local network with a domain. This means that you will have to use additional software to implement your plans.
Let's choose the simplest path - use the Network Setup Wizard, to launch which you need to open the Network Connections window (to do this, run the Start > Network Places command and click on the Show network connections link) and click on the Install link home network or small office network.
As a result, a window will open telling you what you can use the Network Setup Wizard for (Fig. 18.1), including, for example, organizing a shared connection to the Internet.
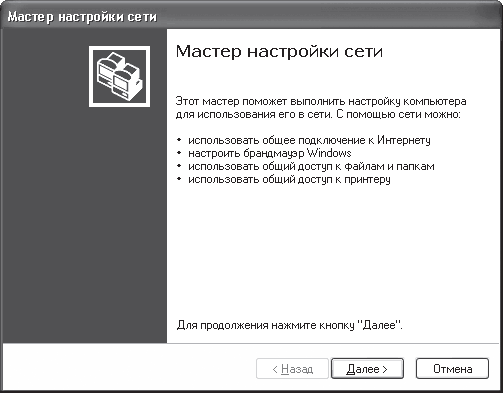
Rice. 18.1. Network Setup Wizard
After clicking the Next button, the following window will open, which provides advice on preliminary preparation for the selected actions. In particular, it is suggested to check whether the network card and modem are installed and whether they are working. In addition, it is recommended to connect to the Internet, which is not at all necessary, since you can do this later, checking the result of sharing.
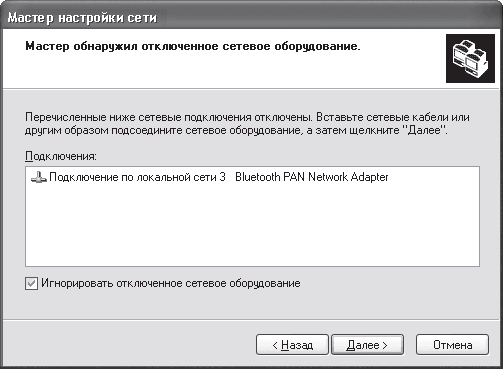
Rice. 18.2. Network connection detected
In this example, there is one wired network connection that is temporarily not working because the network card is not connected to the network. This was done to test the master. As you can see, it detected the connection and asked you to check it or connect the cord, which can be done later by creating a share, so let's check the Ignore disconnected network equipment checkbox.
If there were more than one connection in the list, the wizard would offer to select one of them, which would be responsible for connecting the computer to the local network. In the next window, the wizard will prompt you to select a connection method (Fig. 18.3).
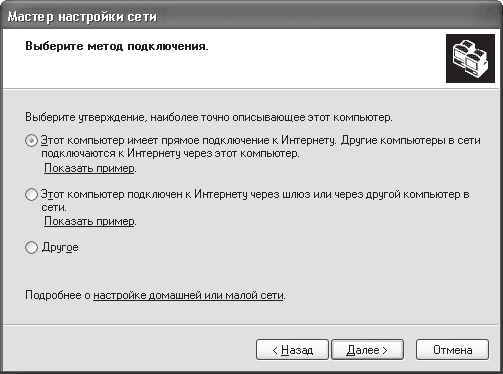
Rice. 18.3. Selecting a connection method
There are several possible options depending on what you need to configure. If you need to make this computer responsible for connecting to the Internet and provide other connections to the Global Network through it, then you should select the first option: This computer has a direct connection to the Internet. Other computers on the network connect to the Internet through this computer.
If there is already a computer on the network with Internet access and public access is already configured on it, then you need to select the second option: This computer is connected to the Internet through a gateway or through another computer on the network.
The third option is a more complicated path, so it will not be discussed in this book.
Let's assume you chose the first option. In this case, the next window will ask you to specify the connection responsible for connecting to the Internet (Fig. 18.4).
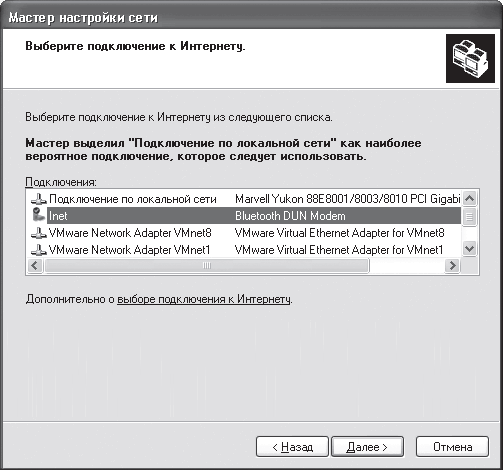
Rice. 18.4. Selecting a connection
After selecting the connection and clicking Next, the following window will open in which you need to specify the computer name and its description. If you need to make changes to a previous selection, use the Back button.
In the next window you will be asked to give the group name and add a description of this computer. For computers to be able to access the Internet, they must belong to the same group as the computer with Internet sharing configured.
As the group name, you can use the current name of the group in which the computer is located, or give a new one.
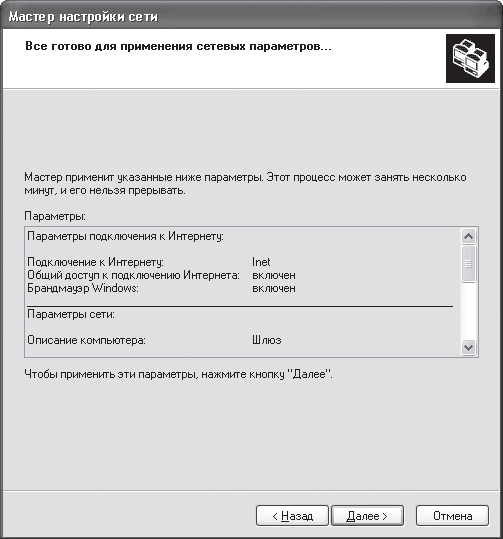
Rice. 18.5. Resulting information
After completing the setup, a window will open (Fig. 18.6), in which you need to select the last item. To configure other computers, that is, to include them in the created group, they also use the Network Setup Wizard.
Rice. 18.6. Finishing the master's work
In order for the remaining computers to connect to the Internet, they will need to configure the IP protocol slightly. So, you need to register the IP address of the gateway, which in our case looks like 192.168.0.1. For more information about setting up the protocol, see Chapter 16, section “Setting up the protocol and checking communication”.
Using Kerio WinRouteUsing helper programs to share the Internet is a worthwhile step. Its main advantage is manageability and control. In addition, such programs contain all the necessary mechanisms to ensure the functioning of public Internet access. Kerio WinRoute is one such program.
Before installing this program, you should understand that to separate local network and Internet traffic, you must have a configured connection to the Internet. As a rule, this applies to both office and “home” networks; an additional network card is used to create such a connection. Although it is quite possible that any type of modem will be used. When installing the program, you will need to specify the device that is used to access the Internet, otherwise traffic will be calculated incorrectly.
The program is not large in size, but nevertheless combines powerful mechanisms to provide Internet sharing and maximum control. Using just one IP address (NAT mechanism) to access the Internet makes other clients as secure as possible. In addition, there is a mechanism with which you can configure rules of various types.
After starting the program, you need to make minimal settings for the entire mechanism to start working. The fact is that WinRoute is initially configured, and the required changes only concern the indication of the required network connection, the list of allowed protocols and the list of users with passwords.
Over time, as new connections and new nuances appear, you may have to configure the built-in DHCP and DNS mechanisms, although this is not necessary.
The number of program parameters is simply amazing. You can configure a variety of filters, block or allow execution software modules, limit speed, configure routing tables, traffic usage rules and much more. All parameters are divided into groups, interconnected in the form of a tree structure on the left side of the program window (Fig. 18.7).
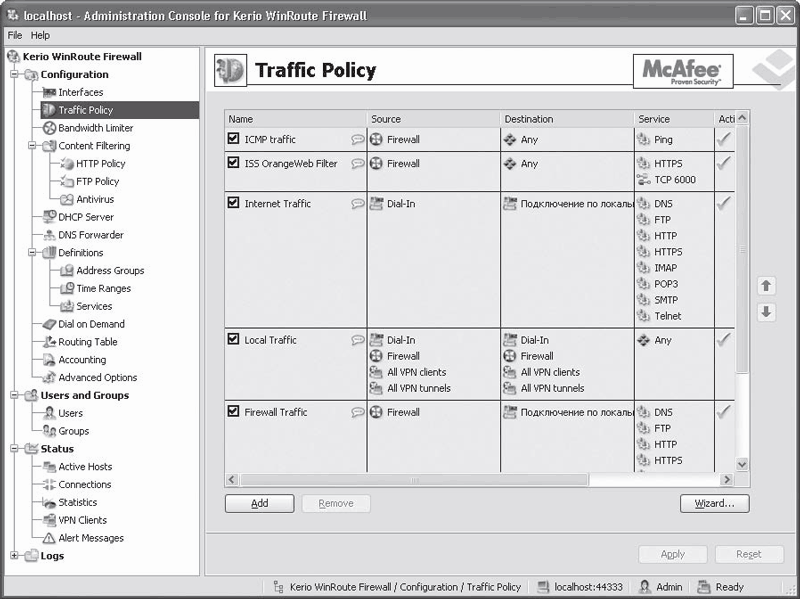
Rice. 18.7. Kerio WinRoute program interface
The advantage of WinRoute over other similar programs is the presence of a built-in firewall and McAfee anti-virus protection. There are also detailed statistics on traffic usage, available both in the program interface itself (Status branch) and called up using the browser.
Settings client computers consists of entering the proxy server address in the IP protocol settings (in the Default gateway field).
If you want to easily charge users, be sure to add them all and assign them a static IP address. In this case, no user authorization is required. If a DHCP server is configured on the network and addresses are issued dynamically, then users will be authorized every time they try to load any web page.
Sometimes you need to reset the adapter. To carry out this task, you must enter the network connections section. This is done in the following order: you need to go to the control panel from the Start menu. Using the search system, find the adapter, then in the section for managing sharing and networks, select “Show network connections.” Right-click on the adapter icon and select “Disable” before resetting the wireless network settings. If you are required to enter or confirm an administrator password, you must provide the password or confirm.
By clicking on right button Click on the network adapter icon to select the enable command. If you are prompted for an administrator password or need confirmation, you must enter the password (confirm). The network adapter is now returned to its default settings. You can read about how to connect the DVR to the network in the corresponding section of this site. Now that the settings have been changed, you should try connecting to the network again. You can also use a network troubleshooter to verify that the adapter is working correctly.
The sequence of actions is as follows: you need to open the troubleshooter. To do this, right-click the mouse to select the network icon located in the notifications and click the troubleshooting command. Information on how to send a message over the network and others useful tips available to visitors of this site. If, after performing the steps to reset the network adapter, as well as updating the drivers, the network troubleshooter still indicates that there are problems with the adapter, you still need to replace the adapter.
You can purchase a network adapter in specialized stores. Its installation is easy. On special websites you can find information on how to install the adapter, how to set up a VPN network and much more. The device also comes with instructions with which you can install the network adapter yourself. If problems arise, you should seek the help of a specialist. If you decide that the adapter should not be used, then you must either remove it from the system or simply turn it off. Many users are interested in how to log into social networks. By clicking on the link or using the search system, you can get the necessary information.
When you disconnect the adapter, it will become inactive, i.e., it will not be used. The sequence of actions is as follows: from the “Network Connections” component (opens by clicking on “Start” and going to the section for managing networks and sharing), through the search system you need to find the adapter (type “adapter” in the search window) and click on the “Show” item Network Connections" in the Network Control Center. All that remains is to click on the “disable” command. If a password or confirmation is required, you must enter the password (confirmation).