Installing a network printer is very useful feature in Windows 7, because if there are several computers connected via local network and one printer can greatly increase the efficiency of using this equipment. With this option, users will be able to print documents without leaving their workplace, and there will no longer be a need to transfer files from computer to computer.
So we tried something different and it worked. We decided to share our solution here, hoping it might help someone else. On the computer that the printer is connected to, share the printer as you normally would, and when sharing it, set up a shared name that's easy to type.
On the computer from which you want to connect to this printer, use the built-in Add Printer Wizard and select the "Add Local Printer" option. Click "Next" and on the next page select "Create a new port" and make sure the "Local port" option is selected.
It must be borne in mind that not the printer itself should be connected to the network, but the computer on which it is installed, in addition, during installation you may need, you can download them on the official websites of the equipment manufacturer, or install from the disk supplied with the printer. There are two ways to find a printer on the network: the first, simple, fully automatic. The second is more difficult, minimal knowledge and participation will be required. Usually the second is resorted to when the first does not work.
On this page, look for the text "computer name". Be sure to use the name of the computer to which the printer is connected, not the one from which you are trying to connect to the printer over the network! The above procedure worked for us, hopefully it will work for you too. If you have a network that uses multiple devices and operating systems, you may not be able to use home group for easy network sharing. In such situations, you need to share folders and devices using various procedures.
Method 1. Automatic
1. Go to Control Panel -> Hardware and Sound -> Devices and Printers. Here, in fact, all the action will take place.
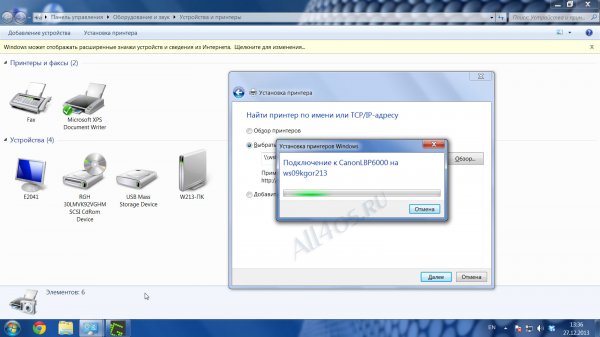
2. Click on " Installing the Printer". The installation window will appear. A local printer is a device that you connect directly via USB. But we are interested in the second option - "Network Printer", - a printer, access to which is usually shared between several computers at home or in the office.
For example, sharing a printer with a network involves a different and longer set of steps. Go to the "Printers" section and select the printer you want to share. If you have a multifunction printer installed that also works as a fax or scanner or both, then you may need to select which of the properties you want to select. Select printer properties.
The printer properties window opens. Depending on the printer model and its drivers, you will see various tabs and options. Click the Sharing tab, which is shared by all printers. Here you can provide general access to the printer with the entire network. Check the "Share this printer" box.

3. Automatic search for devices on the network will start. In the best case, you will see several devices and select the one you need. All you need to know is the exact name of the printer, eg CanonLBP6000.

In the example, in the "Printer Name" column, you see the type name "CanonLBP on LARISA". The first is the network name of the device, the second is the network name of the computer to which the printer is connected directly.

Submitting all print jobs to client computers can help improve the performance level of the computer to which the printer is connected, especially when large print jobs are ordered. Select the Run print jobs on client computers check box if you want this feature to be enabled.
The printer is now shared with other computers on your network, no matter which OS they use. Now that your printer has been shared with the network, you are all done with the easy part. You then need to install it on the computers that need to use it. Below you will find useful advice to help you with this.
5. If everything is fine, you will see “You have successfully installed [Printer Name]” at the end.

6. A new device will appear in the Devices and Printers window. It remains to put it default printer. When you click on it right click, you will see the desired item.
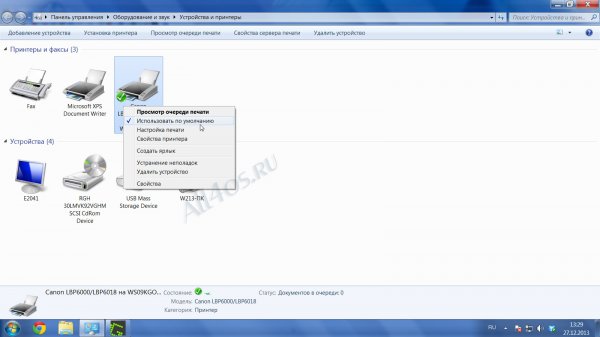
Now all documents, when printed, will be automatically sent to the newly installed network printer.
Method 2. Find the printer by network name
Let's say method 1 did not help find the device. Step #3 failed, a notification appeared that no printers were found. This usually happens when the system is just installed.
Shortcut method
Before installing a printer, you need to know the name of the printer you want. Check if they are sorted by both type and location. Note. If so, you can skip to the next section on installing the printer driver.
- Select "Small Icons" from the "View" drop-down list.
- Be sure to use the backslash.
The usual way to install the printer
If you don't know the printer's name, after selecting or entering the server name, simply type the trailing backslash. A drop-down list of printer names will then appear, allowing you to select one. A window will then open asking if this should be your default printer.
1. Step No. 3 was interrupted, the line “The desired printer is not in the list” appears in the window below. Click on it or "Next".
2. You will see a window where you must enter the printer name manually, for example “\\network_computer_name\network_printer_name”.

Both the first and the second are located on the “master” computer, to which the printer is connected directly. In the properties of "My Computer" look for the line " Network name". In the printer properties in "Devices and Printers" - the network name of the printer.
The printer is now installed and can be selected from application programs. In a few minutes your network connection will be restored with a new name working group that you created. When printer sharing is enabled, a list of printers available for sharing will appear.
- Place a checkmark next to "Printer Sharing" in the list of services.
- Place a checkmark next to the name of the printer you want to open.
- Close System Preferences.
In Windows, you can share more than just folders or drives. It is very convenient to share over the network for printer connected to one of the computers on the local network. As a result, to print documents from several different computers one printer can be used. This will not only save a lot of money, but also save staff from running around with flash drives or disks when office employees need to print something.
Set print properties
If the printers do not have an optimized driver that allows you to connect directly to the network, you can also connect manually. To do this, install the printer driver on your computer and select any port. It doesn't even work. After installation, call "Print Properties" via context menu and go to the "Ports" tab.
It starts a wizard that keeps you connected. They can be seen directly on the printer in Network Settings. Leave the Port Name field blank. Selection mask for direct network connection printers to the network card. The wizard then attempts to discover and bind the printer. If the wizard does not find the port name, use the Shared NIC setting. If that doesn't work, you'll have the option to check other settings later.
To share the printer, sit down at the computer, to which the printer is connected , and do the following:
1) Go to "Start" - "Control Panel" - "Printers and Faxes".
2) Right-click on the name of the printer that you want to share with network users - select "Properties" - go to the "Sharing" tab:  3) Put a marker in front of the item “Sharing this printer”.
4) In the Network Name field, enter a name or description for the printer that will be visible to network users. It is undesirable to use spaces in the printer name: 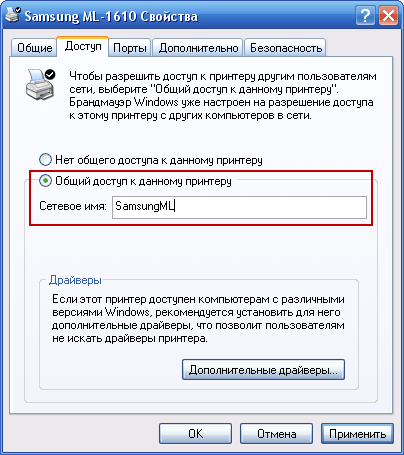 5) Click the "Apply" - "OK" button. After that, the printer will be shared and a hand symbol will appear on it:
On the Ports tab, make sure the new port is added and selected. The printer should now connect to the network and work. This guide will try to show you what to do and what to look for. The printer can be installed with two different ways. Either as a normal installation where you run the setup on all computers where you want to use the program, or as a shared network printer where you just run the setup on the print server.
Default shared printer stores the output in a predefined folder on the print server. This folder can be changed if you want to store files in a different location. For most systems, this folder is located here. Note that the last part of the path is the name of the current printer name specified by the option during installation. This will change if you install a printer with a different name.
In order for the user of any computer on the local network to be able to print on this network printer, it is necessary to install this printer on his computer over the network. If you want to allow all computers on the network to print to this printer, then on each of these computers we do the following steps:
Security context and personalization
If the printer is used as a network printer, network users can use it and start printing. Sometimes this user does not have a user profile on the computer that is using the printer. Usually this Account local service. It is recommended that the default location for files used by the printer be changed to an appropriate structure adapted for this use.
Print user personalization is disabled by adding a value to the registry. For manual setting navigate to the printer registry key. Set a value for this parameter. As mentioned on this page, a shared printer uses a predefined set of settings. Print users cannot freely set various options such as output file name or watermarks. Each shared printer instance has a fixed set of options.
1) Sit down at the computer of the user who needs a network printer. Go to "Start" - "Control Panel" - "Printers and Faxes".
2) On the menu bar, click "File" - "Install Printer". The Add Printer Wizard will start. Click "Next": 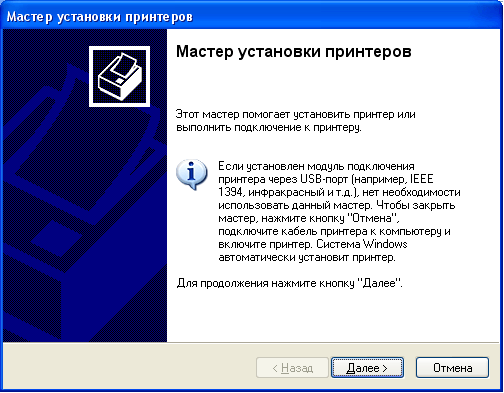 3) In the next window, set the marker to “A network printer or a printer connected to another computer” and click “Next”:
  4) Then set the marker to the “Browse Printers” position and click the “Next” button:
 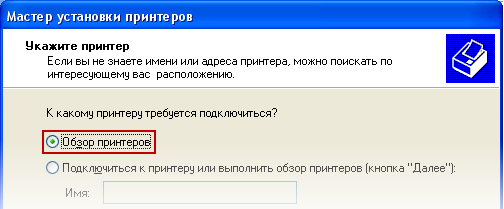 5) In the next window, you will see a list with the names of computers and printers connected to them. Double-click the computer and then the printer you want to connect to. The name of the selected printer will then appear in the Printer field. Click "Next":
 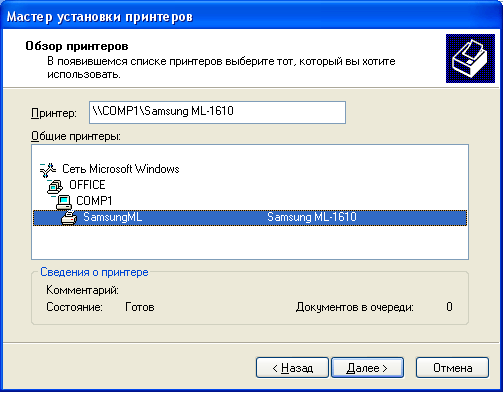 6) You will see a warning that printer drivers from the network will be installed on the computer. Click "Yes":
  7) The next window will prompt you to use the default printer to be installed. If you agree with this, leave the marker in the “Yes” position and click “Next”:
  This completes the installation of the network printer. After you click Finish, the icon for this printer should appear in the Printers and Faxes folder.
When dialogs are displayed, printing may stop and wait for user interaction. This can block the process because no one can see what is happening in the context of the print spooler service. Therefore, you must ensure that all dialogs are disabled. The macro is the name of the user who sent the print job to the spooler. This is usually the network user name for the printer.
Using version 3 drivers
These drivers make it easy to share the printer over a network. Installing version 3 driver When the printer is released, it is important to install drivers that support the operating systems we want to share. These drivers must be installed on the computer that is sharing the printer.
Printing to a network printer is no different than printing to a local printer. It will also show out-of-paper alerts and other messages to network users. You can also cancel or pause print jobs.
Remember that in order for the printer to be used by other computers on the network, the computer to which the printer is physically connected must be turned on, not frozen, and connected to the local network. If you encounter errors when printing to a network printer, check these conditions.
This run uses a 64-bit system to replace the printer. Below are the steps to install the driver. The setup will try to find printers, but we need to stop this. We don't need it, just drivers.
- After unpacking, it will attempt to configure.
- If you are on a 64-bit system, the installation will fail.
- We only need unpacked files.
- Run the downloaded 64-bit executable.
- Select "Traditional Mode" to install.