class="eliadunit">
Today, with the development of modern technologies Personal Computer- almost a must-have in every home. In addition, many PC users also have a laptop, tablet, smartphone, so sometimes it becomes necessary to transfer any folder with data between devices. How to do this without using a flash drive? Let's take an operating system as an example. Windows 7 how to share a folder network connection.
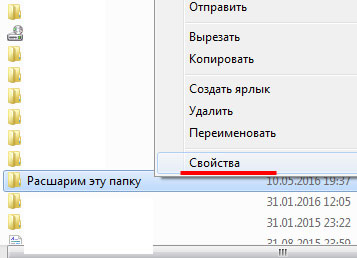
So we have some new folder". In order to share a folder, you will need the following sequence of actions. Hover your mouse over the folder and click on it right click, in Windows 7 a pop-up window will appear as shown on the screenshot below.

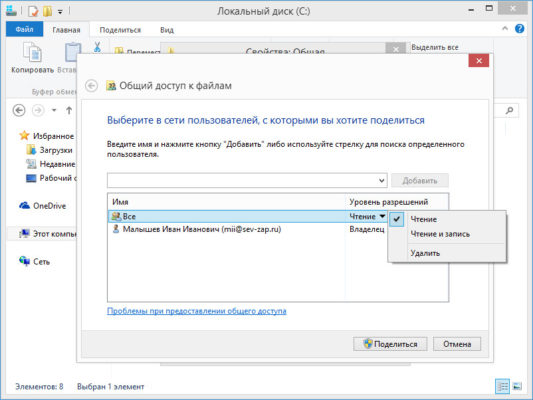
From the list of actions that appears, select " General access". In the new list that appears, click "Specific Users". Now in the "File Sharing" window, click on the drop-down list, from which we select a specific user that is on your network, or click on the "Everyone" item if you want the folder to be available to any device connected to the network.
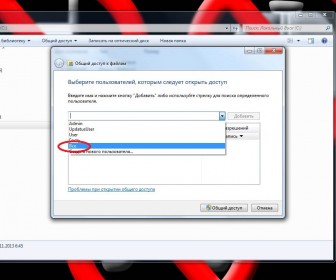
If share a folder If you need a user that is not in the list, then click "Add a new user ..." and add it manually. After selecting a user, you need to configure the sharing rights for this user, which will determine the allowed actions: "Read", "Read and write". In the first case, the user will only be able to view and copy information, in the second case, the ability to append files or their removal . For security purposes, select "Read" and the "Share" button:

class="eliadunit">
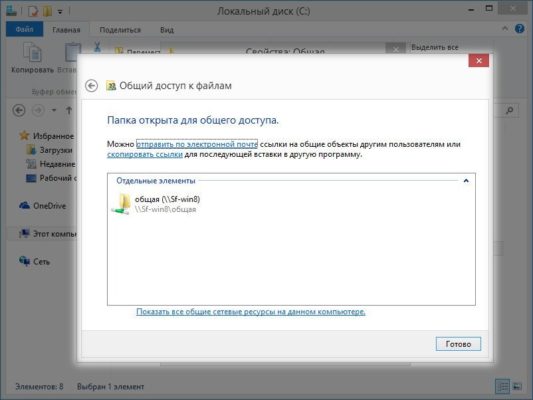
As a result, we see the following window:

Click on the "Finish" button.
Often, after performing these steps, network users still cannot access the folder - a password is required, so you must perform the following steps: click on the icon network connection, located in the lower right corner of the Quick Access Toolbar, right-click, a pop-up window will appear where there is an item " Network and Sharing Center” (in the screenshot above). Click on it and get into the network connection settings menu. In the left column, select "Change advanced sharing settings":

In the list of settings that appears, check the box next to " Disable general access with password protection and click the "Save Changes" button:

These are all the necessary steps to share a folder. Now you can actively use the computer, for example, as a media center - you can open access to music and other information that can now be viewed on a laptop or tablet without using a USB flash drive.
Connecting a couple of computers to a local network is half the battle. After the cable is inserted into the network card and the computer is assigned an IP address, you start to wonder, why do you need a network if you cannot transfer files and folders from one computer to another? Therefore, today we will set up sharing folders and files, and also learn how to connect a network drive in Windows.
Network Setup Wizard
So, you have a network of two or more computers. In order to be able to access the folders of other PCs from one computer and vice versa, you must first of all run the Network Configuration Wizard on all computers in turn. During this procedure operating system Windows will automatically configure the built-in firewall and network connection settings of each PC to work properly in local network.
Open "Start" - "Control Panel" - "Network Connections" and in the "Network Tasks" area select "Install home network or small office network.
The Network Setup Wizard will start. Click next.

Check if you have done all the steps listed in the list and click "Next".

Choose how you want to connect your computer to the Internet: directly or through another computer (another network device). If your computer is not connected to the Internet in any way, check the “Other” item and in the next window select the option that suits you. Click "Next" to continue.

If the computer is directly connected to the Internet, the Network Setup Wizard will prompt you to select from the list the network connection through which the PC communicates with the Internet. Highlight the desired network connection and click Next.

Enter a description and computer name. You entered the computer name when Windows installation, you don't have to change it if there are no computers with the same name on your network. The description of the computer is necessary for your convenience. It can be entered in Russian, or you can not enter it at all. The computer name must be entered strictly on English language without spaces. Do not be surprised if this field will display uppercase letters - it should be so. Click "Next" to continue.

Enter the title working group, which will appear as the name of your network. You could have already entered this name at the stage of setting up the local network. Check that it is the same for all computers. The workgroup name must be entered in English and without spaces. It, like the computer name, will be displayed capital letters- this is normal. Click the "Next" button to continue.

In the next window, the Setup Wizard Windows networks will prompt you to allow or deny file and printer sharing on your computer. Of course, allow it by checking the "Turn on file and printer sharing" option and click "Next".

Finally, the Network Setup Wizard will give you a summary of the network connection configuration with all the options you specified earlier. Read carefully and if everything is correct, click "Next". If some options do not suit you, click "Back" and change them.

Windows will set up your computer for a local network. You will have to observe this process for a few seconds, and then click the "Finish" button.

Windows will prompt you to restart your computer for the network settings to take effect. Do not refuse the operating system this request.
You have to run the Network Configuration Wizard on each computer on the local network. Be careful and remember that the workgroup of all your computers must be the same, but the names of the computers must be different. Also note that there can only be one computer connected to the Internet. All other computers will connect to the World Wide Web through it or through a special network device, such as an ADSL modem. Therefore, select the correct options in the Internet Connection Method box of the Network Setup Wizard on each computer.
After you have completed the network setup using the Wizard on all computers, it's time to create shared folders and network drives, and allow other users to work with them.
Sharing a folder
Create a simple folder somewhere in the root of the drive. Give it a short and understandable name in English, such as shareFilms. Right-click on the folder and select "Properties". Go to the "Sharing" tab and check the boxes "Share this folder" and "Allow changes to files over the network." Click OK.

Thus, you have granted access to all users of your network to the created folder. Such a folder is called "shared", from the English "share". A hand icon will appear on its icon.

By default, all users on other computers will only be allowed to view the contents of the shared folder. You may want other users to be able to modify the files stored in it and copy their own there. Then you need to open access to this folder not only for reading, but also for editing.
First of all, in the "Tools" menu of the Local Disk window (in which you created the shared folder), select the "View" tab and uncheck the box "Use simple file sharing (recommended)". Click OK.

Now right-click on the shared folder again and select Properties. You will notice that there are more tabs. Go to the "Access" tab. It has additional settings: you can enter a note for the share (the "Note" field) and determine the number of users simultaneously viewing the folder ("User limit").

Click the "Permissions" button and check the "Change" box. Thus, all users of your network will be allowed not only to view the contents of the shared folder on your computer (Read permission), but also to change it. Click OK to apply the settings.

Where to find shared network folders and computers on the local network
So we opened a shared folder on one computer, and also granted other users the rights to read and modify the files stored in it. Now you need to go to this folder from another computer. To do this, change to another PC on your network and select "Start" - "Network Places", in the "Network Tasks" section, click "Display Workgroup Computers". Windows will search for computers on the local network and their shared resources (folders and printers) for several minutes. During the search process, your PC may freeze. Do not be alarmed and wait a few seconds while Windows displays the computers on the local network.

By clicking on the computer name (as usual, double-clicking with the left mouse button) you will see a list of its shared folders. Among them is our own shareFilms.

Working with shared network folders and the files they contain is no different from working with regular files and folders. Over the network, you can perform all the same actions with them: copy, rename, delete, etc.
How to map a network drive
Agree that it is not very convenient to search for a shared folder in Network Places every time. It is much more practical to connect it to your computer as a network drive. It will be displayed in the list of drives in the My Computer window, and you can quickly work with its contents.
To connect a shared folder from another computer as a network drive, go to Network Places ("Start" - "Network Places"), select a local network computer and the shared folder located on it that you want to connect to your PC as a network drive. Right-click on the folder and select Map Network Drive.

In the window that appears, select the letter under which the network drive will be displayed in the list of drives on your computer. Remember, there should not be two disks with the same letters on your PC! Also check the "Restore at logon" checkbox so that when you turn on the computer and Windows boot automatically displayed the network drive in your PC's drive list.

Now you can just go to My Computer and you will see the network drive. Each network share can be mapped to your computer as a network drive. Just make sure that the disk names do not repeat. Network drives in the My Computer window are indicated by special icons that distinguish them from the rest.

To disable a network drive, right-click on it and select Disable. Also remember that when you turn off the computer on which the shared folder, its corresponding network drive will be unavailable.
On this, let me finish the shamanism in the local network and wish you a pleasant work!
How to share a folder in Windows 7 and above
The advantage of this method of information exchange is that you will not need to share files with colleagues at every request. You simply place the necessary folders and files in a shared folder, and your colleagues will have access to them when they need and without your intervention.
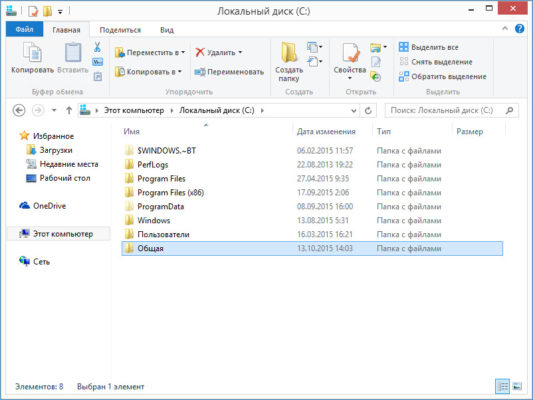
First you need to choose which folder you want to share. You can take any existing one or create a new one, in our case the folder is called "Public".
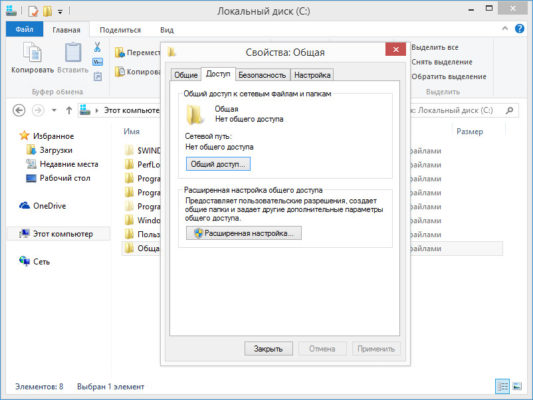
Sharing settings are located in the folder properties. Move the mouse cursor over the folder, right-click and open "Properties", after which we go to the "Access" tab.
In this tab, you need to do the following:
- Click on the "Sharing" button
- In the window that opens, select "All" from the drop-down list
- Click "Add"
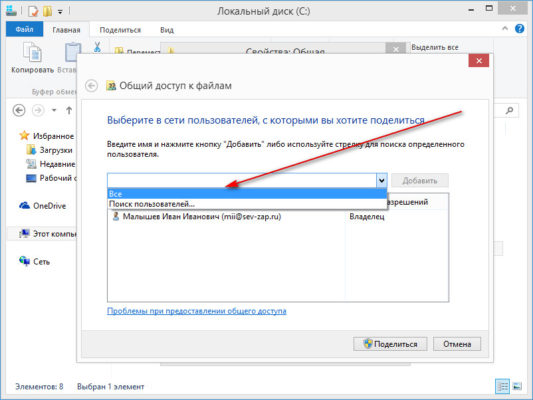
Thus, you grant the rights to view this folder for all network members.
To allow participants not only to view the folder, but also to change its contents (delete and modify files and folders), in the "Permission level" column, change the value from "Read" to "Read and write".
Now from another computer on the network, go to the computer where you shared the folder. If you did everything correctly, then you will see that there is a public access network folder.

This folder will be available to all network members as long as your computer is turned on and the local network is active.
How to close access to a shared folder
To close a shared folder, do the following:
- Open the directory where the shared folder is located
- Right click on it and open "Properties"
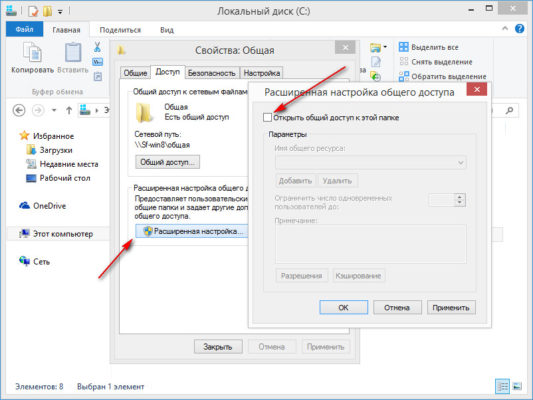
- Go to the "Access" tab
- Click "Advanced Setup"
- Uncheck "Share this folder"
How to share a folder in Windows XP
In Windows XP, sharing a folder is easier, as Microsoft's security policy used to be different. If you are still using this version of the operating system, then it will be enough for you to do the following:
- Right click on the folder to share
- Select "Sharing and Security"
- Check the box next to "Share this folder"
- To allow changes to files, check the box next to the option "Allow changes to files over the network"
- Click "OK"
What methods do you use to share data with colleagues?
At the moment, the topic that we will consider in this article is very popular. After all, many people at home, in addition to a computer, also have a laptop, maybe more than one, a netbook and other devices connected to the network. And when you need to transfer files between them, it is not very convenient to use a flash drive or disk. And if you work in an office, it's much easier to copy files from your computer to desired folder, than on a flash drive, which then also will need to be attributed.
So, how can you transfer files from one computer to another using a local network - you just need to share a folder on the local network, that is, open it to public access. In the article, we will consider how to share a folderWindows 7, the described method is also suitable for those who have an operating system installed on their computer Windows system 8.
If you have Windows XP installed, read the article:. You may be interested in the topic:, and if you have a laptop, read.
First, go to "Computer" and look for the folder that we want to share over the local network.
Right click on it and select from context menu"Properties" .
In the next window, go to the "Access" tab and click the "Sharing" button.

Now you can add a new user if it is not in the list: enter a name in the empty field and click "Add". Then select the desired user from the list and select for him "Permission level". Let's make sure that all users connected to the network can view and edit files in the folder: select "Read and write". Click the Share button.

After that, a window will appear that the folder is shared. Click Done.

To view or add files to the shared folder, go to "Computer", on the right side, click "Network" and click on the name of your computer. In the Explorer window you will see the folder that was shared. Go to it and upload the necessary files there.
Now go to the "Network" from another computer and click on the name of your computer there too. The user will see all the folders that are shared on your computer. Depending on the rights that you assigned earlier, it can perform various actions with them: view or edit.
In order for another user to be able to perform any actions with a folder that is shared on your computer, your computer must be turned on: it must not be in sleep or hibernation mode.

If you are asked for a password when you try to open a shared folder on another computer, do the following. Right click on the icon network connection tray and select "Network and Sharing Center".