DISM(Deployment Image Servicing and Management)- quite a recent innovation. This tool is a command line utility and is designed to work and configure operating system Windows.
DISM functionality
By using DISM you can perform the following tasks:
- Prepare an image.
- Enable or disable Windows features within an image.
- to another edition.
- Add and remove packages inside a Windows image.
- inside the wim image.
- Apply the changes specified in the offlineservicing section for an unattended installation.
- system image.
- Keep detailed logs.
As you can see, the DISM utility is mainly designed to work with a ready-made Windows wim image. In addition, this tool can serve a working computer, that is, an already working wim image. To do this, you need to set the parameter /online. And here is what the DISM utility itself says about itself:
command syntax
- DISM /mount-wim /wimfile:c:\install.wim /index:1 /mountdir:c:\papka_podklucheniya
This command mounts the wim image to the specified folder, where:
- c:\install.wim
The storage location and name of the wim image we are going to mount.
- /index:1
Indication of the index of the publication that we are connecting.
- c:\papka_podklucheniya
We create and specify the folder in which we connect the image.
- c:\install.wim
- dism /commit-wim /mountdir:c:\papka_podklucheniya
Applies all changes made to the specified wim image. This command is run after all changes to save them. The command must specify the address of the file.
- dism /unmount-wim /mountdir:c:papka_podklucheniya /commit or /diccard
With this command, we disable the connected wim image. It is possible to use two options, one of which saves the changes before unmounting the image, and the other cancels. Commit- apply changes, discard- do not save changes.
- dism /remount-wim /mountdir:c:\papka_podklucheniya
This command tries to bring back to life a "hung" folder with a connected wim-image. Apparently, such situations are not uncommon, since Microsoft has taken care of such functionality.
- dism /cleanup-wim
The command deletes all data associated with the given image. They are various temporary or other files that are created during image setup. Best applied before finishing work.
- dism /get-wiminfo /wimfile:c:\papka_podklucheniya\install.wim /index:1
Displays information associated with the specified image index. Let me remind you that the index points to in the assembly.
- dsim /getmounted-wiminfo
Lists information about an already mounted Windows wim image.
The DISM system is designed to work with pre-existing images. With this utility you will not create a new image. Only the basic commands for working with the DISM tool are listed here. Naturally, the possibilities of DISM do not end with the ability to connect, get information, and disconnect a wim image. , in other words - the main potential of the utility, we will study later. Don't switch.
DISM.exe is a new command-line tool that is included with both the installation version of the Windows 7 operating system and version 2.0 of the Windows Automated Installation Kit (Windows AIK).
Comment: Support for VHD files as Windows boot images is a new feature in Windows 7 and will be discussed in later articles in this series.
DISM.exe can be used to work with Windows images, as with Windows files image (WIM), and with virtual hard disks (virtual hard disk - VHD). Although the DISM.exe tool was originally designed to deal with broken Windows systems, its functionality also allows you to switch to working with running Windows operating systems. Working with images includes such operations as adding and removing device drivers, adding and removing operating system packages, adding patches, working with regional settings, and performing similar actions with images. DISM can also be used to upgrade a Windows image to another edition (for example, from Business to Ultimate), and to prepare a system image for use.
DISM is used to work with images of the following versions of Windows:
- Windows Vista SP1 or older
- Windows Server 2008
- Windows 7
- Windows Server 2008 R2
Using DISM
In Windows Vista (or when working with Windows AIK 1.1), imaging required several different tools. For example, you needed to install a separate device driver on the image created earlier from the main installation. To do this in Vista, you had to do the following:
- Mount image via ImageX
- Add device driver via Package Manager (Pkgmgr.exe)
- Disable image via ImageX
Also, if it was a Windows PE image, one would also have to use Windows tool Preinstallation Environment (PEimg.exe) to prepare the image. Finally, if you needed to change the culture of an image, you would need the International Settings Configuration Tool (Intlcfg.exe).
However, starting with Windows 7, the Pkgmgr.exe, Intlcfg.exe, and PEimg.exe tools that were present in Windows AIK 1.1 have been replaced by DISM.exe. Plus, DISM.exe includes the functions of connecting and disabling images.
It's likely common for DISM to add a driver to an offline Windows image instead of deploying the image to devices that require the driver. Let's take a look at this scenario to understand how to work with DISM through command line.
At the beginning, in the C:\Images folder of a computer with Windows AIK 2.0, there is a Windows 7 installation image (install.wim file):
C:\Program Files\Windows AIK\Tools\PETools>dir C:\Images
Directory of C:\Images
05/03/2009 12:46PM
05/03/2009 12:46PM
04/22/2009 07:28 AM 2,218,242,699 install.wim
1 File(s) 2,218,242,699 bytes
2 Dir(s) 180,411,486,208 bytes free
Comment: Remember, in Article 17 of the Vista Deployment series, I said that there are two types of Windows images: boot and install :)
Then, in the C:\Drivers folder, there are drivers for Windows 7 beta (version 2.91) for Microsoft devices lifecam:
C:\Program Files\Windows AIK\Tools\PETools>dir C:\Drivers
Volume in drive C has no label.
Volume Serial Number is 1C9A-D699
Directory of C:\Drivers
05/03/2009 01:19 PM
05/03/2009 01:19 PM
05/03/2009 01:19 PM
0 File(s) 0 bytes
3 Dir(s) 180,411,486,208 bytes free
We will mount our image to the empty folder C:\Servicing.. Let's start with the DISM.exe command with the parameter get-wiminfo to display a list of all Windows images contained in the install.wim file. Be aware that an installation image can contain more than one Windows image.
C:\Program Files\Windows AIK\Tools\PETools>dism /get-wiminfo /wimfile:C:\Images\install.wim
Version: 6.1.7100.0
Details for image: C:\Images\install.wim
Name: Windows 7 STARTER
Description: Windows 7 STARTER
Size: 7,927,317,234 bytes
Name: Windows 7 HOMEBASIC
Description: Windows 7 HOMEBASIC
Size: 7,983,232,406 bytes
Name: Windows 7 HOMEPREMIUM
Description: Windows 7 HOMEPREMIUM
Size: 8,422,988,972 bytes
Name: Windows 7 PROFESSIONAL
Description: Windows 7 PROFESSIONAL
Size: 8,303,245,818 bytes
Name: Windows 7 ULTIMATE
Description: Windows 7 ULTIMATE
Size: 8,461,373,562 bytes
Now suppose we are going to install Windows 7 Professional, in which case we see that image number 4 is just right for that purpose. Therefore, let's connect this particular image to the C:\Servicing folder using the parameter /mount-wim DISM.exe commands:
C:\Program Files\Windows AIK\Tools\PETools>dism /mount-wim /wimfile:C:\Images\install.wim /index:4 /mountdir:C:\Servicing
Deployment Image Servicing and Management tool
Version: 6.1.7100.0
The operation completed successfully.
To check if the image mounted successfully, you can use the parameter /get-mountedinfo, say, as follows:
C:\Program Files\Windows AIK\Tools\PETools>dism /get-mountedwiminfo
Deployment Image Servicing and Management tool
Version: 6.1.7100.0
Mount Dir : C:\Servicing
Mounted Read/Write: Yes
The operation completed successfully.
If we check the contents of the C:\Servicing directory, we can see the folders and files of the mounted image:
C:\Program Files\Windows AIK\Tools\PETools>dir C:\Servicing
Volume in drive C has no label.
Volume Serial Number is 1C9A-D699
Directory of C:\Servicing
04/22/2009 03:36 AM
04/22/2009 03:36 AM
03/20/2009 10:42 AM 24 autoexec.bat
03/20/2009 10:42 AM 10 config.sys
04/22/2009 01:17 AM
04/22/2009 05:26 AM
04/22/2009 03:27 AM
04/22/2009 05:29 AM
2 File(s) 34 bytes
6 Dir(s) 180,321,382,400 bytes free
Now let's look at what actions we can perform with the connected image:
C:\Program Files\Windows AIK\Tools\PETools>dism /image:C:\Servicing /?
Deployment Image Servicing and Management tool
Version: 6.1.7100.0
Image Version: 6.1.7100.0
The following commands may be used to service the image:
WINDOWS EDITION SERVICING COMMANDS:
/Set-ProductKey - Populates the product key into the offline image.
/Get-TargetEditions - Displays a list of Windows editions that an image can be upgraded to.
/Get-CurrentEdition - Displays the editions of the specified image.
/Set-Edition - Upgrades the Windows image to a higher edition.
UNATTEND SERVICING COMMANDS:
/Apply-Unattend - Applies an unattend file to an image.
DRIVER SERVICING COMMANDS:
/Remove-Driver - Removes driver packages from an offline image.
/Add-Driver - Adds driver packages to an offline image.
/Get-DriverInfo - Displays information about a specific driver in an offline image or a running operating system.
/Get-Drivers - Displays information about all drivers in an offline image or a running operating system.
INTERNATIONAL SERVICING COMMANDS:
/Set-LayeredDriver - Sets keyboard layered driver.
/Set-UILang - Sets the default system UI language that is used in the mounted offline image.
/Set-UILangFallback - Sets the fallback default language for the system UI in the mounted offline image.
/Set-UserLocale - Sets the user locale in the mounted offline image.
/Set-SysLocale - Sets the language for non-Unicode programs (also called system locale) and font settings in the mounted offline image.
/Set-InputLocale - Sets the input locales and keyboard layouts to use in the mounted offline image.
/Set-TimeZone - Sets the default time zone in the mounted offline image.
/Set-AllIntl - Sets all international settings in the mounted offline image.
/Set-SKUIntlDefaults - Sets all international settings to the default values for the specified SKU language in the mounted offline image.
/Gen-LangIni - Generates a new lang.ini file.
/Set-SetupUILang - Defines the default language that will be used by setup.
/Get-Intl - Displays information about the international settings and languages.
APPLICATION SERVICING COMMANDS:
/Check-AppPatch - Displays information if the MSP patches are applicable to the mounted image.
/Get-AppPatchInfo - Displays information about installed MSP patches.
/Get-AppPatches - Displays information about all applied MSP patches for all installed applications.
/Get-AppInfo - Displays information about a specific installed MSI application.
/Get-Apps - Displays information about all installed MSI applications.
PACKAGE SERVICING COMMANDS:
/Add-Package - Adds packages to the image.
/Remove-Package - Removes packages from the image.
/Enable-Feature - Enables a specific feature in the image.
/Disable-Feature - Disables a specific feature in the image.
/Get-Packages - Displays information about all packages in the image.
/Get-PackageInfo - Displays information about a specific package.
/Get-Features - Displays information about all features in a package.
/Get-FeatureInfo - Displays information about a specific feature.
/Cleanup-Image - Performs cleanup and recovery operations on the image.
For more information about these servicing commands and their arguments,
specify a command immediately before /?.
DISM.exe /Image:C:\test\offline /Apply-Unattend /?
DISM.exe /Image:C:\test\offline /Get-Features /?
DISM.exe /Online /Get Drivers /?
The options we want to use are under the DRIVER SERVICING COMMANDS line (see above). Let's use the parameter /get drivers to display a list of drivers already installed in the mounted image:
C:\Program Files\Windows AIK\Tools\PETools>
Deployment Image Servicing and Management tool
Version: 6.1.7100.0
Image Version: 6.1.7100.0
Driver package listing:
Published Name: oem0.inf
Class Name: Printer
Provider Name: Microsoft
Version: 6.1.7100.0
The operation completed successfully.
Now we use the parameter /add-driver to add the LifeCam driver to our mounted image:
C:\Program Files\Windows AIK\Tools\PETools>dism /image:C:\Servicing /add-driver /driver:C:\Drivers\VX6000\vx6000.inf
Deployment Image Servicing and Management tool
Version: 6.1.7100.0
Image Version: 6.1.7100.0
Found 1 driver package(s) to install.
Installing 1 of 1 - C:\Drivers\VX6000\vx6000.inf: The driver package was successfully installed.
The operation completed successfully.
Now let's use again /get drivers to check if the LifeCam driver has been successfully added to the mounted image:
C:\Program Files\Windows AIK\Tools\PETools>dism /image:C:\Servicing /get-drivers
Deployment Image Servicing and Management tool
Version: 6.1.7100.0
Image Version: 6.1.7100.0
Obtaining list of 3rd party drivers from the driver store...
Driver package listing:
Published Name: oem0.inf
Original File Name: prnms001.inf
Class Name: Printer
Provider Name: Microsoft
Version: 6.1.7100.0
Published Name: oem1.inf
Original File Name: vx6000.inf
Class Name: Image
Provider Name: Microsoft
Version: 5.5.3.74
The operation completed successfully.
Now we finish working with the image and disable it:
C:\Program Files\Windows AIK\Tools\PETools>dism /unmount-wim /mountdir:C:\Servicing /commit
Deployment Image Servicing and Management tool
Version: 6.1.7100.0
Image File: C:\Images\install.wim
[==========================100.0%==========================]
unmounting image
[==========================100.0%==========================]
The operation completed successfully.
Additional Resources
For more detailed information about DISM dial dism/? at the Deployment Tools command line on your computer. Same detailed information about DISM.exe can be found in the section Deployment Tools Technical Reference Windows guides Automated Installation Kit User's Guide (WAIK.chm), which can be accessed by clicking Start | All Programs | Microsoft Windows AIK on your computer.
Finally, check out free e-learning Clinic 10077: What's New in Windows 7 for Professionals in the Windows 7 Learning Portal section of the Microsoft Learning website. I was involved in the development of these three materials, and the pro material even has a short video demonstration of using DISM to add a driver to an image.
Dism++ was originally developed as a command-line graphical Deployment Image Servicing and Management (DISM) control panel. However, the application offers much more than creating and managing system images. In fact, Dism++ is a comprehensive set of various tools for cleaning and optimizing the operating system, managing startup, drivers, updates and Windows components, as well as processing Windows images.
Key features of Dism++
Disk Cleanup and App Startup Settings
Dism++ does not require installation, just run the program's executable file. The main window contains a simple navigation menu that organizes quick access to all program functions.
Cleanup is the first tool on the list. It shows which files can be deleted and how much disk space they take up. The user can delete search history, update installation history, system and program crash dumps, temporary files, system cache, and Microsoft Store service data.
Dism++ includes a startup manager to help you decide how applications and commands should run on Windows after the OS boots.
Manage system images and create WIM backups
If you require image management tools, they can be found in the Advanced section. You can convert ESD images to ISO or WIM format, edit Windows image files, and compile individual files into an ISO image.
However, not all tools on this page are related to image files. You can also find the tool here Reserve copy and restore a system that works with WIM images. Also on the “Advanced” page you can find an account manager, a boot repair utility, and a tool to run any command in God mode.
System optimization and tuning
Dism++ can also act as a system optimization tool. The application allows you to change many settings in Windows Explorer, Windows updates, network, services, or other areas of the OS. In addition, Dism++ can manage installed drivers, application associations, Windows features, and updates.
Powerful system maintenance and tuning tool
Dism++ is by no means an exhaustive set of tools. Although advanced users will find the program very useful because it offers several tools in one place, the way these functions are organized is not the most convenient.
Obviously, Dism++ needs further improvements, but already now the program can help those who want to clean and optimize the system or create backup. Dism++ is not just a GUI for DISM, it is a powerful system tuning tool for any Windows user.
The newly introduced "dozens", we will talk about the useful functionality of the most popular Windows 7, taken from the arsenal of Windows 8, namely, the restoration of damaged components with the participation of a console utility DISM.exe. Moreover, this functionality is not the newest, but completely deprived of the attention of all Russian-speaking IT-resources. About the reasons and, in fact, about the very Deployment Image Servicing and management(eng. "system for servicing and managing deployment images", DISM) see the short note below.
It's simple: the option appeared exactly a year ago with the release of the update KB2966583, about which literally a couple of words were said in the announcement, which became, due to dislike for FAQ-am, the reason for the silence of "native land" ("pioneer" DISM for Windows 7 - blogger Vadim Sterkin). Well, let's fill in the gap in the education and opportunities of our beloved "seven", but first, in one paragraph about why all this is needed.
Starting with Vista, Windows deployment and maintenance is built around components and packages defined by manifests (screenshot). In directory C:\Windows\winsxs all files of the operating system are located, including previous versions - this is component store Windows. AND package repository represented by a folder in the system C:\Windows\servicing\Packages where you can see available packages and their manifests. Revealing what has been said plastic bag ohm can be a fix for the OS or a driver, and manifesto there is a text XML-file where definitions for components and deployment items are defined. Due to the fact that the practice of system updates is a necessary thing, and the most common reason for an update to fail is damage to the voiced storage, the utility DISM.exe is real" lifesaver" with such bugs. After the initiation of KB2966583, all users of the "seven" can evaluate today's heroine in action, because earlier this required a separate solution CheckSUR(Check for System Update Readiness), which is not correct.
Working with DISM.exe
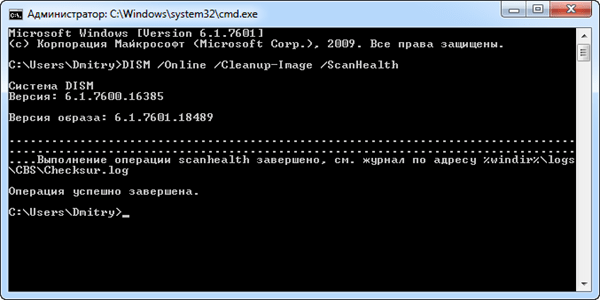
Again, everything is simple: from under account administrator (if you are the only Windows user, then there is nothing to worry about) run the command line (" Start" → cmd in the search field → " Enter") and enter, with confirmation, the command DISM /Online /Cleanup-Image /ScanHealth → waiting for the end of the process (screenshot) → results of the work DISM be sure to check out the address C:\Windows\Logs\CBS in file checksur.log. The presence in the log of a critical number of problematic components will be a signal to look for a flash drive (disk) with a Windows image or download the necessary recovery package SystemupdatereadinessTool.

Ideally, you should see the text ("No errors detected") as in the screenshot above, which is what I wish everyone. And this is all that any more or less experienced Windows user needs to know on the topic.
Note: Owners of a PC running a later "eight" to broaden their horizons can read the article " DISM command-line options for servicing operating system packages"from Microsoft MSDN-libraries.
To create your own distribution, it is not necessary to capture a prepared system, the kit WAIK gives us another opportunity - work directly with ISO image ohm installation disk, in Microsoft terminology, this kind of images is called: offline image. This tool is called DISM ( Deployment Image Servicing and Management) it allows you to deeply modify the Windows image, add drivers there (one file or a whole collection), turn on / off various system components, add OS update packages, as well as language packs and a bunch of everything else, in general, we can “saw” the distribution quite deeply Windows OS. By the way, WAIK allows you to serve distributions of Windiows 8 / 2012
Another option is also possible, you already have a customized image that you got after capturing, you can read about how it is created in the article: everything suits you in it, but there is a problem, newer equipment has arrived, and drivers that are already are present in the image, do not fit the new hardware, respectively, the equipment does not work at full capacity. In this situation, it is enough for us to find out the configuration of the new hardware and to the existing image, just add drivers, and if the image was created a long time ago, then update packages, otherwise our image is not safe, but according to the recommendation "the best dog breeders", from Microsoft, our image must be secure, and contain the latest security updates, at the time of deployment ...
If you think logically, then in the office network, over time, "motley" workstations will appear, this may be due to the growth of the company or the planned replacement of obsolete equipment with a new one, or simply by different suppliers or batches of equipment, in any case, the idea of you can forget about uniform equipment and don’t even count on it, believe my experience in a company that employs almost 14,000 people in the Russian Federation, with equipment there is a complete zoo, so you may need to add drivers, updates, etc. to the finished image . The ideal option is a single point of service, which will be our installation image, we can add drivers to it as new technology becomes available.
To be honest, this software is quite difficult to understand, but having mastered it, you will get a powerful tool for maintaining and tuning MS Windows distributions. In principle, you can safely open “your” MSDN, provided that your images are assembled with high quality, well, for one thing, raise the “pirate flag”, but this is true, the lyrics ...
All actions are performed from the command line, on the one hand, this is a big plus, on the other hand, a disadvantage. modern people have brought their “button-pressing” reflex to such heights that the speed of working with a mouse just rolls over, but the sight of a black command line field and a blinking cursor causes a nervous tic and personal dislike for those who came up with it.
IMPORTANT-The article will be divided into several points, each of them is optional, you are free to choose whether to complete all the points or only some that you need, in any case, the image will work!
All actions will be carried out using Windows 7 Professional amd64 as an example, but all commands are also relevant for Windows 8 / 2012 / 2008 / 2008R2 distributions
For work we need:
1) Windows 7 installation disk (edition and bit depth, it doesn’t matter, for example, the x64 architecture will be used), you can download from torrents or from MSDN- who has access to the subscription. In this work, I will use a pure MSDN image, I do not recommend taking an image that someone has already redone, it’s not a fact that you will succeed with it, so in order to understand the principle of work, take an ISO file from Microsoft, it’s direct - like crap in flight...2) The WAIK (Windows Automated Installation Kit) installation disk can be downloaded from the Microsoft website, as well as an additional package for proper operation with OS with SP1.
3) The physical machine, with Windows 7 on board, the bit depth and edition of the OS does not matter, but the edition starter it is better not to use it, with enough free space on the C drive - there should be at least 25GB free (just in case).
4) A set of drivers and updates that will be installed in the system.
It is assumed that all this has already been downloaded and is on the disk; we do not need the Internet to configure the image.
To work, we need to create the necessary directories on drive C.
We will work with the system image in the folder dism, I named it so specifically to make it clear what it is for (the folder name does not affect anything) the only condition is not to assign a name to the folder in Cyrillic, in order to avoid problems, also, inside this folder, we will create a whole bunch of other folders, their purpose is me I'll tell you in the course of the article:
We will work on the command line, yes, Windows, like Linux, allows you to do this, and like Linux, many tasks like this are better done from it. mouse is too long, although in Linux, the command line is more functional.
Launch a command prompt as administrator and run the following in it:
mkdir c:\dism mkdir c:\dism\iso mkdir c:\dism\offline mkdir c:\dism\updates mkdir c:\dism\drivers mkdir c:\dism\drivers\network mkdir c:\dism\drivers\ mainbord mkdir c:\dism\drivers\sound mkdir c:\dism\drivers\video
Now, we need to copy the contents of the entire installation Windows disk, to a folder c:\dism\iso as it is.
Also next to the folder iso there is a folder offline it will mount the file install.wim which we will work with.
Let's not pull the cat for the "causal place" and mount the image install.wim which, if you copied everything correctly, should be on your path:
c:\dism\iso\sources\install.wim
Let's go: Start->All programs ->Microsoft Windows AIK ->Deployment tools command line run it as administrator
The disk may contain several editions of the operating system, we are interested in Windows 7 Professional, it all depends on what serial number you enter.
We get a list of OS from the disk:
dism /get-wiminfo /wimfile:c:\dism\iso\sources\install.wim
We are interested in the OS image with index 3. (circled in red in the screenshot)
In the window that opens, enter and press Enter:
dism /mount-wim /wimfile:c:\dism\iso\sources\install.wim /index:3 /mountdir:c:\dism\offline
Where:
dism- what we launch to work
/mount-wim-what we want to do, in our case, mount wim file.
/wimfile:c:\dism\iso\sources\install.wim-the path to the file install.wim
/index:3-in file install.wim may contain several images of operating systems, we will take the third one from the list.
/mountdir:c:\dism\offline- folder where the file will be mounted install.wim
The system will give something like: 
After successfully connecting the image, the contents of the file install.wim you can see it in the folder c:\dism\offline
If you look there, you will find there, nothing but the contents of the C drive, for the lazy I will attach a screenshot: 
1-Adding hardware drivers to the system
At the beginning, when we created a bunch of folders, we had a folder called drivers, and in it there were various subfolders like mainbord, sound, network, so they are just designed to store drivers. Sound driver, we drop it into the sound folder, and the drivers network equipment to the network folder - everything is simple, etc. in principle, you can dump everything in one heap, the main thing is that files with the same names do not overwrite each other, but it’s better to get used to order right away and then in a few months you can easily figure out where everything is, what can be deleted, and what should be left, and Now, if everything is in a heap, then this is already problematic, so the recommendation is quite simple and banal - Do it normally, it will be fine!DISM allows you to add drivers in 2 modes
1) By file - when you explicitly specify which file to download
2) Recursively, when the software itself examines the folder and nested subfolders and adds all found driver files to the image.
Frankly speaking, adding files by file is for “aesthetes” or if you need to add only one file to an already finished image. But we are "drinking" with you clean system and it is assumed that there is nothing in it, so we will add them recursively.
At the command line, enter:
dism /image:c:\dism\offline /add-driver /driver:c:\dism\drivers /recurse
It happens that you need to add drivers that do not have digital signature, then the command becomes:
dism /image:c:\dism\offline /add-driver /driver:c:\dism\drivers /recurse /ForceUnsigned
The system will think a little, then it will display the following: 
2-Add updates to the image
Next, suppose that your image is out of date and you decide to add service packs to it. But the main question is where to get updates ?!They can be taken from a running system, all files with the extension .cab are our target they can be found at C:\Windows\SoftwareDistribution\Download, if WinRAR is installed, then it highlights them as archives, so we will collect them. All updates are applied in the order in which you specified, so try to specify them in ascending order of numbers.
Option number 2, updates can be downloaded from the Microsoft website so as not to go through the "fascinating quest", here's a link for you that works through IE.
At the beginning of the article, we created a folder:
mkdir c:\dism\updates
We put the update files into it, for example, I have 2 files, I will arrange them in numerical order:
KB2574819.cabLet's apply the updates to our image:
KB2592687.cab
dism /image:c:\dism\offline /Add-Package /PackagePath:C:\dism\updates\KB2574819.cab /PackagePath:C:\dism\updates\KB2592687.cab
Where:
/PackagePath:C:\dism\updates\KB2574819.cab- specify the path to the update file
From the system we get: 
Problem number 1. Some updates do not want to install without other updates, therefore, dependence on this can become a serious problem, but you can always look at the Microsoft website which update depends on which.
Problem number 2. You don't have update files as files *.cab, but is in the form of files *.msu, the problem is not complicated, the files can be unpacked using expand -F:*-how to use this utility, will be your homework!
3-Enable/disable operating system components
Sometimes it is required to enable system components that are disabled by default, for example, a telnet client, I need it quite often for work, therefore, in the image, using its example, we will enable it.To begin with, we will execute a request for a list of all components, it is quite large, so we will redirect it to a file, and you can safely read it in the file.
We get a list of packages and redirect it to text file:
dism /image:c:\dism\offline /Get-Features > c:\dism\Featurelist.txt
Where:
dism /image:c:\dism\offline-referring to our connected image
/Get-Features- request for a list of system components
> c:\dism\featurelist.txt- redirecting the output to a file, which we call Featurelist.txt, and the path to it c:\dism\Featurelist.txt
Go to the list of system components, open the file:
c:\dism\Featurelist.txt
And at the output we get "krakazyabry" of which you can only make out the Latin alphabet, and even then not all of it. The problem is not big, in notepad we go to Format-Font choose a font Terminal and, voila, all content becomes readable.
We find the TelnetClient component in the list, it is marked as disabled:
Feature Name: TelnetClient State: Disabled
Let's try to enable it, enter:
dism /image:c:\dism\offline /Enable-Feature /FeatureName:TelnetClient
The system will think a little and give: 
All component included.
How to disable a component:
For example, let's try to disable the component, we already have a list of components, we find the component there Solitaire Yes, this is the same “Selitor” that employees love so much and “effective managers” hate so much, because he steals working time - a real scoundrel, he must die ...;)
dism /image:c:\dism\offline /Disable-Feature /FeatureName:Solitaire
The system will think a little, though the system removes the component faster than it adds it, it’s understandable, breaking is not building ... 
Final part
The work with the image is completed, we need to save the changes and unmount the image:dism /Unmount-Wim /MountDir:C:\dism\offline /Commit
The process of saving changes will start, it takes about 1-2 minutes, after which, we will be given something like this: 
If you forgot something, then the image can be easily connected again and added the necessary one.
Now we need to collect, from the received, the image of the installation disk.
Our resulting distribution lies in c:\dism\iso the only problem is that it is not bootable, in principle this is not a problem and we will now assemble a full-fledged ISO image from it, which, later, can be cut into a DVD-R disc.
Building a Windows installation disk image (ISO)
Because operating system files are in the folder:c:\dism\iso
Then we will name the resulting ISO image windows.iso and put it in:
c:\dism\
Then the path to it will look like:
c:\dism\windows.iso
To make the image bootable, we need some files that come with WAIK. Our operating system image has x64 architecture, then we need an appropriate bootloader.
in folder Dism create a folder boot, but you don’t need to create it manually, it will be created automatically when copying, open the command prompt as administrator and write there:
Let's go to the utilities folder:
cd c:\Program Files\Windows AIK\Tools\PETools
And we copy the utilities for the architecture we need:
copype.cmd amd64 c:\dism\boot
For one thing, let's add a memory test to our disk, it won't take up much space, and in case of unknown problems, it will make life much easier
copy c:\Windows\Boot\PCAT\memtest.exe c:\dism\boot\ISO\boot
Now we return to the command line where we worked with DISM and enter there:
oscdimg -n -m -o -bc:\dism\boot\etfsboot.com c:\dism\iso c:\dism\windows.iso
The assembly of the image will begin, after which, in the folder dism file will appear windows.iso, this is our ready-made distribution kit, which can be cut into a blank or connected to virtual machine and enjoy.
The build process looks like this: 
Alternative use of the image
It is not necessary to cut the disc, you can always assemble an installation USB flash drive from this, you can read about how to do this in the article:, for me, this is the most suitable option, because. burning plastic for the sake of one time, I think it’s not right, and all the equipment that has been released over the past 3-4 years supports booting from USB.
It remains on your conscience to test what we have done...
On this optimistic note, let me finish, well, as always, if you have any questions, please in the comments, if you find a mistake, then write in a personal.
That's all.