Generations of computers
On the path of development of computers, five generations of computers with program control can be distinguished, differing in the element base, constructive and technological design, logical organization and software.
Each generation is characterized by an element base, constructive and technological design, logical organization and software.
First generation. The first generation computers were created on the basis of electron tubes. Industrial production was mastered in the early 50s of the twentieth century. Computers were large, expensive and unreliable. For the input - output of information, punched tapes and punched cards were used. Software was missing.
Second generation. Computers of the second generation were created on the basis of transistors. Their overall weight characteristics have significantly improved, and power consumption has decreased. Computers appeared to solve economic problems. Algorithmic languages have been greatly developed. Magnetic tapes and magnetic drums were used to store information.
third generation. computers are characterized wide application integrated circuits that have replaced transistors and most discrete parts. Thanks to integrated circuits, it was possible to significantly improve the technical and operational characteristics of computers. Operating systems appeared that provided control of work in batch processing, time sharing, request-response and others.
fourth generation. For computers of this generation, the use of large non-separable integrated circuits (LSI) is typical. A high degree of integration contributed to an increase in the density of the electronic equipment layout, an increase in its reliability and speed, and a decrease in cost. Device characteristics have been significantly improved. The capacity of the OP increased to 64 MB, which made it possible to work in local and global networks, process photographic images or videos.
The active element of the first generation of computers was the vacuum tube. In 1948, transistors appeared, which completely replaced electronic tubes as computer elements, and from 1953 the period of the second generation of computers began. The third generation of computers (since 1962) is characterized by the widespread use of integrated circuits. An integrated circuit is a complete logical functional unit that has replaced a large number of transistors and other computer components. These components and bonds between them are formed in one crystal. The fourth generation began to be developed in 1970. This generation of machines is characterized by the use of large integrated circuits (LSI). One LSI contains several thousand circuits equivalent to a separate integrated circuit.
The table shows the generalized characteristics of four generations of computers.
RAM capacity - the number of words that are simultaneously stored in memory.
A word is usually 4 bytes. Byte - 8 bits. Bit - 1 binary digit, which stores either the digit 0 or the digit 1.
The history of the appearance of the first PC
In 1970, an integrated circuit was designed in terms of its functionality similar to a computer processor. This circuit is called a microprocessor.
In 1974, based on the microprocessor, the first Personal Computer(PC), which performed the same functions as the EMW, but was intended for one user.
3.4. PC design
Depending on the design, there are three types of PCs: desktop, notepad (laptop) and pocket.
Consider the main blocks of a desktop PC.
System unit. Inside system block located:
The system (motherboard) board that houses the processor, RAM, cache memory, ROM and controllers of some devices;
Drives for floppy and hard magnetic disks;
Power Supply;
Additional devices for input and output of information that can be located inside or outside the PC.
Keyboard.
Operating system Windows
Basic information
operating room Windows system provides a large number of features and conveniences for users and programmers by virtue of an extremely user-friendly windowed graphical user interface (Graphics User Interface, GUI).
In the GUI, each running program is assigned a window, which can take up part of the screen or the entire screen. All GUI components are largely standardized. Almost every window contains a window title bar, elements for resizing it and moving around the screen with the mouse. When working in a Windows environment, there are three types of windows. Some windows can be ""collapsed"" into icons (icons). There can be several windows on the screen at the same time, but at any given time only one of them is active (usually the title is highlighted in bright blue), and all other windows are inactive (the title is pale blue).
In 1992, the Windows 3.1 system appeared and from that moment on, Windows is officially referred to as the operating system. Different versions of Windows are currently in use: Windows 95, Windows XP, Windows 98, Windows 2007 and others. Versions differ in their functionality.
After loading and initializing the Windows operating system, the initial Windows window appears on the monitor screen, which is shown in the figure. At the bottom of the window is the Taskbar with the Start button. The rest of the window area is reserved for the desktop.
There are icons (icons) of objects on the Desktop. Each icon corresponds application program, data file, or directory. Each object has its own context menu, which can be called by clicking right click mouse over the object.
The desktop is the oldest object in Windows. The desktop contains windows for Windows programs, windows for documents being processed, windows for queries, and so on.
Task bar
The taskbar has a special status, it does not obey the Windows object hierarchy
The taskbar is the most important object of the Windows graphical interface. When loading any Windows program, an icon (icon) corresponding to this program appears on the taskbar, which disappears when the program ends. The program icon remains in the taskbar line if the program window is temporarily "minimized". You can restart the "curtailed" program by clicking on the icon. In addition, the taskbar may contain a clock, keyboard layout, and indicators for various modes.
By default, the taskbar is located at the bottom of the screen and windows of Windows programs do not overlap it, but the user can customize the taskbar to his liking: place it on any edge of the screen, make it pop up, remove the clock, and so on.
Context menus Windows objects
The context menu of various objects contains different commands, but there are commands that are repeated in the context menu of any object.
Figure 4 shows the context menus for the following Windows objects.
First row from left to right:
Task bar;
Desktop.
Second row from left to right:
Windows program;
Catalog;
Document.
The Properties of Different Objects command window can contain different information and provide different options. Usually, the properties window of a directory or file displays information about the name, size, and date of creation, in addition, it is possible to change the attributes of the object.
The context menu of the Desktop object allows you to change background picture, a set of sounds, icons and other elements of the Desktop. All these changes can be made by selecting the Properties command from the Desktop context menu. For example, to change the desktop wallpaper, open the Properties command, select the Desktop tab, and then select the wallpaper.
The context menu of the Taskbar object allows you to change the location of the Taskbar on the screen. In the context menu of the Taskbar, the checkbox in the line Lock the taskbar is checked, which should be unchecked and then moved with the mouse to any side of the screen.
Main menu
On the line Taskbar is the Start button, pressing which opens the Main menu of the Explorer shell. The main menu contains commands for accessing programs, documents, system Windows help etc. Among the main menu items there is the Programs item, which, when activated, opens a hierarchical menu of available application and utility programs. The Programs menu contains the Standard, Explorer, and so on items (see figure).
in number Standard programs includes programs selected by Windows installation:
The Explorer item window displays the hierarchical structure of files, directories and drives on the PC.
Conductor
Any directory can be opened in an Explorer window. You can open the Explorer window by the context menu command (Open) or by clicking the mouse, placing it on the Explorer directory.
Explorer simultaneously displays the contents of the current (that is, selected) directory and the structure of the entire directory tree, so it is more convenient for copying and moving files and directories by dragging and dropping with the mouse. Figure 5 shows the Explorer window. The window consists of two panels. The left panel displays objects (Desktop, My Documents, My Computer, disks, directories), and the right panel displays the contents of the current (selected) directory (folder). The symbol ""-"" (minus) to the left of the object's icon means that the left panel displays all registered subdirectories in it. The ""+"" (plus) symbol to the left of the object's icon means that the object has subdirectories, but they are not displayed in the left pane. If there is no sign to the left of the object's icon, then it has no subdirectories.
Window types
When working in a Windows environment, the screen may display three window types:
Windows program window (Windows applications);
A secondary window, that is, a window that a Windows program creates;
A query window, also known as a helper or dialog box.
Some components of the window interface are standardized for all types of windows, but there are components that are specific to a particular type of window.
Any window is a rectangle of a certain size.
You can only resize program windows and secondary windows, to do this, set the mouse pointer to one of the window borders (the mouse pointer turns into a double-sided arrow), press left button mouse and holding it to move the border.
You can expand the window to full screen (or return it to its original size) by double-clicking on the Title bar.
Windows program window components
Consider the components of the window interface using the example program Microsoft Word(see picture).
The top line of the window contains a title with the name of the program and the name of the document currently being edited in the window. Until the document is saved to a file, it is called Document1. The title bar is used to move the window, by placing the mouse pointer on it and holding the left mouse button, you can drag the window.
There are three buttons on the right side of the header: minimize to icon, minimize or maximize the window, and close.
On the left side of the header there is a button with the program icon - a button of the system (or window) menu, the commands of which practically duplicate the actions of the buttons located on the right side of the header.
Below the title is the menu bar. To work with menu items, place the mouse pointer on the desired item and click the left button, after which a list of commands for the selected item will open.
Conventions encountered when working with the menu:
Let's look at the elements of the Windows program window that can be added, removed, and moved in the window. Such elements are numerous toolbars, vertical and horizontal scroll lines, and a status bar.
Toolbars can be added different ways, for example, click on the View menu item, then select the Toolbars command and check the boxes desired panels. In the figure below the menu bar, the Standard and Formatting toolbars have been added, while the Drawing and WordArt panels have been "hung" in an arbitrary place in the window.
You can place the status bar at the bottom of the Windows program window.
The status bar usually displays information about the current state of the program and document, as well as various indicators.
Text scroll bars can be placed on the right and bottom sides of the Windows program window, which allow you to move through the document text on the screen with the mouse.
To add a status bar and scroll bars to the window, select the Tools menu item, then the Options command, open the View tab and check the boxes in the status bar, horizontal and vertical scroll bars.
Window interface of programs from the Standard group
The figure shows the first two lines of the window interface of three Winlows programs: Paint, WordPad and Notepad.
The top of each window contains a title bar with the name of the program and the name of the document currently being edited in the window. Documents being edited have not yet been saved to a disk file.
Below the title is usually the program's menu bar. Classic menu Windows programs - drop-down.
The presented programs are designed to edit some data, so the menu bar must have the File and Edit items.
Each program allows you to access the Windows help system (Help item).
secondary windows
Windows that are created by Windows programs are called secondary windows. For example, in the window Microsoft Excel the secondary windows Book1, Book2 and so on open, in the Microsoft Access window the secondary windows db1: database, db2: database and so on open. Secondary window components are different from program window components.
In the program window, the Title line displays the name of the program (Microsoft Excel, Microsoft Access), and the Title line of the secondary windows displays the document name (Book1, db1: database).
There is no menu bar in secondary windows. In secondary windows, as in program windows, there are three buttons in the Title bar (minimize to icon, minimize/maximize to window, close window), but the ""minimize to icon"" button places the secondary window icon at the bottom of the program window, and not in the Taskbar line.
Microsoft Word, WordPad, Paint, and Notepad do not create Title lines in a window open document and the name of the document is displayed in the Program Title line, for example: Document1-Microsoft Word, Document-WordPad, Unnamed-Paint, Unnamed-Notepad.
Thus, there are no buttons to minimize to an icon, minimize / maximize the window, close the secondary windows of these programs. The exception is the secondary window Microsoft programs Word, which has its own close button (black cross) and it is located under the close button of the Microsoft Word program.
Query windows
While the program is running, informational or warning messages may be displayed, or it may be necessary to enter the values of some parameters. When such situations occur, Windows displays the appropriate prompt window ( dialog boxes, auxiliary windows). A query can be simple (for example, informational) or complex with buttons, checkboxes, radio buttons, and fields. Query windows always appear on top of other windows. Further work is not possible until the request is answered and the request window is closed.
Query windows differ significantly in their components from other types of windows. As a rule, in the title bar (if there is a title) there is only one button - Close. Some queries have a system (window) menu button. The query window can be moved around the screen with the mouse, but the query window cannot be resized.
Simple Queries
Simple queries usually display one or more buttons (see Figure 6).
First request - two buttons, second request - three buttons.
User actions - select one of the buttons and only after the query window closes, you can continue working.
Some simple queries may display a button to access the directory.
Complex Queries
In complex queries, besides buttons, there may be other elements (see table).
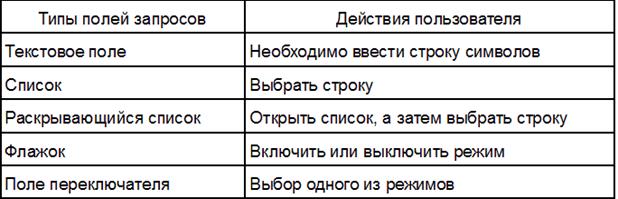
Figure 7 shows complex queries to demonstrate the types of fields that can be found in queries. Consider the queries (top to bottom and left to right):
 Fig.7
Fig.7
Checkbox field, in the request next to the inscription there is a box (empty or with a checkmark), a checkmark indicates that the mode is enabled;
Switch field, in the request, next to the inscription, a circle (empty or with a dot), the dot corresponds to the inclusion of the selected mode;
Text field for entering characters from the keyboard;
List of possible values, only one line can be selected in the list;
Drop-down list, the field shows only one value, and to the right of the value there is a button with a down arrow, which you need to click with the mouse to open the entire list.
The context menu (sometimes called the right-click menu or object menu) is a small menu that appears when you use the right mouse button to click on a file, folder, application title bar, or just about any other object on the screen. In most cases, this menu contains a list of actions specific to the object you clicked on. In other words, the available options depend on the context.
The context menu for the files shown in fig. 3.16, is a set of standard actions applicable to all files (for example, Copy (Copy), Paste (Paste), Delete (Delete), Rename (Rename) and Properties (Properities), plus one or more special actions depending on the type of file Each of these actions is application-specific: if you right-click on a .txt file and select Open, Windows launches Notepad (the default) and instructs Notepad to open the selected file.The default action is the action that is performed when you double-click on a file, - is highlighted in bold in the context menu, and the rest of the actions are listed below.By the way, this means that you can have more than one program associated with this type of file.
For example, for .html files, you can add an Edit action to open your favorite web page editor, a View with Firefox action, and a View with Internet Explorer- all this in addition to the default Open action. To see how this works, see the next sidebar, "Copying the Contents of a File to the Clipboard."
Figure 3.16. Right-click on a file to see its context menu; in Windows 7, it is not very easy to customize the elements that are displayed here
COPYING THE CONTENT OF A FILE TO THE CLIPBOARD
Here's a tingly example of how to add a custom context menu to a file type using a little-known new toy in Windows 7 called clip.exe. This program command line, which copies text to the clipboard and, by coincidence, works well with text files.
Open registry editor and navigate to HKEY_CLASSES_ROOT\.txt. Look at the (Default) value in the right pane for the name of the file type section (usually txtfile).
Navigate to the file type section (for example, HKEY_CLASSES_ROOT\txtfile) and open the shell subkey (HKEY_CLASSES_ROOT\txtfile\shell). Create a new section inside the shell called copycontents. Open a new section, click the (Default) value, enter Copy Contents to Clipboard as the value data, and click OK.
Then create a section called command inside the copycontents section. Open a new command section and set it to Default cmd. exe /c clip
To test how this works, right-click on any .txt file in Explorer and select Copy Content to Clipboard. (If the new entry isn't there, you may have placed the new registry keys in the wrong place.) You can verify that the contents of the file have been copied to the clipboard by pasting it into an empty Notepad window.
You can use the Clip utility to copy just about anything to the clipboard. For example, to copy the name of the selected file, enter these values (Default) in the command section: cmd.exe /c echo%l | clip
Open a command prompt window and type clip /? to see the commands for this tool.
Sounds great, doesn't it? Unfortunately, in Windows 7, the File Types window is completely missing - a tool from earlier Windows versions, which allows you to edit Explorer's context menus. Instead, it offers an extremely simplified Set Associations window, shown in Figure 1. 3.17. Here, you can only select default applications for various file types and in doing so, clear your applications' defaults or any custom context menus you've created (more on that later).
So, if you want to customize your context menus, there are two options left: either hack the registry, or use third party program. Given that this chapter is about the registry, let's have a little fun digging into sections and values.
There is a section in the registry called Shell, which is where everything happens. Each Shell subkey corresponds to one action on the file's context menu.
The text that appears in the context menu is determined by the value of the action section (Default); if the value is empty, Explorer uses the section name (for example, Open). Unfortunately, Windows 7 has two competing systems that define the default actions for file types; for getting detailed information see the sidebar “The Evil of UserChoice Overrides” on page 169.
Let's say you right-click on Microsoft document Excel (.xlsx file), and at the top of the menu that appears, you see Open (Open), New (New), and Print (Print). If you open the registry you will see that HKEY_CLASSES_ROOT\. xlsx points to HKEY_CLASSES_ROOT\Excel. sheet. 12. Navigate to HKEY_CLASSES_ROOT\Excel.Sheet. 12\Shell. Inside the Shell section, you will see three subsections - you thought so - New. Open, and Print Add a new subkey to the Shell, followed by the subkeys shortly described, and you will get a new entry in the context menu for all files of the selected type.
THE EVIL OF USERCHOICE REDEFINITIONS
If you right-click on a file, select Open with (Eagle With) and then select the default application ~ or if you use the Set Associations window shown in Figure 1-1. 3.17 - Windows does not actually change the file type. Instead, Windows adds a new section for the file extension to HKEY_CURRENT_USER\Software\Microsoft \Windows\CurrentVersion\ Explorer\FileExts and then in this new section adds a UserChoice section with the full path of the program you chose:
HKEY_CURRENT_USER\Software\Microsoft\Windows\CurrentVersion\Explorer\FileExts\. wav\UserChoice
The UserChoice section should prevent applications from changing the defaults without your permission; as long as the UserChoice section exists, Windows ignores all actions defined in the normal file type section. Any normal context menu actions disappear and even the icon is replaced by the icon of the newly selected application.
Like many patched features in Windows, the UserChoice system doesn't work very well. First, file types that have UserChoice applied to them cannot have normal context menus or icons. And the old trick of reinstalling an app to restore its file types won't work while the UserChoice section is present (unless the installer is smart enough, which is unlikely). But the worst thing is that the system cannot be defeated without delving into the registry.
The solution is to open the Registry Editor, navigate to HKEY__CURRENT_ USER\Software\Microsoft\Windows\CurrentVersion\Explorer\FileExts and wipe the extension you want to restore (or wipe the entire FileExts key to restore all file extensions). After that, refrain from using the Open With menu or the Control Panel to modify your file types, and your file associations will continue to operate at full capacity.
XoTirre to prevent Windows from overriding file types? See 4How to prevent changes to a registry key* for instructions.
It is worth noting that the UserChoice system may actually have an advantage. Traditionally, file types are stored under HKEY_CLASSES_ROOT, which is a subset of HKEY_LOCAL_MACHINE; this means that your file types are the same for all users on your computer. However, the UserChoice sections hidden under the HKEY_CURRENT_USER branch allow each user to have their own override group.
Each action section has a subsection called command (and sometimes another one called ddeexec). Inside the command section is a value (Default) that specifies the full path and filename of the program to run. Right-click the .xlsx file and select Open, and Windows will launch the program listed in HKEY_CLASSES_R00T\Excel. sheet. 12\shell\0pen\command. For example:
"C:\Program Files\Microsoft 0ffice\0fficel2\EXCEL.EXE" /e
The quotes around the full path and filename of the application allow spaces and tell Windows where the filename ends and command line options (such as /e) begin. More often than not, however, the command line contains %1, a placeholder for the selected filename, like so:
"C:\Program Files\UltraEdit\UEDIT32.EXE" "XI"
When Windows opens this program, it passes it the full path and name of the selected file, putting it in place of XI, like so:
"C:\Program Files\UltraEdit\UEDIT32.EXE"
"C:\Users\Asher\Desktop\readme.txt"
This little option, XI, is the reason a large number problems in the type system Windows file, such as About The app displays a "not found" error
The quotes around "XI" are missing, and the document you are trying to open contains a "space" character in the filename or path. Add quotes to the (Default) value and try again.
O Older application displays "invalid command line" error or something similar
Not all programs respond well to quotes around the "XI th" parameter. Try to remove them.
About The app won't open the file at all
The "XI" parameter is missing, or the application requires a different syntax. For example, the Mozilla SeaMonkey web browser requires a url parameter before %1, thus:
C:\Program FilesXMozilla SeaMonkey\seamonkey.exe -url "XI"
If you're not sure you know what your application needs, check the documentation or type in Google search the name of the application and the words "command line".
In some cases, you can get help using the program's command-line options by running the application with /? or -help.
Context menu
With every object desktop, you can do many different things with each folder or icon. One we have already mastered is the launch, or opening. We perform this procedure by double-clicking on the object with the left mouse button.
But there are others. Any icon or folder can be renamed, deleted, copied or moved. To any of these objects, you can create Label. Finally, you can change appearance object, its properties. The number and range of operations, of course, vary depending on the object we are working with. It is clear that there are differences between a folder and a file, and therefore, there are operations that can be applied only to a folder or only to a file. Unfortunately, there is no universal list of operations and cannot be.
In this situation, you will come to the aid of another useful windows function – Context menu . It appears if you move the cursor over the object you need and click ... no, not the left mouse button that we are used to, but the RIGHT mouse button. Immediately you will see a list of actions that we can do with this object. And you will just need to select one of the actions and click on the line with its name now with the left mouse button.
Explain what all the points mean context menu I just don't have the option. Partly for the reason I mentioned above (there is simply no universal menu), and partly because new items are constantly added to the menu depending on the programs you have installed. However, there are items that you will find in almost any context menu no matter where you called it from.
To cut – using this item, you can “hide” the element you need (label, icon, selected piece of document) in a special Windows “pocket” ( Clipboard or clipboard). This operation will come in handy if you suddenly want to move an object to another folder or part of one document to another.
Copy – almost the same operation, only when this item is selected context menu in the "pocket" is placed not the object itself, but its copy.
Insert – operation, reverse Copy or To cut . Insertion is made at a pre-selected location.
Properties – By selecting this menu item, you can learn a lot of useful information about an object, whether it is a document, a program, or even itself. Desktop. Properties shortcuts will show which file it points to, document properties - when, by whom and in what program it was created. This command allows the user to change the properties of the corresponding object. For example, try calling Desktop context menu(to do this, right-click on any free part of it) and get to know him. The customization options are just fantastic!
Create Shortcut, Delete, Rename, Copy – these points hardly need commentary.
Sorting – will allow you to arrange icons in a folder according to one of the features you specify: name, date of creation, size, etc.
Try using the context menu to create on Desktop a text document is a kind of sticker sheet in which you can quickly enter phone numbers, notes, a work plan for the day ... There is an opinion that documents have no place Desktop, and in a special folder The documents . But this time we will make an exception.