Want to set up a simple home network for computers running Vista, XP, and Windows 7? Want to create a network without a host computer and unnecessary passwords that works even if some computers are offline, and a simple equal access rule for all connected computers?
Setting up a wireless network on Windows 7
The purpose of this article is to look at creating a simplified home network using a Windows Vista computer, a Windows 7 laptop, and a Windows XP laptop as an example. The main feature of this network should be the absence of passwords for local connections(wireless and wired) and no host computer. The devices on the network should be equals - no computer should depend on another for network access - other than Internet access, but it shouldn't be an ad-hoc network. Access to files and folders will depend only on the presence of the computer on the network, but we will try to configure which folders we will put on access for everyone, and these folders will have equal rights.
Router settings
The most relatively central entity on the network is the wireless router. For our purpose, we will assume that each computer has access to the router. In our test network, a Windows Vista computer was connected to the router via a cable and we configured the router through it. An important point is that we did not leave the default settings on the router and configured it manually, because the security of the simplified network is based on the router and on a complex network password on both machines and on a connection using encryption. By a complex password, we mean a combination of letters and numbers that is hard to guess or crack. The router installer may suggest a pseudo-random password based on the selected cipher. It's pretty safe. By encryption we mean secure WiFi access or WPA-PSK. PSK stands for "pre-shared key" - the shared key, which is this complex password.
Since the setup is very different and it is necessary to read the documentation for setting up a separate router, we will only cover this in passing. You need to set it to pass the network name or service set identifier (SSID). You need to make sure that all computers have access to the network. You may find that the PC is connected using wireless communication to the router and when viewing the status, data movement is visible, but the Internet browser does not load pages.
This means that the computer has wireless networking enabled by default (of course with help from Microsoft networks), but not to the Internet. However, this is easy to fix.
Instructions for Windows XP
Windows XP: Start - Connection - Show all connections. Select "Wireless Network Connection", click on it right click and select Properties. In the General tab of the main window, you will see "The checked components are in use by this connection". Scroll down and find Internet Protocol (TCP/IP). If it is not there, click on the Install button, and then Protocol. You will see Internet Protocol (TCP/IP) in the list, select it and click OK to add it (if there is Microsoft TCP/IP version 6 in the list, it is also suitable). Return to the Properties dialog, scroll down and select Internet Protocol (TCP/IP) from the list. Select it and click the Properties button. Check "Obtain an IP address automatically" and "Obtain DNS server address automatically". Click OK to close the dialog box, and then restart your computer. After the reboot, connect to the network and Internet access should appear.
Windows Vista: Start - Network - Network and Internet (or Start - Control Panel - Network and Internet) - Manage network connections. Right click on "Wireless network connection" and do everything as described for Windows XP.
Windows 7: Start - Control Panel - View network status and tasks - Change adapter settings - Wireless network connection. Right-click to open properties and repeat the same steps as for Windows Vista and Windows XP.
In each case, remember to repeat all the steps (enable automatic IP and DNS acquisition) for Internet Protocol version 6 before saving and reloading.
Simplified network setup
There are just a few rules here. All computers on the network must have different names and belong to the same working group. It is usually named WORKGROUP by default on Windows. However, it is better to create a more unique group name. This is handy if any of your computers already have a network set up. Due to the different name, Windows omits its default network settings, which is quite important when creating a simplified network.
To change the name of a computer or group in Windows XP, right-click My Computer, select properties. On the Computer Name tab, click Change. Enter a unique computer name (if it doesn't exist) and a workgroup name. When you click OK, Windows will say "Welcome to the workgroup" and prompt you to restart your computer.
To change the computer name and workgroup in Windows Vista and Windows 7, right-click Computer and select properties. If necessary, expand the window and find "Computer Name". On the right, click Change Settings. In the System Properties dialog box, under Computer Name, click Change. Enter network name computer (or leave the old one if it is unique), enter the same group name that you entered in the previous computer, leave the Domain field blank. Click OK and Windows will invite you to a new workgroup and prompt you to reboot.
That's all - we have done the basic settings of our network. From this point on, all computers are in the same workgroup and see each other. Everyone is connected to a router and has access to the Internet. Everyone has access to pre-existing network and shared folders on other devices on the network. Now let's move on to setup.
Access settings
The next thing we'll look at is what do we want to access on each computer? Do not forget that access is on an equal footing. We're not going to go into password-protected folders or fiddle around with permissions and settings.
Accessing Folders in Windows 7
Windows Vista and Windows 7 allow you to customize access, but it's worth considering that Windows 7 has the concept of a "Homegroup", which is incompatible with Windows XP and only partially with Windows Vista. To test this, connect your Windows 7 computer to the network. Go to Start - Control Panel - Select Options home group and data sharing. You will see a message that the homegroup is not available. Everything is correct. The PC is connected to the group you created, so nothing is displayed in this dialog box. (In general, Windows 7 automatically sets up a homegroup - but only with computers that are also running Windows 7. Because we're using a mixed network, we don't need this feature.)
Therefore, instead, open Start - View network status and tasks. The Network and Sharing Center opens. On the left, click Change advanced sharing settings.
In the next window, you will see several options. Again, remember that the security center of our simplified network is network password router, so on this page you should not overclock much with the settings. "Network discovery" must be enabled, as well as " General access to files and folders. It's up to you what you do with shared folders, but keep in mind that you're only sharing them with others on your network, not the Internet. If you want other users on the network to be able to move files to your shared folders, enable "Turn on sharing so network users can read and write files in shared folders".
Next, do you have MP3 or iTunes music on your Windows 7 computer that you want to share? If yes, click "Media Streaming" and click "Enable Media Streaming". If you have a laptop, you probably don't want to enable "Keep PC from going to sleep". Because our network acts as an ad hoc or peer network, although it is not, other users and devices will know that what is accessed can come and go.
Then select Turn off password protected sharing. Under HomeGroup Connections, select Use Accounts users and passwords to connect to other computers. In fact, this disables the automatic processing of network settings in Windows 7.
From now on, other users have access to files on a Windows 7 computer.
But when you try to access the computer itself, an error will occur, because in general, not a single folder in Windows 7 was given permission to access. (This is actually a side effect of disabling password protection, but don't worry. It's an easy fix.)
Let's set up public access for the shared folder. Double click on Computer and go to C:\Users. Right-click on the General folder and select Access - Select Users... Where the name is, select Everyone. Everyone is the magic word that gives access to this folder to all network users who do not have Windows 7. Then click Add. All will appear in the list. Do you want all users to be able to move files to your public folder? If so, you need to give everyone permission to Write. Click the down arrow and select Read & Write. Then click Sharing.
The same should be done with all the folders that you want to make available from a Windows 7 computer. (Remember that the files are already shared).
There are 2 more things to consider. First, I would advise you to restart your computer and let it re-establish a connection before trying to access files and folders on a Windows 7 computer. Second, some network setup details may change with the release of the new Windows versions 7. If you didn't find any steps or icons, look in Windows Help and find what has changed.
And this is what the result should look like. This is the view from a Windows Vista computer if you open Start - Network and open a Windows 7 computer.
By the way, to get into the network through the menu Windows start 7, right-click on the Start button and select Properties - Customize. Scroll down, find Network, tick it and click OK twice.
Sharing folders in Windows Vista
Setting up sharing in Windows Vista is much easier than setting up a workgroup in Windows 7. All you need to do is open Start - Control Panel - Network and Sharing Center. You will notice that under "Network discovery" there is a Configure button. This is the result of our workgroup setup. There is no need to change anything here.
Access to files shared folder, to Printers and Media must be enabled.
Password protection must be disabled.
There are some useful links at the bottom of the page that will show you all the files and folders that are shared on a Windows Vista computer, as well as a list of available folders on the computer to which the printer is connected, if you have connected it for sharing.
What about access to personal folders? Let's look at an example.
I wanted to make a folder called WindowsFAQ, which is located on a computer with Windows Vista, accessible to all devices on the network. I right clicked on the folder and selected properties. In the Sharing tab, I clicked "Advanced Access" and checked "Share this folder". Changed the number of concurrent users to 3 (including this computer) and clicked Permissions.
In the "Permissions for WindowsFAQ" I said the magic word Everyone and turned on full access. And clicked OK twice.
Then I specified the network path. It looks like \\PC2007\WindowsFAQ and this is where you can now find this folder on the network.
And that's it for sharing folders and files on a Windows Vista PC. Now it's time to connect the laptop with XP Pro to the network.
Sharing folders in Windows XP
One Windows time XP has been praised for being easy to set up sharing, and it is. If you have not upgraded to Windows XP Service Pack 3 and have not networked to Windows Vista, you must download and install "Linked Layer Topology Discovery Responder", which will enable Windows Vista computers to see Windows XP computers and include them in the network map through Start - Networks. Of course, this is not required, but it makes the process of opening folders from computers running Windows Vista and Windows 7 much easier.
You can find out if you have LLTD enabled through Start - Control Panel - Network Connections. Look at the list of used wireless network connections. If among them there is a "Link-Layer Topology Discovery Responder" - everything is fine.
If not, you have 2 options. You can upgrade to Service Pack 3 from Windows Update, or download an older version of LLTD .
If you find that LLTD is installed but cannot connect to the workgroup, check your firewall. It all depends on which firewall you're using, but if you're using the standard Windows firewall, check to see if file and printer sharing is allowed. Go to Start - Control Panel - Windows Firewall. Switch to the Exceptions tab. Is "File and Printer Sharing" listed and is it enabled? If not, click "Add Program" and select it. Before clicking OK, check if it is checked. Try to connect again.
Finally, your XP computer is online and visible through Start - Networks in Windows Vista and Windows 7. Now let's share a few more folders.
As an example, let's check if the iTunes folder on a Windows XP computer is available on other computers. Right-click on the iTunes icon and select "Security and Sharing". Uncheck "Make this folder private" if enabled, and check "Share this folder". Because we don't want family members to make changes to our music, leave "Allow network users to make changes to my files" unchecked. Click OK.
And here is a folder located on a computer with Windows XP, visible from Windows Vista.
A few more settings
Windows Vista and Windows 7 have a function to connect to the network as soon as the laptop appears within the wireless network. This is very convenient if the laptop is always with you. Sure, you don't run around with Wi-Fi on all the time, but Windows Vista and Windows 7 are smart enough to periodically check if you're at home or not and turn Wi-Fi on automatically.
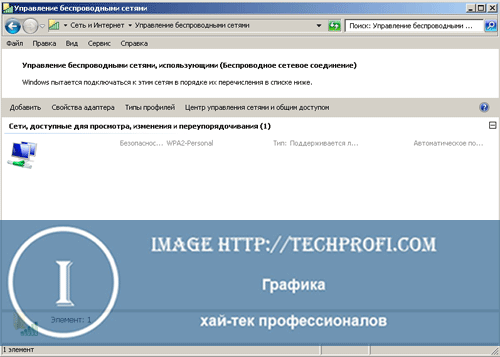
To enable this feature on both systems, go to Start - Networks and click "Network and Sharing Center". On the left, click Manage Wireless Networks. You will see a list of wireless networks that Windows has detected. The networks are displayed in the order that Windows tries to connect to them. You can move networks up and down the list. To enable automatic connection, select the name of the network, right-click on it, open properties and enable "Connect automatically if the network is in range" and click OK.
Conclusion
And here it is - the simplest home network, which you can create from a mixed environment of Windows Vista, Windows XP, and Windows 7 computers. Some folders on each device are shared as equals, and these folders are defined by you.
You can absolutely safely turn off any computer on the network, because. there is no host computer that is used as a gateway. No passwords (other than the password for the wireless modem) to access. The security is quite good, as a complex router password that is impossible to guess also acts as a network password for users. Even the Internet connection is safe, because. we have enabled encryption.
This certainly does not compare with the protection of the production level, but IT security is based on the fact that people do not go where they do not need to. Our simplified network gives all users equal access to those folders that should be open.
If you once again ask yourself a similar question on computer topics, you should not call a paid specialist with a home visit. Be smarter, save your money and gain more knowledge on your own by simply reading this article. It will bring you significant benefits:
Will teach you
Clearly and correctly explain the essence of this concept
Will create the basis for your intellectual and creative development in the field of programming
We create wireless connection in Windows 7
If you are ready to find out How create a wireless connection please read the attached instructions:
1. Click on START, find the CONTROL PANEL tab
2. Change the type of page being viewed (upper right corner) to VIEW: CATEGORY; immediately select the option VIEW NETWORK STATUS AND TASKS
3. Now we go to MEASURING ADAPTER PARAMETERS and open the WIRELESS NETWORK CONNECTION tab menu; open the PROPERTIES tab
4. Take a look at the GENERAL tab, and you will immediately notice the marked items that apply to a particular connection
5. We find in the open window Internet Protocol version 4 (TCP / IPv4) and mark it with a “tick”
Completing the process of creating a connection
Now, in order to visually verify the successful completion of the operation, you need to restart the computer. Now you know, how to create a wireless connection, it remains only to log in and connect to the network! As you can see, in this process There is nothing difficult to create a wireless connection. The most important thing is to act exactly with the indicated steps of the instructions, and you will definitely succeed. Successful completion of the procedure = access to the Internet on your computer.
Network connection settings in Windows 7 video
video how to create a wireless network computer - computer
Setting up a wireless WI FI network for Windowsvideo
Think it's so easy to set up a local Wi-fi network in Windows 7? Of course, it's easy if you take our guide as a basis!
To ensure data transmission, computers and digital devices are connected in a network. The simplest of them are home local and wireless networks, which allow you to exchange information between computers, phones, and so on. Today we will figure out how to create a local network in the Windows 7 operating system. Let's see what configuration features the local and wi-fi networks have, and use an example to carry out all the necessary operations.
Local and Wi-fi networks
To begin with, we must understand the features of each of the types of networks used. And since today we will talk about the local network in Windows 7, and the wireless Wi-Fi network, it is about them that we should talk.
- Local area networks (LAN). This type of network has been the most common in recent decades. Of the pluses, the following aspects can be noted: - Inexpensive materials for creating a network. The UTP (twisted pair) cable used in most cases is very cheap. But if you want to lay fiber optics, be prepared to spend. But even in this case, the final cost of the network will be within reason. - Cable networks provide the highest speed - tens of Gbps. - Security. Data transmitted over a cable network is quite difficult to intercept. As disadvantages - the lack of mobility and the inability to lay cable in hard-to-reach places.
- Wireless WiFi networks . The transmission of data based on radio signals has evolved into the advent of mobile networks and wireless networks. They are gradually capturing the market - because they are very convenient to use. - Advantages. Mobility - you can go online anywhere within range WiFi hotspots access. In large cities, there are wireless Wi-Fi networks in almost every crowded place (hospitals, shopping centers, train stations, etc.) - Disadvantages. Lower data transfer rate compared to cable networks. Although in our time, this technology has already developed so much that the proposed speeds are more than enough to provide the entire range of tasks. Creating a wireless network will require a little more financial support - you need to purchase the appropriate equipment and adapters for devices.
Now that we understand the difference between these two network options, let's try to implement each of them, using an example operating system Windows 7
Cable network computer-to-computer on Windows 7
As an example of a cable network, let's connect two desktop PCs in a network like " computer-computer". This is the most elementary option that does not require additional equipment.
We will need two computers with network adapters and a cross cable. Please note that this type of cable must be used when connecting two computers. If you connect them standard network cable- the network will not work.
So, plug the cable into both network cards, and start the computers.
We need to place each of them in the same working group.
Creation of a working group
We find the "My computer" icon on the desktop, right-click on it, and then click " Properties". Here we scroll down the page to the " Computer name, domain, workgroup", and click change settings:
Here we click the " Change" button and enter the name of the computer and workgroup.

After that, save the settings and restart the computer.
This procedure must be carried out on both PCs. In this case, the name of the working group must match.
Network settings
Now we need both computers to be in the same address space. This is necessary to ensure data transfer between them.
Go to " Control Panel", then to " Network Control Center". Further " Change adapter settings". In the list, find the network card, and open the properties for it. Click " Internet protocol version 4":

For example, let's take the most used address range, which is most often used in local networks.
So here is the list of options:
- :
computer 1 - 192.168.1.1
computer 2 - 192.168.1.2 - - 255.255.255.0
- Default gateway: 192.168.1.1
- - 192.168.1.1 (or leave blank)
We enter these parameters in the appropriate areas. After that, save the settings and restart the computers.
The computer-to-computer network is ready, you can check its performance. To do this, you can go to " My computer" - both computers should be displayed in the network environment.
Or use the ping command. On the first computer, "Start", "Run", type cmd, and write the command ping 192.168.1.2 - if data is transmitted, the network is functioning.
Wireless network on Windows 7 with Internet access
We make the parameters for the network card in the same way as the previous paragraph. Only now we use wireless adapters.
Computers must also be in the same workgroup.
When network adapters are enabled and configured accordingly, do the following.
Go to " Network Control Center", then " Wireless Network Management".
Here we click the "Add" button, and select the item" Create a computer-to-computer network":
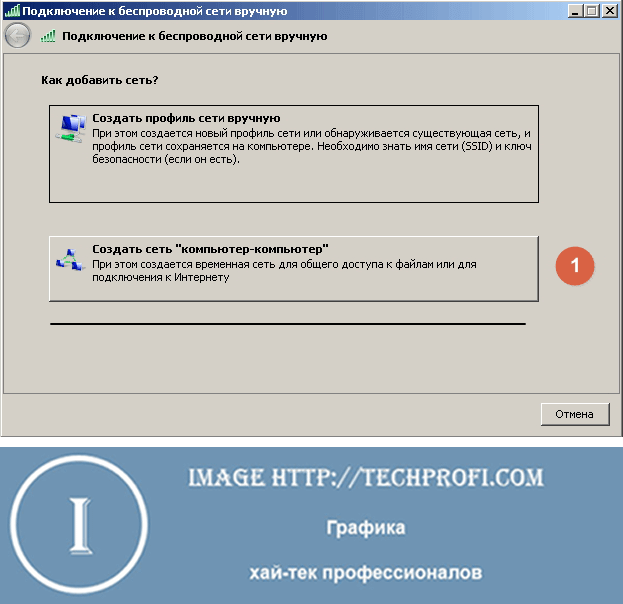
We read the description of this type network and click Next.
The next step we need to configure the parameters of the future network:
Enter the following parameters:
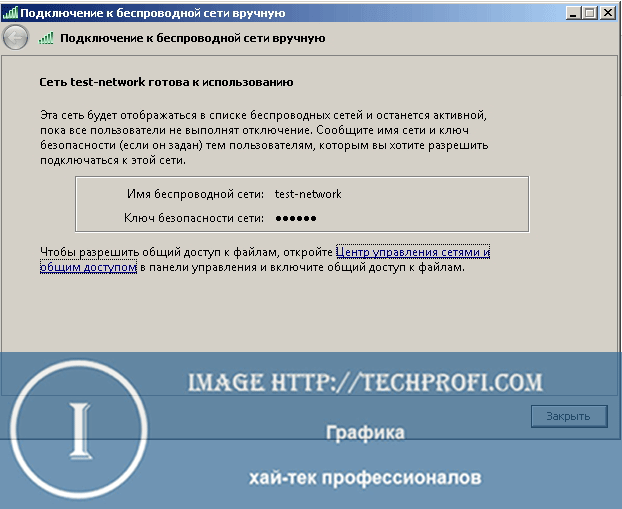
- Network name - used to identify it (in Latin letters)
- Security type - leave "WPA-2 Personal"
- Security key - set a password to connect to our network
- Check the box "Save settings for this network"
When all the parameters are specified, click "Next", wait for the end of the process, and we get a message that ours has been created:
We open access to the Internet
As an example, it will be assumed that on the first computer we have cable connection to the Internet. And we want to make it available to the rest of the computer on our network. To do this, go back to the list network adapters, we find an Internet connection there, and open the properties for it:

Go to the "Access" tab, and put all the checkmarks in the " Internet connection sharing":

We save the settings.
Connecting a second computer to a wireless network
We remember that our second computer must be in the same workgroup, and have its ip address settings in the same address space as the first computer.
Now to connect it to a computer-to-computer wireless network, you need to do the following.
Locate the wireless networks icon in the system tray and click on it. Find the network we created in the list, and click the " Connect" button:

You will be asked to enter a password - we assigned it when creating the network. Enter it and connect.
Now you can check the performance - wireless LAN type " Computer-Computer"Set up and ready to go.
Video for the article:
Conclusion
The options we have considered local networks very easy to set up and build, and well suited for home use. Wireless network computer-computer can be used to connect to the Internet portable mobile devices such as smartphones or tablet computers.
If your computer has stopped starting normally, it will help you
When setting up a network, you need to know the network card.
Correct security settings will help to avoid.