We continue to look at new and improved features of the new operating system Windows 7. Next up are tools for working with the network. In addition to them, in this article we will focus on new troubleshooting tools, features of the updated defragmentation tool hard drives, and also consider a new interface for managing external devices Device Stage.
Creation home group will take a few seconds, after which Windows will generate a password that will be needed to add other computers to the home group. Since this difficult-to-remember password will need to be entered on all computers that will be joined to the homegroup, for convenience you can print it using the link posted right there. You can't specify your own password at this stage, but you can change it later in your HomeGroup settings.

After clicking the "Done" button, the system will open the homegroup settings window, where you can change the sharing options for different types of data, view the password, or change it.

If you wish to change your password, please note that before doing so, you must ensure that home network There are no computers that are in sleep or hibernation mode. After changing the password, you will need to change it on all computers connected to the homegroup. That is why it is much more convenient to change an automatically generated password immediately after creating a homegroup, even before you join other computers to it.
Joining a homegroup is done in the same Network and Sharing Center window. After in local network a home group has been created, on other computers in the “View active networks” section you can see the “Ready to join” link. By clicking on it, you can specify which resources of this computer you want to share. After this, you will need to enter your homegroup password.
If you need to add an additional computer to your homegroup and you have forgotten your password, you can always view it on any of the computers that are part of the homegroup. To do this, go to your homegroup settings and click on the “Show or print homegroup password” link.
If, when you join your computer to a homegroup, you receive a message that the password is incorrect, but you are sure that you entered it correctly, the reason may be due to the date and time settings. According to the official message published on the Microsoft website in the user support section, this error occurs when the date and time settings on homegroup computers do not match. The computer that you want to join the homegroup must be set to the same date and time as the PC on which the homegroup was created.
Once computers are joined to a HomeGroup, they will be visible in Explorer under the HomeGroup section, and all users can quickly access files that have been shared.
![]()
Using context menu Explorer, you can quickly manage the resources that will be open to other users connected to the home group. Click a folder or library right click mouse and select submenu " General access". After this, you can open the resources for reading or for reading and writing for homegroup users.

Note that since HomeGroup is a simplified mechanism for sharing files, it does not provide for setting access rights for each user separately. For more fine tuning restrictions, you must go to your sharing settings and manually specify who can view or change files.
A computer cannot be connected to multiple homegroups at the same time. If you want to join another homegroup, you must first leave the first one. To do this, you need to open the home group settings window and click on the “Leave the homegroup” link, and then confirm your desire to do this.
The HomeGroup feature is not available if the system settings indicate that the computer is connected to an office or public network. If you need to temporarily connect your computer to a homegroup (for example, you took home a laptop that you usually use in the office), you must first change the network type, after which you can become part of the homegroup and gain access to home network resources.
Using the HomeGroup feature, you can not only quickly access files stored on other computers, but also stream data over the network. This feature will be useful, for example, if digital photo frames, modern TVs, Wi-Fi streaming radio receivers and other similar devices are connected to your home network. To enable data streaming, you need to check the appropriate box in the homegroup settings, and then decide on some parameters.

First, you need to choose a name for your media library. Under this name, the library will be displayed on other computers on the network in Windows Media Player in the "Other Libraries" section. You can then configure your access settings. The "Select default settings" link opens a window in which you can specify general access settings, and if you click on the "Configure" link next to each device on the network, you can set your own settings for each computer.

You can also quickly block access to shared multimedia files for a specific computer.
⇡ Quickly connect to available networks from the system tray
In the first article of our series (see “The Hidden Potential of Windows 7: Installing New Windows”) we already talked about the improvements that have occurred in the notification area. One of them directly concerns working with the network. Now, when you click on the "Network" icon, which is displayed by default in the system tray, you can see a list of all networks available for connection, including wireless, corporate, mobile broadband, etc.
By clicking on the name of a network, you can immediately connect to it and just as quickly disconnect from it. In the View menu available networks" (View Available Networks) shows all current connections for of this computer, and there is also a link to quickly open the Network and Sharing Center.
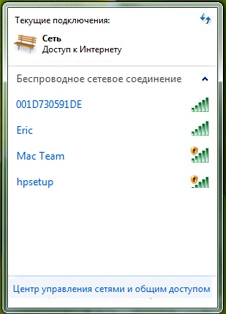
The ability to quickly connect to the network is especially convenient when working with a laptop, because using it in different places, you constantly change the Internet connection settings.
Updated: August 2009
Purpose: Windows 7
This walkthrough contains instructions that provide a quick overview new feature HomeGroup in Windows® 7. These instructions assume that you have two computers on the same network. Windows control 7 and at least one of these computers is running Windows 7 Home Premium or higher edition. Additionally, none of these computers are members of a homegroup or joined to a domain.
Prepare each computer for this walkthrough
Click the button Start, type and press ENTER.
In area View active networks make sure the network type is set to Public network. Otherwise click home network or Work network and select a value Public network.
Repeat step 2 for the second computer.
Create a homegroup on the first computer
On the first computer that you want to be running Windows 7 Home Premium or higher edition, click Start, enter Network and Sharing Center and press ENTER.
In area View active networks click Public network.
In the dialog box Setting up network location click home network. After changing the network location, the Create HomeGroup Wizard starts automatically.
On the page, check the box Documentation and press the button Further. A HomeGroup provides shared access to documents, in addition to photos, music, videos, and printers.
The Create HomeGroup Wizard creates a strong password, as shown in Figure 1. 1. This password is required to join additional computers to the home group. After writing down the password, press the button Ready to close the wizard.
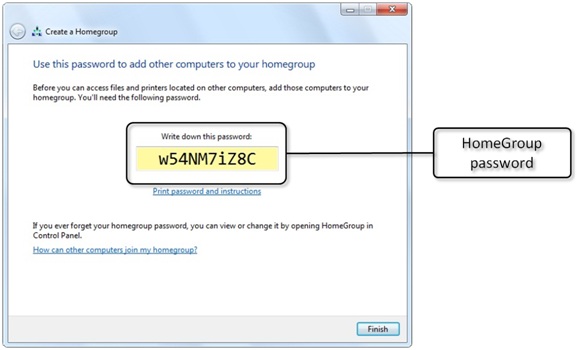
Rice. 1. Homegroup Wizard
Adding a second computer to a homegroup
On the second computer, click Start, enter Network and Sharing Center and press ENTER.
In area View active networks click Public network.
In the Network Location Setup dialog box, click home network. After changing the network location, the Join HomeGroup Wizard automatically launches.
On the page Share with other Windows 7 home computers check the box Documentation and press the button Further.
On the page Enter your homegroup password enter the password recorded on the first computer and click the button Further. The password is case sensitive, so enter it exactly as it was set on the first computer.
Click the button Ready to close the Join HomeGroup Wizard.
Set HomeGroup Settings
- Selecting shared libraries.
- Stream media using network devices.
- View and change your homegroup password.
- Run the HomeGroup troubleshooter.
Click the button Start, enter home group and press ENTER.
There are a variety of options available to change, as shown in Fig. 2. Setting options are listed below.
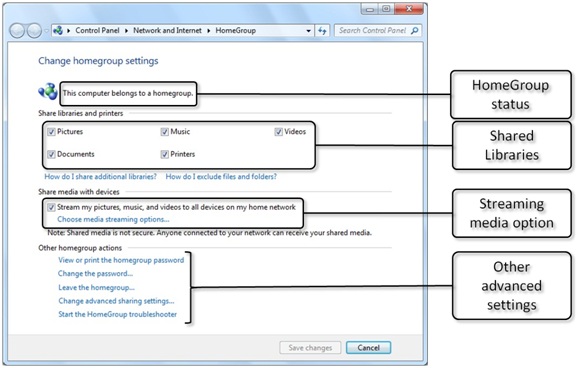
Rice. 2. Advanced homegroup options
View files shared with a homegroup
Open File Explorer.
In the navigation pane, click Home group to view all computers that are members of this homegroup.
Expand a homegroup computer to view all shared libraries on that computer, as shown in Figure 1. 3.
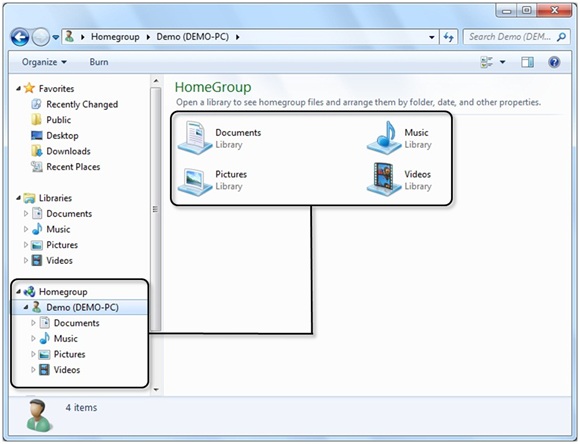
Rice. 3. Shared libraries on other homegroup computers