Setting local network in Windows 7 will not require time and effort, if you first figure out what's what. After studying this material, you will be able to independently create a wired and wireless computers with Windows 7, organize a homegroup and set up folder and device sharing.
Create a wired network between Windows 7 computers
Hardware and software
To network multiple computers, you need the following:
- A network card for each computer (also called a network controller, Ethernet controller, or network adapter). Separate purchase and installation of network cards is usually not necessary, since they are built into most modern motherboards. An additional card may be needed to install in the computer that will serve as your gateway to access the Internet.
- Segments of a twisted-pair network cable of category 5 and above with 8P8C connectors (sometimes called RJ-45) - according to the number of computers in the local network. One end of the cable is connected to the network card socket, and the other end is connected to another PC or device with which your PCs will be networked.
- Switch or router (router) - if you plan to network more than two PCs. If there is no need to connect each computer to the Internet, it is enough to buy a switch (switch). With its help, it is possible to create a local network in which only one of the PCs will be connected to the Internet. To access the Internet for all computers on your home network, you will need a router.
special software not required - all configuration is done by the system's own tools. You only need drivers for the network controller for Windows 7, which are freely available on the websites of mat manufacturers. boards and network devices. And also - on the disks that are attached to the purchase. motherboards or laptops.
Connection and setup
Make sure that the network cards on each of the computers on your future home network are ready to go. Look in the device manager if there is no unknown hardware and exclamation marks opposite network adapters, then the necessary drivers are installed correctly. Otherwise, you will have to install them manually.
After installing the network drivers, connect the computers using a twisted-pair cable by connecting one end of a piece of cable to the network card jack of one PC, the other to the jack of another. Or, if there are more than 2 computers, connect the second end of the twisted pair from each network card to the LAN ports of the switch or router.
Now let's move on to the setup.
- Open "Network & Sharing Center". In Windows 7, this is done through the Control Panel or by clicking right click mouse in the tray on the network icon.
- Click "Change adapter settings" in the navigation bar.
- Here you should see your new LAN connection. Expand its properties.
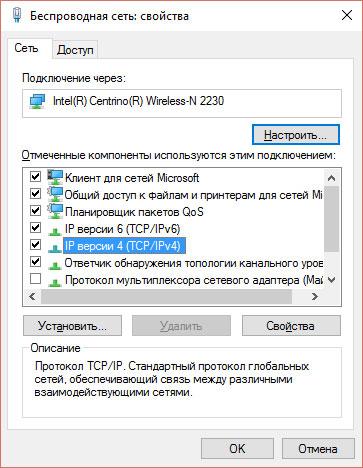
- In the list of components that this connection uses, click first "Internet Protocol Version 4" and then the "Properties" button.
- In the properties window, check the "Use the following IP address" box and assign each computer one of the private (local) range IP addresses: 10.0. . The most important thing is that this address is not repeated anywhere. If you create a network without Internet access, no other settings are used.
Examples of assigning IP addresses:
- 1 computer: 192.168.1.1
- 2 computer: 192.168.1.2
- 3 computer: 192.168.1.3 and so on.
After each computer on your home network has received a unique IP address, you can check the quality of the connection. Launch the command console and run the command ping IP neighboring PCs. For example, from the first computer, you can check the connection with the second by running the command ping 192.168.1.2.
The exchange of packets will mean that the connection is established.
Creating a wireless network on Windows 7
Equipment
Installing and configuring 7 is as easy as local wired. However, to create this type of connection, each computer must be equipped with a wireless network adapter. The vast majority of laptops already have such devices "on board", and for a stationary PC, you will most likely have to buy it separately.
Wireless WLAN adapters are available with USB (external), PCI or PCI-E (internal) connection interfaces and differ slightly in range and transmission speed. Most Wi-Fi cards for private use have the 802.11 b/g/n standard, which is enough to maintain a stable connection in an apartment or office.
Some of the Wi-Fi cards also include a BlueTooth module.
Installing the WLAN adapter requires drivers, which are sold as bundled discs with the devices. After installing the driver, the adapter is ready to work.
Setting up an ad hoc wireless network
- Go to "Network & Sharing Center". At the bottom of the window is the "Change network settings" section. To create a local wireless network you need to select "Setting up a new connection" from this list.
- Select the lowest item: "Setting up a wireless computer-to-computer network." Click on the "Next" button.
- In the next window, it will be written what the network being created is and how to achieve a good connection quality (you need to place computers no further than ten meters from each other). Click next.
- Next, you need to assign a name (SSID) to the new wireless network, which will be displayed in the list of available Wi-Fi connections, and also select the type of security. If your home network has computers running Windows XP, choose the WEP security type, and if all PCs are running Windows 7, WPA2 is preferable as it is more secure. The password for accessing the network is also set here.
- To save the settings, check the "Save network settings" box and click "Next". The creation of a local wireless network between peer PCs is now complete.
- To view or change the properties and settings of the newly created wireless network, click the "Manage wireless networks" button in the "Network Control Center..." navigation bar. The next window will display the settings of the local wireless network, or rather, all networks of this type created on this PC.
The new connection will appear in the folder network connections, which can be accessed by clicking "Change adapter settings" in the "Network and Sharing Center..." window.
Assigning IP addresses to devices on a wireless home network is done in the same way as a cable network.
Create a hosted wireless network
Hosted networks on Windows 7, unlike peer-to-peer networks, have a structural hierarchy: a virtual point is created on one of the computers WiFi access and others are connected to it. Such structures are usually created to distribute the Internet in networks without routers, where one of the PCs is used as a gateway. The computer on which the virtual access point is created must have a wireless network controller (Wi-Fi card).
Consider the procedure for creating a hosted network on Windows 7. To simplify it, you can use special software, like Connectify or mHotspot. To create a virtual access point, just run such an application and enter the name in the fields provided. new network(SSID) and password. In the future, it can be launched with one click.
However, the same can be done without third party programs — Windows tools. For this:
- run the command console as an administrator;
- enter the command: netsh wlan set hostednetwork mode=allow ssid="Access_name" key="12345678" keyUsage=persistent

where SSID is the point name and key is the password. Press Enter.
The hosted network virtual adapter will then appear in the Device Manager list and in the Network Connections folder.
To start the hosted network, run the following command in the console: netsh wlan start hostednetwork. The new access point will be visible in the list of wireless networks of other computers.
To disable the network, just command: netsh wlan stop hostednetwork.
In order not to have to open the command line every time and enter it manually, you can create text file with the .bat extension, where to enter these commands in sequence. And in the future, run as needed (from the admin).
Create a homegroup and share network resources
home group
General setting Windows Access 7 to network resources begins with the creation of a homegroup. It is created on one of the PCs of the local network, where Windows 7 of any edition is installed, except for the starter and home base.
To create a homegroup, go to the "Network Control Center ..."

or in the control panel. Click on the button of the same name.

In the next window, click "Create a homegroup".

Check the items to which it will be open general access. Click next.

A new window will generate a password to join other computers to the homegroup. Print or write it down.

Next, you can change the resource sharing settings this computer for other devices on the local network, set a new homegroup password, etc. However, you will always have these options.

On this home setting Windows networks 7 completed. To connect another computer to the group, open the same application on it (" home group”), click “Join” and enter the password.

Setting up sharing
- To edit additional sharing options, click the button of the same name in the transition panel of the "Network Control Center ..."
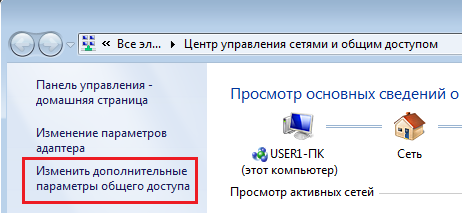
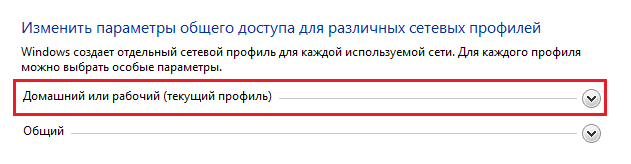
- Expand the list of Home or Work profile options.
- Check the options you need. Please note that in order to share network devices (such as a scanner or printer connected to this computer), the corresponding setting must be active.
- To apply the settings and exit the installation window, click the Save Changes button.
Sharing Permissions for Individual Folders
- To give other devices network access to separate folder, open its properties.
- Go to the Sharing tab and click the Sharing button.

- In the next window, click the button of the same name again.

After that, the folder will be opened for public access. Its network address will look like this: \Computer_name_path_to_folder_folder_name. Users of other PCs on the local network will be able to connect it as network drive and will see it in their "Computer" folder, in the "Network Locations" section.

To enter network folder you need to activate the Guest account on your PC and give it permission to read and modify files.
Installing a network scanner
To scan documents using a network scanner connected to another computer or router (switch), you need to make a number of settings.
Connecting the scanner directly to a PC does not assign its own IP address, so a physical connection between computers and properly configured file and device sharing is sufficient. Setting the network Windows Scanner 7 in this case is done like this:
- to view network devices, open the "Networks and Internet" section in the control panel, from the "Network Control Center ..." menu, select "View network computers and devices";

- open the context menu of the scanner and select the "Install" command. This will launch the Add Hardware Wizard, and when it finishes, the installation of the shared network scanner will be completed.
Installing a scanner that connects to the network as a device with its own IP address is done differently. First you need to install drivers for this scanner on each of the computers on the network and assign it its own IP address. Then open the TCP port in the firewall or Windows firewall 6077.

In this article, we will set up a local network between two or more computers with installed Windows 7 (Windows 8) that are connected via a Wi-Fi router. In fact, setting up a local network in Windows 7, Windows 8, and Windows 10 is almost the same. In Windows XP, perhaps there are some nuances, there are always some problems when setting up a network between the seven and XP. But, about this in a separate article, and it's time to move from Windows XP, it is outdated.
It is clear that in order to set up a local network and file sharing, computers need to be somehow connected to each other. This can be done with a network cable, I have a direct connection between two computers. But, it is much more interesting to connect all computers through a router, which is now installed in almost every home and office. When connected through a router, it is already possible to set up a local network not only between two computers. All computers can be connected to a local network, and even mobile devices that are connected to one router
For example, desktop computers can be connected to the router via network cable, and laptops WiFi networks. This is how you feel more comfortable, and how you get it. It doesn't matter if the computer is connected to the router via Wi-Fi or a cable, the local network will work. And it doesn't matter which one you have operating system installed, but I will show on the example of Windows 7.
And I will configure and show the network through asus router RT-N18U, to which I have a laptop connected via Wi-Fi, and a desktop computer. Both work on Windows 7. It is between these two computers that we will now set up a local network. And also, we will open the general access to folders and files. What is a local area network between computers for? Mainly for file sharing. If you often need to transfer some files from one computer to another, then in order not to run with a flash drive, you can do it over the network. Well, you can play online games.
If you still have a Smart TV in your network, you can set up access to movies on your computer from your TV. More details in this article.
Instructions for setting up a local network in Windows 7
Let me remind you that the computers that you want to network must be connected to the same router, or connected by cable directly. Also, all the actions that I will show in this section must be performed on both computers.
Important point! If you want to set up a network through a Wi-Fi router to which some third-party devices are connected (for example, your neighbor), then after setting it up, it will be able to access those folders on your computer that you set up for sharing. Set a good password for your Wi-Fi network to secure your network. If you still need to connect third-party devices to your router, but want to set up a home network, then you can create a "guest network" for guests, as we did on the Zyxel router in this article.
One more moment. If you are setting up a network when connecting computers directly, without a router, then you will also need to set static IP addresses in the properties of the LAN connection. If you have a connection through a router, then you do not need to do anything else, continue to follow the instructions.
1 First of all, we need to check that all computers work in the same workgroup. This must be checked on all computers that will be connected to the local network.
We do this: press the key combination Win+R, and in the window that appears, specify the command sysdm.cpl. Click Ok.
Against Working group is likely to be written WORKGROUP. You can leave her. The main thing is that on other computers the working group should also be WORKGROUP.
If you want to change it, for example to MSHOME, then click the button Change, and specify a new group. Save changes and restart your computer.
2 The second step is to change the sharing settings. We perform these settings in the same way on all computers in the network. Now I will show what needs to be included.
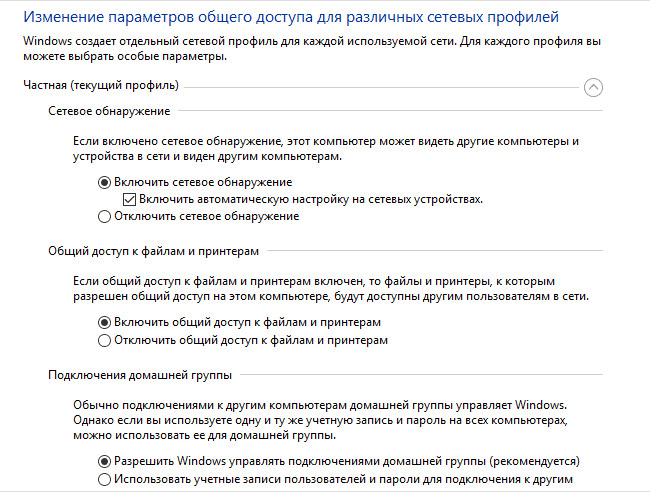
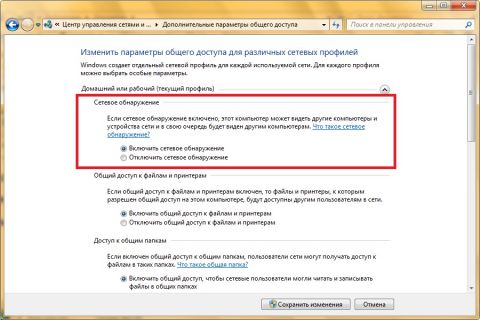
Right click on the internet connection icon in the notification bar and open Network and Sharing Center. In the new window select Change advanced sharing options.
There will be two profiles. Home or work, and General. We change the one whose carriage is written current profile. You can make these settings for both profiles.
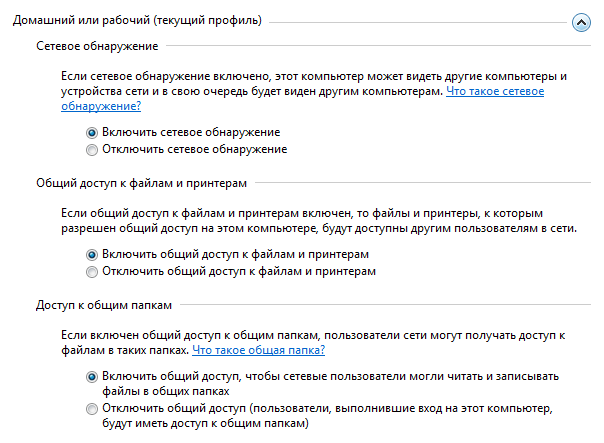
First of all, put the switch near Enable network discovery. Also, turn on Sharing files and printers, and turn on folder sharing. See screenshot below.
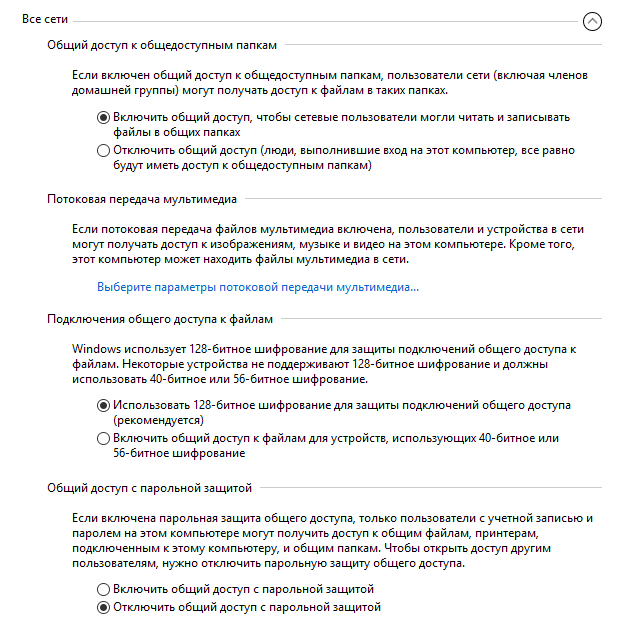
Scroll through the settings page, find and open the tab All networks, or General, and be sure disable password protected sharing.
After these steps, it is advisable to restart the computer. These are actually all the settings, the local network should already be working. To check, you need to go to Explorer on one of the computers (My computer), and open the tab on the left Network. All computers on the network will be displayed there. In the screenshot, you can see my computer, and another one from the network.
We can already go to a computer on our home network, there will be access to shared folders.
If you do not have computers on the network, or do not have access to a computer, then see the solutions at the end of this article.
Set up file and folder sharing
As I wrote above, there is already access to shared folders. But, we may need to share some other folder, which is located, for example, on the local drive D. This can be done without any problems. After we share the folder, all computers from the local network will be able to view the files in it, modify them, and add new files to this folder (true, it depends on what permissions we enable).
For example, I want to share the "Pictures" folder. To do this, right-click on it and select Properties. Go to tab Access, and click on the button Advanced setup. Place a checkmark next to Share this folder, and click on the button Permissions.
In the window that opens after clicking on the button Permissions, we need to set permissions for this folder. So that network users can only view files, then leave a checkmark only in front of Reading. Well, for full access to the folder, with the ability to change files, check all three checkboxes.
Click Apply and Ok. In the window Advanced sharing settings, also press the buttons Apply and Ok.
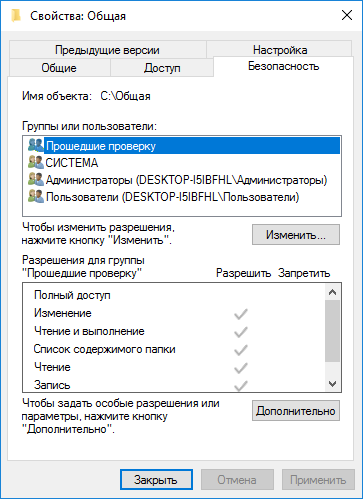
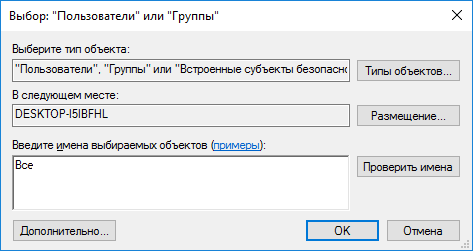
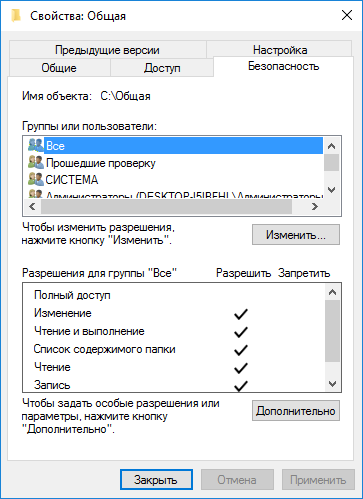
In the folder properties, go to the tab Security, and click on the button Change. Another window will open, in which we click on the button Add. We write in the field "Everybody" and press Ok.
Select a group Everybody, and from below we tick off the access points we need for this folder.
Everything, after these steps, this folder will be shared from all computers on the network. Starts to work without reboot, checked. Open this folder from another computer:
Everyone did it in a confusing way, until you figure it out ... It was possible somehow to make these settings more simply, and more understandable. But, everything works. It turns out that I have access to a folder that is located on another computer. And this is all over the air, since I have both computers connected to the router via Wi-Fi.
By the way, this folder will also be available from smartphones and tablets that are connected to this WiFi router. To view network folders on Android, I advise you to install the ES Explorer program, or use the standard explorer. Everything works:
We will now consider possible problems and errors that you can often encounter during the setup process.
Possible problems and errors when setting up a home LAN
If any errors or problems appear during the setup process, then first of all disable your antivirus, and other programs that may block the connection. If the problem is in the antivirus, then you will need to add your connection to the exceptions.
- Computers from the local network do not appear on the Network tab. In this case, on all computers we check the workgroup, and the sharing settings. Open a tab in File Explorer Network, right-click on an empty area, and select Refresh. Another important point, very often antiviruses and firewalls block access to the local network. Try temporarily disabling your antivirus. Also, you need to make sure that there is a connection to the router.
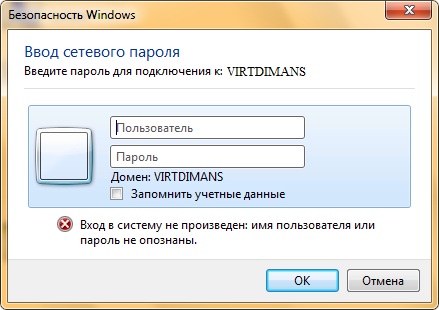
- No access to shared folder. Another problem, when we seemed to have set everything up, opened the public access, but when we try to open a folder on a computer on the network, a message appears that we do not have access, there are no rights to access this folder, we could not open the network folder, etc. Or, you are prompted for a username and password.
Be sure to check the sharing settings in the properties of this folder. There are a lot of settings, everything is confusing, maybe something is missed. Well, again, turn off the antivirus, it can block. - A computer that is connected via Wi-Fi cannot be seen by other computers on the local network. Or vice versa. If your network is built from computers and laptops that are connected both wirelessly and via cable, then there may be problems with a certain connection. For example, laptops that are connected via Wi-Fi may not appear on the local network.
In this case, pay attention to which profile you enabled network discovery for. (settings at the beginning of the article). Also, it is desirable to assign the status of a home network to connect to your Wi-Fi network. Also, try disabling your antivirus.
I think you have succeeded. If something could not be configured, then ask in the comments. Also, do not forget to share your tips on this topic.
In this article, I will talk about creating a local network using the Windows 10 operating system as an example. Creating and configuring a local network in Windows 8 and Windows 7 occurs in a similar way, this instruction is universal.
Maybe someone did not know, but you can access the data of another computer that is on the local home network or connected to your Wi-fi. It is very convenient and fast way for transferring files according to the computer-to-computer scheme, without the use of external media (flash drives, external hard drives, memory cards, etc.).
Check network card settings and working group
On the desktop, right-click on the "This PC" icon ("My Computer", "Computer"), in context menu select "Properties". In the "System" window, click on "Advanced system settings".
In the System Properties window that opens, open the Computer Name tab. Here you will see the workgroup name. By default, in Windows 10, a workgroup is named "WORKGROUP".
On all computers connected to this local network, the workgroup name must be the same. If the computers connected to the network have different workgroup names, change the names to the same name for the workgroup.
To do this, click on the "Change ..." button, in the "Change computer or domain name" window, give a different name for the workgroup (write the new name in capital letters, preferably in English).
Now check your network card settings. To do this, in the notification area, right-click on the network icon (Internet access). Click on "Network and Sharing Center". In the "Network and Sharing Center" window, click on the "Change adapter settings" link.
In the Network Connections window, select your network card, Ethernet, or Wi-Fi, depending on how your computer is connected to the Internet. Next, right-click on the network card, in the context menu, click on "Properties".
In the network card properties window, in the "Network" tab, select the "IP version 4 (TCP / IPv4)" component, and then click on the "Properties" button.
In the Internet protocol properties window that opens, in the "General" tab, check the parameters of the IP address and DNS service. In most cases, these parameters are assigned automatically. If these parameters are inserted manually, check the appropriate addresses with your Internet provider (the IP address on the computers connected to the network must be different).

After completing the verification of the parameters, you can go directly to creating a local network in Windows.
Creating a local network
The first step is to configure the LAN settings in Windows. Enter the "Network and Sharing Center", click on the item "Change advanced sharing settings".
In the "Advanced Sharing Options" window, you can change the sharing settings for various network profiles. operating room Windows system for each used network creates a separate network profile with its own specific settings.
There are three network profiles available:
- Private
- Guest or public
- All networks
In the private network profile, in the "Network discovery" option, select the "Turn on network discovery" option.
In the "File and Printer Sharing" option, activate the "Turn on file and printer sharing" option.
In the HomeGroup Connection option, select Let Windows manage HomeGroup connections (recommended).
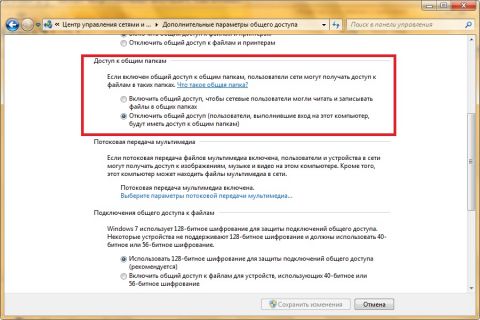
After that, open the network profile "All Networks". In the Public Folder Sharing option, select Turn on sharing so network users can read and write files in shared folders.
In the File Sharing Connections option, select the setting "Use 128-bit encryption to secure sharing connections (recommended)".
In the "Password protected sharing" option, activate the "Turn off password protected sharing" option.
After completing the settings, click on the "Save Changes" button.
Repeat all these steps on all computers that you plan to connect to your home LAN:
- check workgroup name (name must be the same)
- check network card settings
- in sharing options turn on network discovery, turn on file and printer sharing, turn off password protected sharing
How to enable folder sharing
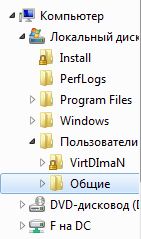
In this case, I created a folder and named "Public". Right-click on this folder, in the folder properties window, open the "Access" tab.
Then click on the "Advanced Settings" button.
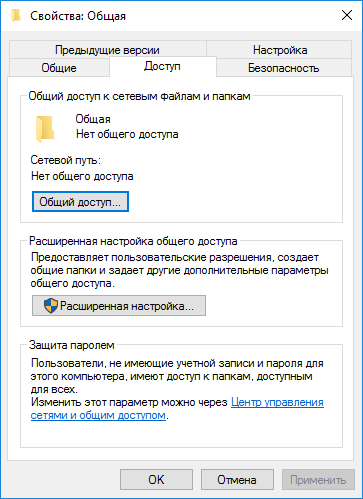
In the "Advanced sharing settings" window, activate the "Share this folder" item, and then click on the "Permissions" button.
![]()
Select permissions to use shared folder data from another computer. There is a choice of three options:
- Full access
- The change
- Reading
To save the settings, click the "OK" button.
Go back to the folder properties, open the "Security" tab, and then click on the "Edit ..." button.
In the window that opens, enter the name "All" (without quotes) in the "Enter the names of the objects to select" field, and then click the "OK" button.
In the folder properties window, in the "Security" tab, configure the permissions that you previously selected for the shared folder.
To change the permission for the "Everyone" group, click on the "Advanced" button. In the "Advanced security settings for the shared folder" window, select the "Everyone" group, and then click on the "Edit" button to change permissions.
The LAN setup in Windows is now complete. In some cases, you may need to restart your computer for all changes to take effect.
Login to the local home network
Open File Explorer, in the "Network" section you will see all available computers connected to the local home network. To log in to another computer, click on the computer name, and then click on the shared folder name to access the files and folders in the shared folder.

The local network in Windows 10 is created and configured. If something is not clear, write in the comments and I will definitely help you.
What tasks can be performed with the help of general access? In order for your users to be able to view the contents of the local network and have access to computers and devices, you can enable network discovery. If each computer on your network is not connected local printer, you will have to share printers in order for users to print their documentation. You can share computer resources both for all users and for those users whose credentials are available on the computer that provides file and folder sharing. You can allow users to share music, videos, and pictures by allowing streaming media sharing and more.
In this article, you'll learn more about advanced sharing options and learn how to properly set sharing permissions.
Opening the Advanced Sharing Options window
To open the window, do any of the following:
Window "Advanced Sharing Options" shown in the following illustration:
Rice. 1. Advanced Sharing Options window
Change sharing options
As mentioned in the article, the Windows 7 operating system supports multiple active profiles, which allows you to most securely use multiple network adapters. With the help of a window "Advanced Sharing Options", you can specify different sharing settings for any of the three profiles (Home and working network, Domain profile, and General profile). By specifying the sharing settings for each of the profiles, they will be applied depending on which network interface with the profile is currently active. Selecting a network profile in the window for changing sharing settings is shown in the following illustration:
Rice. 2. Selecting a network profile for which the sharing settings will be changed
Network discovery
Network discovery is a function for the network that was implemented in the operating system Windows Vista and is responsible for the parameter that determines whether other computers on the network can discover the user's computer and whether he can see them. There are two settings responsible for network discovery: "Turn on network discovery", with which the computer becomes visible to other user computers, and "Turn off network discovery", which prevents other computers from being viewed and makes the user's computer invisible to other computers on the network. Default for profile "Home and work" this option is enabled. When the computer is connected to a network in a public place, such as an airport or cafeteria, the "General" profile in which network discovery is disabled by default.
To change network discovery settings, follow these steps:
Network discovery functionality is also disabled by default in the domain environment. In order to turn it on, in the snap "Group Policy Management" create a GPO, open the Group Policy Management Editor, under the node Computer Configuration/Policies/Administrative Templates/Network/Link Topology Discovery (Link Layer). Choose a policy "Includes I/O Mapping Driver (LLTDIO)", in its properties set the value "Turn on" and check the box "Allow operation for domain" in the advanced settings of the policy properties. Repeat the same steps for the policy setting "Enable Responder Driver (RSPNDR)", then update the policy settings on the client machine using the command gpupdate /force /boot.
Sharing files and printers
If your computer is on a local network, then you may want to share some files or folders, as well as allow other members of the local network to use your printer. If you want other users to be able to view and perform any actions on the files you share, you must enable this functionality. Default for profile "Home or Work" this opportunity enabled, and for the profile "General"- disabled. To enable or disable this feature and add files to a public folder, follow these steps:
You can also give access to any folder located on your computer and specify users with different rights who will have access to it. To do this, do the following:
- Change the display name of a shared folder. To do this, select from the drop-down list "Share Name" available share name or click the button "Add". In the dialog box "New Shared Resource" enter a name and, optionally, a description of the resource and click the button "OK". In order for connected users to display only the name of the share you specified, select the original name of the folder from the list and click the button "Delete";
- Limit the number of simultaneous connections to your share. The default value is 20 connections. For example, if there are only five computers on your local network, you can change the number of users that can use your resource at the same time;
- Configure folder permissions and offline settings, which will be covered in a later article.
Rice. 9. Credential request window
Rice. 10. Public Folders
Access to shared folders
As mentioned above, along with user account folders, the Windows operating system creates a folder "General", which is shared by default for the profile "Home and work". With the help of a window "Advanced Sharing Options" you can deny access to this folder. To do this, follow these steps:
Please note that users who have already managed to connect to this folder will still have access to use the resources that are located in it.
Streaming media
With the media streaming options for computers and devices, you can set permissions for folders containing music, video files, and images that will be available for streaming to devices and computers on the network in "Windows Media Player". To configure these parameters, you need to follow the link "Choose media streaming options" in a group "Media Streaming" window "Advanced Sharing Options".
In the window "Media Streaming Options", shown in the following illustration, you can configure any settings related to broadcasting your multimedia data to other computers. You can read about the settings of this functionality in the article.
Rice. 12. Media streaming options
Connecting File Sharing
Using the options located in this group, you can specify the type of encryption to protect the sharing connection. Encryption is used to ensure that shared files and folders are protected. The Windows 7 operating system provides two algorithms for encrypting connections:
- 40-bit or 56-bit encryption - DES (Data Encryption Standard). It is a symmetric encryption algorithm in which the same key is used to both encrypt and decrypt data. DES was developed by IBM and approved by the US government in 1977 as an official standard;
- 128-bit encryption - Advanced Encryption Standard (AES). It is also a symmetric block cipher algorithm (block size 128 bits, key 128/192/256 bits) adopted as an encryption standard by the US government following the AES competition. This algorithm has been well analyzed and is now widely used, as was the case with its predecessor DES.
The default value for all profiles is 128-bit encryption to protect public connections.
Sharing with password protection
For security purposes, access to shared folders is password protected by default. To access user shared folders and files on another computer, you must enter the appropriate credentials for your account. This method is used to allow access to only the specified set of resources.
The method of granting access to files and folders is usually used when some users are allowed access to one set of shares, while others are given full access. In order to disable access with password protection (which, in principle, it is highly undesirable for enterprises to do), follow these steps:
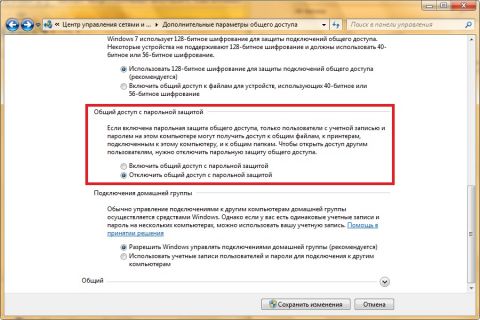
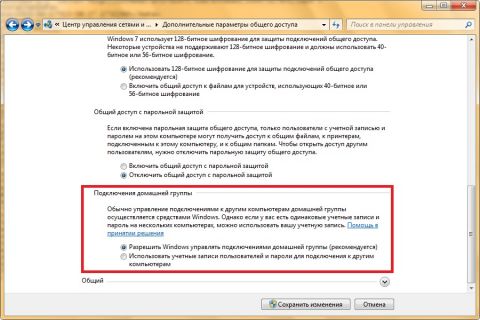
Homegroup connections
As you know, creating and joining an existing homegroup is only possible if the location of the active network interface is « home network» . The homegroup connection options in the advanced sharing options settings window are only available for the profile "Home and work". There are two options for sharing files in a homegroup: "Let Windows manage homegroup connections"- with the help of which the operating system independently provides general access for computers that are members of this group. It is possible that even before creating the homegroup, sharing permissions were created on your computers, and you would like to save them for later use in the homegroup. Parameter "Use Accounts users and passwords to connect to other computers" allows you to display a dialog asking for credentials when accessing the computer. To change your homegroup connection settings, follow these steps:
Conclusion
This article describes the advanced sharing options functionality. You have learned to change network location depending on the use of a network profile, learned about ways to share files and folders with and without password protection, recalled the settings for media streaming settings, learned a little about encryption methods for network connections, and learned how to change homegroup connection settings. Using the knowledge gained, you will be able to effectively set up file and folder sharing in your home and small office environments. In the next article, I will detail the use shared folders that are managed by the Microsoft Management Console snap-in "Shared Folders".
Setting up resource sharing is pretty easy, but there are a few things you need to take care of first. (The simplest sharing option is described in the Homegroups section.)
In order to share resources, your account needs a password. If you haven't set a password yet, open the User Accounts window in the Control Panel and click the Create a password link.
* You can make it so that it was impossible to use ad-
administrative accounts without passwords. Open the Control Panel __Ж" page Parental control(Parental controls), and if in the opened window
there is a yellow box that says One or more administrator accounts do not have a password, then click on it. On the Ensure Administrator Passwords page, select the Force all administrator accounts to set a password at logon check box, and then click OK.
Now in the Control Panel, open the Network and Sharing Center. If in the View your active networks section there is a Public network link under your network name, click on it and select either Home network or Work network. (If you cannot click this link, the network is not working properly; see Chapter 6 for troubleshooting tips.)
Open the HomeGroup page in the Control Panel and at the bottom of the window that opens, click the Change advanced sharing settings link. The window shown in Fig. 7.16.
On the Advanced sharing settings page, make sure the Home or Work (current profile) section is expanded, and select the following radio buttons:
О Turn on network discovery
О Turn on file and printer sharing (Him on file and printer sharing)
A Use 128-bit encryption to help protect file sharing connections
A Turn on password protected sharing When finished, click Save changes. Please note that 128-bit encryption may cause problems when using sharing on Macintosh computers or older computers with Windows control. If this happens, disable encryption.
Finally, if you do not know the name of your computer, then determine it. See the sidebar “What is the name of my computer?” for more information.
WHAT IS MY COMPUTER NAME?
Other users see your computer name when they access your shared folders over the network, so it's in your best interest to choose a name that's convenient and trustworthy.
Click on the Advanced system settings link on the left side of the System window from the Control Panel and go to the Computer Name tab. Ignore the field Description (Computer description); you are interested in the Full computer name field.
You can also open command line and execute the hostname command - it returns the computer name.
All computers on the local network must have different names, but they must be in the same workgroup. To rename the computer or change the workgroup name, click Change (do not click the Network ID button).
You may need to restart your computer for the changes to take effect.
Now you're all set to set up sharing.
Windows 7 provides three ways to share a folder: Sharing Wizard, Advanced Sharing window, and Homegroups.
About Sharing Wizard
It's not actually a real wizard, but that's what it's called on the View tab of the Folder Options window in the Control Panel (more on this panel in Chapter 2). If the Use Sharing Wizard check box is not cleared, you can select any files and folders in Windows Explorer, open the Share with drop-down menu (shown in Figure 7.17) and select one of the options: None of the users (Nobody), Homegroup (read) (Homegroup (Read)), Homegroup (read and write) (Homegroup (Read/Write)) or Specific users (Specific people). The Share with menu is also available from the right-click context menu.
Unfortunately, Windows does not tell you if this stick is shared, and if so, to whom. In addition, the parameter None of the users (Nobody) is an outright lie. If any parent folder of the selected item is shared, that item can also be accessed over the network, even if the Share with menu is set to Nobody. To avoid misunderstandings, use the settings of the Properties window, which will be discussed later. Please note that in some situations you may not even be aware of the public access available to your hard drive. For more information, see the Disabling Administrative Shares section.
About Advanced Sharing
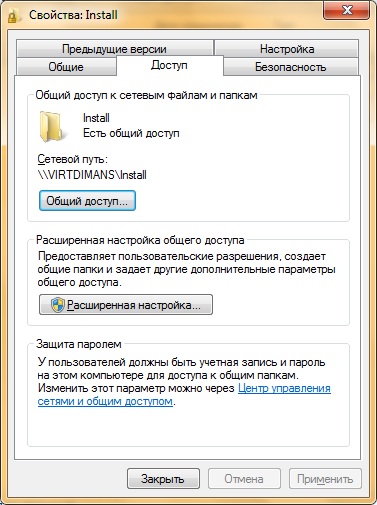
To check if a given folder or any of its parent folders is shared, right-click the folder, select Properties from the context menu, and click the Sharing tab. (Sharing). The window shown in Fig. 7.18.
If the parent folder of the selected folder is shared, then no settings in this window will change the settings for access through the parent object. To change the sharing settings for a parent folder, close the preferences window, right-click on the parent folder, select Properties, and go to the Sharing tab.
To open the Advanced Sharing window shown in fig. 7.19, click on the button of the same name. The Share this folder checkbox allows access to the selected folder and all of its contents. In the Share name field, enter a name that users on other computers will use to access the resource. Leave the default value so that the share name is the same as the source folder name.
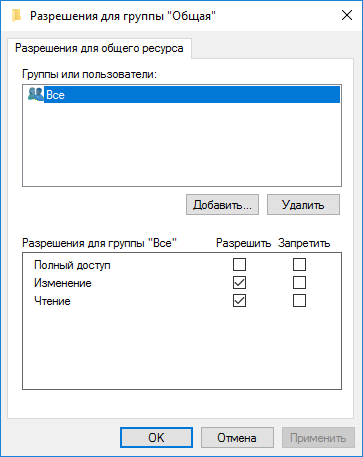
But that's not all. Click Permissions - the window of the same name will open, shown in fig. 7.20. As discussed in the "Setting Permissions for Files and Folders" section, sharing permissions are different from file permissions, although for sharing to work, the two types of permissions must match.
Note that the Everyone group - and it really does include all users - has been granted permission to read files, but no one has Change or Full Control permissions. It hardly suits you. Select Everyone in the Group or user names field and click Remove. Now click Add, enter your username in the Enter the object names to select field, and click OK. After that, highlight your name in the Group or user names field and check the boxes of the required permissions in the Allow column. In order to allow remote user read, write and delete files, check the Allow box in the Full Control line.
About Home Fuppa
There are no special icons in Windows to indicate that a given object has network access. (In previous Windows versions for this, a drawing with two men was used - if you saw it on the punk icon, you immediately realized that its contents were available to someone else. Obviously, Windows users 7 don't care about such trifles.) To see a list of almost all shared folders, open the Network folder in Windows Explorer and navigate to your computer's pane. About how to view full list shared folders, including hidden folders, is described in the "Disabling Administrative Shares" section.