1.Connecting a computer to a ZyXel Keenetic Lite router:
Before settingZyxelKeeneticLite, You plug the router's power adapter into an electrical outlet, connect the provider's cable to WAN router interface, and one of LAN ports, connect the yellow patch cord to the network card of your computer. Then you need to change the settings TCP/IP from the network card to automatically receive values(DHCP client). You can do this in the following way:
Windows XP: Start - Control Panel - Network Connections -( right click on) Connection via local network(if there is no "local network connection" icon (see Figure 1), then this either indicates that it has been renamed or the driver for the network card is not installed.) - Properties - Internet Protocol(TCP/IP) -Properties- further see fig. one
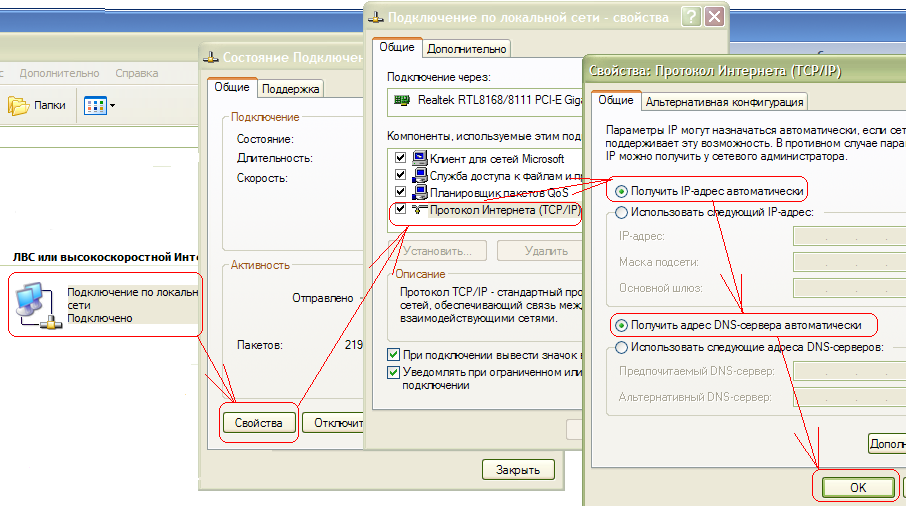
rice. one
Windows 7 : Start —> Control Panel -> Network and Internet -> Network and Sharing Center -> (left column) Change adapter settings -> (right click on) Local Area Connection -> Properties -> Internet Protocol Version 4 -> Properties ->further see fig. 2

rice. 2
Then open a browser (Opera, Internet Explorer, Mozilla, ...), in the address bar go to: http://192.168.1.1 , a window should appear:
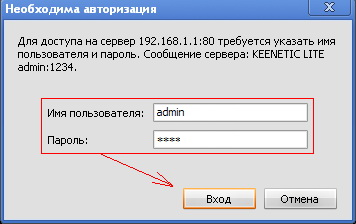
fig.3
username: admin, password: 1234
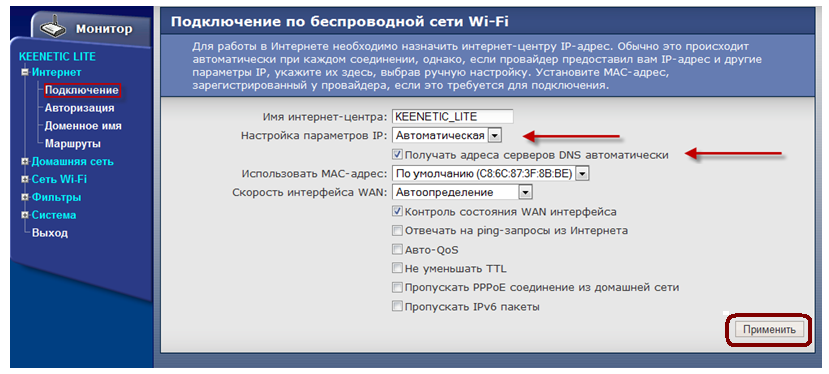
2. Configuring the WAN interface (that part of the router that "looks" towards the provider):
3. Setting up a wi-fi connection:
Router setting:
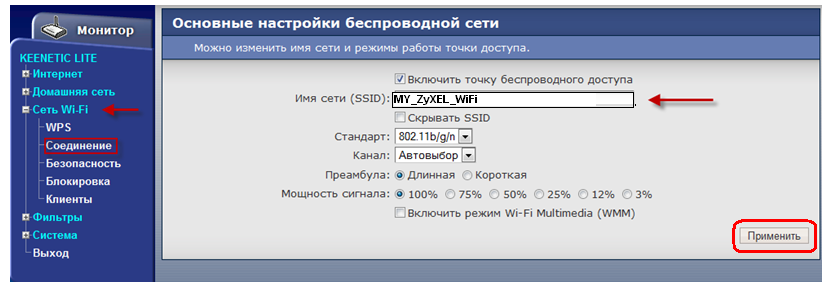
Network name (SSID) - the name of your wi-fi network. An arbitrary name written in Latin letters, for example, as in the figure MY_ZyXEL_WiFi.
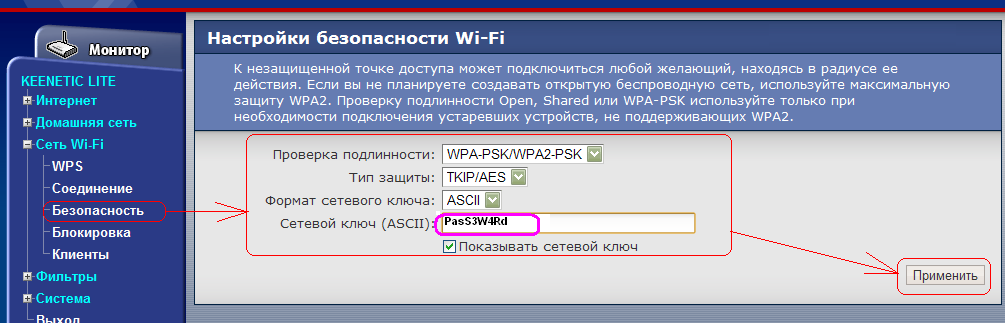
network key (ASCII) a password you have arbitrarily thought up (written in the English layout), which you need to write down in the future, it will come in handy. Click Apply. Wi-Fi router setup is complete. It remains to configure the wireless card of your computer (laptop).
WiFi card setup:
WindowsXP: Start - Control Panel - Network Connections.
Windows 7 : Start —> Control Panel —> Network and Internet —> Network and Sharing Center —> (left column) Change adapter settings.
Make sure you have the "Wireless Network Connection" icon (if the icon is missing, this either means that it has been renamed, or the driver for the wi-fi card is not installed.)

If you have Windows XP:
Next, you need to understand which application in Windows XP is responsible for connecting to WiFi networks. It may be a special utility from the manufacturer WiFi module that comes with the wireless adapter driver, or maybe Windows itself. The fact is that such special utilities intercept control over the wireless communication module from operating system, then Windows XP just won't see wireless WiFi networks, about which the system will not be slow to inform you:
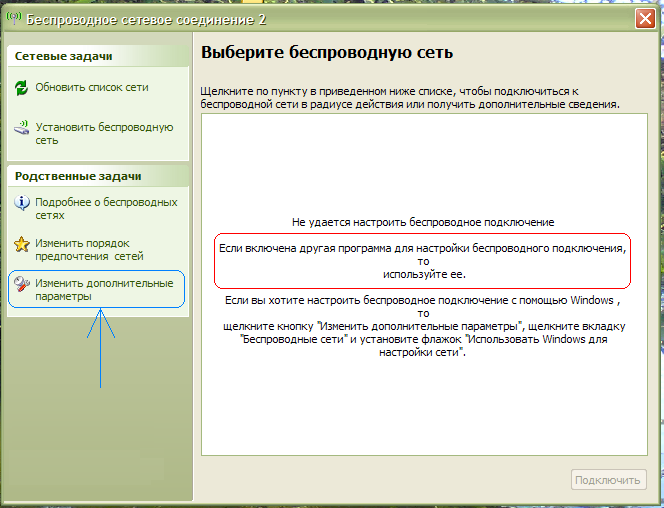
In principle, you can return control of wireless networks back to the operating system, for this you need in the window in Fig. click on the link on the left Change advanced options. Next, open the " Wireless networks' and check the box there. "Use Windows for network settings" :
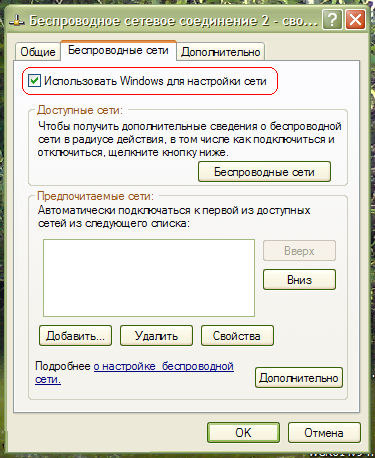
click OK.
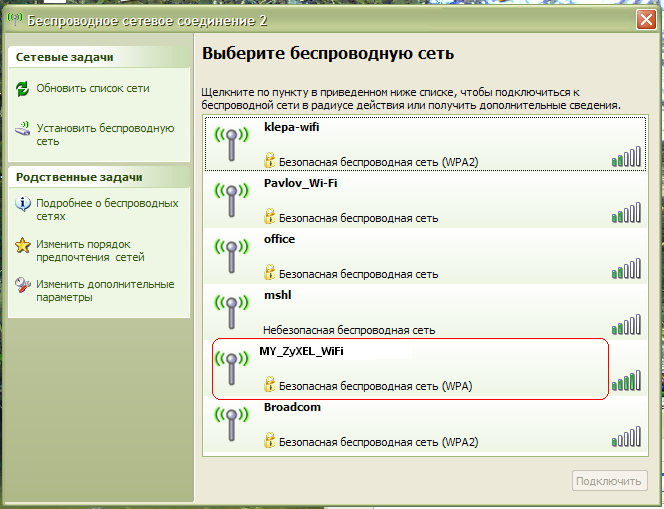
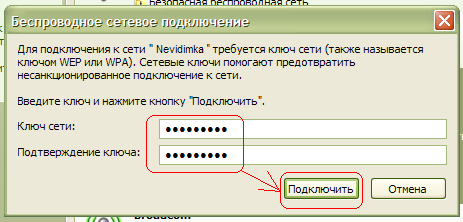
To connect to your wireless network(MY_ZyXEL_WiFi) from wifi router in windows xp You need to follow the following path: Start- (settings) - Control Panel - Network connections- then double click on the icon Wireless network connection. Next, select your network from the listand double-click on it with the left button, see fig.
Then Windows XP will ask you for a password to connect to a wireless wi-fi network (see Fig.). Here you need to specify, which is used for the security of the wi-fi network in your router. Enter the key, its confirmation (i.e. the same key is re-entered) below and press To plug.
Setup completed.
If you have Windows 7:
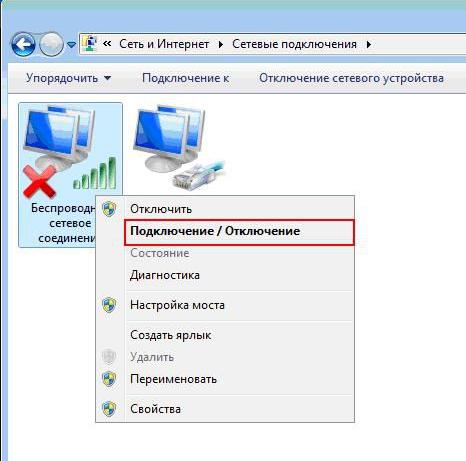
Click: Start —> Control Panel —> Network and Internet —> Network and Sharing Center —> (left column) Change adapter settings—>"Wireless Network Connection":
Then right click on , select item "Connect / Disconnect" :
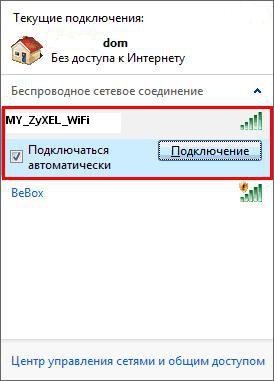
In the list of found wireless networks, find and select your network - MY_ZyXEL_WiFi. Then we press the button "Connection" .
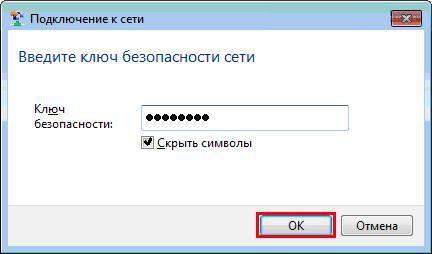
In the next window, you must enter, which was invented when setting up wi-fi in the router. Enter the key and press the button Ok .
Upon successful connection "Wireless Network Connection" will look like this.

Setup completed.
Check with a browser. Is the internet working? If the Internet is working, then as a result of the configuration you have received a configured router with a secure wi-fi channel.
Wi-Fi is a wireless network between laptops through which you can exchange files at a distance, play computer games with friends and neighbors, and connect to Wi-Fi hotspots cafes and metro.
Range wifi signal is about 100 meters of line of sight, without obstructions and about 15 meters passing through the stone walls of a residential building.
These indicators may vary depending on the model of the Wi-Fi device built into your laptop.
Using a wireless network will solve all the problems associated with laying network cables between multiple users. Previously, in order to connect 3 or more computers, you needed to purchase Switch or Hub devices, using a Wi-Fi wireless network, you do not need to connect others additional devices. Setting up the parameters for creating a wireless network is quite simple and does not take much time. On each operating system, the location of options for setting up a network is different, so we will consider the technique wifi settings in the latest Windows 7 operating system, which is most commonly used on laptops.Before you start entering the settings to create a network, you need to make sure that the device is turned on. To do this, in the window Control Panel->, Network and Internet->, Network Connections, you can see the wireless adapter network connection. If the sign of the wireless network connection is colorless, you need to right-click on it and turn on the adapter.
The same thing needs to be checked on all laptops to which we want to connect. Now you need to register the same name on all machines working group. The default names can be "MSHOME" and "WORKGROUP". Select any name and write it on all machines in the computer properties (right-click on the "My Computer" icon). After that, go to Control Panel->, Network and Internet->, Network and Sharing Center. On the left side of the tab, you see the following subsections: "Manage wireless networks", "Change adapter settings", "Change advanced sharing settings". First you need in the subsection "Changing adapter settings", in the properties wireless adapter write "Internet Protocol Version 4 (TCP/IPv4)". In the properties of this protocol, enter the IP address: 192.168.0.1, where the last digit "1" indicates the number of your laptop in the wireless network and it should not be repeated by other users. On the second laptop, enter the IP address: 192.168.0.2, on the third, enter the IP address: 192.168.0.3, and so on, changing only the last digit of the IP address. In general, the meaning of these numbers may be different (for example: 010.010.010.1, 144.123.34.1), but for an illustrative example, we will use the one proposed above. Next, click in the "Subnet Mask" field, and we get the standard 255.255.255.0. Do the same for other laptops. So, we have entered the necessary parameters and we can start creating a new Wi-Fi network. When the device is turned on, in the lower right corner, next to the volume control, you can see the current connections and Wi-Fi networks that are in range.
For creating new network it is necessary on the first laptop in the "Wireless Network Management" subsection, select "Add", and "Create a network profile manually". In the window that appears, enter the name of the profile, "Security Type", ->, No Authentication and check two checkboxes for "Start this connection automatically", and "Connect if the network is not broadcasting". After creating a network, other users will see in the lower right corner of the taskbar, among the current connections, the name of your network. By connecting by double-clicking on it, you will be on the same network and can start exchanging files. To share files, you need to open access to folders and files on your laptop. To do this, on the required folder in the properties, select the "Access" tab, clicking general access you will see a window in which you need to select "ALL", ->, "Add", ->, "Sharing".
To check network performance and quick access to other users' files, you need to write 192.168.0.2 in the address bar of any open window to enter the second computer, 192.168.0.3 on the third & hellip, 192.168.0.10 on the tenth. You will not be able to access the files of other wireless network users if they do not share any of the folders. Wireless WiFi networks already widely used so you can easily connect to other open networks that you can catch with your Wi-Fi device.
The documents
The pcQuality.ru team works under the Fruktus LLC brand.
What qualitatively What sets our team apart from others?
- All our employees are highly qualified specialists with over 7 years of experience.
- Many of our valued customers have been served by our experts for over 20 years (the process of working with customers began before the formation of the brand).
- Over the past 5 years, not a single client has left us, which is confirmed by the reviews.
We strive to maintain a focus on the quality of the services provided, we will be glad to see you among our customers!
Bookmarking
To add this page to your favorites, press CTRL + D
Probably everyone who has anything to do with computers has heard about wireless networks. Wireless networks, also called Wi-Fi or WLAN (Wireless LAN) networks, have many advantages over traditional wired networks, the main one of which, of course, is ease of deployment. For example, a wireless network does not need cabling (often requiring wall chasing); it is difficult to dispute such advantages of a wireless network as the mobility of users in its coverage area and the ease of connecting new users to it. At the same time, wireless networks are not without certain disadvantages. First of all, this is a low, by today's standards, connection speed, which, along with this, seriously depends on the presence of obstacles and on the distance between the receiver and transmitter; poor scalability, and also, when it comes to using a wireless network in the premises, a rather limited range of the network. There are also some issues related to wireless network security. However, despite all the problems that are typical for wireless networks (the number of which, by the way, is decreasing from year to year), they are rapidly developing and have already firmly entered our lives.
the use of wireless networks in public places (so-called hot spots), such as airports, train stations, cafes, hotels, exhibitions, has already become the norm for European countries and the United States and is gradually spreading to Russian expanses. Wireless networks are no less widely used in the home. Indeed instead of gouging walls and laying cables in them, planning in advance stationary PC installation sites, how much easier it is to put one (in extreme cases two) access points in the apartment, turning the home into one wireless zone! In addition, in this way, shared Internet access is created for all computers of the wireless network, and in the case of using mobile PCs (laptops) in the apartment, it will no longer be necessary to bind to a stationary place that has access to the network.
In this article, we will detail how to deploy and set up a wireless network at home step by step.
What you need to deploy a wireless network
so, to build a wireless network, you will need an access point (Access Point) and computers (laptops) equipped with wireless adapters. At the same time, we note that there are two modes of operation of wireless networks: Infrastructure mode and Ad Hoc mode.
In Infrastructure Mode, network end nodes (computers with wireless adapters) communicate with each other through an access point. In this case, the access point acts as a coordinating node, ensuring the sharing of the data transmission medium by all wireless adapters. Two Infrastructure modes are considered Basic BSS (Basic Service Set) mode and Extended ESS (Extended Service Set) mode. In BSS mode, all network nodes communicate with each other through only one access point, which can also act as a bridge to the external network. In ESS enhanced mode, there is an infrastructure of multiple BSS networks, with the APs themselves communicating with each other, allowing traffic to pass from one BSS to another. Access points are connected to each other using either cable network segments or radio bridges.
In addition to the wireless network architecture with an access point (Infrastructure mode), there is also an architecture without an access point (Ad Hoc mode). In Ad Hoc mode, which is also called Independent Basic Service Set (IBSS) or Peer to Peer (point-to-peer) mode, network nodes directly interact with each other. This mode requires minimal equipment: each station must be equipped with a wireless adapter. With this configuration, no network infrastructure is required. The main disadvantages of Ad Hoc mode are the limited range of the received network and the inability to connect to an external network (for example, the Internet).
In the future, we will talk about the architecture of wireless networks based on an access point.
Choice of wireless equipment
There are several types of wireless standards: 802.11a, 802.11b and 802.11g. In accordance with these standards, there are various types of equipment. The standards of wireless networks of the 802.11 family differ from each other primarily in the maximum possible transmission speed. Thus, the 802.11b standard implies a maximum transmission rate of up to 11 Mbps, and the 802.11a and 802.11g standards a maximum transmission rate of up to 54 Mbps. In addition, 802.11b and 802.11g use the same frequency range 2.4 to 2.4835 GHz, while 802.11a uses the frequency range 5.15 to 5.35 GHz.
Equipment of the 802.11a standard, due to the frequency range it uses, is not certified in Russia. This, of course, does not prevent you from using it at home. However, buying such equipment is problematic. That is why in the future we will focus on the consideration of the 802.11b and 802.11g standards.
Please note that the 802.11g standard is fully compatible with the 802.11b standard, that is, the 802.11b standard is a subset of the 802.11g standard, so clients equipped with an 802.11b wireless adapter can also work in wireless networks based on 802.11g standard equipment. The reverse is also true Wireless networks based on 802.11b equipment can be operated by clients equipped with an 802.11b wireless adapter. However, one pitfall is hidden in such mixed networks: if we are dealing with a mixed network, that is, a network in which there are clients with both 802.11b wireless adapters and 802.11g wireless adapters, then all network clients will work on 802.11b protocol. Moreover, if all network clients use the same protocol, for example 802.11b, then this network is homogeneous and the data transfer rate in it is higher than in a mixed network where there are both 802.11g and 802.11b clients. The point is that 802.11b clients don't "hear" 802.11g clients. Therefore, in order to share access to the data transmission medium of clients using different protocols, in such mixed networks, access points must work out a certain security mechanism. Without going into details of the implementation of these mechanisms, we only note that as a result of the use of protection mechanisms in mixed networks, the real transmission rate becomes even lower.
Therefore, when choosing equipment for wireless home network it is worth stopping at the equipment of one standard. The 802.11b protocol is already obsolete today, and the actual data transfer rate using this standard may turn out to be unacceptably low. So optimal choice 802.11g equipment.
Some manufacturers offer 802.11g + (SuperG) equipment, and on the boxes of their products (access points and wireless adapters), in addition to the inscription "802.11g +", they also indicate a speed of 100, 108 or even 125 Mbps.
In fact, no 802.11g+ protocol exists, and all that lies behind this mysterious protocol is an extension of the basic 802.11g standard.
In fact, all wireless chipset manufacturers (Intersil, Texas Instruments, Atheros, Broadcom, and Agere) have implemented 802.11g+ enhanced mode in one form or another. However, the problem is that they did it differently and there is no guarantee that solutions from different manufacturers will be able to interoperate with each other. Therefore, when buying an 802.11g+ access point, you should make sure that your wireless adapters also support this standard.
Access point or wireless router?
The main element of any wireless network is the access point. The latter can be either a separate device or integrated into a wireless router. Thus, first of all, it is necessary to establish which equipment is optimal for a particular wireless network. The answer to this question depends on what tasks this wireless network is designed to solve. Let's look at a few typical situations.
In the simplest case (Fig. 1), several computers are combined into a wireless network solely for data exchange between PCs. In this case, the ideal choice would be an access point that connects to one of the PCs on the network (and the PC to which the access point connects must not be equipped with a wireless adapter).
![]()
Rice. 1. The simplest type of wireless network based on an access point
In the second option (Fig. 2), it is assumed that in addition to data exchange between computers connected in a wireless network, it is necessary to implement shared Internet access for all computers using an analog modem (a modem that connects to a telephone line). In this case, the modem is connected to one of the computers on the wireless network, and the Internet connection is configured in shared access mode. An access point is connected to the same computer, and Internet access is configured on all computers of the wireless network in the access mode via the local network. It is clear that the optimal solution in this case is the use of an access point.
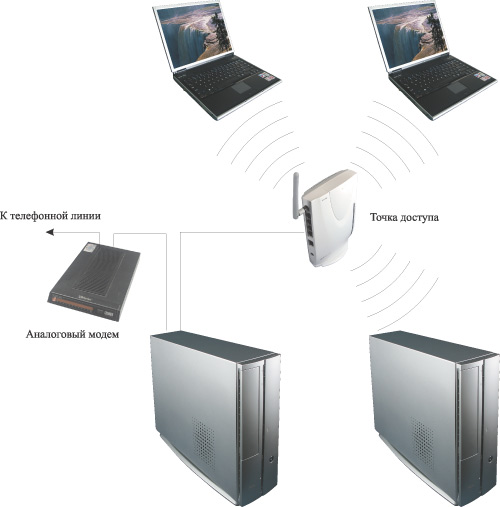
Rice. 2. Wireless network with Internet access when using an analog modem
And finally, the last option for the wireless network topology is the use of high-speed Internet access using a DSL, cable modem, or Ethernet connection (Fig. 3). In this case, the best option is to use the wireless access point built into the router.
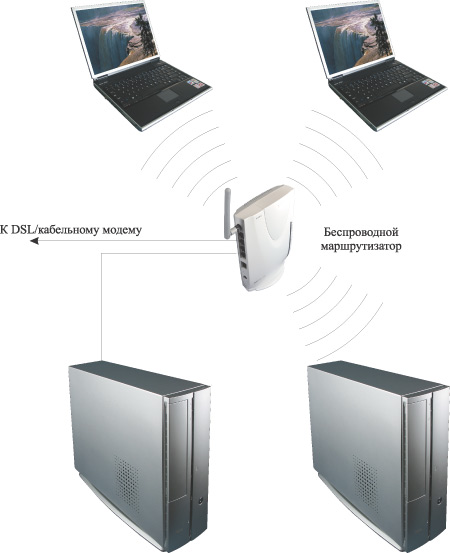
Rice. 3. Wireless network with Internet access using DSL/cable modem
Routers are network edge devices, that is, devices installed at the edge between two networks or between a local area network and the Internet, and in this sense they act as a network gateway. From a constructive point of view, they must have at least two ports, one of which is connected to the local network (this port is called the internal LAN port), and to the second the external network, that is, the Internet (this port is called the external WAN port). As a rule, SOHO class routers have one WAN port and several (from one to four) internal LAN ports, which are combined into a switch. In most cases, the WAN port of the switch has a 10/100Base-TX interface and an xDSL modem with the appropriate interface or an Ethernet network cable can be connected to it.
The wireless access point integrated into the router allows you to organize a wireless network segment, which for the router belongs to the internal network, and in this sense, computers connected to the router wirelessly are no different from those connected to the LAN port.
Using a wireless router instead of an access point is beneficial not only because it saves you money on buying an additional Ethernet network controller or mini switch, but also because routers provide an additional means of protecting your internal network from unauthorized access. So, almost all modern SOHO class routers have built-in hardware firewalls, which are also called firewalls or firewalls.
Setting up an access point/wireless router
To deploy a wireless network, you first need to set up an access point (wireless router). We will consider the process of setting up an access point integrated into the Gigabyte B49G wireless router. It is assumed that all computers on the wireless network are running Windows XP Professional SP2 (English version). Other access points are configured in the same way.
So, the first thing you need to find out is the IP address of the access point and the default password. Any access point or router, being a network device, has its own network address (IP address). In order to find out the IP address and password, you will have to scroll through the user manual. Let's assume that the default IP address of the access point is 192.168.1.254.
Next, the access point must be connected to the computer using a traditional Ethernet network interface (for this, an Ethernet network controller must be installed on the computer). If a wireless router is used, the computer is connected via the router's LAN port.
To set up an access point, it is necessary that the computer to which the access point is connected and the access point itself have IP addresses that belong to the same subnet. Since in our case the access point has an IP address of 192.168.1.254, the computer must be assigned a static IP address of 192.168.1.x (for example, 192.168.1.100) with a subnet mask of 255.255.255.0.
To assign a static IP address to a computer, click the icon My Network Places Properties network connection Local Area Connection(Local Area Network) and by right-clicking on it, go to Properties again. This should open a dialog box. Local Area Connection Properties(Network Connection Properties) that allows you to configure network adapter(Fig. 4).
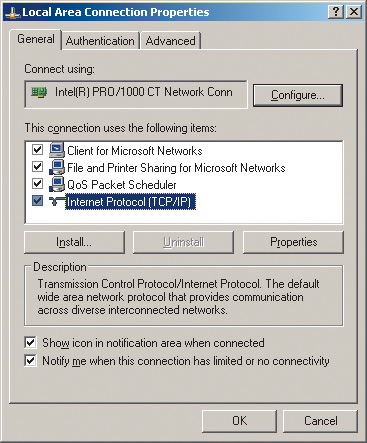
On the General tab, highlight the protocol Internet Protocol (TCP/IP) and click on the button Properties. You will see a dialog box that allows you to set the computer's IP address and subnet mask. Check the box in this dialog box. Use the following IP address: and enter the IP address and subnet mask in the appropriate text fields (Fig. 5).
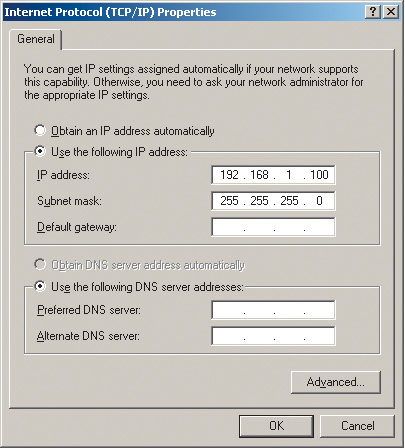
Rice. 5. Set Static IP Address and Subnet Mask
Once the static IP address of the computer is set, you can directly access the settings of the access point itself. To do this, enter the IP address of the access point (192.168.1.254) in the address field of the Web browser. If everything is done correctly, then you will see the access point (router) settings dialog box (Fig. 6). You may first need to enter a username and password (they are available in the documentation).
Using the settings dialog box, you can change the IP address of the access point (for example, this will have to be done to implement shared Internet access using an analog modem), as well as configure the wireless network.
To set up a wireless network, you need to set the following parameters:
- type of wireless network. If the access point supports multiple wireless standards, you must explicitly specify the wireless network standard (for example, 802.11g);
- channel number. For wireless connection access points with network clients can use different frequency channels. For example, in the case of the 802.11g protocol, channels one through thirteen can be used. You can explicitly specify which channel will be used to establish a connection, or you can set automatic channel selection ( Enable auto channel select);
- SSID. Each wireless network has its own unique SSID, which is the conventional name for the wireless network. In our case, the name Gigabyte is used;
- rate. The access point allows you to explicitly specify the speed of the connection being established. However, it is not recommended to do this and it is best to set the automatic connection speed detection (auto / best).
So, after all the basic settings of the access point are made, you can start setting up wireless adapters on network clients.
Configuring Wireless Adapters
The setting of a specific wireless adapter, of course, depends on the version of the driver and management utility used. However, the tuning principles themselves remain the same for all types of adapters. In addition, there is a general, independent of the type of management utility for a specific adapter, use the Microsoft client (the wireless adapter configuration utility built into the Windows XP operating system) to configure the wireless adapter. Let's take a closer look at both configuration methods. In addition, given the popularity of laptops based on mobile technology Intel Centrino, an integral part of which is the presence of a wireless communication module, we will describe the wireless connection setup using an example Intel drivers PROSet/Wireless (version 9.0.1.9) used in laptops based on Intel Centrino technology.
So, first of all, you need to install the wireless adapter driver. In the case of a laptop based on Intel Centrino mobile technology, open the Intel PROSet / Wireless dialog box (the icon of this window is located in the system tray), which will be used to create a new wireless connection profile (Fig. 7).
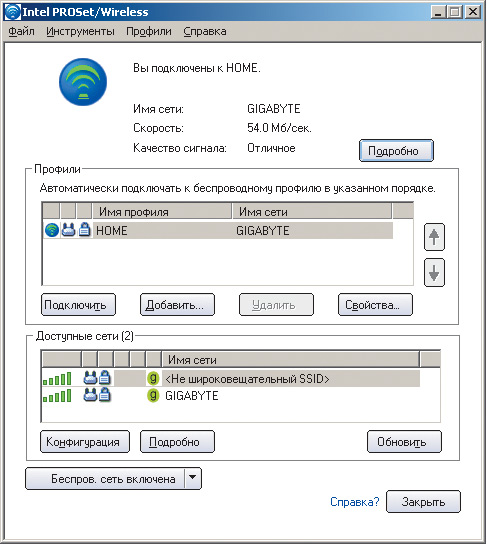
Rice. 7. Wireless Settings Dialog Box
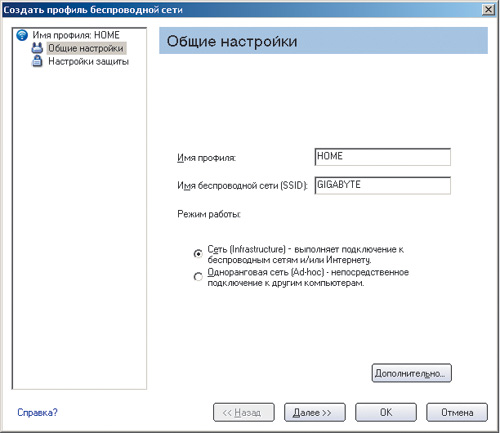
Click on the button Add to create a new wireless connection profile. In the opened dialog box Create a wireless network profile(Figure 8) enter the profile name (for example, HOME) and the wireless network name (SSID) that was set when setting up the access point (Gigabyte).
When using the Microsoft client to configure a wireless adapter (a generic method that works for all wireless adapters), the first thing to check is that you are not using another adapter management utility.
Click the icon My Network Places(Network Neighborhood) right-click and in the list that opens, select the item Properties(Properties). In the opened window network connection(Network connections) select icon Wireless Network Connection(Wireless Connections) and by right-clicking on it, go to the item again Properties. After that, a dialog box (Wireless Network Connection Properties) should open, allowing you to configure the wireless network adapter (Fig. 9).
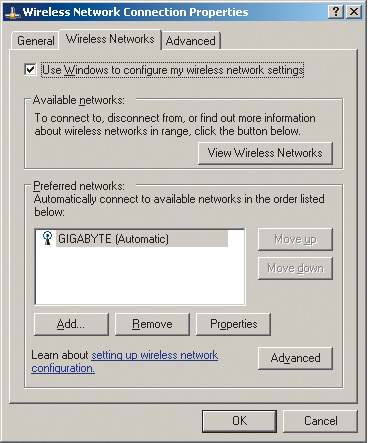
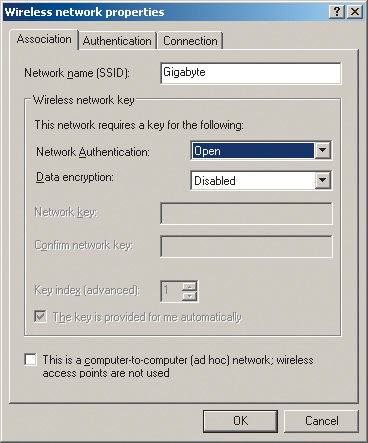
By going to the tab Wireless Networks(wireless networks), press the button Add...(add) and in the opened dialog box Wireless network properties(wireless connection properties) enter the name of the wireless network (SSID) in our case, Gigabyte (Fig. 10). Leave the rest of the fields (protection settings) unchanged for now.
Rice. 10. Setting up a wireless connection profile
Regardless of which of the following methods is used to create a wireless connection profile, after creating it, the wireless adapter should automatically establish a connection with the access point.
Communication in a wireless network
If, after setting up the access point and wireless adapters of network computers, you try to access data stored on another PC from one PC, then most likely you will not succeed. The fact is that the data to which it is necessary to organize network access must be located in a shared folder or even on a logical drive. Therefore, on those computers between which it is supposed to implement data exchange, it is necessary to create shared network resources.
To do this, left-click on the icon My Computer(My Computer) and in the window that opens, select the logical drive (or folder) that you want to make available to network users. By right-clicking on it, select the item from the list that opens. Sharing and Security…. In the dialog box that opens (Fig. 11), go to the tab Sharing.
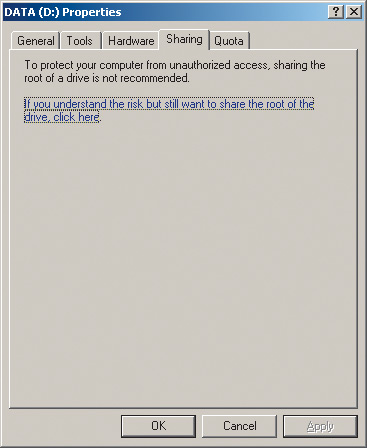
Rice. 11. Dialog box for creating a shared logical drive
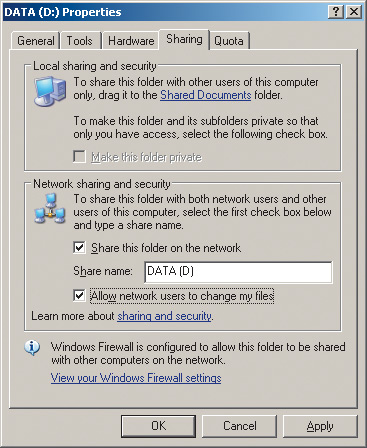
This dialog box has only one option: if you understand the risk but still want to share the root of the drive, click here. This is nothing more than a warning about the risk of partitioning a logical drive. If you, in spite of everything, want to make this disk available to network users, then simply click on this inscription. The dialog box will change its appearance, and in the new window (Fig. 12) you will need to select the item Share this folder on the network(make this folder (disk) available to network users). In addition, if you want network users to be able to change (and not just download) data on a shared disk, then you must additionally select the option Allow network users to change my files(allow network users to modify files).
Implementing Shared Internet Access Using an Analog Modem
The next important aspect to consider is the implementation of shared Internet access using an analog modem. To do this, you first need to assign a static IP address to the computer to which the modem is connected.
The computer's IP address must be 192.168.0.1 and the subnet mask must be 255.255.255.0. Using a different IP address when creating shared Internet access is not allowed. In extreme cases, if you set a different IP address, then when you activate shared access, you will be sent a notification about the automatic change of the server IP address.
Once the computer has been assigned a static IP address, click the icon My Network Places(Network Neighborhood) right-click and in the list that opens, select the item Properties(Properties). In the opened window network connection(Network Connections) select the icon with the name of the Internet connection (the name of this connection is set arbitrarily when setting up the Internet connection). Right click on it and go to Properties and in the opened dialog box Internet Properties(Internet connection properties) go to the tab Advanced.
In a group Internet Connection Sharing(Internet Sharing) check the box Allow other network users to connect through this computer's Internet connection(Allow LAN users to connect to the Internet via this computer). This will enable shared Internet access for all computers on your local network. Automatically in this dialog box, the next two items will also be checked. The first one ( Establish a dial-up connection whenever a computer on my network attempts to access the Internet) allows you to connect to the Internet on demand from any computer on your network. Even if there is currently no direct connection to the Internet on the server, in the event of a corresponding request from any computer on the network, the modem will start dialing the provider's number and establish a connection to the Internet.
second paragraph ( Allow other networks users to control or disable the shared Internet connection) allows all network users to manage shared Internet access.
After Internet Sharing is enabled on your computer, you need to check network settings on all other computers on the network. Unlike the server, all other computers on the network should not have a static IP address. To verify that this is indeed the case, repeat the procedure for assigning an IP address on all computers on the network, but in the dialog box Internet Protocol (TCP/IP) Properties mark the item Obtain an IP address automatically. In this case, all computers on the local network (except the server) will automatically receive dynamic IP addresses.
Without delving into all the subtleties of dynamic network configuration, we only note that a special DHCP service will be launched on the server, which will automatically distribute IP addresses in the range of the same subnet as the server, that is, in the range 192.168.0.x .
Once the server and all computers on the network have been configured, you will be able to use shared Internet access.
Configuring Wireless Network Security
If the initial testing of the created wireless network was successful, you can proceed to the second stage setting up network security to prevent unauthorized access to your network, at least from neighbors. Of course, if your grandmother lives behind the wall - God's dandelion, who knows nothing about computer technology, then you don’t have to do this, but if a grandmother has grandchildren, then it’s better to protect yourself.
First of all, we note that the wireless network we created is peer-to-peer, that is, all computers on this network are equal and there is no dedicated server that regulates the network. Therefore, relying on a system security policy in such a network is meaningless, since such a policy simply does not exist there. Unfortunately, through the operating Windows systems XP Professional on such a network will not be able to set up a list of authorized users to access the network. But there is still a way out. To do this, you need to use the capabilities of an access point or a wireless router, that is, implement network protection at the hardware level.
MAC address filtering
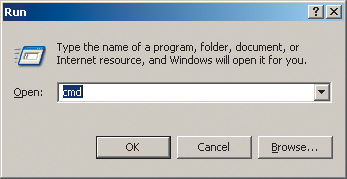
On the first "line of defense" it is desirable to configure filtering by MAC addresses. A MAC address is a unique (in the sense that no two are the same) identifier for a specific network equipment such as a wireless adapter or access point. The MAC address is written in hexadecimal format. For example, a MAC address can be written as 00-0F-EA-91-77-9B. To find out the MAC address of the installed wireless adapter, click the button start(Start) and in the list that appears, select Run...(Execute). In the window that opens, type the command cmd(Figure 13), which will launch a command prompt window.
AT command line dial a team ipconfig/all(Fig. 14).
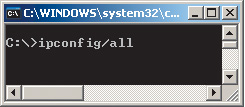
This will let you know the wireless adapter's IP address and MAC address.
After the MAC addresses of all computers on the network are found out, you need to configure the filtering table by MAC addresses on the access point. Almost any access point and router provides this capability. Setting up this table comes down, firstly, to the need to allow filtering by MAC addresses, and secondly, to entering the allowed MAC addresses of wireless adapters into the table (Fig. 15).
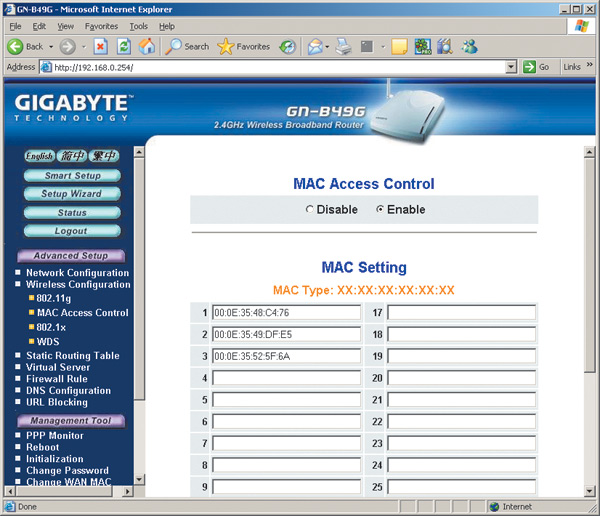
After setting up the MAC filtering table, any attempt to enter the network using a wireless adapter whose MAC address is not in the table will be rejected by the access point.
Configuring User Encryption and Authentication
Any access point, and even more so a wireless router, provides users with the ability to configure network traffic encryption when it is transmitted over an open environment.
But before proceeding to the direct configuration of encryption modes in a wireless network, we will make a small theoretical digression to familiarize readers with the basic concepts and terminology.
The first standard used to encrypt data in wireless networks was WEP (Wired Equivalent Privacy). In accordance with this standard, encryption is carried out using a 40-bit or 104-bit key (some models of wireless equipment support longer keys), and the key itself is a set of ASCII characters with a length of 5 (for 40-bit) or 13 (for 104 -bit key) characters. The set of these characters is translated into a sequence of hexadecimal digits, which are the key. It is also possible to use directly instead of a set of ASCII characters hexadecimal values(same length).
As a rule, in the utilities for setting up wireless equipment, 64- or 128-bit keys are specified not 40- or 104-bit keys. The fact is that 40 or 104 bits is the static part of the key, to which the 24-bit initialization vector is added, which is necessary to randomize the static part of the key. The initialization vector is chosen randomly and dynamically changes during operation. As a result, taking into account the initialization vector, the total key length is 64 (40+24) or 128 (104+24) bits.
The WEP encryption protocol, even with a 128-bit key, is considered not very strong, so 802.11g devices support the improved WPA Wi-Fi Protected Access encryption algorithm, which includes 802.1x, EAP, TKIP and MIC protocols.
The 802.1x protocol is a user authentication protocol. For its operation, this protocol requires a dedicated RADIUS server, which, of course, is not available on a home network. Therefore, it will not be possible to use this protocol at home.
TKIP (Temporal Key Integrity Protocol) is an implementation of dynamic encryption keys. Encryption keys are 128 bits long and are generated by a complex algorithm, and the total number of possible key options reaches hundreds of billions, and they change very often.
The MIC (Message Integrity Check) protocol is a protocol for checking the integrity of packets. The protocol allows you to drop packets that have been "inserted" into the channel by a third party.
In addition to the above protocols, many wireless equipment manufacturers are embedding support for the AES (Advanced Encryption Standard) standard, which has come to replace TKIP, in their solutions.
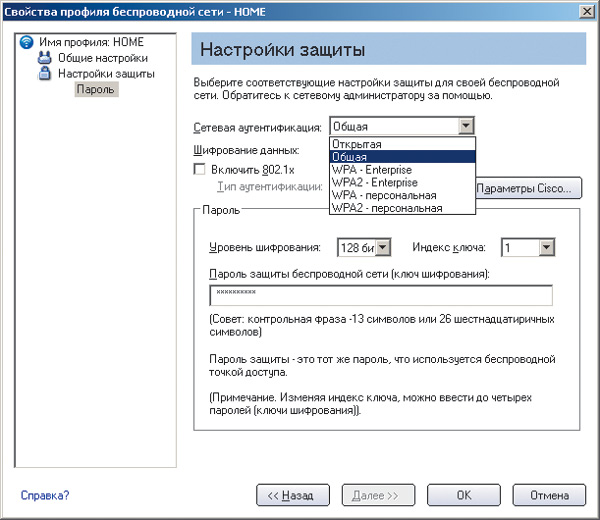
So, after a short digression into the basic concepts of encryption technology and network user authentication, let's start setting up our wireless equipment. In doing so, we will adhere to the following recommendations whenever possible. If all devices on the network support WPA-based encryption, we will use this method (otherwise, we should choose WEP encryption with a 128-bit key). Well, if all devices on the network support AES encryption, then we will use it.
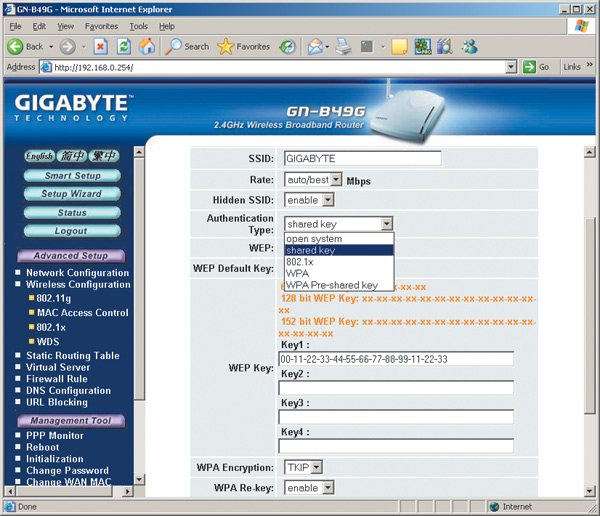
Let's start by setting up a wireless access point. First of all, let's choose the type of authentication (Authentication) (Fig. 16). The following options are available in the authentication type list:
Open System (open);
Shared Key (shared);
WPA pre-shared key.
Rice. 16. Setting the type of authentication
Open System (default mode) This is actually a mode that does not have network authentication. When you select this mode, you only need to know the network identifier (SSID) to enter the wireless network.
In the Shared Key mode, as well as in the Open System mode, it is possible to use WEP traffic encryption. The difference between the Shared Key and the Open System is that in the first case, to enter the network, you also need to set a common WEP encryption key for the entire network.
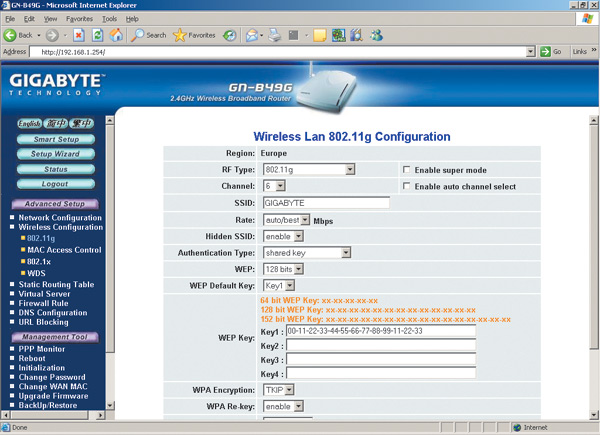
WEP Encryption Example
If for some reason it is decided to use WEP encryption, then you must set the Shared Key authentication type. Next, set the key size (recommended value is 128 bits) and enter the key itself (in our example, the key is in hexadecimal format). In total, it is possible to set up to four key values, and if several keys are set, you must specify which one is used (Fig. 17).
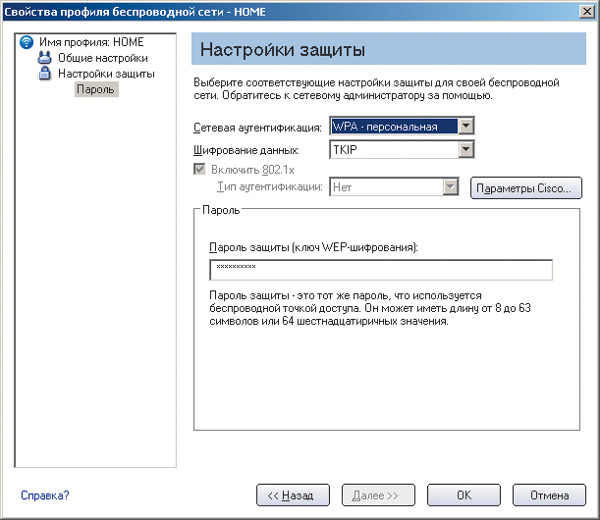
Next, you need to implement similar settings on all wireless adapters of network computers. This is done either using a management utility (in our case, Intel PROSet/Wireless) or through a Microsoft client. If you are using the Intel PROSet/Wireless utility, open the utility's main window, select a connection profile, and click the button Properties…. In the dialog box that opens (Fig. 18), go to the tab Security settings and select the type of network authentication General(this corresponds to the Shared Key type). Next, select the WEP encryption type, set the key length to 128 bits, and enter the encryption key.
When using the Microsoft client adapter to configure, open the dialog box Wireless Network Connection Properties(Wireless Network Connection Properties) and on the Wireless Networks(wireless networks) select the desired wireless connection profile. Click on the button Properties(Properties) and in the dialog box that opens (Fig. 19), set the type of network authentication (Network Authentication) Shared, the type of encryption (Data encryption) WEP and enter exactly the same encryption key that was specified when configuring the access point.

Rice. 19. Set WEP encryption settings on the wireless adapter using the Microsoft client
WPA Encryption Example
If it is possible to use WPA encryption (that is, if all devices on the network support it), then it is recommended to select this type of encryption.
There are two types of WPA encryption: standard WPA mode (sometimes called WPA-Enterprise) and WPA Pre-shared key, or WPA-personal.
WPA-Enterprise mode is used in corporate networks because it requires a RADIUS server. Naturally, at home it will not be possible to use this mode.
But the WPA Pre-shared key mode is for personal use. This mode provides for the use of predefined encryption keys (access password) that are the same for all network devices, and the primary user authentication is carried out using this key.
There is also the WPA2 algorithm (the next version of the WPA protocol). If all wireless network devices support this mode, then it is quite possible to use it. The settings in this case are carried out in exactly the same way as in the case of the WPA mode.
You can select TKIP or AES as encryption algorithms when using the WPA standard.
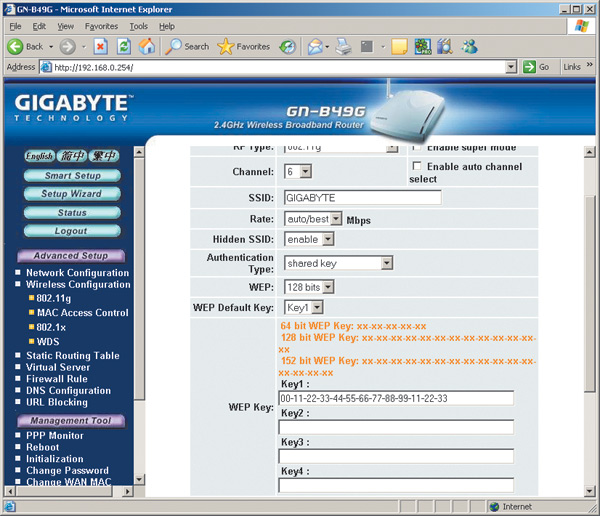
To configure WPA encryption on the access point, in the main settings window, select the WPA Pre-shared key authentication type and set the encryption type to TKIP or AES (Fig. 20). Then you need to set the encryption key (WPA PSK Passphrase). In our example, the key is the word Gigabyte.
Next, you need to implement similar settings on all wireless adapters of network computers. This is done in exactly the same way as in the case of the WEP encryption we have already considered. An example of configuring a wireless adapter using the Intel PROSet/Wireless management utility is shown in Figure 1. 21.
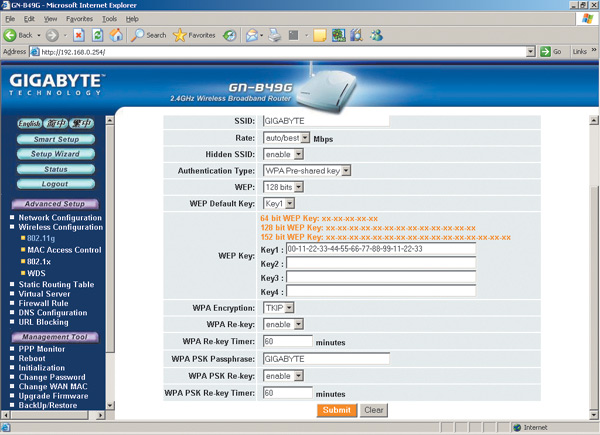
To determine the degree of influence of various encryption algorithms on the data transfer rate, we tested wireless channel connection between the Gigabyte B49G access point and the wireless adapter integrated in a laptop based on Intel Centrino mobile technology with an Intel Pentium M 1.6 GHz processor.
To generate maximum network traffic, we used the NetIQ Chariot 5.0 package. The test results are presented in the table.
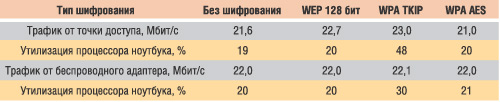
Results of testing a wireless communication channel for various traffic encryption modes
As the test results show, network traffic is absolutely independent of the encryption algorithm used, and the only thing that changes for different algorithms is the degree of processor utilization on a laptop with a wireless adapter. The most resource-intensive in this sense is the TKIP encryption algorithm. So, in case of using Intel processor Pentium M with a clock frequency of 1.6 GHz, the average degree of its utilization was 48% for incoming traffic and 30% for outgoing. Thus, it is advisable to use this encryption algorithm only when all network computers equipped with sufficiently powerful processors.
The Multi-SSID tab (Multi SSID) is used to configure additional SSIDs, with which you can organize virtual networks and differentiate connections to an access point at the guest SSID level, which can be done due to the presence of a corresponding mechanism in the D-Link DWL-2100 AP than can boast not every access point (Fig. 15.20).
Rice. 15.20. Multi-SSID Tab Contents
The tab contains a group of parameters that is repeated three times, but for different SSIDs. Thus, up to three different guest SSIDs can be configured. Set different SSIDs after setting the master SSID using the following settings.
Enable VLan Status - By default, the ability to use multiple SSIDs is disabled. To enable it, you must check this box.
– Master SSID (Main SSID) - the parameter does not change, since the value of the access point's SSID, which is configured earlier, is used. In fact, this field displays the current SSID assigned to the access point.
– Security - The parameter is also not editable and displays only the current security mechanism, such as Open or Shared.
– VLan Group ID (Virtual Group ID)—The created virtual groups are distinguished by their number. More than 4000 numbers are available for their numbering, starting from one. As a rule, the main group, that is, the one that contains the main SSID, is designated by the very first number, that is, one, as shown in Fig. 15.20.
Enable Guest SSID1 Status - This check box contains options that describe the optional SSID, specifically SSID1. To enable this feature, you must check this box.
– SSID—the parameter contains a unique identifier, in particular SSID1, when selecting which you must follow the same rules as when selecting the main SSID. This is especially important if the SSID broadcast is disabled and you need to know exactly this SSID to connect to the network. In this case, you can easily weed out unwanted connections from the outside.
– Security - This parameter describes the authentication method. However, additional authentication method configuration is possible only if the Security parameter in the Enable VLan Status area is set to Open or Shared. At the same time, None, Open, or Shared values become available for selection.
– Webkey - You can select the length of the encryption key (64, 128 and 152 bits) that will be used to encrypt data transmitted over the network between devices that use Guest SSID1. Having chosen the key length, you must immediately set the type of character string (HEX or ASCII) representing the key, and the key itself.
– VLan Group ID (Virtual Group ID) - as in the case of the main virtual group, the created virtual group must also have its own unique number - any number of interval 1-4095 different from the main virtual group number. In our example, the main virtual group is numbered 1, and the group with guest SSID1 is numbered 2.
– Key Index - as usual, up to four keys of different or the same length can be used to encrypt data. To switch between them, use the Key Index parameter.
Similarly, you can configure two more guest SSIDs, if, of course, this is necessary.
Once you've set up your access point, you'll need to set up your other access points and wireless adapters accordingly.
Configuring Wireless Adapter Settings
After installing the driver for the D-Link DWL-G122 wireless adapter, an icon in the form of the letter "D" appears in the notification area on the Taskbar.
In the future, you can configure the adapter by right-clicking on it and selecting in the appeared context menu item Wireless Network (Wireless network) (Fig. 15.21) or simply by double-clicking on it with the mouse button.
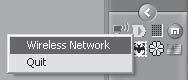
Rice. 15.21. Configuring the adapter through the item Wireless Network (Wireless network)
By default, even if you run the native adapter configuration utility, the standard Windows configuration wizard will open. Naturally, since there is a "native" configuration utility, you can configure the adapter using it. Moreover, the “native” utility allows you to configure many more different parameters than the standard Windows hardware setup wizard.
The following shows examples of using both options and how to switch between them.
Using the Standard Configuration Mechanism
By default, the adapter is always configured using Windows mechanisms, unless the user himself specifies a wireless connection configuration option.
To launch the configuration mechanism, just double-click on the D-shaped icon in the notification area on the Taskbar. In the future (when it is indicated that by default you need to use the “native” utility for configuration), in order to launch the standard adapter configuration mechanism, you will need to open the wireless connection properties window (see Figure 15.1), in which you can configure it. Here you can also set the parameters of the adapter itself.
To change the adapter settings, click the Configure button - the wireless adapter properties window will open, containing several tabs with settings and useful information.
Let's go to the Advanced tab, which contains the parameters that affect the operation of the device on the network (Fig. 15.22).
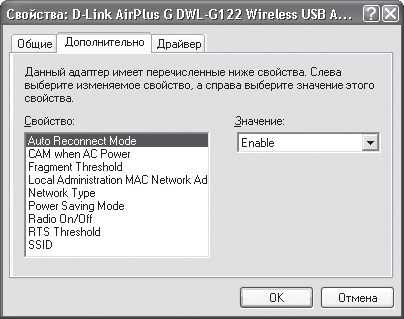
Rice. 15.22. Contents of the Advanced tab
Among the parameters that will probably have to be adjusted are the following.
Network Type - the mode in which the network will operate. Two parameter values are available: 802.11 Ad Hoc (Ad-Hoc mode) and Infrastructure (infrastructure mode).
SSID is a unique network identifier used to create a group of computers that can work together. The SSID can be any phrase or a set of numbers and letters. The main thing is that you can then repeat it when another wireless adapter, access point, router and other wireless equipment designed to work in a group is configured.
Using the "native" configuration mechanism
To configure your wireless adapter using the native utility, you need to make some additional changes.
Going to the Wireless networks tab, you need to uncheck the Use Windows to configure the network box (Fig. 15.23), after which the utility supplied with it will be used to configure the wireless adapter.
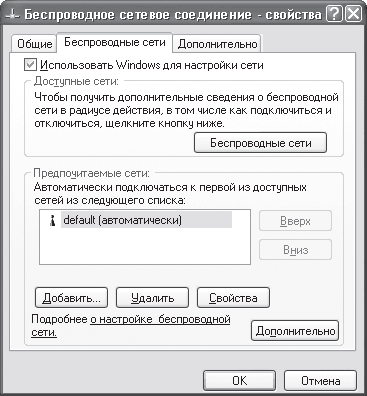
Rice. 15.23. Uncheck Use Windows to set up network
To check this, double-click the D icon in the notification area on the Taskbar - a setup program window will open containing five tabs. By default, the Link Info tab opens, containing information about the current connection: network mode, wireless standard used, current link speed, SSIDhap. (Fig. 15.24).
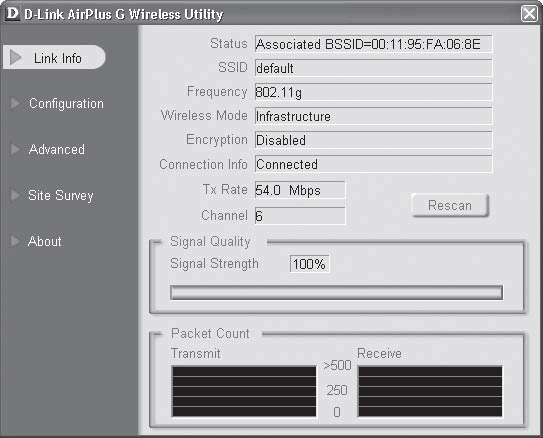
Rice. 15.24. Link Info tab
Device operation parameters are controlled on the Configuration and Advanced tabs. In addition, you can configure connection settings for all found access points on the Site Survey tab. Let's consider them more carefully.