Hello again, dear readers. And today I still want to talk about.
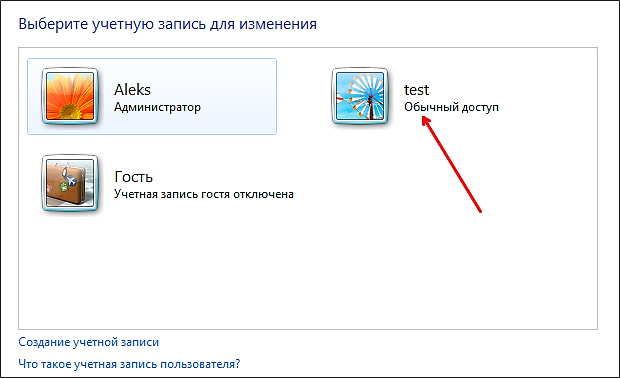
Why and who might need it? First - for example, your mother-in-law came to you, and so that she would not be bored in the evenings, you let her use your computer. Although the mother-in-law from working at the computer knows only Kerchief and Minesweeper, and it’s fundamentally and even theoretically impossible to climb somewhere and see what doesn’t concern her, you still, as an advanced user, organized a user with limited rights for her 🙂
With limited ones - in order to climb where it is not necessary, I did not even dare to think. Especially in the folder "I'm in the sauna with Marusya." But then the holiday came, the mother-in-law leaves for sunny ... well, let's say Tobolsk, on the upper side shelf near the toilet, with demobilizations and a gypsy camp in the same car, you, waving a handkerchief and brushing away a mean man's tear of happiness, return home, sit down to work at the computer , and what? That's right, you see an extra user. How to remove it?
Firstly, you need to have the rights of the System Administrator, since it is basically impossible to remove another user from a restricted user. Log in as Administrator, then click Start - Control Panel - User Accounts. Look for the entry you want to delete, click on it, and then look for the line Delete user below.
Click it, the operating system will ask you if you really want to delete the user. Click Yes, then you will be asked whether to keep or delete all user files. If the files are needed, we leave them, if not, we delete them accordingly. After that, the deletion process takes some time, then the user is no longer in the system, which is what we wanted.
But there is a situation when you have the necessary rights, but you cannot delete a particular user. What to do in this case. You ask? Just the fact that viruses have nested on your computer may be the cause of this error. Clean the computer of infection with a good, preferably commercial, anti-virus software product, and try deleting the user again. It should work.
Also, if you can’t delete the user on a regular basis, go to Control Panel - Administrative Tools - Computer Management - Users and Groups. Find the user you want to delete there and delete it there. It is probably not necessary to say, but I will say: for this action, you need the authority of the System Administrator.
Failed to delete the malicious user again? It's a pity, but then let's go the other way and act with brutal methods.
On drive C: in the Documents and Settings folder, find the folder of the user you are about to delete. Mercilessly delete this user's folder to the Trash(later. If everything works out, delete it completely). Now go to the System Registry. Do you still remember how to do it? That's right, in command line you need to type the word regedit.
Go to registry key \HKEY_LOCAL_MACHINE\SOFTWARE\Microsoft\Windows NT\CurrentVersion\ProfileList. Look at all the subsections with unpleasant names and find there the user that you really want to bang (on the computer, not physically), and delete the subsection where the ProfileImagePass parameter points to this very user. Mentally or not mentally cross yourself and restart your computer.
If you did everything right, then the question of whether you will never be tormented again 🙂
, and in this we will talk about how to delete a user in Windows 7. Deleting a user is even easier than creating one. This can be done through the Control Panel or the command line. In this article, we will look at both of these methods of deleting users in Windows 7.To remove a user, open the Start menu and go to Control Panel. If you want to delete a user in Windows 8, then check out our article on how to open the Control Panel in this operating system.
After you are in the Control Panel, click on the link "Add or remove accounts"

After that, the operating system will offer two options for deleting a user: deleting files and saving files. To select one of the options, click on one of the buttons.

If you click on the "Delete files" button, the user will be deleted along with all his files. If you select the "Save Files" button, then all files will be saved on the administrator's desktop, and in the folder with the username.
After that, the operating system will ask you to confirm the deletion of files again by clicking on the advise button.

This completes the deletion of a user in Windows 7.
How to delete a user in Windows 7 via command line
You can also use the command line to remove a user from operating system Windows 7. To do this, launch a command prompt as an administrator and enter the following command:
- net user username /delete
For example, in order to delete a user with the nickname "test", we need to enter the command net user test /delete .
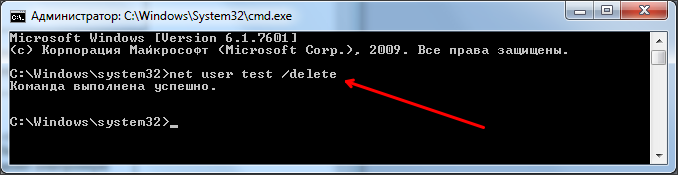
As you can see, deleting users in Windows 7 using the command line is much easier than using the Control Panel. All you have to do is launch a command prompt with administrator rights and enter the desired command.
Quite often, when working on a terminal server, in order to solve user problems, you have to delete their profiles, thereby creating a new clean profile the next time the user logs in. However, when migrating from Windows 2003 to Windows 2008, many people are faced with the fact that deleting a profile in these operating systems must be done differently. If in Windows Server 2003 it was enough to delete the user profile from the C:\Documents and Settings directory, but in Windows 2008 it is not so simple.
First, as you know, in Windows Server 2008, Windows Vista and Windows 7, local user profiles are stored in the C:\Users directory. In addition, these OSes keep a record of all local profiles in the registry century “ HKEY_ LOCAL_ MACHINE\ SOFTWARE\ Microsoft\ WindowsNT\ CurrentVersion\ ProfileList” For each profile that is stored locally, a subkey is created within this registry key. The subkey name is the SID of the user account. You can match the username and SID using this, or just open any branch and look at the value of the ProfileImagePath parameter.
What happens if you just delete the directory with the user profile?
What happens if you delete the user profile directory in Windows 2008 or Windows 7 (C:\Users\”Username”) without modifying the registry? After deleting the profile, the next time the user logs in, a message will appear in the system tray saying that Windows was unable to load the user profile and the user will work with a temporary profile.
Event ID 1511.Your user profile was not loaded correctly. You have been logged on with a temporary profile. Changes you make to this profile will be lost when you log off. Please see the event log for details or contact your administrator.
And as you know, a temporary Windows profile is a profile that is loaded when there are problems with a normal profile, and which is not saved when the session is ended.
How to correctly delete a user profile inWindows 2008?
Use one of the following methods to delete a profile:
- Delete the user profile directory And the corresponding branch of the registry in HKEY_ LOCAL_ MACHINE\ SOFTWARE\ Microsoft\ WindowsNT\ CurrentVersion\ ProfileList
- Open Start > Run and type sysdm.cpl. Go to the Advanced tab, then in the User Profiles section, click the Settings button and delete the user profile you need (or don't need :)).

It's too late, I've already deleted the user profile directory, what should I do?
Don't worry, luckily Windows is smart enough. If the system finds in the registry, in the ProfileList branch, a user SID with which no user profile directory is associated (C:\Users\”username”), it creates backup this branch with extension .bak. Just delete this fallback branch.
Instruction
User management in Windows XP is available only to administrators. If you are working under a user account that does not have such rights, change the account. It is not necessary to restart the computer for this, open the main menu and click the "Logout" button - this will take you immediately to the screen for entering the user's login and password.
After authorization, open the main menu of the OS again and call the panel on the screen Windows controls- the corresponding link is placed in the middle of the list in the right half of the menu. You can do without the main menu, but use the program launch dialog: press the Win + R key combination, enter the control command and click the OK button.
In the "Select a Category" list, click the "User Accounts" link to access the list of accounts. This applet can be called directly through the program launch dialog, bypassing the previous step. To do this, open it with the Winr + R key combination, enter the control /name Microsoft.UserAccounts command and press the Enter key.
Links to Accounts users are placed at the bottom of the applet. Click the desired icon, and a list of operations that can be applied to this account will appear in the window - click "Delete account".
Select one of the options when a screen asks if you want to delete this user's files and profile settings. This will complete the removal procedure.
The operation of deleting a user can also be implemented via the command line. To access it, use the same program launch dialog - press the Win + R combination, type cmd and press the Enter key. In the command line interface, type net user "Username" /delete, replacing "Username" with the name you want. It is not necessary to put it in quotation marks if the name consists of one word. The user will be deleted when you press Enter.
From version XP, operating systems Microsoft Windows equipped with a mashing utility free space on the media where your data once was. With it, you can permanently delete all information from your computer without the possibility of recovery, even with the help of special programs. This can be useful for protecting sensitive information.
You will need
- - operating system Windows XP;
- - cipher.exe utility.
Instruction
Turn on the computer. Wait for the operating system to fully load.
Log in. Sign in with a user account with administrative rights. As a rule, all accounts in Windows are created just like that. Wait for the desktop to fully load.
Run Command Prompt. To do this, open the "Start" menu, then sequentially select the items: "Programs", "Accessories", "Command Prompt".
Check out the help. Before using the cipher.exe utility, it will be useful to read the reference information on it. To do this, enter cipher.exe /? and complete your entry by pressing the Enter key. Pay attention to the /W key - it is he who allows you to perform the designated overwriting task. Basically, cipher.exe is designed to manage encryption in file system NTFS.
Decide where to start. Consider on which computer logical drives or removable media you need to permanently overwrite the information. For the convenience of reviewing the available logical drives You can open "My Computer".
Take enough time. Note that the wipe operation can take quite a long time to complete because cipher.exe performs it in three passes: first writes zeros, then 255 values, and then random values.
Start the operation. For example, the command to wipe drive C would look like this: cipher.exe /W C:.
Wait for the program to finish. Once launched, cipher.exe will display information about the progress (degree of completion) of the current operation. If necessary, you can interrupt the wipe operation, but note that the next time you start it, it will start from the beginning.
Try to avoid frequent use of cipher.exe with the /W (wipe free space) switch on a single media, as this can negatively affect its resource and durability.
In order to properly reinstall the operating system, you need to consider several nuances. You need to be extremely careful when installing a new OS on the partition of the disk where its old version is already located.
You will need
- - Windows disk xp.
Instruction
operating system installation process Windows systems XP does not imply creating or deleting partitions with hard drive. If you need to save information stored on system drive, then remove your hard drive and connect it to another computer.
Turn on the second PC and hold the F8 key. After the new menu opens, select HDD from which to continue downloading. After starting the operating system, open the "My Computer" menu and copy all important data to another hard drive. Now connect your hard drive to your old computer.
Paste installation disk Windows XP operating system into the drive and turn on the computer. Hold down the F8 key. In the menu for selecting devices to boot, select the desired DVD drive. Wait while the installer prepares the required files.
Now select the disk partition on which the operating system is already installed. Press the Enter button. Now select the "Format to NTFS" option. Confirm the start of the Disk Cleanup process by pressing the F key. Wait until this procedure is completed and the installation of the new Windows XP operating system starts.
After the first restart of the computer, set the required parameters for the "Username" and "Password" items. Set the date and time, select the firewall operation mode. Continue installing the new OS.
Now install antivirus program and download the Sam Drivers utility. Run it and update the drivers for the hardware installed in your computer. Remove the hard drive where you copied your important data and connect it to your PC.
Copy all the necessary files to your hard drive. Remember that this step can be skipped if you moved the files not to another hard drive, but to an additional partition on your hard drive.
Sources:
- how to install windows xp by yourself in 2017
Most programs create temporary files as they run. After completing its work, each program must delete them. However, in some cases (incorrect program stop, application errors), temporary files are not automatically deleted.

Instruction
Click the "Start" button to open the main menu of the system and go to "Run" (for Windows XP) or "All Programs" (for Windows Vista and Windows 7).
Enter %TEMP% in the Open field to search for the temporary folder.
Click the OK button to confirm the execution of the command.