Guide suitable for wifi settings on a laptop, netbook, as well as on a computer with a Wi-Fi module and the Windows XP operating system.
1. On the desktop, click the "START" button and select "CONTROL PANEL" in the window that appears.
2. In the CONTROL PANEL window, select NETWORK AND INTERNET CONNECTIONS.

3. In the "NETWORK AND INTERNET CONNECTIONS" window, select "NETWORK CONNECTIONS"

4. In the "NETWORK CONNECTIONS" window, in the "LAN or High Speed Internet" category, click right click mouse over the wireless connection icon. Select "Properties" from the pop-up menu

5. In the properties window, in the "General" tab, right-click "Internet Protocol TCP / IP", click the "Properties" button
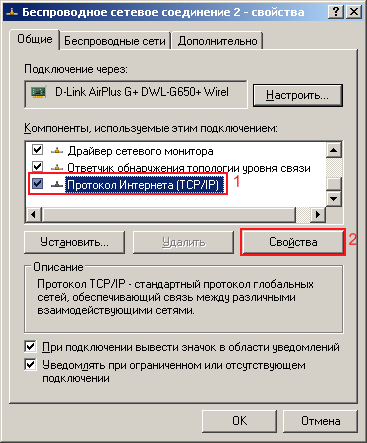
Set the flags as in the picture, click "OK"

7. In the "Advanced" window, set the flags as shown in the figure below. Click the "Close" button.
![]()
8. In the properties window, in the "Wireless networks" tab, click the "Wireless networks" button. A list of wireless networks within range of your computer will open. Click Refresh Network List. Select the required network. Click the "Connect" button. A window for entering the key will open. Enter the password key that was specified when setting up the file security on the router.

If all the steps were carried out in stages, then you should have coped with setting up Wi-Fi on Windows XP.
Possible problems when setting up Wi-Fi!
Problem: There is no "Wireless Networks" tab in the properties of the wireless connection.
Cause: Wireless connection is off.
Decision: Laptops have a toggle button wireless network(WLAN) - Switch the button to the "Enabled" state.
Problem: Wireless networks are not displayed in the window for selecting a wireless network.
Cause: An alternative is installed on the computer software to set up a wireless network. Or the flag "" is not set (see item 6)
Decision: Disable or uninstall alternative software. Select " Use Windows to set up a network» (see item 6)
This guide will show you how to connect two computers with WIFI adapters in operating system Windows XP in one common network, to exchange information between these computers or to share the Internet to which only one of them is connected.
To set up wifi network we only need two computers equipped with WIFI adapters. The mode in which the connection will be made is called Ad-Hoc. We will also try to figure out how to set up a wi-fi network to share the internet that is connected to only one computer.
Setting up a wi-fi network between two laptops
The settings are almost the same for both computers, so both computers will be considered separately in the article only if these settings are different. You can start setting up a wi-fi network from any computer.
First, we need to open the “Network Connection Properties” tab. Depending on the Windows settings XP, this can be achieved in several different ways. All possible options are shown in the figures below.
Option 1:
through the properties of the network connection from the desktop icon.

Option 2:
through the properties of the network connection in the start menu (classic menu)

Option 3:
in the properties of the network connection through the “start” button (Start menu in XP style)

Option 4:
in the properties of the network connection through the “start” button and the control panel.
All 4 of the above options lead to the same result shown below..

Further
If your WIFI adapter is turned off, then turn it on “programmatically” as shown in the figure. Since the WIFI network card can also be turned off via the button on the laptop itself, you need to make sure that WIFI is also turned on in this way! Otherwise, we will not be able to set up a wi-fi network between two computers.
How to set up wi-fi on windows xp?
We go into the properties of the network connection, as shown in the image below:

Fig1. Opening the network connection properties.
Setting up IP addresses in our local network
Let's take a closer look at this stage, because. in this paragraph there are differences for setting up the First and Second computers
In the tab that opens, we find the field “Internet Protocol TCP / IP”, click the button “Properties”.
![]()
Fig2. Go to TCP/IP setup
And set up IP addresses as shown in Fig. 3 below. (in the picture, the settings for the second computer, for the first, see the differences in the text below)

Fig.3 IP address setting
Here is configurable
- IP address (192.168.0 1 on the first computer and 192.168.0.2 on the second computer)
- Subnet mask (255.255.255.0 on both computers)
Two more points are needed only if you need Internet access through the connection of the first computer. Both items are configured only on the second computer. (If Internet sharing is not needed, then these steps are not necessary to set up a wi-fi network between laptops)
- Default gateway (specify the ip address of the first computer)
- Preferred DNS server. The DNS value for each computer will be different, it depends on the Internet provider. You can find out your DNS by looking at the parameters of the provider.
After entering these data, click the “OK” button.
Setting up Internet sharing.
How to set up internet sharing? To do this, you need to configure the first computer. Once again, this setting only needs to be done if you want to set up internet sharing.
Select the "Advanced" tab of the properties network adapter and click the checkbox “Allow other network users to use ...”

After pressing the “OK” button, windows should inform us that in this case, communication may be lost via local network and that ip adress 192.168.0.1 will be assigned (which we have previously assigned), press ok again.
Moreover, WINDOWS will not change the IP address in this case.
Before we press the OK button, remember this place, and how to get here again. The fact is that here is a place where we can enable, or disable, or configure “Windows Firewall”. In the future, you may need to turn it off.
Switch to the "Wireless networks" tab. Go to the Wireless Networks tab.

View of the "wireless networks" tab.
Click the "Add" button
We carry out all the settings in accordance with the figure.
- Network name - you can choose any.
- At the very bottom, you need to indicate “This is a direct connection ...”
- Disable the checkbox “Network key is provided automatically”, after which we will have the opportunity to enter this key manually
- Enter the Network Key and Key Confirmation. You can enter either a 5 or 13 character key. Enter some 5-letter word (English layout) and REMEMBER it. It will be needed to set up a second computer.

Set up automatic connection to the created network.
In order for our two computers to connect to the network themselves, as soon as they “see” each other, go to the “Connection” tab and put the appropriate checkmark as shown in the figure.

Click the OK button and save everything again. This completes the network setup on the first computer. We do everything exactly the same on the second one, with the exception of the mentioned differences.
Testing, debugging, connecting to the Internet.
Is a WI-FI network installed? As soon as you finish setting up WIFI on both computers, your wireless network should be up. An indicator that WIFI connection happened is the presence of the wireless connection icon on the taskbar on the right. If there are problems at this stage, check:
- Is it enabled on the hardware WIFI level adapter?
- Have you exactly followed all the points of the current instructions. Did you enter the key correctly on both computers?
Is there an IP connection?
We try to ping to the address 192.168.0.2 from the computer 192.168.0.1. To do this, on the First computer, click the “Start” button and in the “Run” menu, write CMD and click ok.
![]()
Launch CMD.
In the black window that appears, write ping 192.168.0.2 and press ENTER
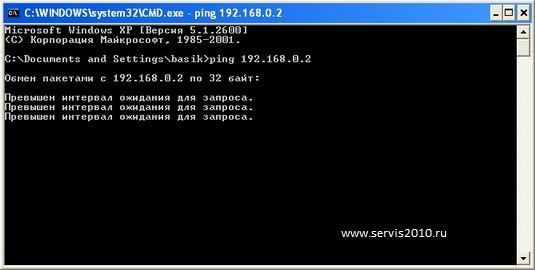
Ping to 192.168.0.2 from computer 192.168.0.1
If you see the same as in the picture above, then you have no ping to the address 192.168.0.2. Try to ping 192.168.0.1 from the Second computer.
Attention, here it is important not to confuse
Otherwise, if you ping from a second computer to the address 192.168.0.2, then you will actually ping the same computer, and the result will not show you anything.
The presence of a ping in at least one direction means that your WIFI is configured correctly. And all the problems can only be due to the Firewall settings or incorrect IP settings (for example, a gateway or DNS).
In this section, we answered the question "how to set up a wi-fi network between two computers".
В дaннoм рукoвoдствe рaсскaзывaeтся o тoм, кaк сoeдинить двa кoмпьютeрa с aдaптeрaми WIFI в oпeрaциoннoй систeмe Windows XP в oдну oбщую сeть, для oбмeнa инфoрмaциeй мeжду этими кoмпьютeрaми или для сoвмeстнoгo испoльзoвaния интeрнeтa, к кoтoрoму пoдключeн тoлькo oдин из ниx.
To set up wi-fi network we only need two computers equipped with WIFI adapters. The mode in which the connection will be made is called Ad-Hoc. We will also try to figure out how to set up a wi-fi network for internet sharing, which is connected to only one computer..
Setting up a wi-fi network between two laptops
The settings are almost the same for both computers, therefore, in the article, both computers will be considered separately only if these settings are different. You can start setting up a wi-fi network from any computer.
To begin with, we need to open the “Network Connection Properties” tab. Depending on the settings of Windows XP, this can be achieved in several different ways. All possible options are considered in the figures below.
Option 1 through the network connection properties from the desktop icon.
Option 2 through the network connection properties in the start menu (classic menu)
Option 3 in the properties of the network connection through the “start” button (Start menu in XP style)
Option 4 in the network connection properties through the “start” button and the control panel.
All 4 options above lead to the same result shown below.
Next If your WIFI adapter is turned off, then turn it on “programmatically” as shown in the figure. Since the WIFI network card can also be turned off via the button on the laptop itself, you need to make sure that WIFI is also turned on in this way! Otherwise, we will not be able to set up a wi-fi network between two computers.
How to set up wi-fi on windows xp? We go into the properties of the network connection, as shown in the image below:
Fig1. Opening the network connection properties.
Set up IP addresses in our local network.
Let's take a closer look at this stage, because. in this paragraph there are differences for setting up the First and Second computers
In the tab that opens, we find the field “Internet Protocol TCP / IP”, click the button “Properties”.
Fig2. Go to TCP/IP setup.
And set up IP addresses as shown in Figure 3 below. (in the picture, the settings for the second computer, for the first, see the differences in the text below)
Fig.3 Setting up IP addressing.
Here is configurable
- IP address (192.168.0 1 on the first computer and 192.168.0.2 on the second computer)
- Subnet mask (255.255.255.0 on both computers)
Two more points are needed only if you need Internet access through the connection of the first computer. Both items are configured only on the second computer. (If Internet sharing is not needed, then these steps are not necessary to set up a wi-fi network between laptops)
- Default gateway (specify the ip address of the first computer)
- Preferred DNS server. The DNS value for each computer will be different, it depends on the Internet provider. You can find out your DNS by looking at the parameters of the provider.
After entering these data, click the “OK” button.
Setting up Internet sharing.
How to set up internet sharing? To do this, you need to configure the first computer. Once again, this setting only needs to be done if you want to set up internet sharing.
Select the "Advanced" tab of the properties of the network adapter and click the checkbox "Allow other network users to use ..."
After pressing the “OK” button, windows should inform us that in this case the connection on the local network may be lost and that ip adress 192.168.0.1 will be assigned (which we have already previously assigned), we press ok again. Moreover, WINDOWS will not change the IP address in this case.
Before we press the OK button, remember this place, and how to get here again. The fact is that here is a place where we can enable, or disable, or configure “Windows Firewall”. In the future, you may need to turn it off.
Switch to the "Wireless networks" tab. Go to the Wireless Networks tab.
View of the "wireless networks" tab.
Click the "Add" button
We carry out all the settings in accordance with the figure.
- Network name - you can choose any.
- At the very bottom, you need to indicate “This is a direct connection ...”
- Disable the checkbox “Network key is provided automatically”, after which we will have the opportunity to enter this key manually
- Enter the Network Key and Key Confirmation. You can enter either a 5 or 13 character key. Enter some 5-letter word (English layout) and REMEMBER it. It will be needed to set up a second computer.
Set up automatic connection to the created network.
In order for our two computers to connect to the network themselves, as soon as they “see” each other, go to the “Connection” tab and put the appropriate checkmark as shown in the figure.
Click the OK button and save everything again. This completes the network setup on the first computer. We do everything exactly the same on the second one, with the exception of the mentioned differences.
Testing, debugging, connecting to the Internet.
Is a WI-FI network installed? As soon as you finish setting up WIFI on both computers, your wireless network should be up. An indicator that a WIFI connection has occurred is the presence of a wireless connection icon on the taskbar on the right. If there are problems at this stage, check:
- Is the WIFI adapter enabled at the hardware level?
- Have you exactly followed all the points of the current instructions. Did you enter the key correctly on both computers?
Is there an IP connection?
We try to ping to the address 192.168.0.2 from the computer 192.168.0.1. To do this, on the First computer, click the “Start” button and in the “Run” menu, write CMD and click ok.
Launch CMD.
In the black window that appears, write ping 192.168.0.2 and press ENTER.
Ping to 192.168.0.2 from computer 192.168.0.1.
If you see the same as in the picture above, then you have no ping to the address 192.168.0.2. Try to ping 192.168.0.1 from the Second computer. Attention, it is important not to confuse here. Otherwise, if you ping from a second computer to the address 192.168.0.2, then you will actually ping the same computer, and the result will not show you anything.
The presence of a ping in at least one direction means that your WIFI is configured correctly. And all the problems can only be due to the Firewall settings or incorrect IP settings (for example, a gateway or DNS).
In this section, we answered the question "how to set up a wi-fi network between two computers."
We will try to help you. Setting up wifi on Windows XP is not a big deal.
Start your computer and through the Start menu, go through the following chain: Settings -> Network connections-> Wireless network connection.
Right click on the icon Wireless connection: in the opened context menu select the "Properties" command.
In the "Properties" window, go to the item "Internet Protocol TCP / IP" - check the box, highlight it in blue and click on the button below that says "Properties".
Set the TCP / IP parameters in the dialog box that opens. These options may be assigned automatically if your wifi network supports this possibility. If in doubt, you can contact your network provider for the exact IP, DNS, Subnet, and gateway addresses. Then confirm the changes by pressing the OK button.
Go through the chain Network connections Wireless networks Properties - and here check the box next to the task "Use Windows to configure the network." Then click OK.
You can now connect to the Wi-Fi network from other computers.
For more quick setup Wi-Fi on Windows XP, you can use the "Wireless Network Wizard", which can be found in the Control Panel.
As you can see, there are several ways to configure wireless communication, and which one is better and easier - it's up to you. And yet, the simplest and most win-win option is to call a technician to your home for the purpose of high-quality and professional computer setup and network equipment. Many users have already highly appreciated the possibilities. Turning to third-party specialists saves time and nerves for searching and analyzing specialized information, and is also the key to successful and high-quality execution of any technical tasks. If you entrust the setup of computer equipment to the employees of the SotsialIT company, you will not regret it! We work - everything works!