How to determine working group? For those who are just starting to build their own local network, it can be difficult to immediately navigate many issues that seem complicated at first glance. When you already know all this, you don’t even understand what scares people away from self setting networks. But this is only when you already know all this. But if you ask a person to remember how he himself at first poked through the settings and for a long time could not find what he had almost in front of his very nose, then he most likely will not admit to you that he was once the same as you are a "blind kitten". Some pretend that they knew all these settings, almost from infancy. And some don't remember anything at all. Personally, I perfectly remember all my first steps regarding the computer. And not only do I remember, but I am not ashamed to admit that there was a time when I simply did not know elementary things.
Once other computers on your network join the workgroup, their users can share these resources without having to manually configure general access, permissions and printers. Workgroups have some drawbacks: you can't set security or sharing permissions for computers in a workgroup, so everything is shared.
However, if security on your network isn't a concern, a workgroup is an easy way to get your network up and running quickly. Check the "Workgroup" radio button, and then enter the name of the new workgroup in the text box. Andrew McClain has been writing since he wrote several articles for various websites and writes user manuals and guides for software for several freelance clients. He holds a Bachelor of Arts degree in journalism from the University of Missouri.
When I first had to connect new computer to the local network, then I could not find the name of the workgroup of this network. I searched through the entire computer already connected to the local network, but did not find anything.
And there was no one to ask, because. before me, this grid was deployed by people coming from different services. And those programmers that I knew never worked on the network. And the internet was not the same back then as it is now. Not only was it very slow, but also there were almost no websites on computer topics. I wanted to drop everything and run away from shame and helplessness.
Computers on a network can be part of a workgroup or a domain. The difference between the two is how to manage resources on the network. While domains are suitable for corporate networks, home and small business networks can work very well using a workgroup.
How is this different from a network domain?
Workgroups are small, peer-to-peer local networks where each computer has its own set of rules and settings controlled by that device's administrator. As a result, workgroups are used primarily in home or small business networks. To easily access and share resources with another computer on the same network, both computers must be part of the same workgroup. If you want to avoid this, users can share resources from their computers and set them up so that they don't require authentication from others.
But it's not in my nature. So I just went to the market and began to look for literature on local networks. Not immediately, but I found a good book. I worked on it almost all night, and the next day I came and within an hour not only set up a new computer, but even managed to connect several computers to the Internet via local network. If you are interested in how to do this, then read the article and.
If you need help, please read this guide. However, the workgroup name can contain spaces. On the contrary, domains are used in large networks, which include servers along with desktop computers, laptops, network printers and many other devices. In network domains, everything is managed and configured network administrator. The domain has a standard set of rules and settings that apply to all network computers and devices.
There you will find the Computer name, domain, and workgroup settings section. If you click "Change Settings" you will be able to change the workgroup set up for your device. Next, let's learn how to change an existing workgroup for a new one.
So how do you define the workgroup of an already finished local network? Everything is outrageously simple!
Click right click mouse by icon My computer(in Windows XP) or A computer(in Windows 7) on Desktop.
If you do not have such an icon on the Desktop, then in Windows XP you need to open the menu Start - Settings - Control Panel, and open the folder System(computer icon). In Windows 7 enter the menu Start and right click on the link A computer.
The System Properties window opens. You are now told that you must restart your computer for the changes to take effect. You will return to the System Properties window. At the bottom of the window, you will see a note reminding you that the computer must be restarted for the workgroup changes to take effect.
After the computer restarts, it will join the newly assigned workgroup and be able to communicate with other computers and devices that are part of the same workgroup. Having a different workgroup on the computers that make up your network is most often the root cause of many network problems.
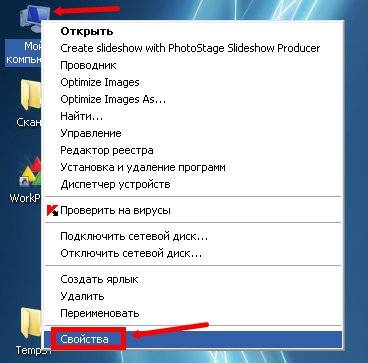
Click on the link in the drop down list Properties(at the bottom). The window of the same name will open. Properties. Go to the tab Computer name and see the name working group to which this computer is connected. In my screenshot, the group is called S.E.ST.
With a simple change, they can be resolved and you can easily share folders, libraries, and devices. If you are looking for other useful networking tutorials, feel free to check out our recommendations below. Note that you need to assign a unique computer name to each computer, but you can group all home computers in the same workgroup for ease of access.
And so you can quickly and easily change the computer's workgroup
Note. Feel free to enter a description of your computer in the Computer Description field. If, for example, you joined another network on clan days or want to connect to your home network with a laptop, then you will soon come up with the idea of joining a local network workgroup. Only the way it is now is a little different. If you have a computer icon on your desktop, right-click it. In the appeared context menu click on the Properties link. A window will open with basic information about this computer.

It is always easier for readers to perceive information when it consists of small pieces. text, constantly alternating with each other and set out in a variety of fonts: bold or italic, color or black and white, small or large. It is not in vain that newspapers and magazines always use this technique, since to change format text in computer program very simple. To do this, you need any well-known text editor.
This, however, was only seen in the fields. It shows, however, that this window can also be accessed via system element management. If the window with basic information is now open, click on the link "Additional system settings» in the right margin.
If it's not activated yet, click here on the Computer Name tab. At the bottom of the window, you will find Edit buttons by clicking Edit to rename this computer or whose domain or workgroup should be changed. A window for changing the computer name or domain name will appear. At the bottom of the window, not really overlooked, perhaps most of the options for the operation of the group. Below is a field where the workgroup name can be assigned again.
You will need
- Text editor, formatting panel.
Instruction
Launch a well-known text editor. It can be a simple "Notepad" or the initial editor "Word Pad". They are contained in the "Standard" group of the operating room. Windows systems. To open them, click on your desktop personal computer bottom start menu. Next, go to the "All Programs" section. This is where the group of standard commands is located. Click Standard.
How to change the computer name and workgroup?
For example, on clan days or other computer gatherings, it makes sense to place the computers in the same workgroup. New versions operating systems usually improved by their predecessors. However, this comes with a number of incompatibilities with other systems that could speak a common language. These languages are the protocols by which machines are connected on the network.
For a network as shown in Figure 1 - be it an office, a family home, or a residential community - there are a number of components, including access to the Internet. There are already ready-made solutions for little money. Figure 1: Typical structure of a small mixed network. Click on it to start setting up. Both terms differ centrally at one point: in authentication - more on that later. If a service is down, it is often in closed port. The share named "users" can be omitted. Its output displays a listing.
You can also use professional text editors, such as " Microsoft Office Word", "Microsoft Publisher" or their free counterpart - text editor "AbiWord". The latter is distributed freely over the Internet and has a free General Public License (GPL). It can be downloaded from the local network at any time.
All the programs listed above for typing and processing text information have a special text formatting panel. This panel is most commonly found under the View menu and is part of the toolbar. Visually this service looks like a long strip that contains command buttons: "Styles and Formatting", "Font", "Font Size", "Bold", "Italic" (i.e. italic font), "Underlined Font" and other elements responsible for additional functions.
HomeGroup: This is how you create your home network
The process is very simple and it only takes five minutes to complete. It's not irreversible, so if there's something that doesn't convince you, you can reconfigure it and you'll always have the option to eliminate home group. In the application list, you will first see one name. It will open a window named "Share" with other home computers. If this button is not enabled in the same window, you will get an error message telling you why and using the button to resolve it automatically.
Select the part of the text you need to process with the right mouse button. Go to the formatting panel and click the appropriate button. The font will change according to the selected function.
Additionally, you can set the direction of the text. To do this, go to the top menu bar, the "Format" tab. Next, click on the "Text Direction" item and set the desired value. Return to the formatting panel, as you can change the text format there using additional functions. Adjust the text layout options on the document page: Align Left, Align Center, Align Right, or Justify.
A new pop-up window will appear where you can set up your home network. Now comes one of the most important parts of the process where you have to choose what to do on your home network. When you like it, click next. When you click it, click "Finish", you have already created home network. The window where you set up the group will close and you will be returned to changing the group settings in the home. In it, you can change any of the parameters of the homegroup you created.
Warning Before you change a subscription to a computer in a domain in a workgroup, make sure you know the username and password of the local account administrator groups. For more information, click the following article number to view the article in the Microsoft Knowledge Base.