Hello readers of the ComService company blog (Naberezhnye Chelny). In this article, we will touch on network settings in the Windows 7 operating system. Namely, we will deal with home groups. This feature allows you to simplify the exchange of information between users on your home network. Here we will analyze the configuration of IP addresses for computers so that we can create home group and setting up a network location. Let's see how to create home groups, how to join them and naturally how to do it general access to directories so that other users can work with them. We will also consider a place from where it is convenient to control the shared resources on . I hope that after reading this article, you will be able to easily set up a home network between computers running Windows 7.
Article structure
1. Set up a Windows 7 network for a homegroup
Firstly, in order for computers to work properly on the network, it is necessary to synchronize the time between them. On all computers on the network, you must set the current time and make sure that it is.
Secondly. Need to ask computers so that they are on the same network. This function usually assigned to the router or router. Then it assigns an address from the specified range to each connected computer. If you do not have, then you need to configure the addresses manually.
1. In the notification area, left-click on the Network icon. In the window that opens, click on the link Network and Sharing Center
In the Network and Sharing Center that opens, on the left side, click Change adapter settings

The window that opens displays all network connections your his . Choose the connection through which you will connect to your home network. It could be a connection wireless network or else. Select it with the left mouse button and call context menu right click mice. Choose Properties

In the Network window that opens, we need to check the boxes for Client for Microsoft Networks, File and Printer Sharing for Microsoft Networks, and Internet Protocol Version 4 (TCP/IPv4). Select the latter and click the Properties button

In TCP/IP Properties choose Use the following IP address. In the field, enter the address and subnet mask (for example, such as in the figure IP - 192.168.0.1 and subnet mask - 255.255.255.0)

There are four network locations:
- public network. Applies when you are connected to a network in a public place. For example, in a cafe, train station or airport. In this case, the most stringent security settings are applied, network discovery and the ability to create homegroups are turned off. That is, your computer will not be visible to other members of this network and you will not see anyone. Maximum security settings do not guarantee you complete protection. Therefore, it is advisable not to use important resources that require authorization.
- Enterprise network. This location has network discovery enabled but no ability to create or join homegroups
- home network. This includes network discovery and the ability to create homegroups. It is worth choosing the location "Home network" if you know all the computers on this network.
- Domain network. When your computer in the enterprise is connected to an Active Directory domain, the network location is automatically changed to the Domain Network. In this case, all settings are network administrators at the enterprise.
To create a Homegroup, we need to select the location of the Home network.
This is done as follows
We go to the Network and Sharing Center and click on the link Public network

In the Network location settings window that opens, select Home network

In the next window, we are notified about a change in the location of the network. Click Close

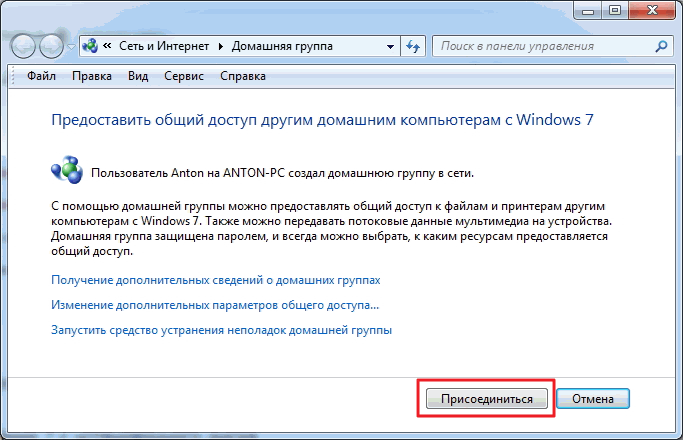
Now we have the option to create an online homegroup or join an already created one. To do this, click on any of the links highlighted in the figure below.
![]()
You can only create one homegroup on a network. You can create it on any network computers. Other computers on the network can only join an already created group. Computers with any version of . To create, you need a more advanced version of Windows 7 than Starter or Home Basic.
Check version operating system You can in the properties of the computer.
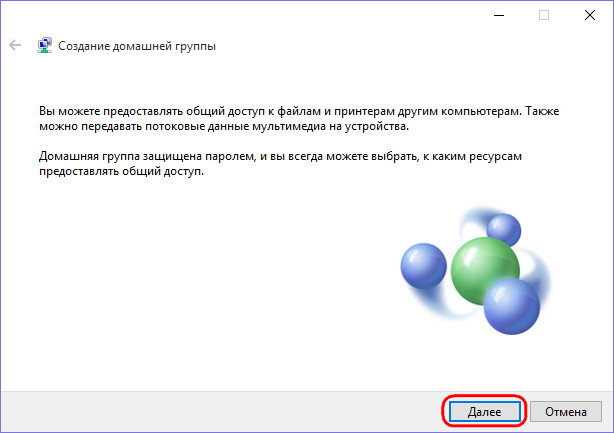
In the HomeGroup window, click Create HomeGroup

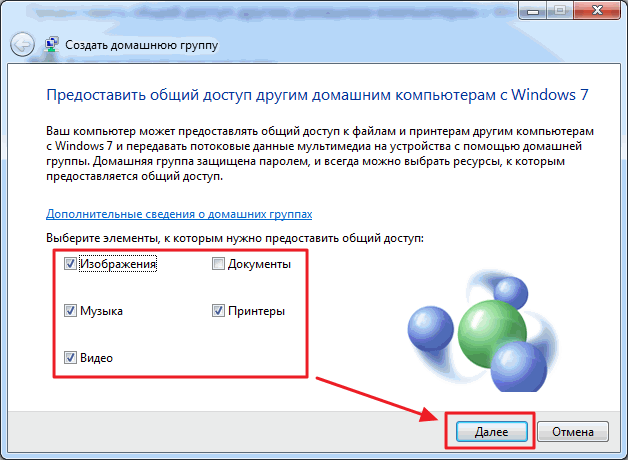
Select the libraries to which we want to give access to group members and click Next
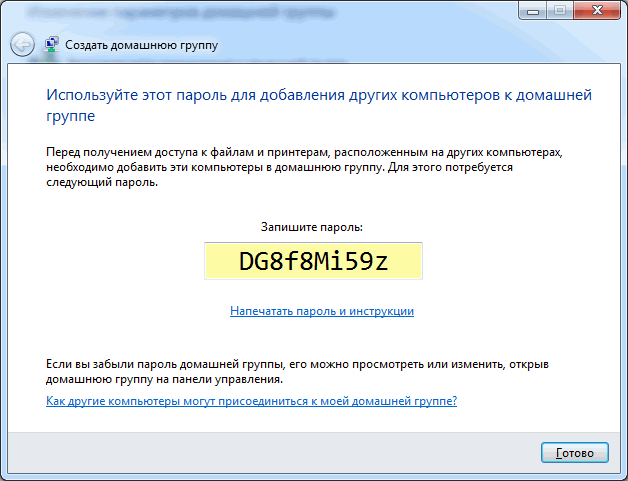
In the next window, we generate a password for the created home group. It's better to write it down right away. Click Finish
Now, when you select a homegroup in the Network and Sharing Center, you will see a window where you can change the homegroup settings

Here you can Show or print your homegroup password if you have forgotten it. Change to any other. Leave homegroup. Change advanced sharing settings and run the HomeGroup troubleshooter.
A home group ceases to exist when the last member leaves it.
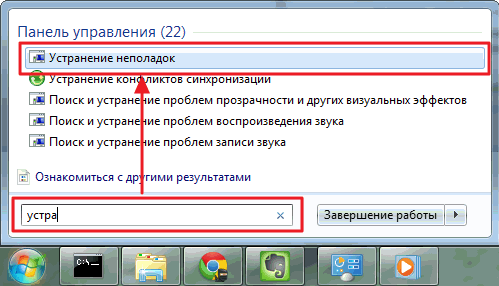
A few words about the troubleshooter. You can run it from the Start menu by finding this tool using the search
In the window that opens, check the box Get the latest troubleshooting online
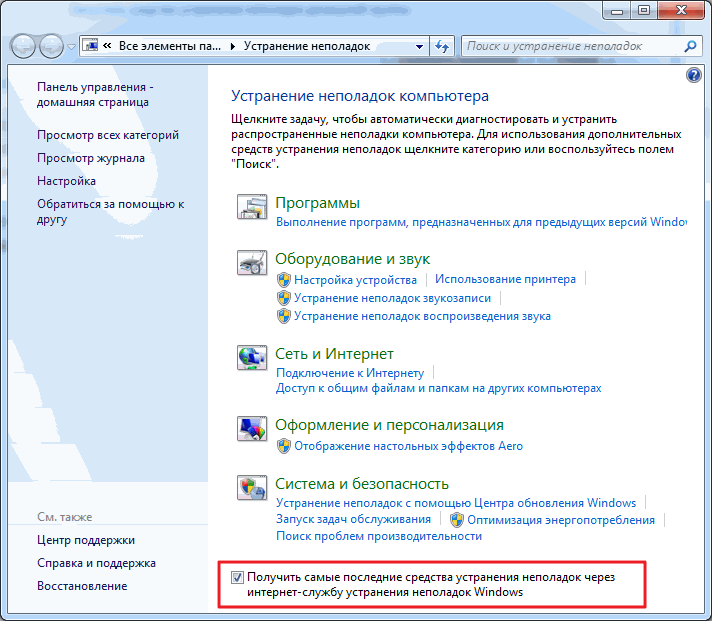
At Microsoft, a lot of people work so that we can fix common mistakes with this tool.
Now, when problems arise, not only with the homegroup, you can use the latest tools.
The homegroup has been created, the settings have been set. Now you need to connect the rest of the computers on the network.
On the computer that we want to connect to the Homegroup, we will find this element

Since the group has already been created, we will be offered to join
Set the libraries that we want to make public and click Next

In the next window, enter the password for the homegroup and click Next.

The computer is successfully connected to the homegroup. In the same way we connect all other computers.
3. Setting up sharing
All that was above is the preparatory steps for the ease and simplicity of setting up network sharing.
You can share with homegroup users as follows. We open. We find and select the folder to which we need to give access. In the toolbar, click the Share button and from the drop-down menu select Homegroup (read) or Homegroup (read and write) if you want users to be able to modify and delete files in this folder
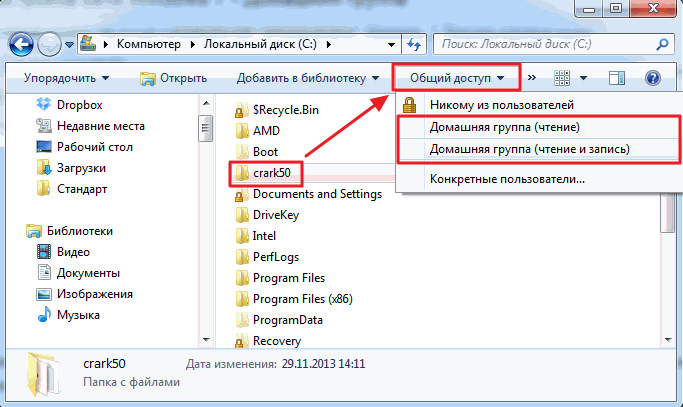
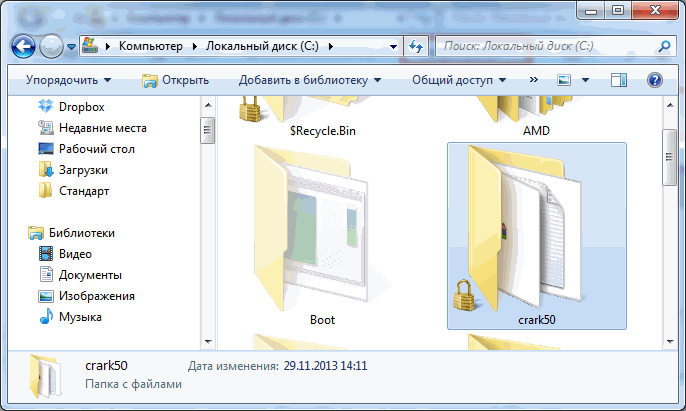
Here you can also deny access by selecting None of the users. The folder icon will be marked with a padlock.
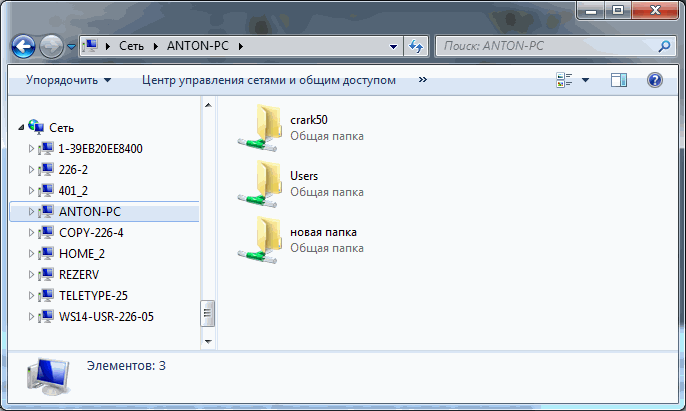
When you create or join a homegroup, the corresponding section appears in the navigation pane of the explorer window. From here it is convenient to access the shared folders of other computers on the network

After some time, you can forget which folders on your computer are shared. To remember, you can go through the network to your computer. It is convenient to do this using the Network item in the navigation menu
You can see, but it is not convenient to manage from here. There is a separate tool for this.
We launch computer management utility

In the computer management window, on the left in the console tree, expand the item Shared Folders and select Shared Resources. The table in the center will display all your shared resources and here you can stop sharing any of them
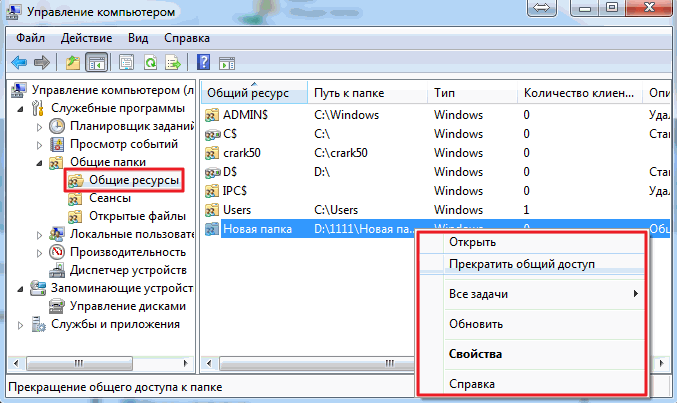
From the Shared Resources section, you can share. To do this, open the Action menu and select New Share…

The Create Shares Wizard will open, following the instructions of which you will expand the folder

By default, shared libraries are read-only. You can give access to the record from the explorer. Select the required library in the navigation area of the explorer, call the context menu and select Sharing and Homegroup (read and write)

In this simple way, you can open and deny access to the resources of your computer in your home Windows group 7.
Conclusion
In this article, I hope I was able to explain in an accessible way how the configuration is performed Windows networks 7. We set up computers to work on the same network, created a home group and learned how to give and block access to various computer resources. In principle, this should be enough. It remains only to add a few recommendations to ensure greater security when working on the network.
- Always install all updates for Windows. especially important. A group of people is also working on this, which closes various gaps in the operating system.
- Use a firewall to control the perimeter
- Use and timely update the antivirus on your computer so that whatever breaks through the firewall is destroyed
Perhaps everything. Write questions and suggestions in the comments.
Thank you for sharing the article in social networks. All the best!
It is probably not news that almost every home has at least one computer. But if you want a quiet life, then there should be at least two of them. In my case, there are also two computers: one stationary and my laptop.Sooner or later there is a need to create a home group. After all, you need to either make the printer shared, can share files, or play games over the network - everyone has their own needs.
Therefore, in today's article the topic will be discussed in detail:How to create a homegroup.
To begin with, we need two computers, but if you have come here, then most of all this is already available.
Let's call the computers numbers, the first will be computer 1, and the second computer 2. Later you will understand why this is.
Creation
1. Now on computer 1 we go Start — Control Panel — Network and Sharing Center

2. We go to the point Choosing a homegroup and sharing options

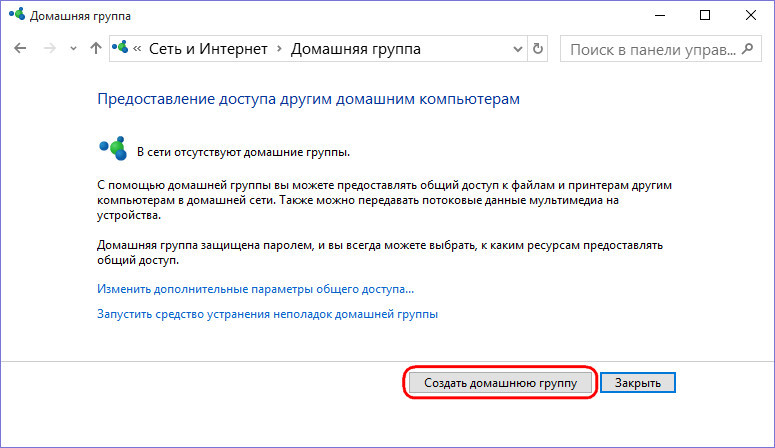
3. As you can see, there is no network yet, so we press the button Create a homegroup
4. In the next window, you must put a tick what exactly will be shared. Therefore, in most cases, leave everything as it is and just click Further.

5. Now you will have your homegroup password, I advise you to write it down or take a picture and press Ready.

Connection
Well, the home group has been created, now it remains to connect. Now the actions will take place on Computer 2.
1. Repeat the first two paragraphs of the Creation part. (I remind you that everything happens on the second computer)
2. Now we already see a window in which we are offered to join a previously created group. Just click Join.

3. Select the items that we want to provide to other users of the home group - Further.
With the advent of Windows 7, the concept of "Homegroup" arose, which in the early Windows versions did not have. The ability to create such a group is available in almost all editions of Windows, except for Starter and Home Basic. When installing the OS, the first computer to register on the local network can create such a group. If there is already one, the system prompts the device to connect to it.
Homegroup features
This group combines several devices based on this OS, which allows you to exchange files with each other: media files, videos and images. The number of devices in such a network does not matter. In addition to sharing files, the homegroup is good because it distributes wireless Internet and any device can connect to it, wifi router it is not required.
Also, computers in this group have access to printers and faxes that are connected to the same computer network.
What you need to create a homegroup
All devices must have Windows system starting from "7" version The local network Wi-Fi router, direct connection of all computers via cable or virtual network provided by the hypervisor.
Create a home group
We enter the "START" and open the "Control Panel". Then select "Network and Internet" and click on the "Homegroup" section.
If after installation Windows programs network discovery and sharing have been activated, the process of setting up a group will be facilitated and you can safely click "Create a home group". But if your device had a different owner and the program has not been changed, then you need to "Change sharing settings".
Click on the desired button:

Open the "Private (current profile)" tab and activate the options:

To make it easier for users to access and not to constantly enter a password, we do the following: open the "All Networks" tab, activate the "Turn off sharing with password protection" option and save the changes.
Go back to the "home group" window, click "Create a home group" and "Next".
We see a window with shared access for folders with files other than "Documents", but if necessary, we also open access for it or remove some, if desired. We press "Next".
In the window that opens, we see the password created by the system. It is created only on the primary computer where the sharing is set up. Then this password must be entered into the system of the device that you want to connect.

All. Click "Finish". The homegroup has been created.
To join, we follow the same paths, just click "Join", enter the password and "Done".