In this article, we will set up a local network between two or more computers with installed Windows 7 (Windows 8) that are connected via a Wi-Fi router. Actually, setting local network Windows 7, Windows 8, and Windows 10 are pretty much the same. In Windows XP, perhaps there are some nuances, there are always some problems when setting up a network between the seven and XP. But, about this in a separate article, and it's time to move from Windows XP, it is outdated.
It is clear that in order to set up a local network, and public access to files, computers need to be somehow connected to each other. This can be done with a network cable, I have a direct connection between two computers. But, it is much more interesting to connect all computers through a router, which is now installed in almost every home and office. When connected through a router, it is already possible to set up a local network not only between two computers. All computers can be connected to a local network, and even mobile devices that are connected to one router
For example, desktop computers can be connected to the router via network cable, and laptops WiFi networks. This is how you feel more comfortable, and how you get it. It doesn't matter if the computer is connected to the router via Wi-Fi or a cable, the local network will work. And it doesn’t matter what operating system you have installed, but I will show it using the example of Windows 7.
And I will configure and show the network through asus router RT-N18U, to which I have a laptop connected via Wi-Fi, and a desktop computer. Both work on Windows 7. It is between these two computers that we will now set up a local network. And also, we will open the general access to folders and files. What is a local area network between computers for? Mainly for file sharing. If you often need to transfer some files from one computer to another, then in order not to run with a flash drive, you can do it over the network. Well, you can play online games.
If you still have a Smart TV in your network, you can set up access to movies on your computer from your TV. More details in this article.
Instructions for setting up a local network in Windows 7
Let me remind you that the computers that you want to network must be connected to the same router, or connected by cable directly. Also, all the actions that I will show in this section must be performed on both computers.
Important point! If you want to set up a network through a Wi-Fi router to which some third-party devices are connected (for example, your neighbor), then after setting it up, it will be able to access those folders on your computer that you set up for sharing. Set a good password for your Wi-Fi network to secure your network. If you still need to connect to your router third party devices, but you want to set up a home network, you can create a "guest network" for guests, as we did on the Zyxel router in this article.
One more moment. If you are setting up a network when connecting computers directly, without a router, then you will also need to set static IP addresses in the properties of the LAN connection. If you have a connection through a router, then you do not need to do anything else, continue to follow the instructions.
1 First of all, we need to check that all computers work in the same workgroup. This must be checked on all computers that will be connected to the local network.
We do this: press the key combination Win+R, and in the window that appears, specify the command sysdm.cpl. Click Ok.
Against Working group is likely to be written WORKGROUP. You can leave her. The main thing is that on other computers the working group should also be WORKGROUP.
If you want to change it, for example to MSHOME, then click the button Change, and specify a new group. Save changes and restart your computer.
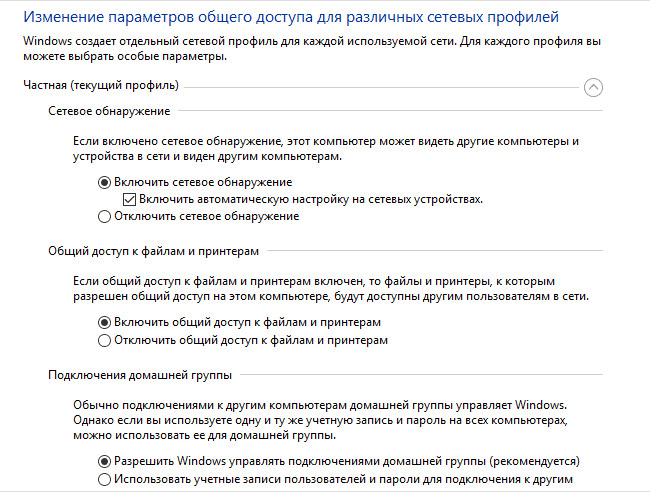
2 The second step is to change the sharing settings. We perform these settings in the same way on all computers in the network. Now I will show what needs to be included.
Click right click click on the internet connection icon in the notification bar, and open Network and Sharing Center. In the new window select Change advanced sharing options.
There will be two profiles. Home or work, and General. We change the one whose carriage is written current profile. You can make these settings for both profiles.
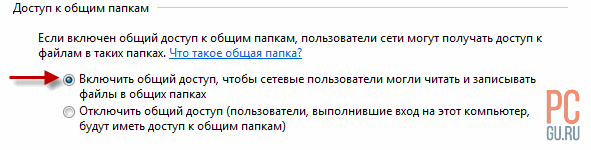
First of all, put the switch near Enable network discovery. Also, turn on Sharing files and printers, and turn on folder sharing. See screenshot below.
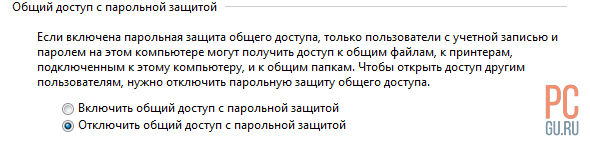
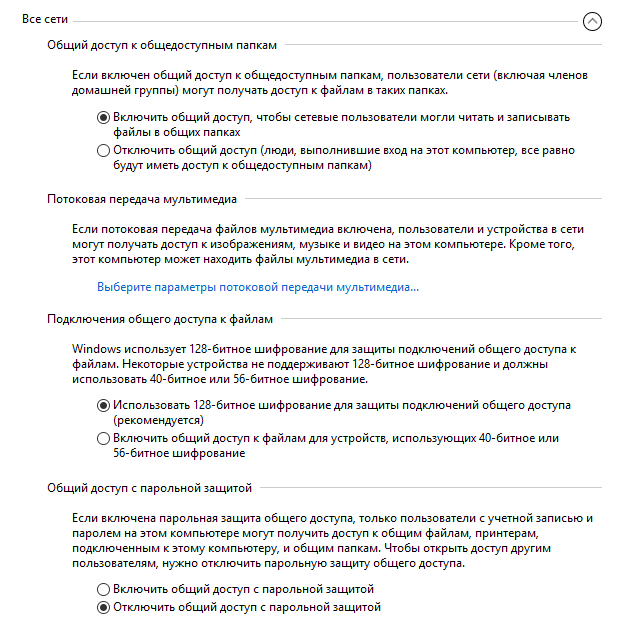
Scroll through the settings page, find and open the tab All networks, or General, and be sure disable password protected sharing.
After these steps, it is advisable to restart the computer. These are actually all the settings, the local network should already be working. To check, you need to go to Explorer on one of the computers (My computer), and open the tab on the left Network. All computers on the network will be displayed there. In the screenshot, you can see my computer, and another one from the network.
We can already go to a computer on our home network, there will be access to shared folders.
If you do not have computers on the network, or do not have access to a computer, then see the solutions at the end of this article.
Set up file and folder sharing
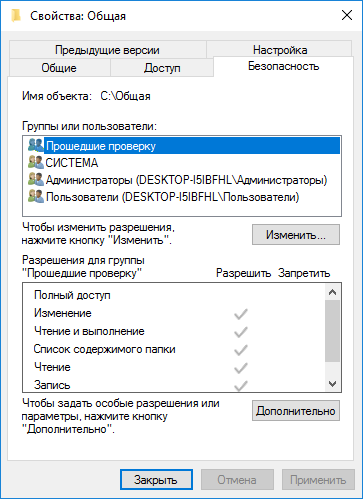
As I wrote above, there is already access to shared folders. But, we may need to share some other folder, which is located, for example, on the local drive D. This can be done without any problems. After we share the folder, all computers from the local network will be able to view the files in it, modify them, and add new files to this folder (true, it depends on what permissions we enable).
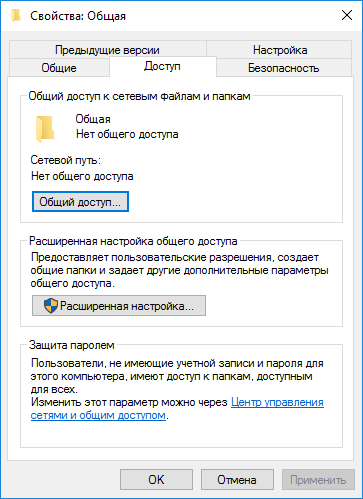
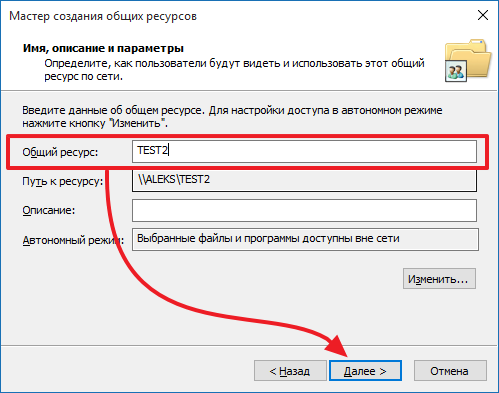
For example, I want to share the "Pictures" folder. To do this, right-click on it and select Properties. Go to tab Access, and click on the button Advanced setup. Place a checkmark next to Share this folder, and click on the button Permissions.
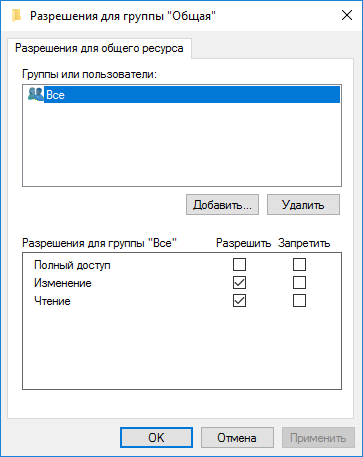
In the window that opens after clicking on the button Permissions, we need to set permissions for this folder. So that network users can only view files, then leave a checkmark only in front of Reading. Well, for full access to the folder, with the ability to change files, check all three checkboxes.
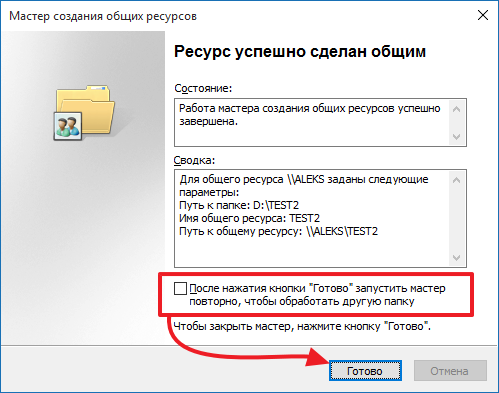
Click Apply and Ok. In the window Advanced sharing settings, also press the buttons Apply and Ok.
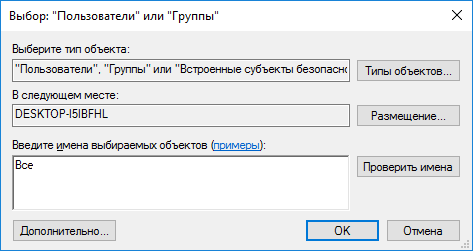
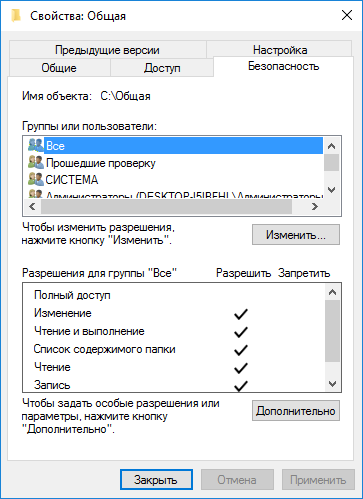
In the folder properties, go to the tab Security, and click on the button Change. Another window will open, in which we click on the button Add. We write in the field "Everybody" and press Ok.
Select a group Everybody, and from below we tick off the access points we need for this folder.
Everything, after these steps, this folder will be shared from all computers on the network. Starts to work without reboot, checked. Open this folder from another computer:
Everyone did it in a confusing way, until you figure it out ... It was possible somehow to make these settings more simply, and more understandable. But, everything works. It turns out that I have access to a folder that is located on another computer. And this is all over the air, since I have both computers connected to the router via Wi-Fi.
By the way, this folder will also be available from smartphones and tablets that are connected to this WiFi router. To view network folders on Android, I advise you to install the ES Explorer program, or use the standard explorer. Everything works:
We will now consider possible problems and errors that you can often encounter during the setup process.
Possible problems and errors when setting up a home LAN
If any errors or problems appear during the setup process, then first of all disable your antivirus, and other programs that may block the connection. If the problem is in the antivirus, then you will need to add your connection to the exceptions.
- Computers from the local network do not appear on the Network tab. In this case, on all computers we check the workgroup, and the sharing settings. Open a tab in File Explorer Network, right-click on an empty area, and select Refresh. Another important point, very often antiviruses and firewalls block access to the local network. Try temporarily disabling your antivirus. Also, you need to make sure that there is a connection to the router.
- No access to shared folder. Another problem, when we seemed to have set everything up, shared access, but when we try to open a folder on a computer on the network, a message appears that we do not have access, there are no rights to access this folder, it was not possible to open network folder etc. Or, you are prompted for a username and password.
Be sure to check the sharing settings in the properties of this folder. There are a lot of settings, everything is confusing, maybe something is missed. Well, again, turn off the antivirus, it can block. - A computer that is connected via Wi-Fi cannot be seen by other computers on the local network. Or vice versa. If your network is built from computers and laptops that are connected as wireless network, and by cable, then there may be problems with a certain connection. For example, laptops that are connected via Wi-Fi may not appear on the local network.
In this case, pay attention to which profile you enabled network discovery for. (settings at the beginning of the article). Also, it is desirable to assign the status of a home network to connect to your Wi-Fi network. Also, try disabling your antivirus.
I think you have succeeded. If something could not be configured, then ask in the comments. Also, do not forget to share your tips on this topic.
Many of us have more than one PC at home with different operating systems. Not infrequently there is a need. But if one of them is running Windows XP, and the second one, it becomes a problem, because. Windows 7 puts a lot of emphasis on network security (what can we say about it then). It is almost impossible to access network resources from Windows XP without making additional settings.
For making necessary settings go to the menu Start", and from there to "Control Panel" and select from the list that appears "Network and Sharing Center"
In the window that appears, we see the name and map of the active network. To configure the network, it is necessary that the "Homegroup" is not created, if it is created, you must exit it. If a homegroup has not been created, its status is set to "Ready to Create". Now we need to go to the menu item "Select home group and sharing options.
In the window that appears, select "Changing advanced sharing options...".
After that, a large list of settings will be displayed on the screen. us for correct setting network, you need to change the following parameters, as shown in the picture:
We save all the parameters and share the necessary ones, for this we select the folder, right-click on it and select from the list that appears "Properties", in the properties of the folder, select the tab "Access". We press the button "General access…".
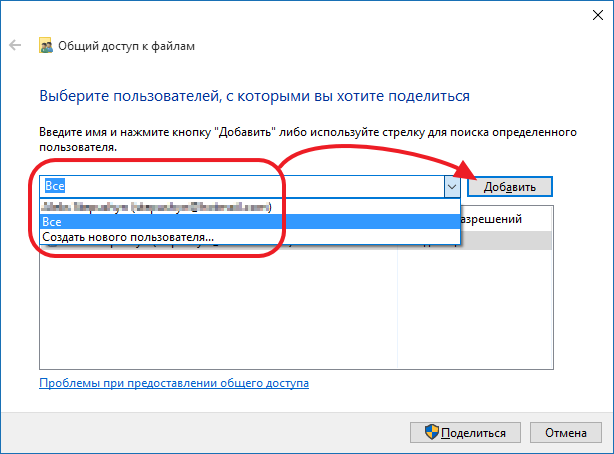
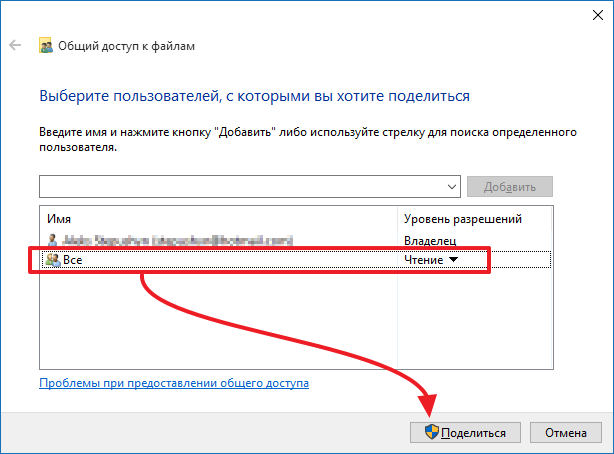
In the window that appears, you must select users and their level of access to the folder. In order for all network users to have access to the folder, you must add a user group called "Everybody"(If it is not in the list, select it in the field at the top of the screen and click on the "Add" button).
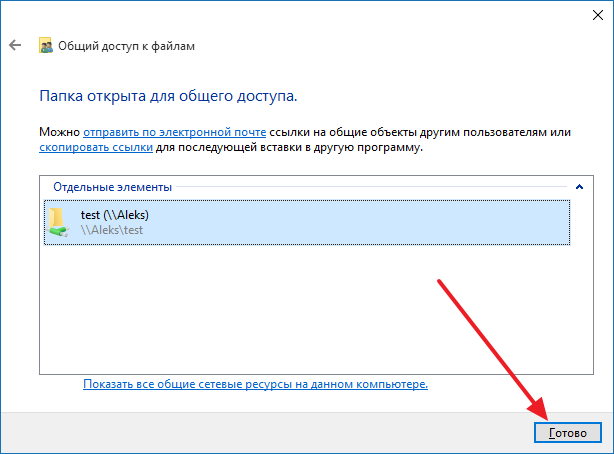
Upon completion of these not tricky manipulations, click on the button "General access" and a window appears on the screen with the specified network path to the folder. Now click on the button "Ready".
In this article, I will talk about creating a local network using the Windows 10 operating system as an example. Creating and configuring a local network in Windows 8 and Windows 7 occurs in a similar way, this instruction is universal.
Maybe someone did not know, but you can access the data of another computer that is on the local home network or connected to your Wi-fi. It is very convenient and fast way for transferring files according to the computer-to-computer scheme, without the use of external media (flash drives, external hard drives, memory cards, etc.).
Check network card settings and working group
On the desktop, right-click on the "This PC" icon ("My Computer", "Computer"), in context menu select "Properties". In the "System" window, click on "Advanced system settings".
In the System Properties window that opens, open the Computer Name tab. Here you will see the workgroup name. By default, in Windows 10, a workgroup is named "WORKGROUP".
On all computers connected to this local network, the workgroup name must be the same. If the computers connected to the network have different workgroup names, change the names to the same name for the workgroup.
To do this, click on the "Change ..." button, in the "Change computer or domain name" window, give a different name for the workgroup (write the new name in capital letters, preferably in English).
Now check your network card settings. To do this, in the notification area, right-click on the network icon (Internet access). Click on "Network and Sharing Center". In the "Network and Sharing Center" window, click on the "Change adapter settings" link.
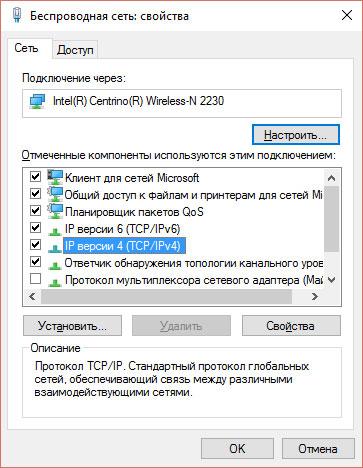
In the Network Connections window, select your network card, Ethernet, or Wi-Fi, depending on how your computer is connected to the Internet. Next, right-click on the network card, in the context menu, click on "Properties".
In the network card properties window, in the "Network" tab, select the "IP version 4 (TCP / IPv4)" component, and then click on the "Properties" button.
In the Internet protocol properties window that opens, in the "General" tab, check the parameters of the IP address and DNS service. In most cases, these parameters are assigned automatically. If these parameters are inserted manually, check the appropriate addresses with your Internet provider (the IP address on the computers connected to the network must be different).

After completing the verification of the parameters, you can go directly to creating a local network in Windows.
Creating a local network
The first step is to configure the LAN settings in Windows. Enter the "Network and Sharing Center", click on the item "Change advanced sharing settings".
In the "Advanced Sharing Options" window, you can change the sharing settings for various network profiles. Operating system Windows creates a separate network profile for each network you use, with its own specific settings.
There are three network profiles available:
- Private
- Guest or public
- All networks
In the private network profile, in the "Network discovery" option, select the "Turn on network discovery" option.
In the "File and Printer Sharing" option, activate the "Turn on file and printer sharing" option.
In the HomeGroup Connection option, select Let Windows manage HomeGroup connections (recommended).
After that, open the network profile "All Networks". In the Public Folder Sharing option, select Turn on sharing so network users can read and write files in shared folders.
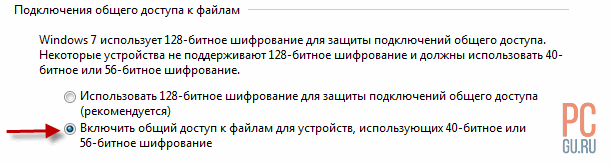
In the File Sharing Connections option, select the setting "Use 128-bit encryption to secure sharing connections (recommended)".
In the "Password protected sharing" option, activate the "Turn off password protected sharing" option.
After completing the settings, click on the "Save Changes" button.
Repeat all these steps on all computers that you plan to connect to your home LAN:
- check workgroup name (name must be the same)
- check network card settings
- in sharing options turn on network discovery, turn on file and printer sharing, turn off password protected sharing
How to enable folder sharing
In this case, I created a folder and named "Public". Right-click on this folder, in the folder properties window, open the "Access" tab.
Then click on the "Advanced Settings" button.
In the "Advanced sharing settings" window, activate the "Share this folder" item, and then click on the "Permissions" button.
![]()
Choose permissions to use data shared folder from another computer. There is a choice of three options:
- Full access
- The change
- Reading
To save the settings, click the "OK" button.
Go back to the folder properties, open the "Security" tab, and then click on the "Edit ..." button.
In the window that opens, enter the name "All" (without quotes) in the "Enter the names of the objects to select" field, and then click the "OK" button.
In the folder properties window, in the "Security" tab, configure the permissions that you previously selected for the shared folder.
To change the permission for the "Everyone" group, click on the "Advanced" button. In the "Advanced security settings for the shared folder" window, select the "Everyone" group, and then click on the "Edit" button to change permissions.
The LAN setup in Windows is now complete. In some cases, you may need to restart your computer for all changes to take effect.
Login to the local home network
Open File Explorer, in the "Network" section you will see all available computers connected to the local home network. To log in to another computer, click on the computer name, and then click on the shared folder name to access the files and folders in the shared folder.

The local network in Windows 10 is created and configured. If something is not clear, write in the comments and I will definitely help you.
In order to use the local network normally, you need to be able to share folders. In this article, we will talk about how to share a folder in Windows 7, 8 or 10, and also tell you what settings you need to make on your computer in order for folder access to work properly.
Setting up your computer before sharing folders
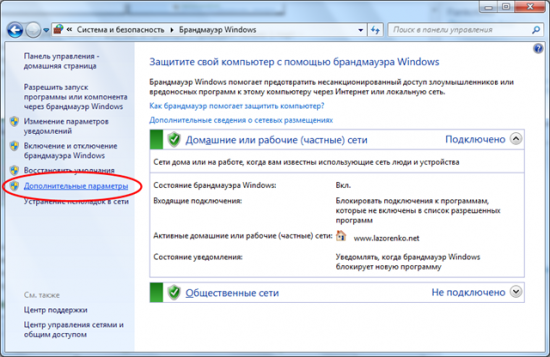
Before opening access to folders, you need to make sure that the computer is properly configured. Otherwise, you will not be able to access the folders you need. To do this, follow the path " Start - Control Panel - Network and Internet - Network and Sharing Center". In this window, click on the link " Change advanced sharing options».
After that, a window with sharing settings will open in front of you. In this window, all functions must be enabled except for " Sharing with password protection". Disable this feature and click the Save Changes button.
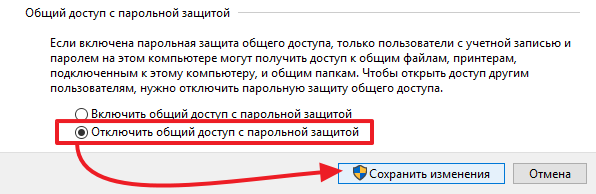
If you do not disable this function, then when you try to access the folder, you will have to enter a password.
How to Share a Folder in Windows 7, 8 or 10
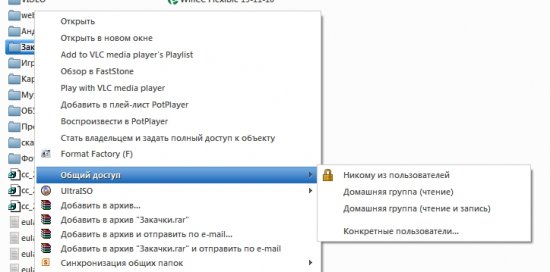
Sharing a folder in Windows 7, 8 or 10 is pretty easy. To get started, right-click on the desired folder and select " Properties».
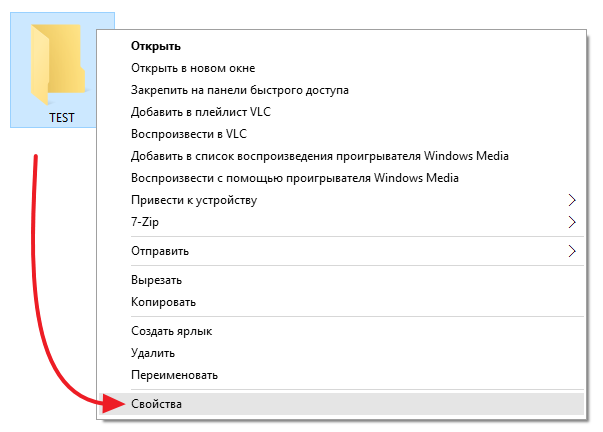
After that, a window with the properties of the folder will appear in front of you. In this window, go to the tab " Access and click on the button there. General access».
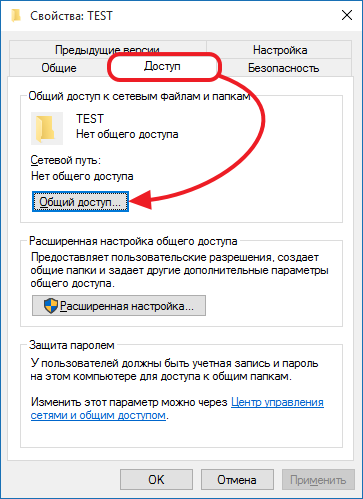
After that, a window with the name of the shared folder will appear. Here you just need to click on the button " Ready».
This completes the opening of access to the folder.
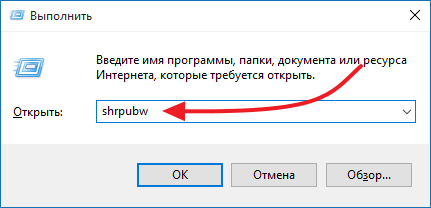
An alternative way to share a folder
Also exists alternative way opening access to folders. In order to use this method, press the key combination Windows + R and in the window that opens, enter the command shrpubw.
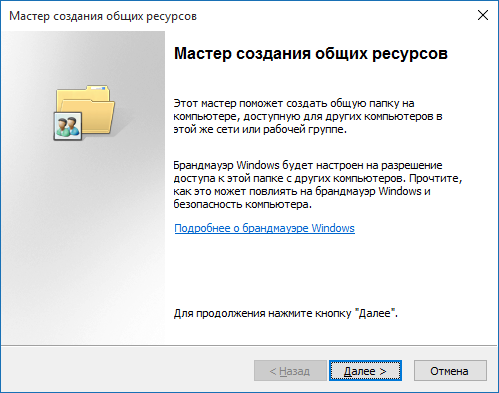
After that, you should see " Share Creation Wizard". With it, you can quickly and easily open access to a folder. In order to start creating a shared folder, simply click on the " Further».
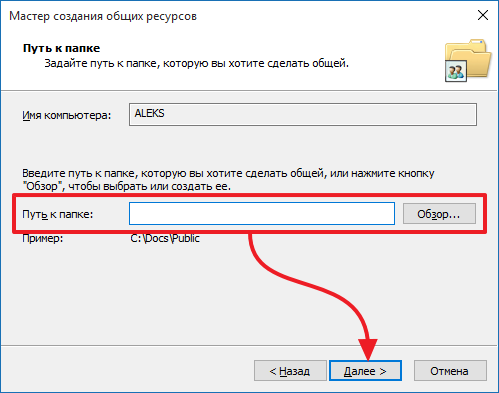
The first step is to select the folder you want to share. Select desired folder and click on the button " Further».
The final step is to select permissions to access the folder. Select the folder access rules that suit you and click the " Ready».

This completes the setup. In order to open access to the folder, it remains to click on the button " Ready».
If necessary, at this stage, you can enable the function of re-launching the "Wizard of creating shares".
In principle, everything is not so difficult, you just have to carefully read this article-lesson step by step.
Step 1. Share a folder (English Shared - general), that is, open a folder for public use on the network.
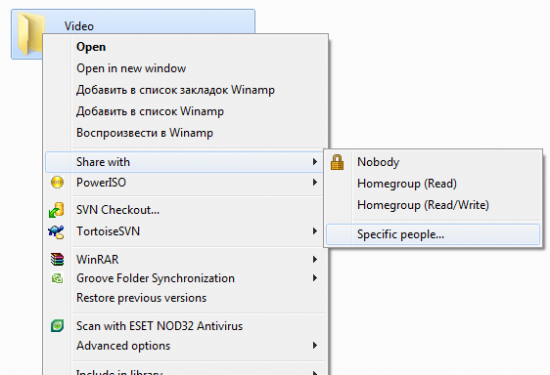
In all Windows, including the seven, the system does not allow anyone to browse your entire disk and wander through all the folders. We ourselves must select a specific folder and indicate that it can be viewed or even modified by all network users. To do this, right-click on the desired folder and get a drop-down menu in which you must select “Share with” -> “Specific people…”
As a result, we will get to the window for selecting specific users to whom we want to give access to the folder. In our case, we give access to all those who are online. Let's allow the folder to be read only, for example, so that a virus cannot be written to the folder or something can be deleted.
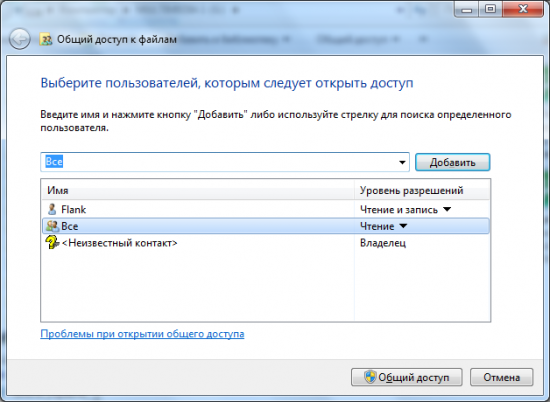
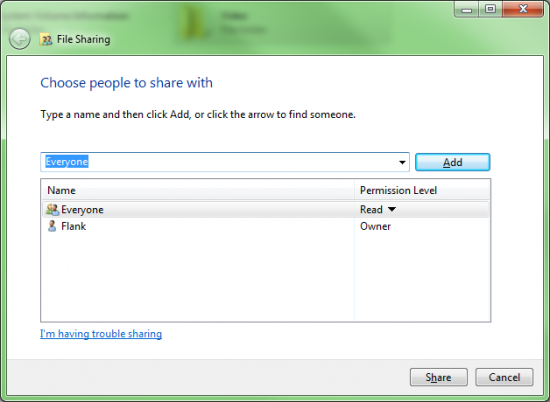
Enter in the proposed field “Everyone” (“Everyone”) and press the button “Add” . Thus, we will add a value to the list below, which will be responsible for all connected. The second column should be set to "Read" opposite the added “Everyone” (“Everyone”) , which means that any user will only be able to read data, but not write or delete. Also in this list there is a second entry - “Flank”, for example, this is you - and the value is “Owner” (“Owner”) , which means I will have full access to the files on this folder. Complete the setup by clicking the button. “Share” , down below.
Note.
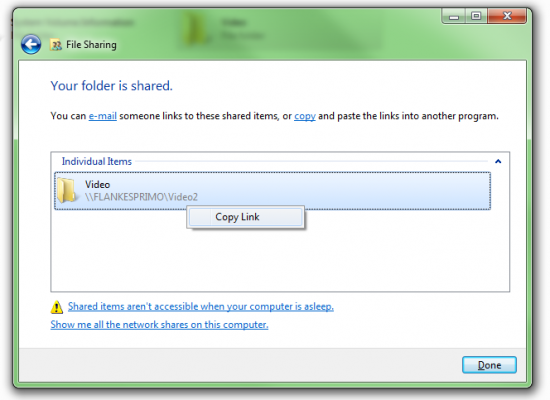
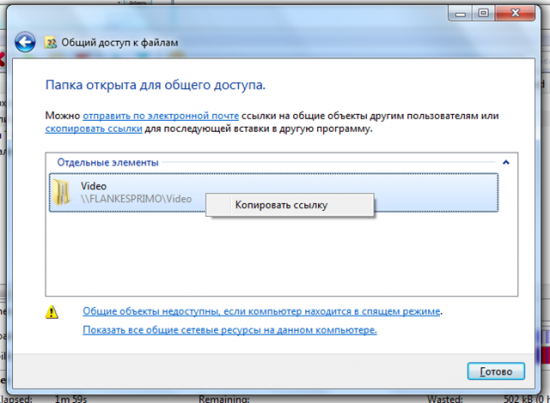
In this window, we see the full network address of the folder, by which any network user can access it. In order not to rewrite this address manually, you can right-click on the folder, and select the option - “Copy link” , after which the address can be immediately sent to a friend or saved, for example, in a notepad.
Step 2 Windows Firewall(firewall)
After completing the previous step, any network user who clicks on the link will not see anything. At first, for a while, Windows will not display anything, then it will show an error saying that the computer was not found.
It's simple - the friend's system sends a request to the address you provided and does not receive a response.
How does the system of information exchange between computers work in general, what blocks communication between them? This can be understood by the example of our folders. Suppose a network user does not care from which computer with which system he tries to access your folder, which I described in the following diagram:
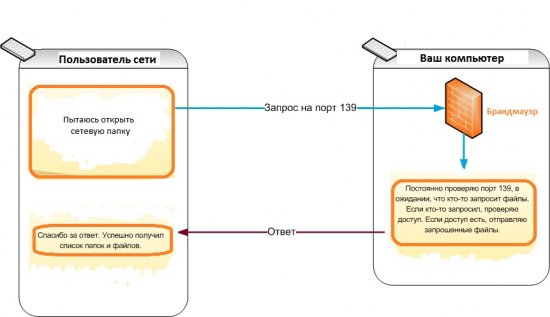
As you can see from the diagram, our Windows 7 understands that it was asked for files only if the files were requested on a specific port. In addition, a mysterious Firewall stands in the way of the request, which, in turn, does not allow the request to simply reach its goal. In principle, this is good, because. different intruders will not be able to give your computer different requests just like that. Firewall does not give a response to the computer of another user, respectively, if he does not receive a response, he gives an error that the computer was not found.
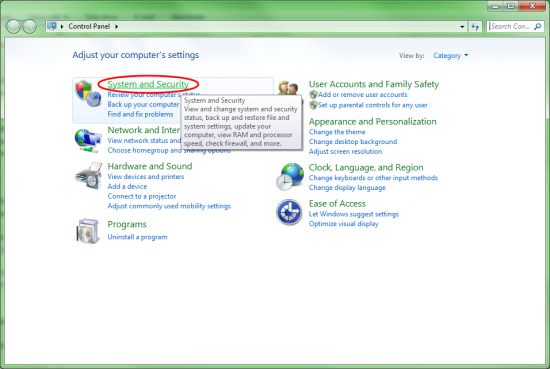
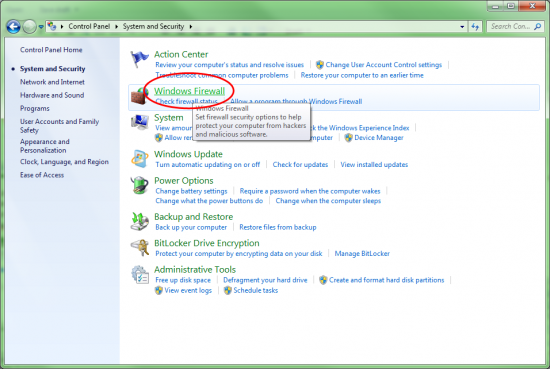
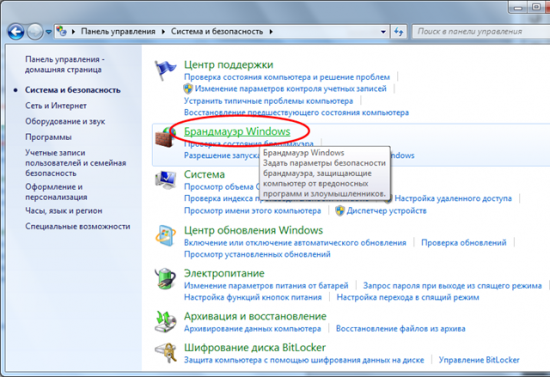
Our task at this step is to set the parameters so that the Firewall passes requests, but not all, but only for access to folders and files. To quickly find the Firewall, we perform the following steps: open the “Control Panel” control panel, go to the “System and Security” security center, launch the “Windows Firewall” control (“Windows Firewall”).
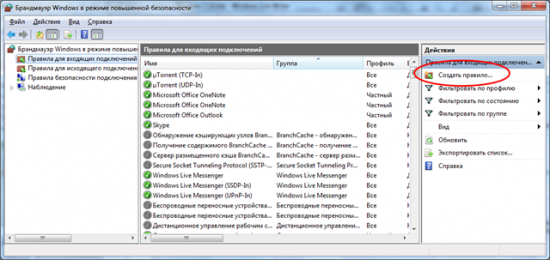
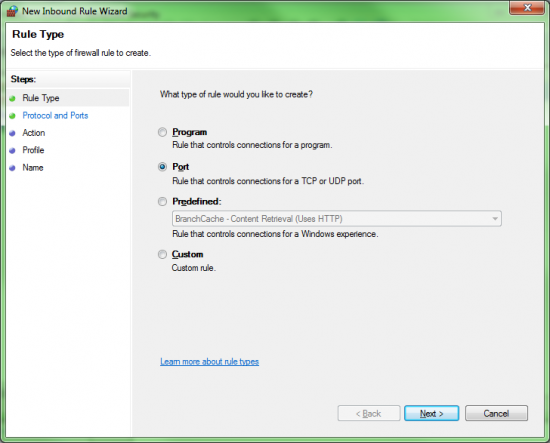
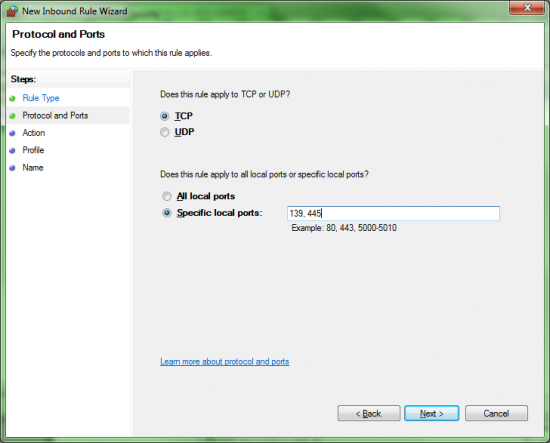
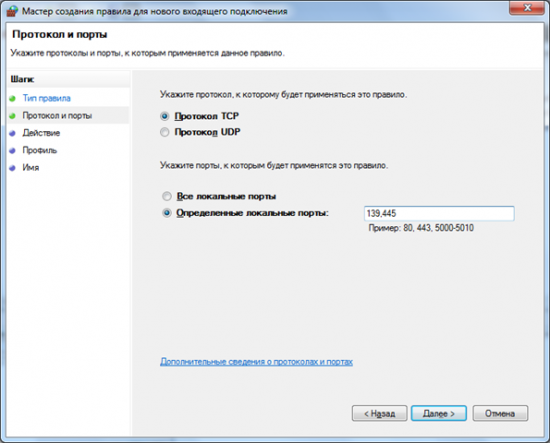
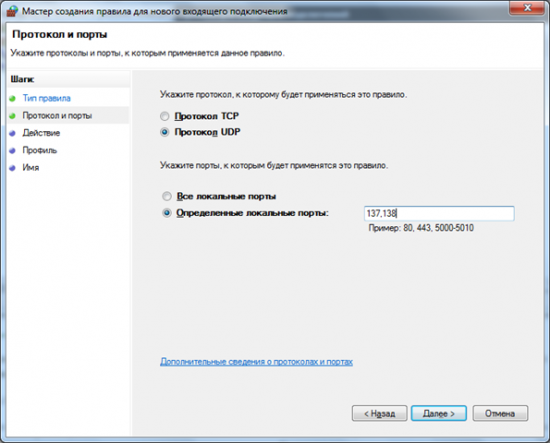
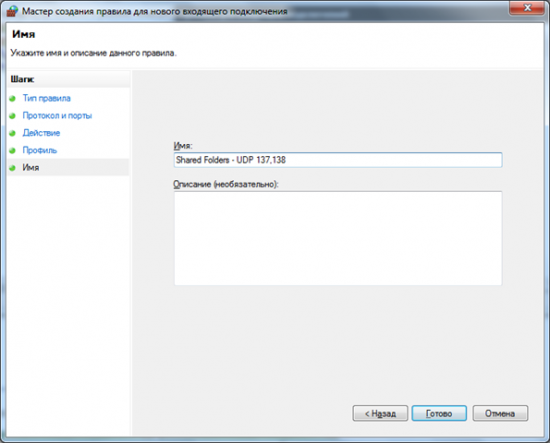
Our task is to open ports for access to folders and files. In the example there was only 1 port - 139, but in fact there are 4 of them, in addition, 2 ports of one type are TCP, and 2 ports of another type are UDP. So let's press “Advanced settings…” (“Advanced options…”) to add new rules for the Firewall, and in the window that opens, on the left, select the list item “Inbound Rules” (“Rules for incoming connections”) , so we can manage the rules for incoming requests. Add a new rule with the button “New Rule…” (“Create a rule…”) .

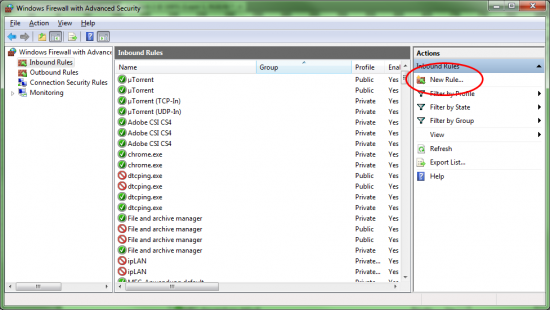
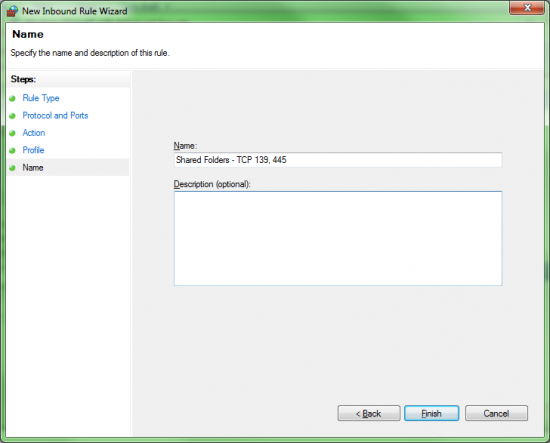
In the window that opens, select the type of rule - “Port” (“For port”) and press the button “Next”. Specify the TCP port type, and enter 139, 445, separated by commas, after, press again “Next”. In the next window, everything is set by default correctly, namely “Allow the connection” (“Allow connection”) , press “Next”, until we get to the last step - entering a name and description for our rule. For example, the name “Shared Folders - TCP 139, 445”. Click “Finish” .
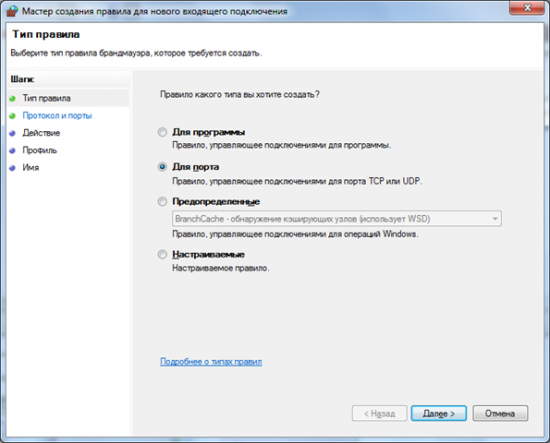

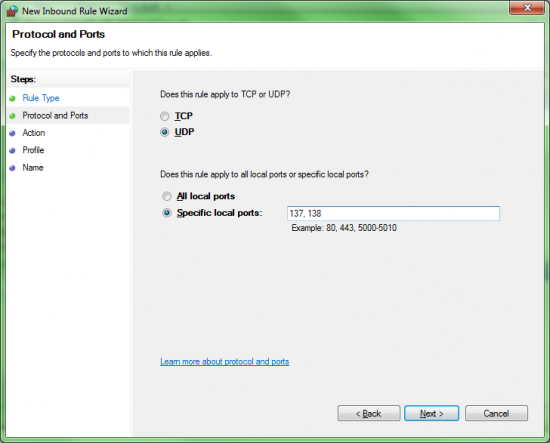
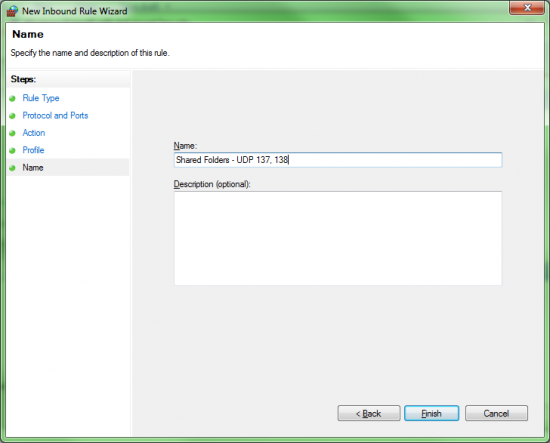
We repeat the procedure again, but now for ports with the UDP type. The ports themselves should be 137 and 138:
This completes the work with Windows Firewall. I hope you understand that this whole passage is needed for a reason, all this reduces the risk of viruses getting to you.
Step 3. Remove the password request
After completing the previous step, the computer of any user on the network will be able to receive a response from your Windows 7, but this response will be a request from Windows 7 to introduce itself. By default, the seven does not allow anyone to climb folders, he wants to know specifically who is doing it. If you do not want to create some kind of account or give your password, you need to persuade your operating system to allow everyone, without entering a login and password, to view folders.
Windows 7 only allows you to change this setting for home networks. Accordingly, we need to make the current network - home.
On the badge network connection right click and select item “Open Network and Sharing Center” :
We get to a page where we can see the current connection and can change it.
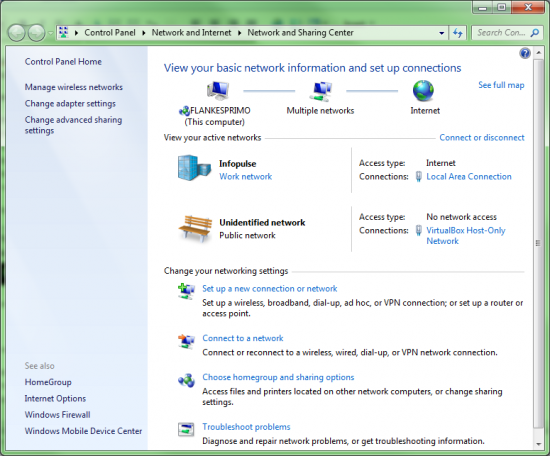
If you look closely at the window, you will see that I am connected to the Infopulse network and I have it installed as working network. Our task is to change the network to home, for this you need to click on the same inscription with the mouse - “Work network” , and in the window that opens, select - “home network” (“ home network”) . If you already have a Home Network installed, as in the Russian example, you can skip this step.