Consider the process of creating a connection to the Internet using a modem (the process of installing a modem is described in Chapter 7, devoted to installing various equipment). Let's assume that you bought an internet card from some provider. On this card, on the reverse side (as a rule) you will find the username (login), password (password) and the phone of the modem pool. These data will be required to establish an Internet connection.
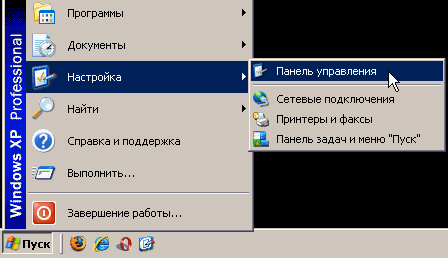
1. To create a connection, go to the Control Panel / Network connections and select Create a new connection in the left part of the window. After that, a new window will appear in which you should click on the Next button.
2. The following window will appear, in which you must select Connect to the Internet and click the Next button.
3. In the next window, select the Set up connection manually item in order to enter the data on the Internet card (Fig. 6.1).
5. After clicking the Next button, a window will appear in which you must enter the name of the service provider. You can enter any information in this field: the name of the provider whose card you bought, or any other word - it does not matter.
Rice. 6.1. Establishing a connection manually
6. At the next step, enter the phone number (modem pool) indicated on the card (Fig. 6.2).
NOTE
If you use pulse dialing, you must put the Latin letter p in front of the phone number. Otherwise, some modems will not dial the phone number.
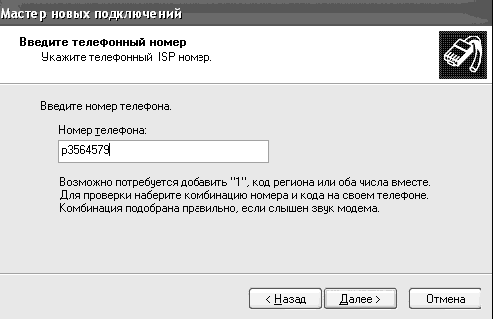
Rice. 6.2. Entering a phone number
7. After clicking on the Next button, the following window will open, in which you must enter the username (login), password (password) specified on the Internet card you purchased, and repeat the password again in the Confirmation field. We recommend that you uncheck the box next to Turn on a firewall to connect to the Internet. In Chapter 9, we'll look at an alternative program to secure your connection.
8. After clicking on the Next button, a window will open with a message that the modem connection was successfully created. Don't forget to check the box next to Add a connection shortcut to the desktop. This will add a shortcut to the desktop for quick access to the dialer.
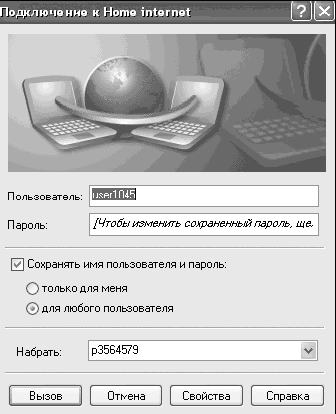
Now, to connect to the Internet, just double-click on the shortcut with a modem connection. A dialer window will open where you can change the phone number, username and password used to connect to remote computer(Fig. 6.3).
Rice. 6.3. Dialing window
To start dialing, you must click on the Call button, after which dialing to the provider will begin. If the connection was successful, two monitors will appear in the system panel (Fig. 6.4). To disconnect from the Internet, right-click on them and select Disconnect.
Rice. 6.4. Connection established
Creating a local network connection
Consider the case of connecting to the Internet through a home local area network. There are more and more of these lately, and the tariffs in these networks are often more profitable than those of traditional providers; in addition, you will learn how to establish a connection between two computers - this will be especially useful for those who have several computers at home, and those who often transfer data from one computer to another.
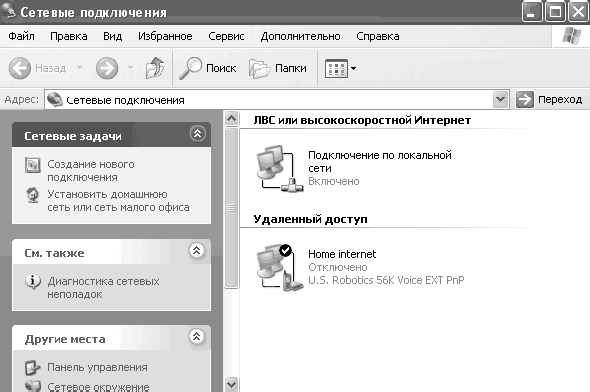
Let's assume that you have already installed a network card and connected to it network cable. If you did everything correctly, then in the control panel, in the Network connections section, the item Connect by local network(Fig. 6.5).
Rice. 6.5. LAN connection
So, you have decided to connect to the Internet through your home local network, you have been allocated an IP address and a proxy server address. What is it and how to use it?
1. Right-click the LAN connection icon and select Properties.
2. Select Internet Protocol (TCP/IP) and click the Properties button.
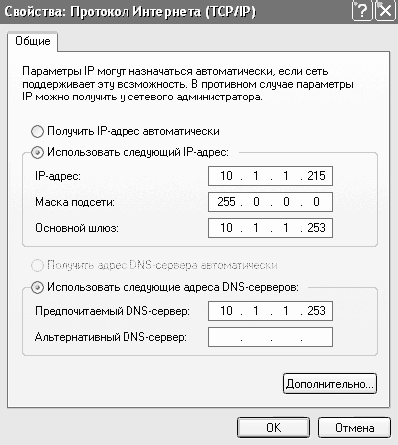
3. A window will open in which you will need to enter the IP address and other parameters given to you to connect to the local network (Fig. 6.6). Before that, check the box Show the icon in the notification area when connected to display the connection status in the system tray (when connected to a local network, there will be two monitors there, as with a modem connection).
When you click on the Advanced button, a few more settings become available, but we will not consider them, as they are designed for an advanced user. Click the OK button and return to the LAN connection properties. On the Authentication tab, you will see several security settings. Feel free to uncheck the box next to Manage network access using IEEE 802.1X.
Rice. b. b. Entering settings for connecting to a local network
If you did everything correctly, then two monitors will appear in the system panel, which indicate a successful connection to the local network. True, to connect to the Internet via a local network, you often also need to enter the proxy server address, but we will talk about this a little later when setting up the program - Internet Explorer.
Now let's imagine that you have two computers at home and you want to connect them to a local network. To do this, we need two computers with network cards. To connect computers directly, you can use a so-called crossover cable. If you have more than three computers at home, you need to use ordinary twisted-pair cables and connect them to a device called a hub (a multiport repeater or hub that serves as a cable system node in networks with tree and star topologies).
ADVICE
Don't be afraid of new terms. At a computer store, salespeople will pick up the right cables for you and crimp them so you can plug them into network cards.
So, you bought a crossover cable, connected one end to the first computer, and the other to the second. Now you need to configure the computers, which we will conditionally call Computer-1 and Computer-2.
1. Go to the properties of the LAN connection on Computer-1, as shown above.
2. In the IP address field, enter the address 192.168.0.1 and the subnet mask 255.255.255.0 if it was not set automatically; leave the rest of the columns blank. Then click on the OK button.
3. On the second computer, enter the same data, but instead of the address 192.168.0.1, you must enter the address 192.168.0.2. That is, each computer must have its own IP address and the same subnet mask, this is the main condition for building a local network. Thus, if you are going to connect another computer to the local network, you must specify the address 192.168.0.3, 192.168.0.4, etc. in its settings.
4. In addition, in order to be able to see the list of computers in the network environment, you must set the same workgroup for all computers. To do this, on the Desktop of each computer, right-click on the My Computer shortcut, select Properties from the menu that appears, and go to the Computer Name tab. Here you can enter a description of the computer that will be displayed as a comment for your computer name in Network Neighborhood. To change the group that the computer belongs to, click the Change button.
5. A window will open; in it you need to enter the name of the workgroup, which must be the same for all computers connected to the local network. In addition, you must specify the computer name, which must be unique for each computer. After entering the information, click on the OK button (Fig. 6.7).
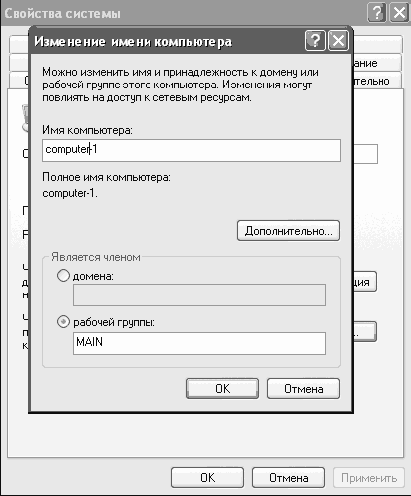
Rice. 6.7. Changing the computer name
If you entered the data correctly on all computers, when you launch the Network Neighborhood shortcut on the Desktop and click on the link in the left part of the Show workgroup computers window, a list of all computers that are part of your workgroup will be displayed in the right area of the window (Fig. 6.8).
Rice. 6.8. Workgroup computers
Congratulations, we have connected home computers to a local network.
And now we will learn how to open access to folders on computers. Assume that the first computer has a Cartoons folder that contains cartoons. By opening access to this folder, you can watch cartoons located on the first computer from the second. To do this, on the first computer, right-click on the Cartoons folder and select Sharing and Security. In the window that appears, you can enter the name of the folder that the user will see through the network environment, as well as enter maximum amount connections to this folder, that is, the number of users who can simultaneously be in this folder (Fig. 6.9).
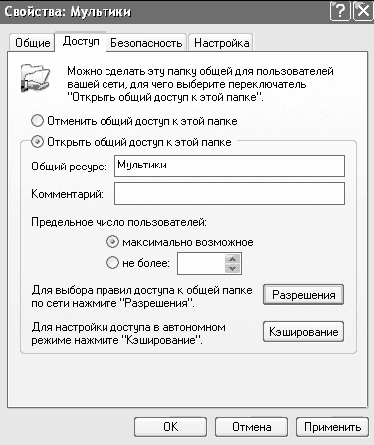
Rice. 6.9. Assignment of access rights
If you did everything correctly, then now, by logging into the network environment from the second computer and double-clicking on the icon of the first computer, you will see the Cartoons folder. You can copy data from this folder, run files, etc. depending on the permissions you set on the first computer for this folder.
As you can see, connecting a computer to a local network and opening folders for sharing takes very little time.
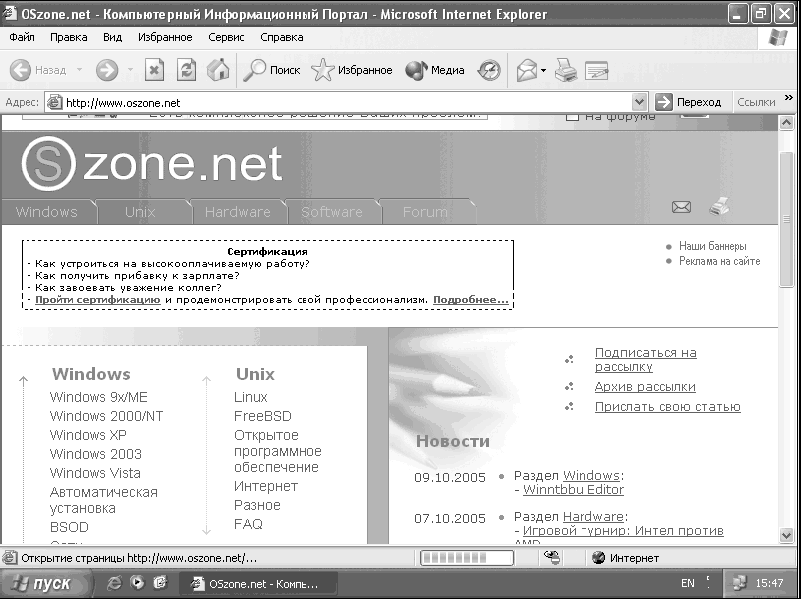
Launching Internet Explorer
It's time to start setting up Internet Explorer to work on the Internet.
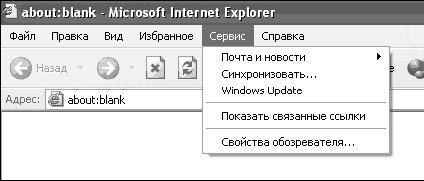
1. To launch the browser, click on the program icon on the desktop or in the panel quick start. After starting the browser, open the menu item Service, in the menu that opens, select the item Internet Options (Fig. 6.10).
Rice. 6.10. Internet Options
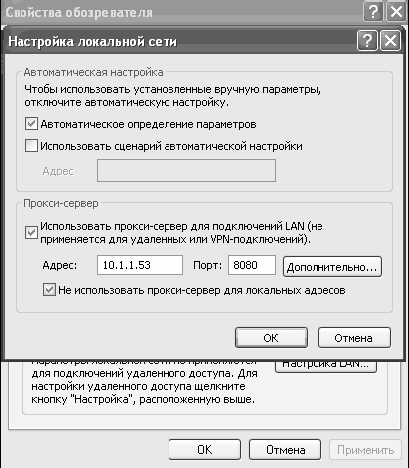
2. A window with settings will open. Open the Connection tab and at the bottom of the window click the LAN Settings button (if you connect to the Internet via your home network) or the Settings button (if you use a modem).
3. In the window that opens, check the box next to Automatic detection of settings, as well as next to Use a proxy server for LAN connections.
4. In the Address and Port fields, enter the data that were given to you when connecting to the network (in case of connecting via a modem, you can find them on the Internet map). Don't forget to check the box next to Do not use a proxy server for local addresses(Fig. 6.11). If you do not check this box, the network will go through a proxy server, which will affect the performance of the local network.
5. After entering the data, click the OK button.
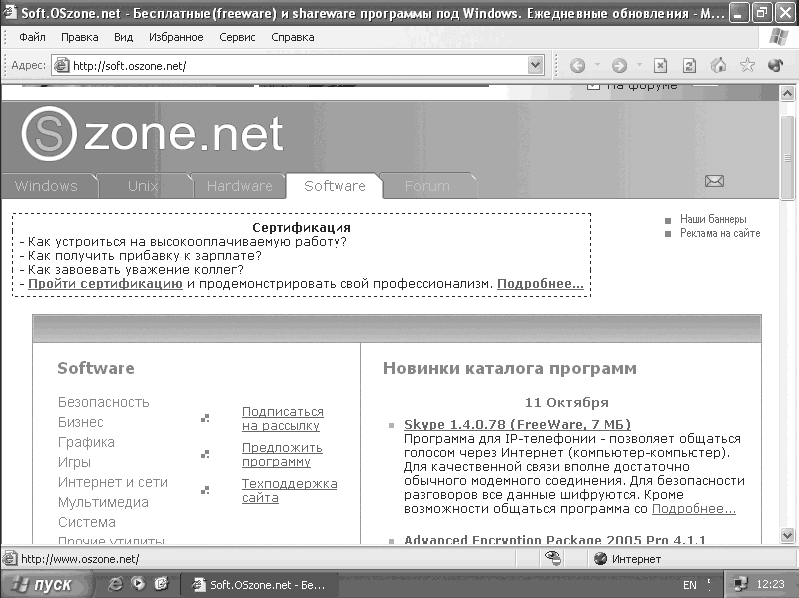
6. Now let's check the performance of your connection. To do this, in the address bar of the browser, enter the address of a site, for example wvjw.oszone.net, and click the Go button or press the Enter key. If all the settings are entered correctly, the page whose address you entered will load (Fig. 6.12).
Rice. 6.11. Entering the proxy server address
Rice. 6.12. Site Display
Let's take a closer look at the settings Internet browser explorer. To do this, select Service/ Properties browser(Fig. 6.13).
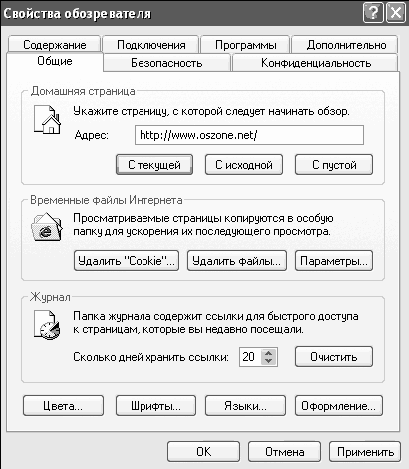
Rice. 6.13. Internet Options
In the first part of the window, you can specify the address of the page that will be loaded when the browser is opened. If you do not want to open any page, click on the button From blank. In area Temporary Internet Files You can delete files that are stored on your hard drive when you visit web pages, and configure the settings for saving these files. In area Magazine you can clear the log, as well as configure the time during which links will be stored. The log stores links to all the pages you have visited in a certain time. Buttons Colors, Fonts, Languages and Registration You can customize page display settings. You can customize link colors, disable styles used on pages and replace them with your custom style, and more.
On the tab Security security settings are configured. If you are not good with computers, we do not recommend that you change anything on this tab.
On the tab Confidentiality configure cookie processing settings (Fig. 6.14). Some websites store data on local computer in the form of small text files. These files are called cookies. Using this tab, you can select one of several levels of protection.
– Block all cookie. Blocking cookies for all websites. Cookies that already exist on the computer will not be available to Web sites.
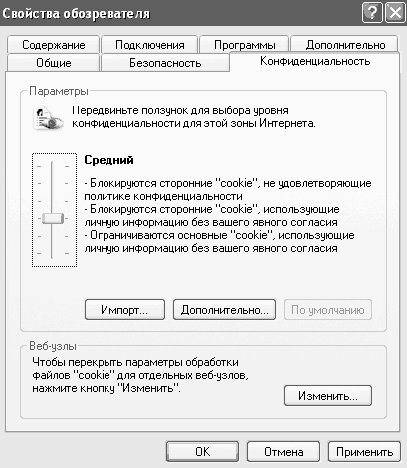
Rice. 6.14. Confidentiality
- Tall. Block cookies for all websites that do not have a compact policy (compressed formalized privacy terms). Blocking all cookies for all websites that use the user's personal identification data without the user's explicit consent.
- Moderately high. Blocking cookies for third-party websites that do not have a compact policy (compressed formalized privacy terms). Blocking all cookies for third party websites that use the user's personal identification data without the user's explicit consent. Blocking all cookies for browsing websites that use the user's personal identification data without the user's implied consent.
- Average. Blocking cookies for third-party websites that do not have a compact policy (compressed formalized privacy terms). Blocking all cookies for third party websites that use the user's personal identification data without the user's implied consent. Delete all cookies for browsing websites that use the user's personal identification data without the user's implied consent when Internet Explorer is closed.
- Short. Blocking cookies for third-party websites that do not have a compact policy (compressed formalized privacy terms). Delete all cookies for third party websites that use the user's personal identification information without the user's implied consent when Internet Explorer is closed.
– Accept all cookies. Save all cookies on your computer. Cookies that are already on your computer will be available to all websites that have created them.
On the Contents tab, you can configure settings for restricting access to certain sites, as well as options for auto-completing forms and fields when visiting web pages. By clicking the Enable button in the Access Restriction area, you turn on the web browsing control system and you can restrict access to sites that contain scenes of violence, profanity, pornography, etc. By clicking the Autofill button, you can configure the settings for autofilling and saving data entered in forms on web pages, and page addresses, as well as clear the list of already saved passwords and phrases.
We are already familiar with the Connection tab, so we will not repeat ourselves. On this tab, you will see a list of all possible connections, and you can also configure the connection settings.
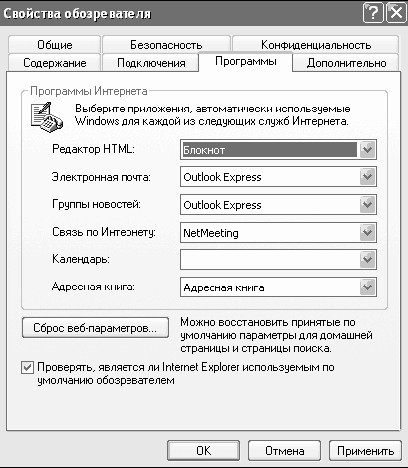
On the Programs tab, you can select the default programs for working with mail, newsgroups, address book and calendar, as well as assign Internet Explorer browser by default, that is, the program that will be automatically used when opening HTML files and links. To do this, check the box next to Check if Internet Explorer is the default browser (Fig. 6.15).
Rice. 6.15. Programs
Tab Additionally allows you to change many other settings (Fig. 6.16). You can turn off the display of pictures, animations, sounds, videos on web pages, adjust link underlining settings, and change other security and page display settings.
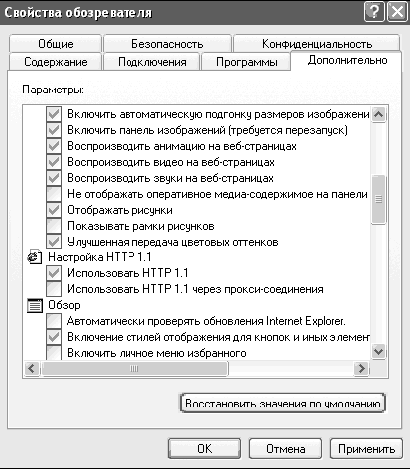
Rice. 6.16. Additionally
If you want to change the size of the toolbar buttons, right-click on the toolbar to the right of the buttons and select Customize from the menu that appears. A new window will appear in which, using the buttons Add and Delete you can select the buttons to be displayed on the toolbar. In addition, you can choose the size of the icons and disable the display of text next to the icons (Fig. 6.17).
Rice. 6.17. Display toolbar before changes
Rice. 6.18. Display toolbar after changes
As you can see, the toolbar has become much smaller and more convenient (Fig. 6.18). Achieving this result is quite simple - you need to select small icons, turn off the display of text near the icons and remove unnecessary buttons from the toolbar. To move the buttons to the right of the address bar, click on the toolbar and select Pin toolbars, then click with the left mouse button on the dashed vertical line in front of the buttons and, without releasing the left mouse button, drag the button bar to the right of the address bar. After that, you need to pin the toolbars again.
Traveling the World Wide Web
In the first part of this chapter, we created an Internet connection and tested its functionality. And now we will learn how to surf the Internet and solve all the problems that arise in the process of visiting various pages.
For travel we will use Internet program Explorer, which can be launched from the desktop or from the quick launch bar. After starting the program, a blank page will open (if you specified when setting up the program homepage from empty). In the address bar, enter the address of the site you want to go to and press the Enter key. If you entered the correct page address and it exists, the page will start loading in the browser window (Fig. 6.19).
You can expand the program workspace to full screen. To do this, press the key F11(Fig. 6.20). To return to normal view mode, press the key again. F11.
Rice. 6.20. Displaying the page in full screen
If such a page does not exist or is temporarily unavailable, you will see the so-called 404 error (Fig. 6.21). In cases where this error occurs, try to return to the previous page using the Back button on the toolbar or check the entered page address.
If on open page you have found useful links (links to other pages with information), then to open them, click once with the left mouse button; if you want to open this link in a new Internet Explorer window, click on the link while holding down the shift. Or right-click on the link and select from the drop-down menu Open in new window.
When visiting various pages, you will come across various banners (animated images) of an advertising nature (Fig. 6.22). Often they do not carry useful information, but sometimes there are links to useful sites.
Now let's talk about sites from which you can start your visit to the World Wide Web.

Rice. 6.21. Page not found

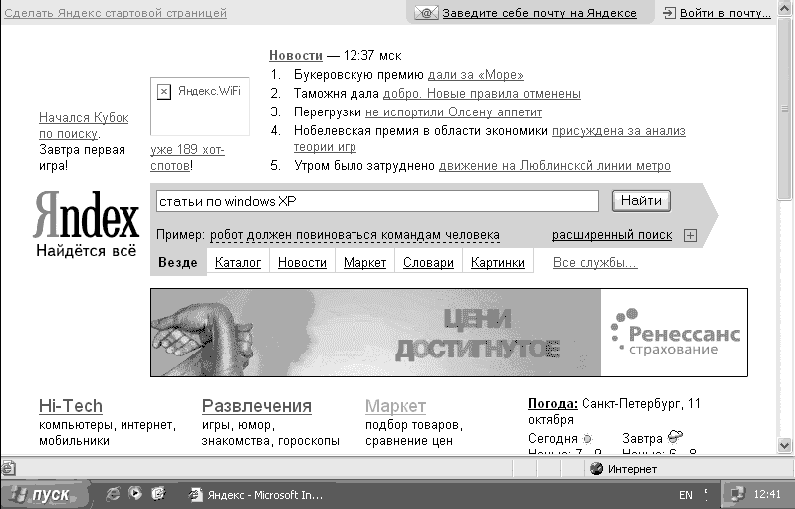
Search engines. Resources where you can find information of interest to you on any subject. For searching necessary information in the Search line, enter the text you are interested in, for example: articles on windows XP and click the Search button (Fig. 6.23).
After the search, a page will open in front of you, on which links will be given to pages that correspond to your search query. Currently, these resources are no longer only search engines, but also represent a huge number of useful services: weather, exchange rates, news, etc. Main search engines Runet:
Rice. 6.23. Entering a search phrase
Sites of computer subjects. AT this group we have placed links to popular sites dedicated to reviews of software and hardware, as well as Windows operating systems:
News sites. This group includes sites of news publications that will help you keep abreast of events taking place in the world:
Consider the process of creating a mailbox in the Mail.ru service, which is a leader in the field of free Email at the moment. Go to the site www.maiL.ru and click on the link Registration in the mail, located on a blue background, in the upper left part of the window (Fig. 6.24).
A page will open in front of you, on which you need to enter various data necessary to create a mailbox. All required fields are marked with an asterisk (Fig. 6.25).
As an e-mail address, do not try to enter addresses like [email protected], as they have already been taken a long time ago. Try to add part of your last name to your first name or choose a different address. Don't forget to write down your answer Secret Question. Otherwise, if you lose your mailbox password, you will not be able to recover it, since you will not be able to answer the security question.
After entering all the data, click on the Register button mailbox.
If you did everything correctly, you will automatically get into the created mailbox. To write a letter, click on the link Write a letter (rice. 6.26).
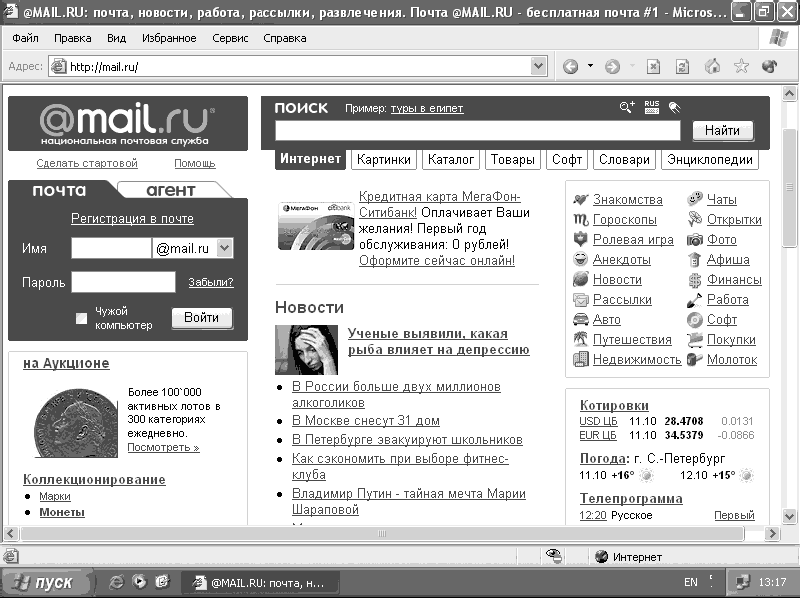
Rice. 6.24. Main pagemail.ru
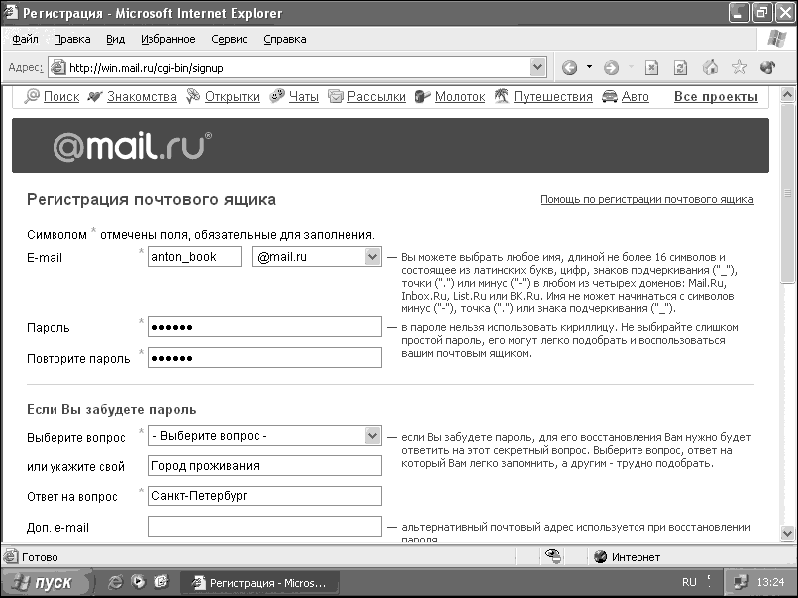
Rice. 6.25. Entering personal data
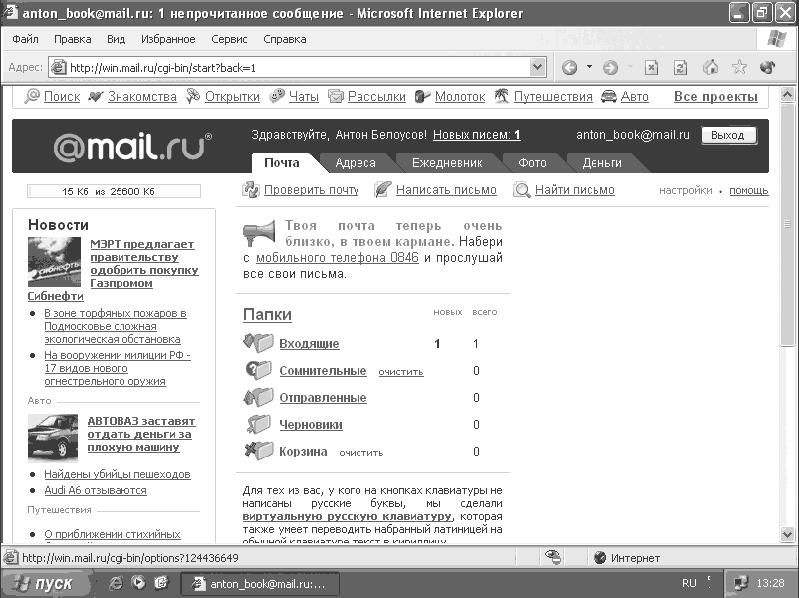
Rice. 6.26. Mailbox
To enter your mailbox, you need to home page Mail.ru in the Name and Password fields, enter your mailbox name and password, and then click the Login button.
Configuring the Outlook Express mail program
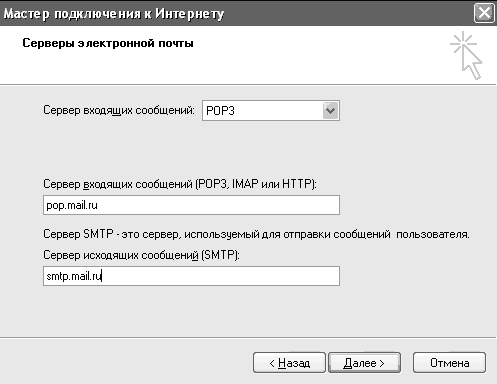
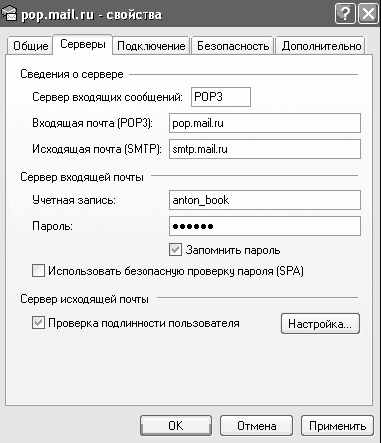
With the help of the program Outlook Express you can receive mail on your computer instead of viewing it on the Internet. It is much more convenient as it saves time and traffic. In addition, some providers offer reduced rates for mail only. For the settings, we will need the following data: username, password, POP3 and SMTP server addresses.
1. If you created a mailbox on Mail.ru, then as a username you must enter the mailbox address without ©mail.ru, that is, if you have an address [email protected], enter anton as the username. For the password, enter the password for your mailbox. Specify pop.maiL.ru as the POP3 server, and smtp.maiL.ru as the SMTP server.
2. To start the program, go to the Start/All Programs/Outlook Express menu. A window will open asking you to create account. The first step asks you to enter your first and last name. This data will be substituted in the From line when your friends receive sent mail.
4. After moving to the next window, you must enter the data of the servers for receiving and sending e-mail. In our case, these are pop.maiL.ru and smtp.maiL.ru, respectively (Fig. 6.27).
Rice. 6.27. Mail server addresses
5. The next step is to enter the username and password required for authorization on the servers of incoming and outgoing mail.
The basic account settings are now complete. The main window of the program has appeared in front of you. For convenience, it is recommended to check the box at the bottom of the window When Outlook Express starts, open the Inbox folder.
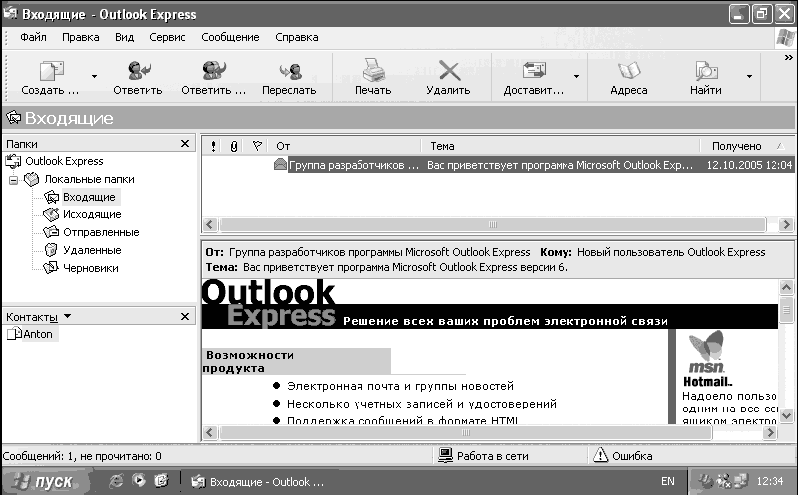
If you click on the Inbox folder on the left side of the window, you will see a list of messages at the top right (so far there is only one message from the Outlook Express development team), and at the bottom - the text of the message (Fig. 6.28).
Some mail services require the username to be verified before sending the message, so we need to check one box. To do this, on the Tools menu, select Accounts. Select your account with the left mouse button and click on the Properties button.
A new window will open in front of you, in which you need to go to the Servers tab, at the bottom of the page you need to check the User authentication box. This flag is responsible for checking the username before sending mail (Fig. 6.29).
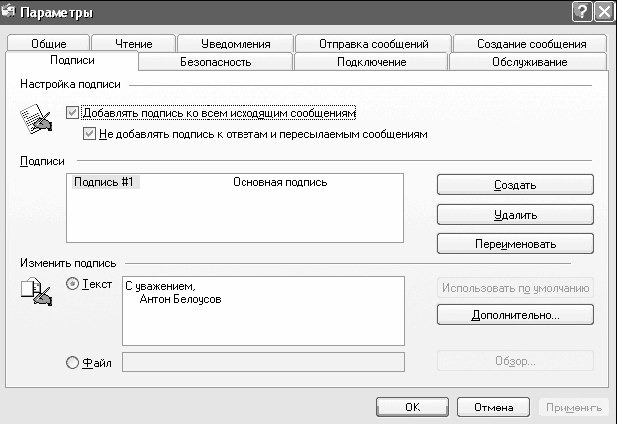
In addition, you can configure various options for displaying letters and receiving mail. To do this, select Tools/Options. You can not edit these parameters, as this does not affect the performance of the pro -
grams, but if you want to add a signature to messages, change the font size, display messages, etc., study these settings. Consider just an example of creating a signature.
Rice. 6.28. Reading a message
Rice. 6.29. Authentication
To create a signature, go to the Signatures tab and click the Create button, then enter the signature text in the Text field and click the OK button (Fig. 6.30).
Rice. 6.30. Create a signature
Rice. 6.31. Toolbar
Outlook Express toolbar:
– the Create button is used to create email;
– the Reply button allows you to reply to the selected message, with your text at the top of your message, and the text of the original message you are replying to at the bottom;
– the Reply to all button allows you to reply not only to the author, but also to other users who have received the letter you are replying to;
– the Forward button allows you to completely forward the message, including attached files, to any email address;
– the Print button allows you to print a message, and the Delete button allows you to delete the selected message, respectively;
– using the Deliver button you can receive and send mail;
– the Address button is responsible for the call address book, where you can store email addresses and other contacts of your friends.
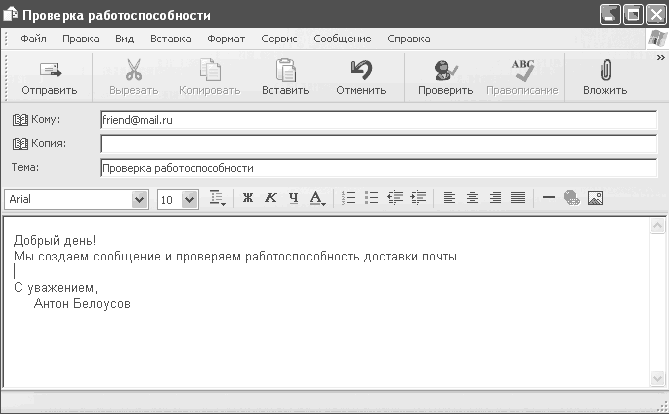
Let's try to create a letter and send it to your friend. To do this, click on the Create button. A new window will open in which you need to enter the email address of the recipient (the To field), as well as the recipient of the copy of the letter, if any (the Cc field). In the Subject field, you can enter a subject for the message, but this field is optional. At the bottom of this window you can enter the text of your message. If you have created a signature, then it will be located under the text of your message (Fig. 6.32).
Rice. 6.32. Create a message
In addition, you can attach various files to your letter. To do this, click on the Attach button when creating a message and select the files that you want to attach to the message. You can also choose different fonts and styles when writing a letter.
NOTE
You can select different styles and fonts only if you have defined the format of sent emails as HTML in the settings.
After writing the message, click on the Send button.
What is spam and how to distinguish it from other emails
Spam - These are letters from unknown recipients that end up in your mailbox without your consent to receive them. If you did not ask to be sent to you given message and did not subscribe to the newsletter on this topic,
did not leave your e-mail address by filling out the form on the Internet, then this is spam. In fact, in most cases, spam is an advertisement of goods and services imposed on you.
Unfortunately, it is almost impossible to completely avoid spam. However, you can try to reduce the amount of "garbage" you receive if you follow very simple rules:
- never reply to the addresses listed in "junk mail" - your reply will only confirm that your email address is valid;
- for the same reason, never use offers to remove your address from mailing lists - this is a trick for simpletons;
– do not indicate your address “for communication and feedback” on your personal page; if you really need to know what your visitors think, install the Guestbook.
To combat spam, you can use various programs, which we will discuss in Chapter 9. If you receive mail through the web interface of your mail service, then the site often has various anti-spam filters already installed, and most of it immediately ends up in questionable mail. . Therefore, if you are unable to protect yourself from spam, use the web interfaces postal services. However, in this case, you will have to view all the advertising banners that appear when working with mail. So try to decide what is best for you: receive spam or watch advertising banners, but have protection from unwanted emails.
How to view the MAC address
Windows XP
1. Click Start, open Control Panel, click Network Connections > click right click click on Local Area Connection and select Status.
2. Go to the Support menu item and press the Details button. 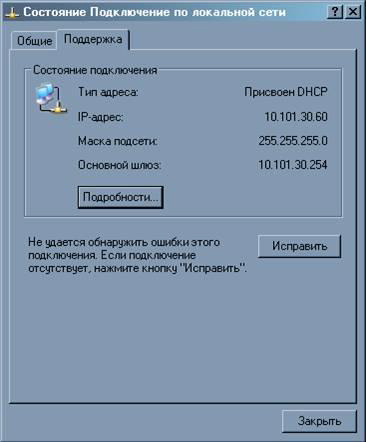
3. In the line Physical address in the value section, the mac-address of the network interface is indicated. 
Windows Vista / 7
1. Open Control Panel, click Network and Internet > Network and Sharing Center and public access, in the left column, click Change adapter settings.
2. Right click on the network connection you want to know MAC address(usually, it's Local Area Connection), and then click Status. 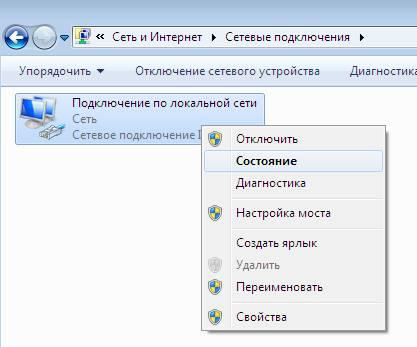
3. Click the Details button. 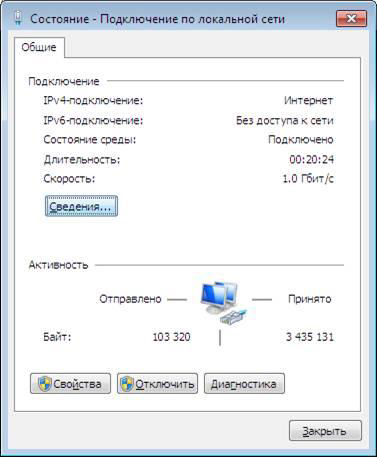
4. In the window that appears, you will see a line called Physical address, which indicates the mac-address of your equipment. 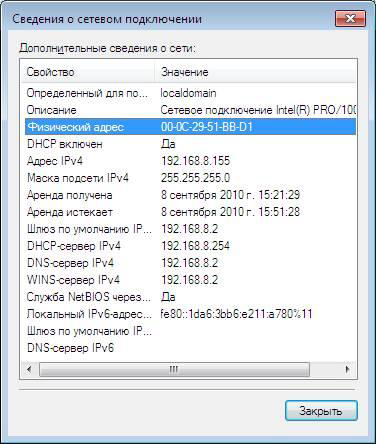
MacOS
1. Select on the desktop System Preferences > Network 
2. Next, select Local Area Network (Ethernet) Connection > Advanced. 
3. In the Ethernet tab, in the Ethernet ID field, your mac-address of the equipment will be indicated. 
linux
1. On the desktop, select Menu > Accessories > Terminal Emulator. 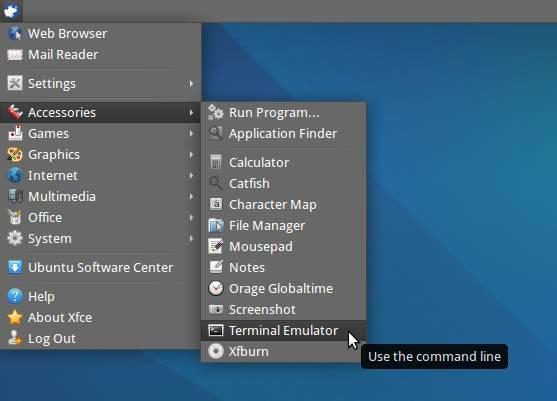
2. Enter the ifconfig command. In the eth0 category, in the Ethernet HWaddr line, the mac-address of your equipment will be indicated. 
Setting up a network connection
Windows XP
2. If the "Control Panel" is displayed by category ("Select a Category" heading), click the "Switch to Classic View" link. 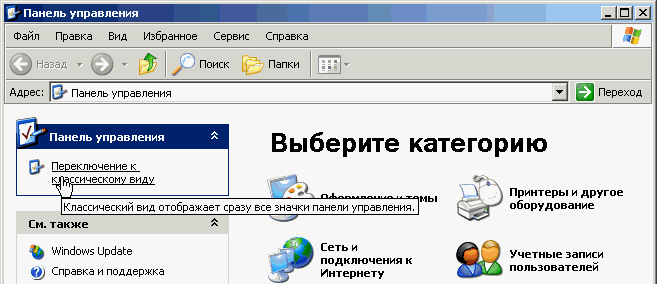
3. Double click the Network Connections icon. 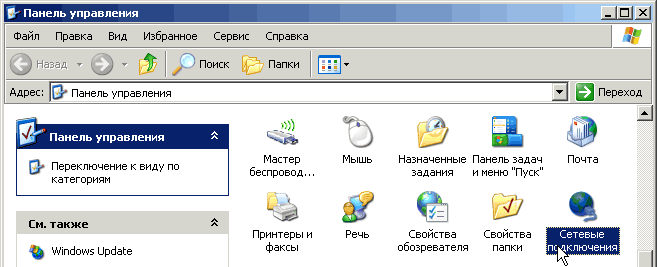
4. Right-click on the network connection, in the appeared context menu select "Properties". 
5. In the window that appears, select the TCP / IP protocol and click "Properties". 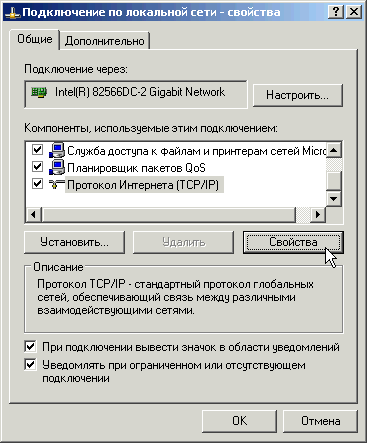
6. In the window that appears, select "Obtain an IP address automatically" and "Obtain DNS server address automatically". 
If you don't see a network connection label in Network Connections (commonly called Local Area Connection), check:
1. Whether a network card is installed in your computer.
2. Are the drivers for the network card installed or motherboard if the network card is built into it.
Windows Vista
To connect to the Internet, you need to configure the system to automatically issue network details. Typically, the default network card is configured to automatically obtain network credentials. In order for your operating system to automatically receive the settings, you need to do the following:
1. Go to the "Start" menu and select "Control Panel". 
2. In the "Network and Internet" subsection, select the "View network status and tasks" item. 
3. In the "Network and Sharing Center" that opens, click "Manage Network Connections". 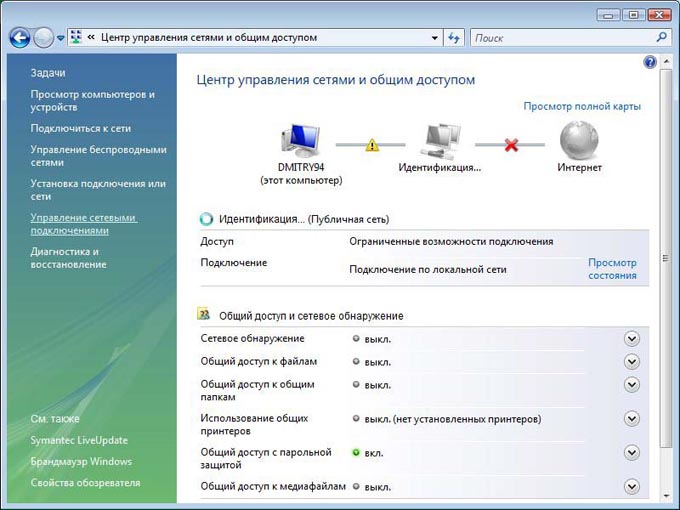
4. Double-click the left mouse button on Local Area Connection.
If you see a LAN icon with a red cross through it, or if it has a Exclamation point, or it is missing, it means that the network connection is not available or is not properly installed network adapter. Contact technical support. 
5. A window will appear showing the status of this connection. Click the Properties button. 
6. Check the boxes as shown below, select the TCP/IPv4 protocol, and click the Properties button. 
7. In the "Properties: Internet Protocol Version 4 (TCP/IP)" window, check one box next to "Obtain an IP address automatically", the other - next to the inscription "Obtain DNS server address automatically". Click the "OK" button. 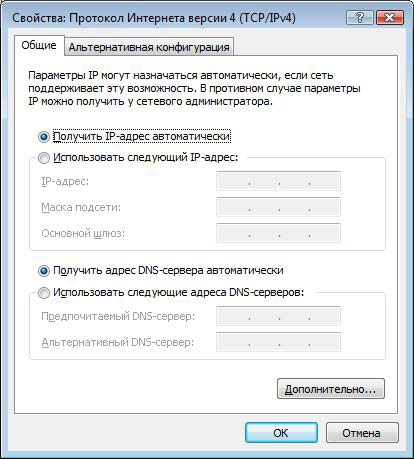
Windows 7
Plug the network cable into the appropriate connector on the computer.
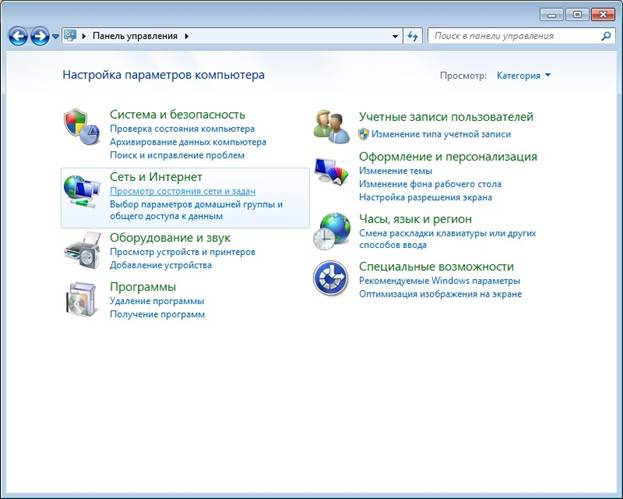
Click the Start button with the left mouse button to open the menu and select Control Panel.
Opening the "Control Panel" menu, select "Network and Internet" - "View network status and tasks."
In viewing network details, select the current active connection. It's under the "View Active Networks" heading. Open the "Local Area Connection" link.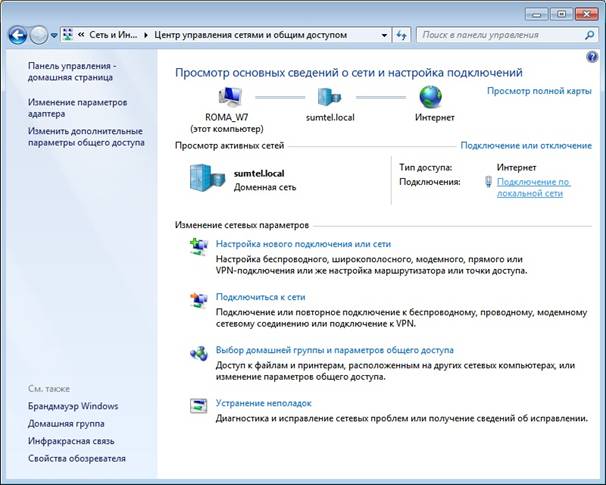
Next, the network connection status window will open, in which you need to click the "Properties" button.

In the window that opens, select "Internet Protocol Version 4 (TCP/IPv4)" and click the "Properties" button.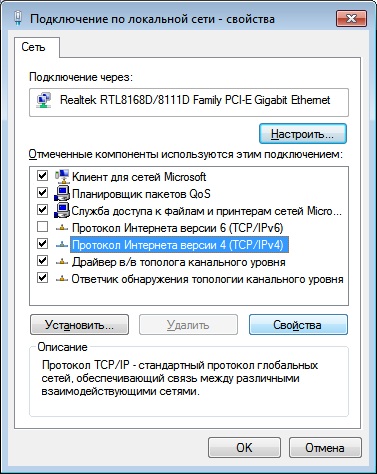
In the properties you need to set:
- Obtain an IP address automatically
- Obtain DNS Server Address Automatically
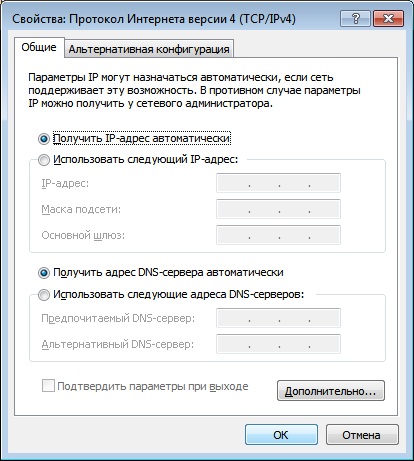
Save the settings by clicking the "OK" button.
Restart your computer.
After reboot please wait 5 minutes.
linux ubuntu
The process of setting up network connections in linux ubuntu extremely simple (provided that your network card is defined).
1. Open network settings: 
2. Enter the password. The system will display all network connections that have been defined. 
3. Select Automatic Configuration (DHCP) and click OK. 
Mac OS 10.x
1.Go to " System settings». 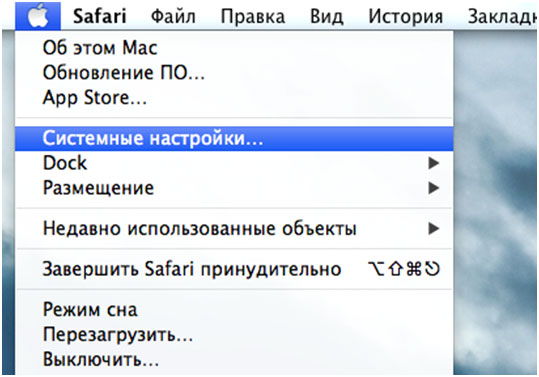
2.Select "Network". 
3. On the left select Ethernet - Configure, in the drop-down list select using DHCP. 
4. Click Apply. 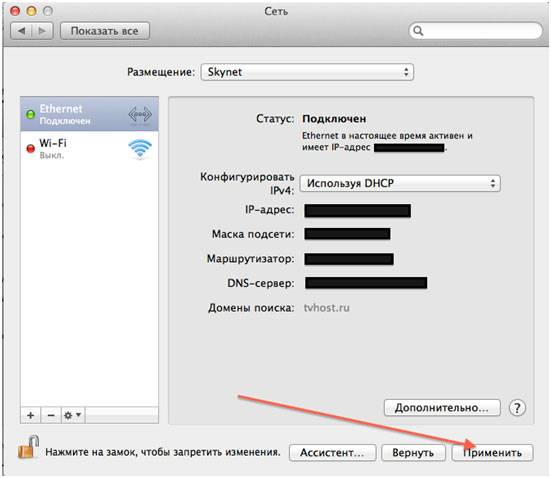
How to change the MAC address
Setting up a Windows 7 network is becoming an increasingly popular issue every year, as the number of users of both the Internet and this operating system. Therefore, sooner or later, everyone faces a dilemma, how the setting is performed windows network 7. As a rule, such a question becomes especially acute when another computer (laptop) appears at home. To properly configure the network, you will have to become a system administrator.
Everything in windows 7 network settings can be set and changed in the "Network and Sharing Center" (hereinafter referred to as NUSiOD). Setting up a windows 7 local network is done here. Even at the stage of installing the operating system, the computer was given a name. This important parameter, because the local network should not contain computers with the same name. Let's see where the network settings are in windows 7.
Network and its types
TsUSiOD can be opened in several ways.
- At the bottom of the screen, by right-clicking on the icon in the form of a computer, we open the context menu in which we find TsUSiOD;
- We press "Start", go to the "Control Panel" (View: "Small Icons") and again we find TsUSiOD.
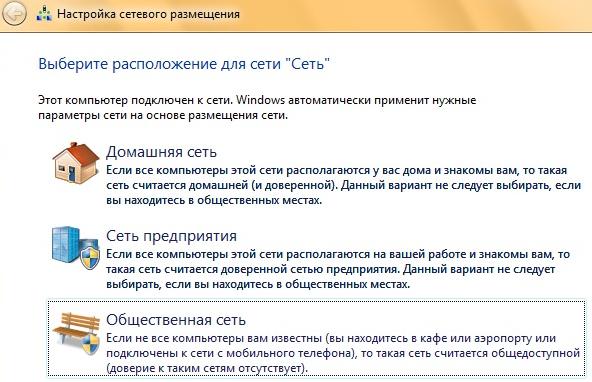
The first thing you see is a map of your network, the number of active network connections and their type: "Home Network", "Company Network" and "Public Network".
Setting up home, office and domain networks
If you network computers and other devices at home, you can very conveniently use shared folders. A home network can only be created on one computer, and others can join it. Setting up a home network in windows 7 is done like this: click "Start", go to "Control Panel", look for the "Homegroup" parameter, click "Create home group", choose which resources will be shared, set a password for access to the home network. Similarly, you can connect to your home network and change the necessary settings.
Let's see how to set up a network in windows 7 office. To do this, select the type of network environment "Work Network". You can do this in TsUSiOD. Under the name of the active network, click on the type of network and select Enterprise Network. This type allows computers on the network to see each other and allows file and folder sharing, but create a group like " home network"It is impossible, since a higher level of security is provided here. To secure data, the following network setting in the windows 7 office will come in handy. In the CUSiOD on the left, click on the link" Change advanced sharing settings ". In the window that opens, you can enable or disable network discovery and access to shared folders and printers.
Windows 7 domain network is used in enterprises. It is configured by the administrator. You cannot make any changes to the network settings on your computer.
Knowing the type and location of the network in windows 7, as well as how to install and configure it, you can easily combine all home devices into one.
Organization and setup working network windows 7 should still be done by professionals. Gaps in network security can lead to the theft of confidential information and cause irreparable damage to a firm.
ubuntu
Setting up a network connection in Windows XP
By default in Windows XP automatic retrieval of settings from DHCP servers. You need to change the automatic setting to manual, open:
Start -> Control Panel -> Network Connections
Double click on "LAN connection", click on the button "Properties" :
In the window "Local Area Connection - Properties" highlight inscription "Internet Protocol (TCP/IP)" and press "Properties" .
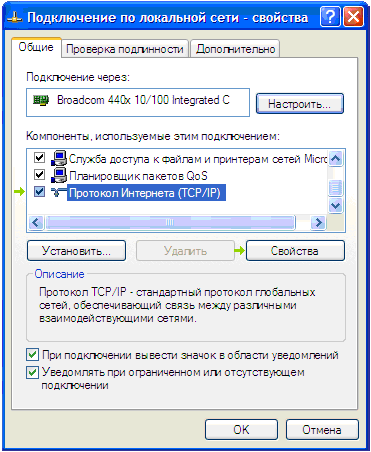
Enable Options "Use the following IP address" and "use the following DNS server addresses" by putting dots in front of these inscriptions, as shown in the figure.
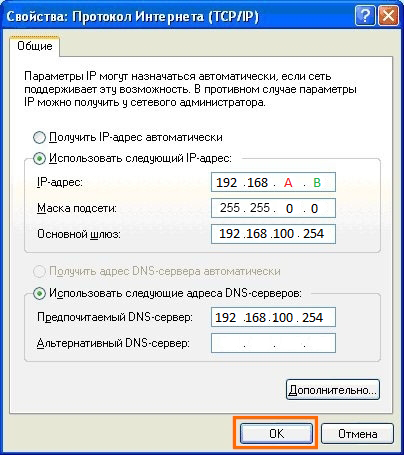
Fill in the fields with your data that are specified in your contract, click OK and close any previously open windows.
Setting up a network connection in Windows Vista
To configure the network in Windows Vista, you need to go: "Start" → Control Panel → Networks and Internet → Center
network and sharing management → Manage network connections.
![]()
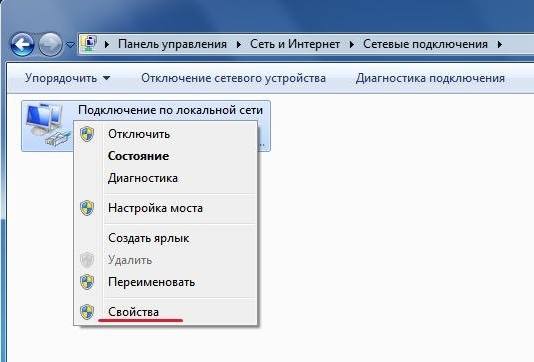
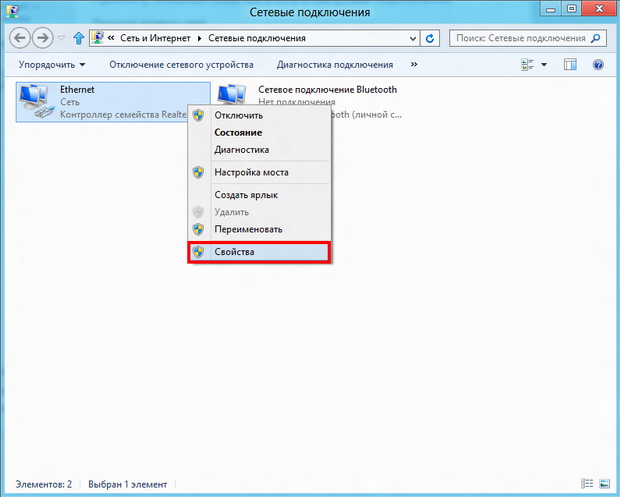
Find "Local Area Connection". Click on it with the right mouse button. In the context menu that opens, select the "properties" item.
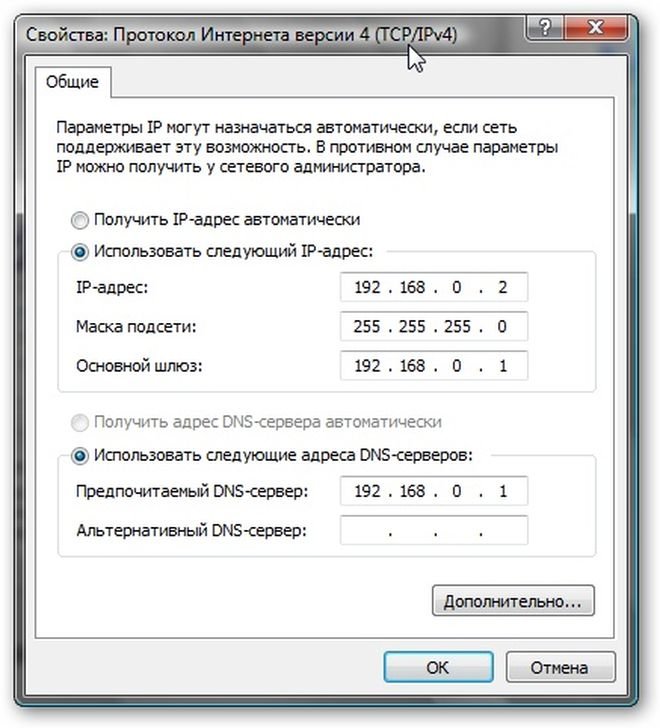
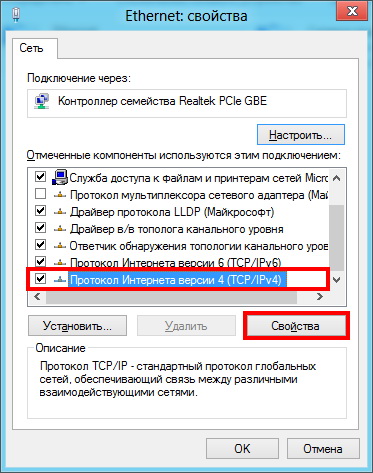
In the "Local Area Connection - Properties" window, select "Internet Protocol TCP / IP version 4" and click on the "Properties" button.

Setting up a network connection in Windows 7
To configure the network in Windows 7, you need to go: "Start" → Control Panel → Networks and Internet → Center
network and sharing management → Change adapter settings.


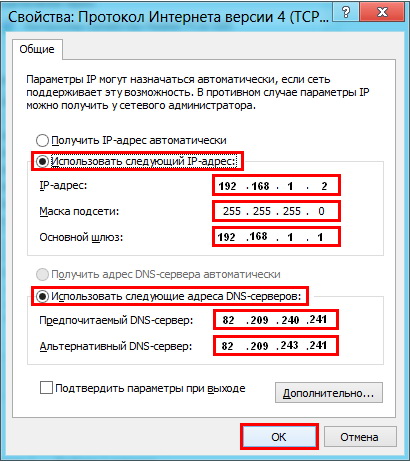
In the window that opens, check the "dots" Use the following ip-address and Use the following DNS server addresses and fill in the fields with the data specified in the contract.
Then click OK and close all windows.
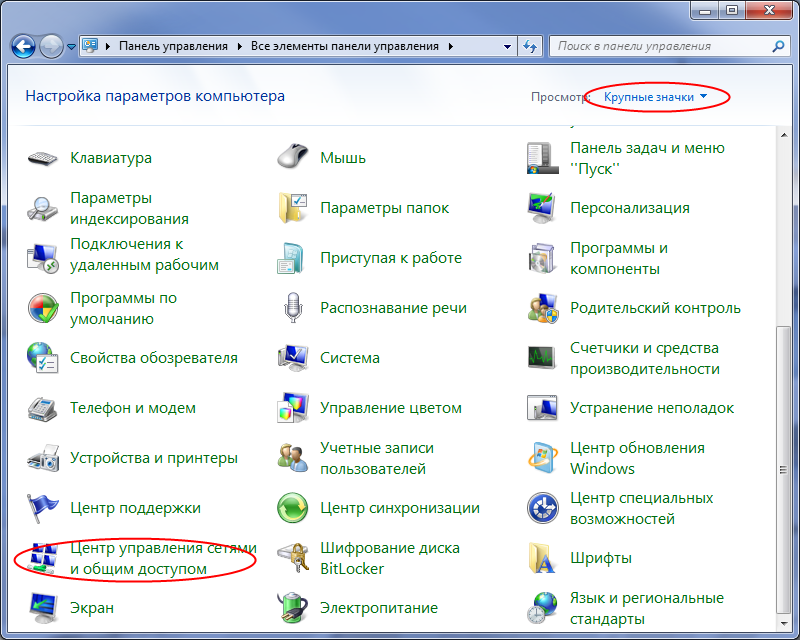
Setting up a network connection in Windows 8
There are two ways to set up a network card in Windows 8.
The first is to go to the desktop, right-click on the monitor-like icon and select .


The second way is to press the keyboard shortcut at the same time Win+W(Search) and in the search bar type " Network and Sharing Center". The desired setting item will be displayed on the left.


Then you need to go to the properties of your network card and specify the settings that can be found in your contract.
The name of the network connection may differ.
If you do not have a local network connection, then you probably do not have drivers installed on the network card or it is not working properly.
If the network connection icon is gray, then most likely the network connection is simply disabled. To turn it on, double-click on the icon.
Right click on network connection.
In the window that opens, check the "dots" Use the following ip-address and Use the following DNS server addresses and fill in the fields with the data specified in the contract.
Then click OK and close all windows.