What is the essence of these actions:
Firmware from DLINK has long been famous for its imperfections and crookedness. They slow down, slow down, hang.
Revision router data b5, b6, b7 identical to the routers of the family ZyXEL KEENETIC START and are perfectly flashed, after certain manipulations, to the firmware from START.
Among the advantages of changing to START:
faster operation of the router
no glitches or freezes
Of the minuses:
The processor gets hot, it is desirable, but not necessary, a radiator.
The firmware process itself:
If you have a router out of the box, with firmware 1.2.94
and below, then start from point 4
.
If you have firmware version 1.4.9
, then you need to restore the old bootloader in the router, which will allow you to flash the required firmware. Downgrading firmware will not help you, because they do not restore the bootloader.
The new bootloader will not allow you to flash the "left" firmware not from DLINK.
How to downgrade uboot and change with official firmware 1.4.9 for firmware from keenetic start:
1.
Downgrade off version. firmware and upgraded to Keenetic Lite B.
Network card address 192.168.0.2, subnet mask 255.255.255.0 default gateway 192.168.0.1
(I left it on automatic)
Via the web interface, sequential downgrade of firmware versions:
192.168.0.1 => Software update => DIR_300NRUB5_1.3.0__12012012.bin => DIR_300NRUB5-1.2.94-20110414.bin => DIR_300NRUB5-to-KeeneticLiteB.fwz
(The archive contains a set of firmware in .bin and .fwz formats. I don’t remember where I got it from, but I flashed it with them. I successfully downgraded the versions and switched to Light)
2.
Launch the tftpd.32r server on your computer
Download the bootloader - mtd1.bin and rename it to uboot.bin, put it in the root folder of the tftp server or in the server settings specify the path to the folder with the file uboot.bin
3.
Network card address 192.168.1.2, subnet mask 255.255.255.0
(I also left it automatic)
Telnet into the router:
telnet 192.168.1.1
Enter password (1234 or your own)
Get root access:
flash || sh
Copy the bootloader from your computer to the router’s memory:
tftp -g -r uboot.bin -l /var/tmp/uboot.bin 192.168.1.33
(or corresponding computer address)
Upload the bootloader to the mtdblock/0 partition
cat /var/tmp/uboot.bin >/dev/mtdblock/0
reboot the router:
reboot
We enable the telnet client in Win7\8 (on XP telnet is enabled by default)
Start -> Control Panel -> Programs and Features -> Turn it on or off windows components-> Telnet Client (check the box) -> OK
Running tftpd.32
Drop the folder with tftpd.32 to disk C. Let's launch tftpd.32 and select the source 192.168.1.33 (or the address specified in the properties of the network card)
Right in the Windows7 search bar we forget: telnet 192.168.1.1
Sometimes it doesn't ask for a password or login. There is a "#" icon and something else.
Enter flash || sh and try to connect to the router.
Further everything according to the instructions.
4.
Firmware KEENETIC_START via failsafe ui(recovery mode).
Network card address 192.168.0.10, subnet mask 255.255.255.0, default gateway 192.168.0.1
Through failsafe ui(turn off the router, hold down reset, connect power, wait 15-20 seconds, release reset)
Enter the address in your browser:
192.168.0.1
select KEENETIC_START-V2.02C1
Wait for the router firmware to finish and reboot. This takes 2-4 minutes. During firmware installation, do not turn off the power under any circumstances.
5.
Set the network card address and subnet mask automatically.
Go to the web interface at 192.168.1.1 --> Reset the router to factory settings.
After all b5-b7 through the web interface you can update 2.02 to 2.03 from the zyxel website
You perform all actions with your router at your own peril and risk!
Everything you need in one archive.
Flashing D-LINK DIR-300 NRU B5 in Zyxel Keenetic B is not so difficult, however, Keenetic Lite B differs from DIR-300 in having 8 MB flash, instead of 4 MB for the link. Therefore, it will not be possible to simply change it to kinetic; the router will constantly reboot, because file system Doesn't unpack properly. Therefore, we will use adapted firmware and will flash WITHOUT using Failsafe UI.
So, for the firmware we need:
1) the cable that comes with the router (do not try to connect via Wi-Fi, because during the firmware update the Wi-Fi module is disabled)
2) Need DOWNLOAD set of firmware versions:
- 1.3.0
- 1.2.94
- transitional
- and finally the final one
This set of firmware contains everything you need to convert DIR-300 to Keenetic Lite and vice versa.
If you have a firmware version higher than 1.2.94, then you may not be able to flash directly to 1.2.94. It is necessary to upload firmware version 1.3.0 in the “Software Update” item, and only then 1.2.94. Login/password after flashing admin/admin
Now, after you have upgraded to 1.2.94, the moment has come when you can upload the transition DIR_300NRUB5-to-KeeneticLiteB.fwz also through “Software Update”. Wait a few minutes; the update may freeze because the router subnet changes (now it will be accessible at 192.168.1.1). After waiting 3-4 minutes, you need to go to the connection properties by local network and enter the IP address manually (for example, 192.168.1.2, subnet mask 255.255.255.0, the default gateway can be specified as 192.168.1.1),
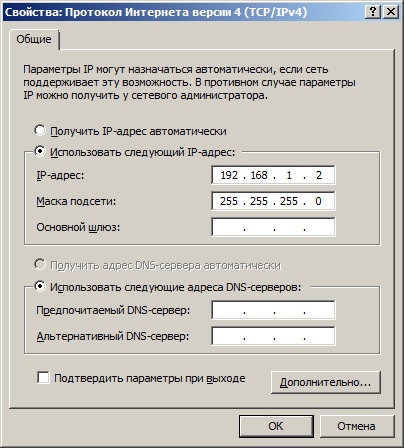
because sometimes it happens that even after reconnecting, DHCP for some reason does not provide the correct IP address and it will be impossible to log into the router’s web panel from a different subnet. We changed the ip, now we go to the address 192.168.1.1 the router asks for a login and password. enter the login admin password 1234, in fact, it will tell us them. After that we sew a stable adapted firmware KEENETIC_LITE-V1.00D0_fixed_for_4MB_flash-wget-for_DIR300NRUB5.bin To do this, go to the router in System->Firmware and select the firmware file.

After flashing, go to the panel and configure the router as we need, BUT do not forget that after flashing the router forgets its original MAC address! You need to drive it in manually, otherwise you are guaranteed to have tears!
First, look at the MAC of the router; it is usually indicated on one of the stickers on the bottom of the router.

Then go to the web panel, open Internet->Connection->Use MAC address: Entered and enter the original MAC address of the router in the field below. 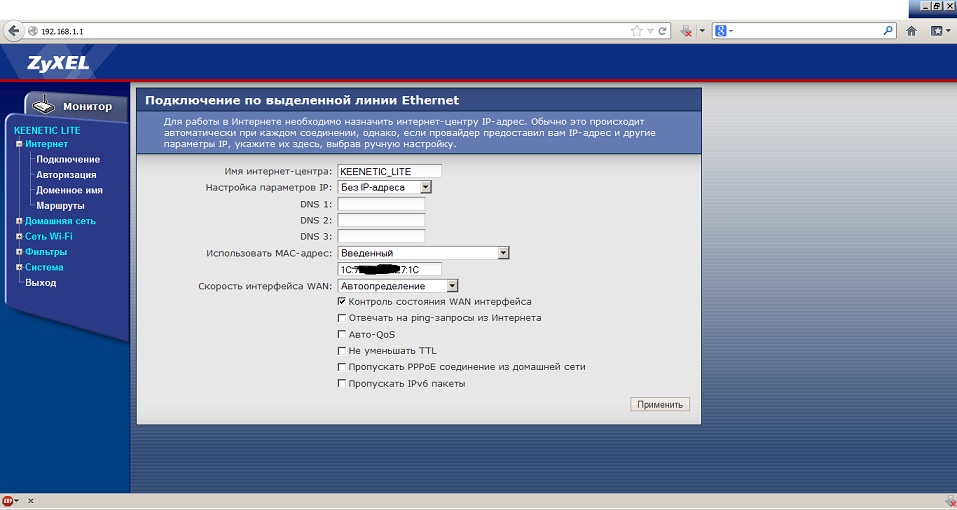
Set up, save, use!
If for some reason you don’t like the firmware from Zyxel, you can always flash it back to DLINK via Failsafe UI. To do this, set the network card address to 192.168.0.2, subnet mask to 255.255.255.0, turn off the power to the router, press reset, turn on the power (do not release reset, hold it for 6 seconds), then release reset, type 192.168.0.1 in the browser and get into Failsafe UI Select the firmware file KeenLiteBbak2Dir.bin we wait, we get a link at the output. login/password admin/admin after that you can flash any firmware, after flashing the firmware we do a reset.
Special thanks to Rusink for the adapted firmware
Let's talk about the case when you, having changed your wired Internet provider, have... How can I return it to its original state? To begin, you need to go to ftp.dlink.ru and prepare the original version file for firmware 1.2.94 . Especially for this D-Link prepared the file DIR_300NRUB5-1.2.94-20110414.fwz located at ( http://ftp.dlink.ru/pub/Router/DIR-300_NRU/Firmware/B5/Old/). Not all browsers will be able to directly enter this address, so we’ll start searching for the required file with ( http://dlink.ru/ru/support/)
 On the right side of the page you can see a link to file server D-Link (FTP.DLINK.RU). Please note that we need a file with the extension .fwz The .bin file located in the same folder sewing a router is useless.
We go to the router at the address 192.168.1.1 , select advanced settings, go to the section System — Software Update.
 Select the firmware file we need and click on the execute button in the lower right corner of the screen.
 The process of updating the router firmware begins. It lasts about 5 minutes. It is very important not to turn off the power to the router and the computer from which the firmware is being installed.
.
The process of updating the router firmware begins. It lasts about 5 minutes. It is very important not to turn off the power to the router and the computer from which the firmware is being installed.
.
 At the end of the update, we will receive on the screen this picture, well known to many)
 There is no need to be afraid. This happened because after the update and reboot, the address of our router changed. Now he 192.168.0.1.
Now, in order for the router to be ready for configuration, you need to return it to the factory settings by pressing the RESET button, located on the back panel of the router in the hole to the right of the power connector. We go to the router at the new address 192.168.0.1
There is no need to be afraid. This happened because after the update and reboot, the address of our router changed. Now he 192.168.0.1.
Now, in order for the router to be ready for configuration, you need to return it to the factory settings by pressing the RESET button, located on the back panel of the router in the hole to the right of the power connector. We go to the router at the new address 192.168.0.1
 Login: admin
Password: admin
When you enter the specified data, the router will ask you to change the administrator password:
 Enter a new password and repeat the entry again:
 All! Router DIR-300NRU Rev.B5 became itself again
 We can set it up for a new Internet operator. But, it is advisable to update the router software again to the latest one recommended by D-Link specialists.
Reflash D-LINK DIR-300 NRU revision B5 V Zyxel Keenetic B not difficult, but Keenetic Lite B differs from Dir-300 in having 8 MB of flash memory, while the long one has only 4 MB. Therefore, it will not be possible to simply update it in Keenetic; as a result, the router will constantly reboot, since the file system will not start. Therefore, we will use adapted firmware and will flash it without using the Failsafe UI interface.
To flash the DIR-300 NRU firmware we will need:
- the cable that comes with the router (do not try to use , because during the firmware installation the Wi-Fi module is disabled)
- you need to DOWNLOAD a set of firmware versions: 1.3.0 and 1.2.94, transitional DIR_300NRUB5-to-KeeneticLiteB.fwz and, finally, final KEENETIC_LITE-V1.00D0_fixed_for_4MB_flash-wget-for_DIR300NRUB5.bin
This set of firmware contains everything you need to convert dir-300 to Keenetic Lite and back.
Router firmware
If the firmware version is older than 1.2.94, you will not be able to flash 1.2.94. It’s easy to get out of this situation; you need to download firmware version 1.3.0 in the “Software Update” section. And only then 1.2.94. Login and password after firmware admin/admin.
After updating the firmware to version 1.2.94, you can upload the transition DIR_300NRUB5-to-KeeneticLiteB.fwz also through “Software Update”. Wait a few minutes; the update may freeze because the router subnet changes (now it will be accessible at 192.168.1.1). After waiting 3-4 minutes, you need to go to the properties of the local network connection and enter the IP address manually (for example, 192.168.1.2, subnet mask 255.255.255.0, the main gateway can be specified as 192.168.1.1). Because, often, even after reconnecting the server, for some reason it does not provide the correct IP address and it will be impossible to log into the administrative panel of the router from a different subnet. We changed the ip, now we go to the address 192.168.1.1 the router asks for a login and password. Enter the login admin and password 1234.
After that, we sew the stable adapted firmware KEENETIC_LITE-V1.00D0_fixed_for_4MB_flash-wget-for_DIR300NRUB5.bin. To do this, in the router go to System - Firmware and select the firmware file.
Restoring the router's factory MAC address
After flashing, we go into the panel and configure the router as we need, but do not forget that after flashing the router “forgets” its original one. Therefore, it must be registered manually, otherwise there may be problems with communication.
First, look at the MAC of the router; it is usually indicated on one of the stickers on the bottom of the router.
Then open the administrative panel: Internet - Connection - Use MAC address: Entered and enter the original MAC address of the router in the field below.
Restoring factory firmware D-link
In the event that you need to return the factory firmware from Zyxel, back to D-Link you need to use Failsafe UI. To do this, you need to set the IP address of the network card to 192.168.0.2, subnet mask to 255.255.255.0.
We turn off the power to the router, hold down reset, turn on the power, do not release reset, hold it for 10 seconds, then release the reset button, type 192.168.0.1 in the browser and get into the Failsafe UI.
We select the KeenLiteBbak2Dir.bin firmware file, wait, and get the restored d-link firmware as output. Login and password: admin/admin
After this, you can flash any firmware; after flashing, do a reset.