The local network is computer network, which serves users of several computers at a short distance from each other. It is very convenient for use in the office and at home. So, for example, if there are two computers at home, then setting up a local network between them will allow you to transfer information from one computer to another via working folder without a flash drive or disk, as well as use one Internet connection and play games over the network. Savings and convenience will be obvious, the main thing is to understand how to set up local network. We will consider this issue in relation to Windows XP and Windows 7.
Check the box next to "This is a computer network." If you are creating an insecure network without a password, click OK. However, if you want to create a secure point-to-point, check the "Data Encryption" box. Uncheck the box next to "The key is provided automatically." Select a network key that has been agreed upon by all those who have access to the network and enter it in the "Network Key" text box.
Select a key type from the drop-down menu below the "Network Key" text box in the "Key Format" section. The selected format must be known to all who will have access. In the next drop-down menu next to Key Length, select the number of characters that the key will have.
Will need:
- two computers;
- two network cards;
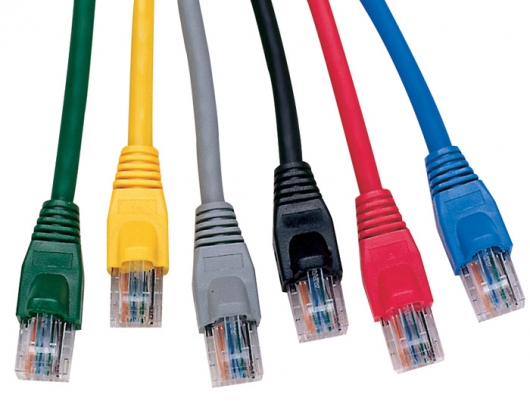
- Network cable for connecting computers, crimped with RJ-45 connectors, also known as a patch cord;
- Switch - Required if more than two computers will be used to create a network.
How to set up a local network in Windows XP
- First, install network cards in computers (usually PCI slots are used for this) and drivers for them.
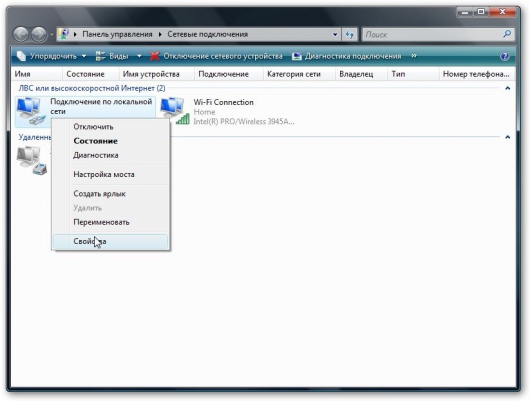
- The next step is to set up network cards on computers. You must perform the following steps as an administrator. Go to the network connection settings: Start - Control Panel - Network Connections. Then press right click Click on "Local Area Network Connection" and select "Properties". Now you will need "Internet Protocol TCP / IP", then click on "Properties". A window will appear in front of you, you need to specify the following information: IP address: 192.168.1.X, on computers, numbers are put in order from 1 (1 - the first computer, 2 - the second computer). Enter the required numbers on each computer. The subnet mask should look like this: 255.255.255.0
- Now you need to provide access to computers to each other. In "Network Neighborhood" specify the same workgroup name for both computers. To do this, right-click on "My Computer" and select "Properties". You will see the "System Properties" window. Select "Computer name", click "Change", set the same names for the workgroup, while making sure that the computer names are different. Then you need to confirm the changes ("OK") and restart the computers. After a reboot, they will be on the same network.
- Now it remains to create a connection between computers using a patch cord.
- We looked at how to set up a LAN connection in Windows XP. To check the connection on the first computer, click "Start" - "Run" and enter "ping 192.168.1.2 -t". If you see the lines "Response from ..." that will be repeated, then the network is working.
How to set up a local network in Windows 7
Windows 7 is very popular these days operating system, so the question of how to set up a local network in it worries many. So, let's begin!
First, check the workgroup settings, because Windows 7 computers can find each other on their own, provided that they have the same workgroup name. By default, the name of the workgroup is "Workgroup". If the names of the workgroups do not match, then this must be corrected by giving them the same names.
- Open the following: Start - My Computer - Properties. Find "Computer Name" and, if necessary, change the name of the workgroup. To change, select "Change", here you can enter any computer name.
- Provided that the network cable has been connected before Windows installation 7, the network must recognize itself. If it is not found, then try restarting your computer. If after that the network is not found, then you will have to install it manually. In the following paragraphs, we will look at how to do this.
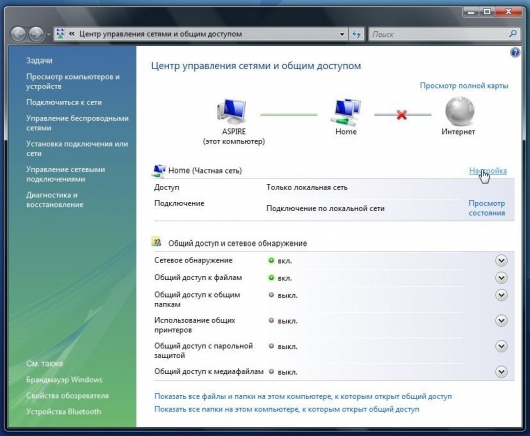
- Go to "Connect to a network", find "Network and Internet", then - "Network Control Center" and "View task and network status".
- Select your network card, right-click on its network card icon, and select Properties.
- A window will appear in front of you, click on "Internet Protocol version four (TCP / IP v4)". Next, a window will open, as in Windows XP, where you need to set all the necessary settings. The IP address and subnet mask are configured in the same way as in Windows XP.
Here's how to set up a computer-to-computer LAN in Windows system 7.
Often the problem arises, how to transfer files from one computer to another? You can use various flash drives, disks, etc., but the most convenient and fast way is to create a network.
How to quickly create a network between two computers, consider the example of Windows XP and Windows Vista/7. There is no difference in setup between PC and laptop.
To organize file sharing, you must first create a network between devices, and then set up sharing.
To transfer files, the most convenient and fastest is to connect using a network cable. Network cables RJ45 to create a network are direct and cross (Crossover).
We need a crossover cable. You can buy it in the store or make it yourself. It is easy to distinguish the right cable if you put the ends of one cable together, then the color markings inside the connector at the crossover cable should not match.

It is worth noting that modern network cards are able to automatically detect the type of cable and adapt to it. In other words, if you don't have a crossover cable, you can use a straight cable. With a high degree of probability, the network will work.
If for some reason the use of a wired network is not possible, then you can create wireless wifi. The procedure for setting up access is similar.
When we got the RJ45 cable, we connect it to the network connectors. If everything is in order, then the green lights near the connector should light up.
If your light bulbs do not light up, then proceed as follows:
1) Check if there are light bulbs at all and if the devices are turned on
2) Check if the interfaces are enabled in Network connections
3) Check the cable. We pay attention to the order in which the wiring goes in the connector and whether the RJ45 cable itself is damaged.
Set up a network between two computers.
Network setup in Windows XP
Go to Control Panel -> Network Connections

We click on the connection to the local network. Note that the connection says Connected. Right-click and click on Properties.

Select Internet Protocol (TCP/IP) and click on Properties

We click OK. Network setup on one device (PC or laptop) is finished.
Let's consider how the network will be configured in Windows Vista/7.
Network setup in Windows Vista / 7
Go to Control Panel -> Network and Sharing Center -> Manage Network Connections.
Right-click on the local network connection, go to Properties:


Specify the IP address. You can specify any of the range 192.168.xxx.xxx. The main thing is that they are not repeated on two computers. That is, if on one 192.168.1.1, then on the other 192.168.1.2. If on one 192.168.100.10, then on the second 192.168.100.20.
It should look something like this:

Now we go to the Network and Sharing Center and look at our network. It must be private. If it is not, then click on Settings.

Click Close:


That's all. With the network setup on Vista / 7 finished. Now let's move on to the Sharing settings.
Setting up sharing in Windows XP
First go to Tools -> Folder Options:

On the View tab, enable simple file sharing:

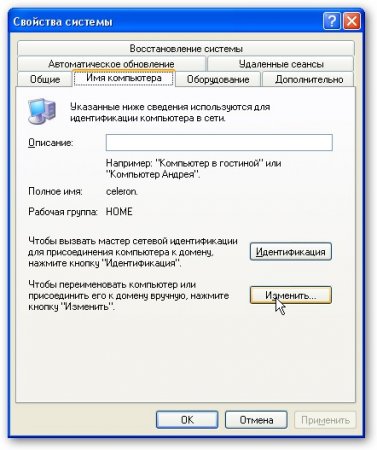
Click the Change button on the Computer Name tab and enter the name of the workgroup.
Two computers on the network must have the same Workgroup name.
On the same tab, you can specify the name of the computer on the network.

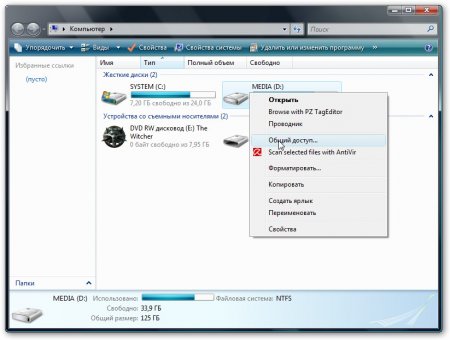
Now we go to My Computer and click on the folder that we want to provide access to from the network, and select Sharing and Security from the menu ... In my example, I open access to the entire D: \ partition, that is, on another computer it will display the entire D:\ partition of the first (on which access was opened)

Click on the warning:

Specify the name of the shared resource and allow (or not allow) changing files over the network:

That's all...
Setting up sharing in Windows 7
First of all, go to Control Panel -> Folder Options and check the box:


Click on Edit:

Enter the name of the computer and the workgroup. Name Working Group must match on all computers on the network:

Now we go to Computer and click on the folder that we want to provide access to from the network, and select Sharing from the menu ... In my example, I open access to the entire D: \ partition, that is, the entire D partition will be displayed on another computer :\ of the first one (on which access was opened)
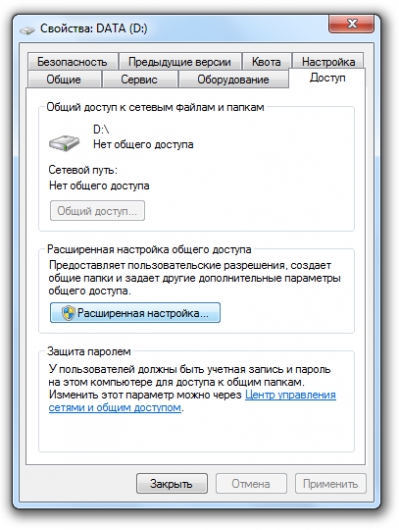
Click on Advanced access settings:
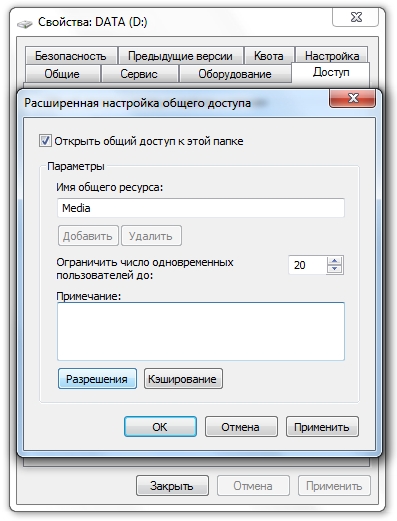
Specify the name of the share and click on Permissions.
On this tab, we can specify which users will be able to open and modify files on this computer from the network:
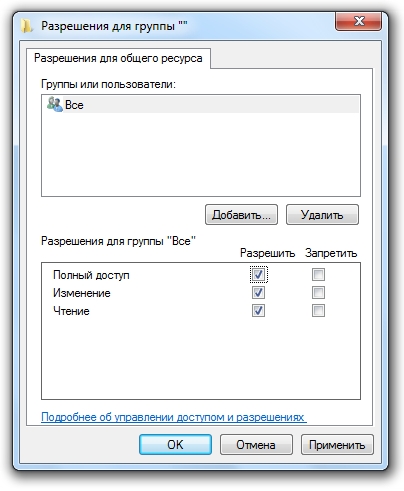
Here's what it should look like:

Sharing on Windows Vista/7 is done.
How to access shares on another computer
After you have set up the network and file sharing, you can already transfer files from one computer to another.
To do this, open Computer and enter \\computer_name\ in the address bar. For example: \\ASPIRE\ or \\Athlon\. You can also use Network Neighborhood or Network. If this does not work, then you can enter the IP address of another computer on the network:

If you need to constantly work with shared files that are hosted on another computer, then click on shared folder right click and select Connect network drive. In this case, the folder with files on another computer will be displayed as a partition (disk)
Connecting through a router
We organized the simplest network between two computers. If you need to connect more than two PCs to the network, then you should buy a router (Router) in the store. A router connects several PCs in a network and allows you to use one Internet connection for all computers.
To connect the router, we use a straight RJ45 cable, not a crossover one.

The router is connected via the WAN connector to the Internet. The remaining connectors on the back wall are LAN, we connect each PC1-2-3-PC4 separately with a straight RJ45 cable:

Setting up routers is described in detail in the model manufacturer's manual.
The general steps are as follows:
1. In the WAN parameters, specify the data from the contract of the InterZet provider - type static IP.
2. In the LAN parameters - select the type of dynamic IP, that is, each connected PC will be automatically assigned an address.

3. Set up Windows XP / Vista / 7, as already described above.
Select Internet Protocol Version 4 (TCP/IP) and click on Properties:
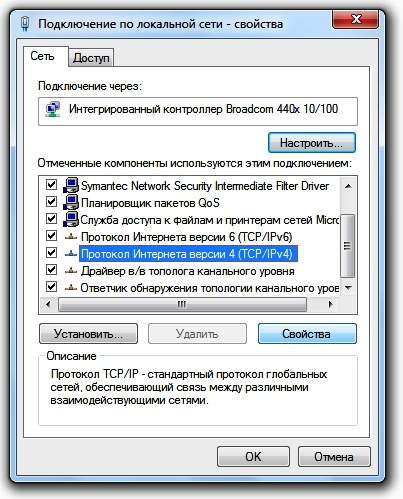

Specify Obtain an IP address automatically, and click OK.
Other settings public access, repeat for the selected Windows.
Solving possible problems
If you are unable to access files on another computer, then you need to do the following operations:

1) See if it works network connection whether the lights are on.
2) Run command line and enter the command ping the ip address of another computer on the network. For example, ping 192.168.1.1.
If you have pings (0% loss), then you need to check the sharing settings, otherwise check the network connection and firewall settings (firewall).