Hello admin! My computer has one hard drive divided into two volumes. On the first partition (C:) Windows 8.1 is installed, and on the second partition (D:) I want to install Windows 10, but not just like that, but on virtual disk vhd. Please explain how to do this quickly and easily? I read on the Internet that on a simple hard disk you can place a dozen virtual disks and you can actually install an operating system on each of them!
How to install Windows 10 on a virtual drive using the program WinNTSetup
Hello friends!
First, I’ll tell you what a VHD virtual hard disk is and why our reader wants to install Windows 10 on it.
Secondly, I will introduce another hero of today's article, this is a utility WinNTSetup, which can create virtual VHDs and install operating systems on them.
Virtual Hard Disk (VHD) is a file format that has the same structure as a hard disk. In simple terms, the operating system perceives virtual diskVHD is like a regular hard drive, but the disk VHD has several advantages, the most important of which allows several operating systems to simultaneously reside on the same partition of a conventional hard disk!
For example, we have a hard disk installed in our computer, in order to install five operating systems on this hard drive, it must first be divided into five partitions, but this is not at all necessary when using virtual disks. We will simply take and create five virtual disks on any partition of the hard disk VHD and install on them different windows. We can do all this without leaving operating system!
I propose to move from theory to practice and create a virtual VHD disk using the utility WinNTSetup, then the same utility will install Windows 10 directly to our virtual hard disk, everything is quick and easy.
- Note: If you like to solve various computer puzzles, then WinNTSetup will come in handy more than once, I suggest that you read the descriptions of the work of the program.
- Another article for you on this topic.
Preparation for work
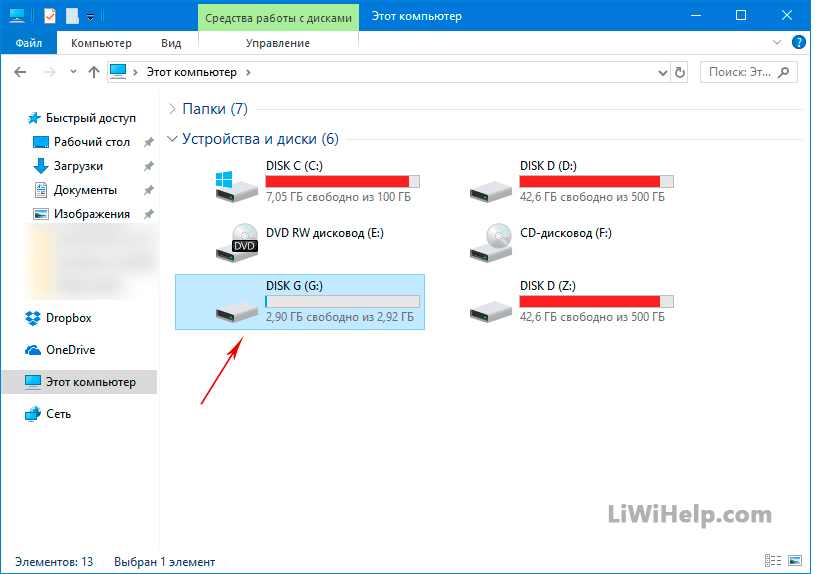
See Disk Management of my computer.
The hard drive is divided into three sections.
one . Hidden partition System Reserved (Reserved by the system, 350 MB) containing files Windows boot 8.1.
2. Drive (C:) with installed Windows 8.1 (on the desktop is ISO image Windows 10).
3 . The new volume (E:) is a file dump. On it, we will create a virtual VHD disk, on which Windows 10 will be installed.
Note: Before work, be sure to createbackup boot storage (BCD), in case you decide to delete it after using Windows 10, because after uninstalling the system, the choice of operating systems ( Windows 8.1 or Windows 10) will remain on boot.
Editboot storage (BCD) and removing the unnecessary entry is very simple, but it's even easier to deploy a backup. In the details of this issue, be sure to read it.
ISO Windows image 10
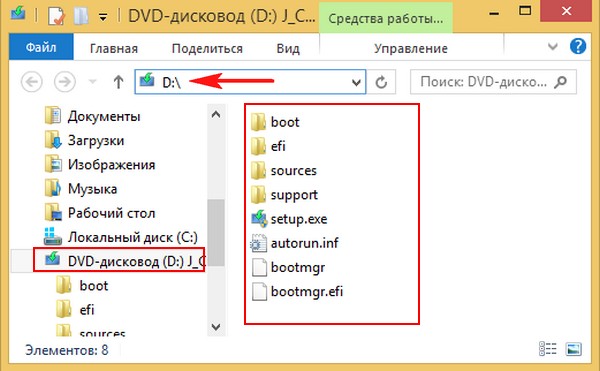
Before starting the WinNTSetup program, we find an ISO image with Windows 10 on the disk (C :) and copy all the distribution files to some folder or double-click on the ISO image by connecting it to a virtual drive (if you are working in Windows 8.1).
I have a Win 10 image right on my desktop.

Windows 10 ISO image connected to virtual drive (D:)
It's WinNTSetup's turn
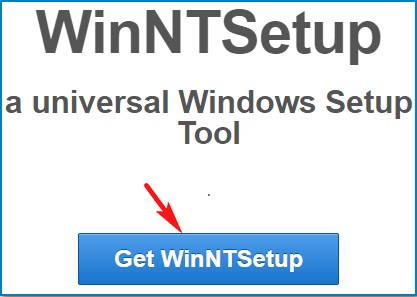
Download WinNTSetup you can on my Yandex.Disk at the linkhttps://yadi.sk/d/xLGkpAOzhXCPcor on the official website
http://www.winntsetup.com/?page_id=5
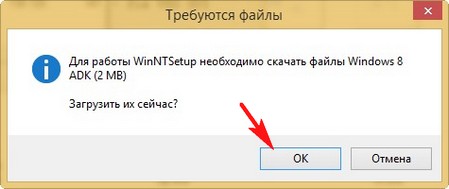
Unzip and run the executable file of the program WinNTSetup_x64.exe (if you are running a 64-bit version of Windows).


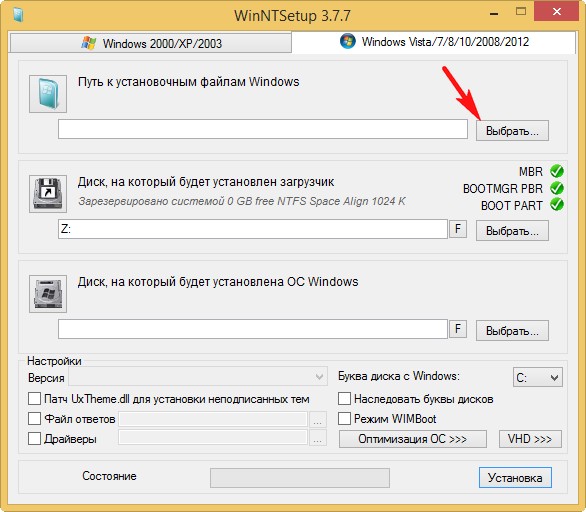
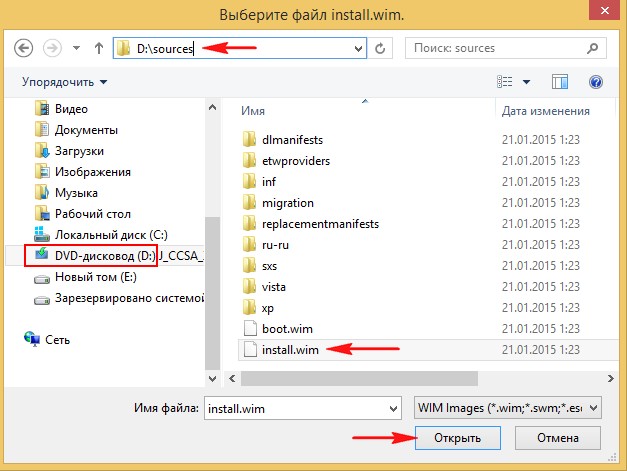
In the main WinNTSetup window, point to the install.wim file located in the D:\sources folder of the Windows 10 distribution.
Click Select.
Select the file with the left mouse install.wim and click Open.
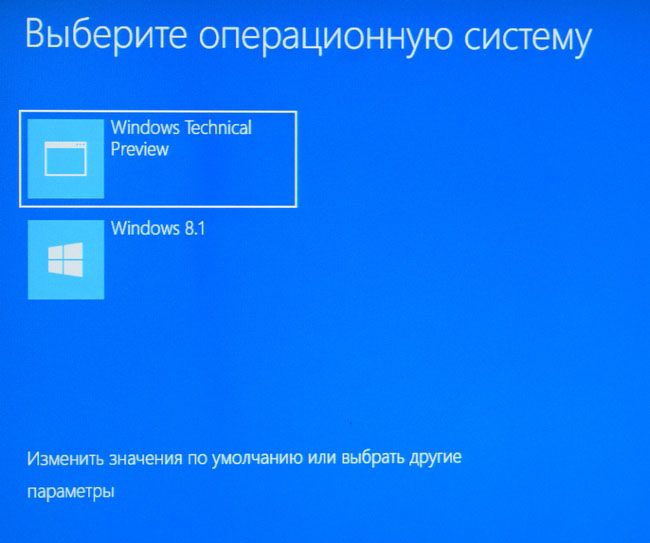
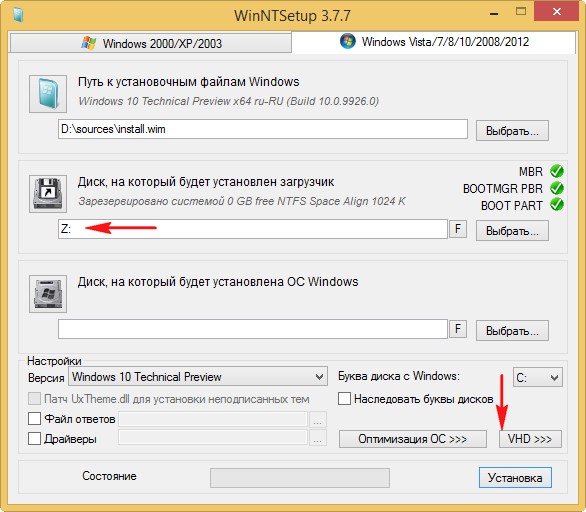
The Windows 10 bootloader is automatically selected by the program - Z: (the first partition, System Reserved, is 350 MB, hidden and has no letter).
We create a VHD file on which Windows 10 will be installed. Click the VHD button.
If we create a dynamically expandable the size of the VHD virtual disk, then after Windows installation its size will be small (several megabytes), but in the course of work it can grow to gigantic sizes and when data is deleted from it, the size will not decrease, this is a little inconvenient. It is worth choosing this type in case you do not plan to work for a long time in a system installed on a VHD disk, but just want to experiment.
If you create a fixed size of the VHD virtual disk and select its size of 50 GB, then a virtual disk of exactly this size of 50 GB will be created, when filled with files, its space will be filled, and when deleted, it will be freed, that is, everything is as in the case of a simple hard drive. I will choose this option.
I specify the size of the created VHD file and click on the View button.
The Windows operating system can be installed on a virtual HDD(VHD) to use as a second operating system on your computer. In this case, the user will be able to select the required Windows operating system at startup, without using a virtual machine.
The virtual file itself hard drive will be located on the local drive of your computer. In Explorer, it appears as a regular file with a ".vhd" extension. You can install on virtual hard Windows disk, and fully work in the system. In this case, the main operating system will not be affected by installing another version of the operating system on your computer.
With all the convenience of using virtual machines, there are big disadvantage: when active on the main system, the operating system on virtual machine will slow down your work. This is due to the fact that the resources of one computer are simultaneously consumed for the operation of two operating systems.
Using a virtual hard disk will solve this problem. The other Windows will be installed on the VHD without the need to start a virtual machine. Operating systems will be loaded on the computer of the user's choice. At Windows installed on a virtual hard disk, all the resources of the computer will be used, so there will be no slowdown.
All work on installing Windows takes place in two stages:
Create a Virtual Hard Disk (VHD)
-Installing Windows on a virtual hard drive
Create virtual hard disk
Go to the Disk Management snap-in.
Select the disk where the virtual disk will be installed

On my computer, I chose drive C, the volume is 277 GB, with Windows 10 Pro installed.
I will install the tighter Windows 10 itself, so I allocated 50 GB for a virtual disk for reliability.
We allocate desired disk, then click on the "Action" menu item, in context menu Click on "Create a virtual hard disk".
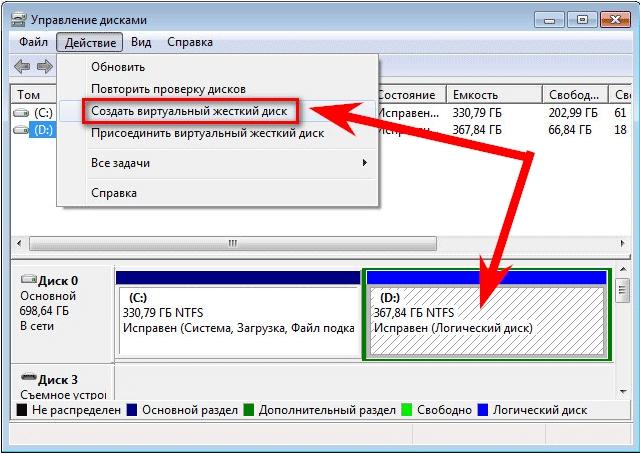
The "Create and attach virtual hard disk" window will open.
Fixed size - more stable operation, the volume of the desired virtual disk at will
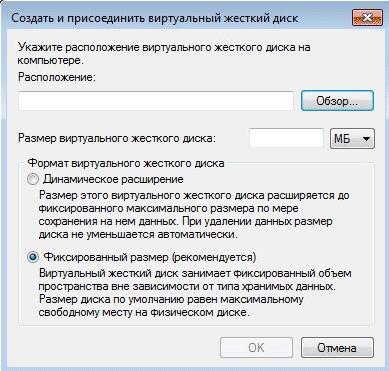
In the File Explorer window, enter a file name, and then click the Save button.
The file name must consist of Latin letters and numbers.
We remember or write down the name, when attaching a disk it will come in handy, if you enter the name of the virtual disk incorrectly, the diskpart utility will not be able to recognize and attach it.
As a result, you will simply lose the space that you allocated for the virtual disk.
The location is at the root of the disk.

After the creation of the virtual disk is completed, the Disk Management window will display new disk with unallocated space.

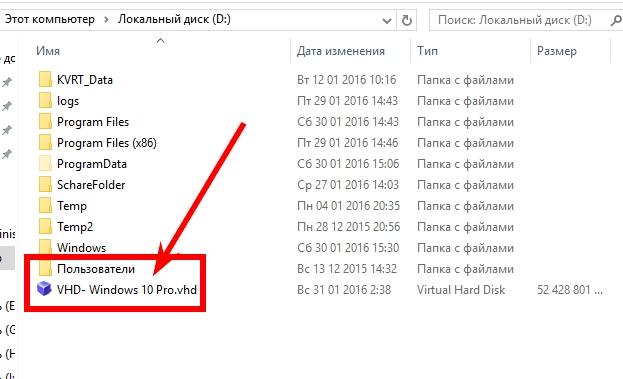
If you open an explorer window, then on the disk that you chose to create the virtual one, you will see the created "win10" virtual hard disk with the extension ".vhd". VHD disk appears in the system as a regular file, but in fact it is a virtual hard disk.

Next, you will need to boot from DVD drive, or bootable flash drive and then install the operating system on a virtual VHD disk
In the "Install Windows" window, you will need to answer the question: "Where do you want to install Windows?". Here you will need to select a virtual hard disk for installing the system, but it will not be displayed in this window.

You can find out the letter of the VHD disk using the interpreter command line. To launch the command line interpreter, you will need to press the keyboard shortcut "Shift" + "F10".
First, using the command line, you will need to find out the letter of the logical drive on which you previously created the virtual hard disk. Drive letters may differ from those drive letters that we see in Explorer.
To run the utility, write the word "diskpart" (without quotes) on the command line, and then press the "Enter" key.
Next, in new line, type the command "list volume" (without quotes), and then press "Enter".
After that, all disks of your computer will be displayed in the command line.
First enter the command to select the virtual hard disk:
select vdisk file="F:\win10.vhd"
(Where F is the drive letter on which you created the virtual drive
win10.vhd - the name of your virtual disk)
Then press the "Enter" button. Under the command, an entry will appear stating that the virtual disk was successfully selected using the DiskPart program.
Next, on a new line, enter the following command:
attach vdisk
After that, press the "Enter" button. You will see a note that the virtual disk was successfully attached using the DiskPart program.
Now you will need to highlight this disc, and then click on the "Next" button and continue installing Windows
To see it in the partition selection window, click refresh.

I had a record that it was not possible to install Windows on this disk partition. Ignore this message, click on the "Next" button
What happened in the end
I named my drive WHD-Win10Pro
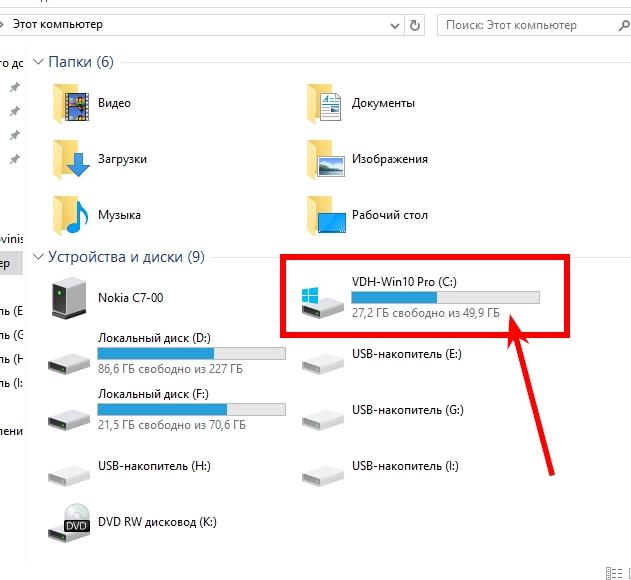
Local disk D- I have installed on it home Windows, I created a virtual disk on it.
The local disk F- as it was for storing various information, and remained.
From Windows installed on a virtual disk, all disks that are in the system are available.
And vice versa - in the home system, a virtual disk is visible.

It seems to be all for now.
There were no jambs in the process of creating, attaching a disk and installing the system.
The only thing, after opening the command line, the layout did not change.
It was decided simply - you need to use the keys on the left side of the keyboard, and not on the right, as usual.
The most important thing is to remember the name of your virtual disk that you give it. I made a mistake with a space - the disk was not detected, I had to cancel the installation, boot into Windows and specify the exact name of the virtual disk.
You need to take into account everything, including spaces, you will not enter correctly drive-name not determined.
On first start new system defined as Windows 10 VHD on volume 7.
After the reboot, it was determined on volume 1.
Apparently, this is how the snap-in worked when creating a virtual disk.
The activation was carried out with the same key as the home system and the same Microsoft account was used.
Well, one more moment. After installing Windows, less than half of the virtual disk is left.
Gobbled up a dozen 27 gigs, but did not even have time to try to work.
A virtual disk in the Windows operating system, just like a regular hard disk, can be used to store data. This data can be user files such as images, documents, etc., as well as files used installed programs and the operating system itself.
Many users like to have a separate partition for storing important files, which is created in addition to the system partition. In this case, if the operating system crashes, you will need to reinstall it, formatting only the system partition. Important data stored on the secondary logical partition will remain intact.
In the absence of a separate physical disk, it is always desirable to main into several additional partitions before installing the OS. But be that as it may, these partitions will still be parts of the same HDD. If it fails, your important data will not be protected from destruction.
What to do in the event that you want to create a separate place to store any data after installing Windows and marking up the necessary partitions. You can simply create a virtual drive using free space HDD. It will be possible to format it, assign its own letter and work the same way as with a separate physical one.
It may also be useful for you to experiment with and do other virtualization testing. Let's see how you can create such a disk using the operating system. Windows systems 10.
VIRTUAL DISK
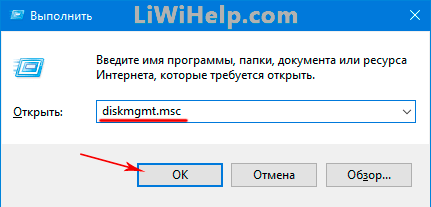
1. Press the Win + R key combination on the keyboard and write in the input field:
Diskmgmt.msc
then wait for the system management utility to launch.
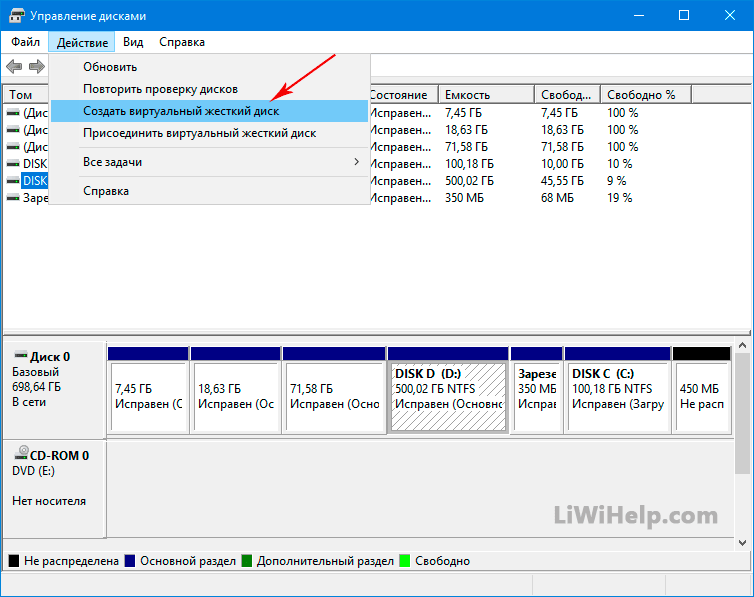
2. Define a disk partition that allows you to allocate enough free space to create a virtual one. Click on the main menu item "Action" and select "Create a virtual hard disk".
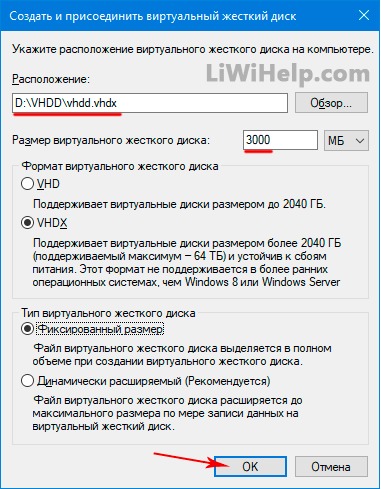
3. Specify the preferred location for the file, its size and type, and then click on the "OK" button.
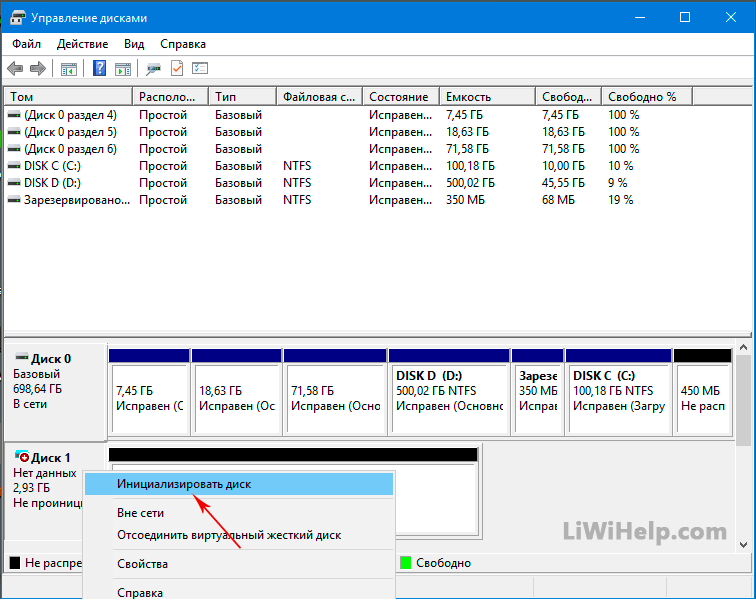
4. After completing the creation process, click right click mouse on the created disk and click on "Initialize".
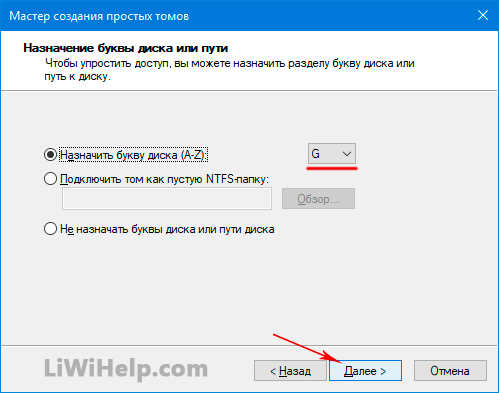
5. After that, select the "Create a simple volume" item in the context menu, assign a letter, a label, file system and the last click on the "Finish" button.


6. Go to Explorer, where you will see the created virtual HDD. Now you can use it to store files or attach to a virtual machine. When you want to delete it, go to management, detach the volume and delete the folder with the file. That's all!
P.S. Browse a list of all our computer tips for !