There are only a few problems that beginners face. And one of them is the BIOS setting for Windows installations from a flash drive. This is the first step that starts everything, and this is where almost everyone stumbles.
The problem is that there are different BIOS versions. And, having studied the instructions on how to enable booting from a USB flash drive in the BIOS, a beginner may still not be able to cope. And all because he simply has the wrong BIOS version, there is no such line as in the screenshot and, accordingly, nothing happens.
It doesn't matter what brand of laptop or computer you have. Version operating system(Windows 10, 8, 7 or XP) doesn't matter either. Only the BIOS version matters. And the easiest way to find out about it is by running it.
How to enter BIOS settings
Before entering BIOS settings, you need to insert a bootable USB flash drive with the installation image into the USB port. At the same time, the main thing here is to write it down correctly. Otherwise it just won't load.
After that, restart your PC or laptop and constantly click the Delete or F2 button until the BIOS window opens. The button may differ depending on the brand of laptop or motherboard on the computer, so see the hint on the first black screen.
Then the BIOS is configured.
Award BIOS setup
How to understand that you have an Award BIOS? From the screenshot below:

If you have the same blue screen, then it is Award. Most often this option is found on the PC.
Management in BIOS is carried out only using the keyboard - arrows and corresponding buttons (their list is usually indicated at the bottom of the screen).
Before setting the BIOS to boot from USB, you need to check that it is enabled (otherwise the USB flash drive simply will not be displayed). For this:

The instruction is as follows:


In the screenshot above, the HDD is in 1st place, and the USB flash drive is in 2nd place. It needs to be lifted up. As you can see from the prompts at the bottom of the screen, you can set the boot priority in BIOS using the + and - (plus and minus) buttons. Select the USB flash drive and press the plus sign - it should move to the first line. Then press Esc to go back.
Then highlight the item "First Boot Device", press Enter and select "USB-HDD". Press the Esc button again. To exit the BIOS, click the F10 button and then Esc (Save and Exit).

AMI BIOS Setup
AMI BIOS looks like this:

And most often it is found on laptops. Again, you first need to make sure that the USB controller is enabled. For this:

 Now let's look at how to boot a USB flash drive through BIOS on a laptop:

Sometimes, in order to change the device boot priority (put the USB flash drive in first place), you need to press other buttons. It can be not only + and - (plus / minus), but also F6 / F7, etc. Focus on the tips where it says what a particular button does (this little instruction is always either on the right or at the bottom).
Phoenix-Award BIOS setup
The Phoenix Award looks like this:

This is a rare (or rather, old) version, but for the full picture, let's look at the Phoenix-Award BIOS through the BIOS.
First, go to the "Peripherals" tab and check that the first two items are set to "Enabled". If necessary, expose the desired.


After that, go to the "Exit" tab (in the top menu) and select the "Save & Exit" line to exit the BIOS.
UEFI BIOS Setup
The UEFI BIOS is a new and improved version of the old BIOS. It has a user-friendly interface, so setting up the BIOS for installing Windows is very simple here.
All you need to do is find the USB device icon, use the mouse to move it to the 1st position, and then click the “Exit” item (in the right corner) with the mouse. And don't forget to save your settings!
In this simple way, booting from a USB flash drive through the UEFI BIOS is carried out. Undoubtedly, this method is the simplest and most understandable. Actually, it was for this that a new graphical interface was developed.
When the PC or laptop reboots for the first time during the Windows installation process, you need to go into the BIOS again and restore the previous settings. That is, put the HDD-drive in the first place, and lower the flash drive to the second or third.
Or when a black screen appears after the reboot with the line "Press any key ..." ("Press any button") - do nothing.

Otherwise, Windows will start installing from the very beginning. And you can go around in circles for hours.
Once again: during the installation process after the first reboot, either go to the BIOS and return all the previous settings, or simply do not press anything. Alternatively, you can also simply pull the USB flash drive out of the USB port (but only when the PC or laptop reboots).
Every System Administrator should know how boot computer from usb stick. Most often, this skill is necessary when installing the operating system. After all, a Windows distribution does not have to be on a CD. And, for example, installing Windows on a netbook in a different way will not even work, because. it usually does not have a floppy drive.
Today I will tell you how to set the boot from a USB flash drive in the BIOS of various manufacturers. Regardless of which version you have, the procedure will be as follows:
1. We insert our bootable USB flash drive into the USB port of the computer. It is advisable to insert it into the port located directly on the motherboard, i.e. from the back of the system unit.
2. Turn on the computer and press the key Delete(or F2) to get into the BIOS. Depending on the manufacturer and BIOS version, other keys (Esc, F1, Tab) can be used, so you need to carefully watch the prompts on the screen.
In Bios, we can navigate through the tabs and rows only using the keyboard.
Next, I will describe in detail this process on the example of different BIOS versions.
Configuring Award Bios to boot from a USB flash drive
Award Bios: First, let's check if the USB controller is enabled. We go to "Integrated Peripherals". We go down with the arrow on the keyboard to the item “USB Controller”. Press the “Enter” key and in the window that appears, select “Enable” (also using “Enter”). Opposite “USB Controller 2.0” should also be “Enable”.
  Exit this tab by pressing Esc.
Then go to "Advanced BIOS Features" - "Hard Disk Boot Priority". Now in my example, the hard drive is in the first place, and the flash drive should be.  We stand on the line with the name of our flash drive (Patriot Memory) and raise it to the very top using the “+” key on the keyboard.
  Exit here by pressing "Esc".
Now on the line “First Boot Device” press “Enter”. We have selected “CD-ROM”, but you need to set “USB-HDD” (if suddenly the boot from the USB flash drive does not work, come back here and try to set “USB-FDD”). Let the second device be “Hard Disk”.  Exit this tab by pressing Esc.
Now exit the BIOS, saving the changes. To do this, click "Save & Exit Setup" - press the key "Y" - "Enter". 
Configuring AMI Bios to boot from a USB flash drive
If, upon entering BIOS, you see such a screen, then you have AMI Bios: First, let's check if the USB controller is enabled. Go to the tab "Advanced" - "USB Configuration".
 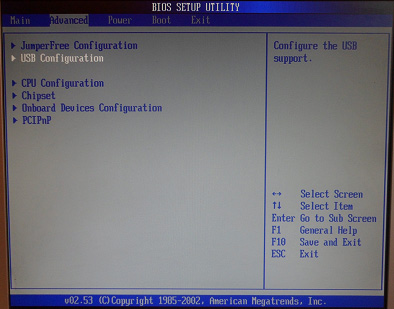 Opposite the items “USB Function” and “USB 2.0 Controller” should be “Enabled”.
 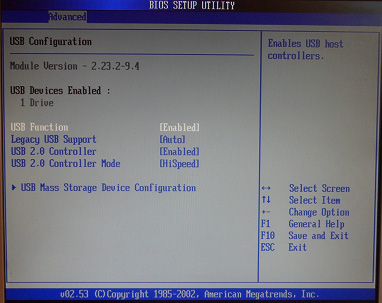 If this is not the case, we stand on this line and press the “Enter” key. From the list that appears, select “Enabled” (also using “Enter”).
Then exit this tab by pressing “Esc”.
Go to the tab "Boot" - "Hard Disk Drives".  Now I have a hard drive in the first place, but I need to put a USB flash drive here. We become on the first line, press “Enter” and in the window that appears, select our Patriot Memory flash drive.
  It should be like this:
  We leave from here through "Esc".
Select "Boot Device Priority". Here, the first boot device must be a USB flash drive.  Press Esc.
Then we exit the BIOS, saving all the settings made. To do this, go to "Exit" - "Exit & Save Changes" - "OK". 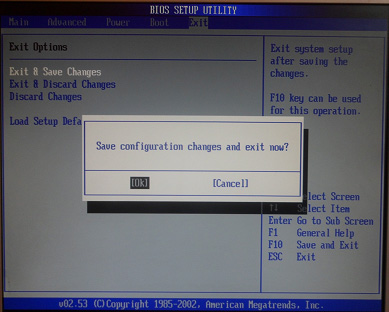
Setting up Phoenix-Award Bios to boot from a USB flash drive
If, upon entering BIOS, you see such a screen, then you have Phoenix Award BIOS: First, let's check if the USB controller is enabled. We go to the “Peripherals” tab - opposite the items “USB Controller” and “USB 2.0 Controller” should be “Enabled”.
  Then we go to the “Advanced” tab and opposite “First Boot Device” we set “USB-HDD”.
  After that, exit the BIOS, saving the changes. To do this, go to "Exit" - "Save & Exit Setup" - press the key "Y" - "Enter"
  That's practically everything you need to know in order to boot from a USB flash drive. In my article, I described the process of setting up the Bios of the most popular versions: Award and AMI. The third example shows Phoenix Award Bios, which is much rarer.
In different versions of the BIOS, the described procedure may be slightly different. But the main thing is that you understand the principle of tuning itself.
By the way, I would also like to add: in order to choose which device to boot your computer from, it is not necessary to change the settings in the BIOS. You can call up a special menu immediately after turning on the computer to select boot devices (this can be done by pressing F8, F10, F11, F12 or Esc). In order not to guess with the keys, we look carefully at the monitor immediately after turning it on. We need to have time to see an inscription like this: “Press Esc to selest boot device”. In my case, it was necessary to press “Esc”. 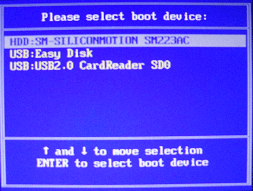 If on your computer BIOS UEFI, and you need to boot from a USB flash drive - you can familiarize yourself with.
If you need reset forgotten password user using a bootable USB flash drive - how to do it.
A “hot” boot from a USB flash drive or setting the BIOS so that the PC automatically boots from portable media may be needed when installing the OS on a hard drive or when starting a resuscitation Live CD. How to configure the BIOS to boot from a USB drive, read on.
Preparing a flash drive
This procedure boils down to burning the installation image or Live CD to media, for which there are enough a large number of methods, the description of which is the topic of a separate article. We note only popular programs created specifically for this purpose:- Rufus;
- UltraISO;
- WinSetupFromUSB;
- WinToFlash;
- UNetbootin;
- Universal USB Installer
- WiNToBootic;
- Win7 USB/DVD download.
Boot via Boot Menu
Typically, when installing Windows recovery there is no point in interfering with the BIOS settings, it is enough to boot from the flash drive the only time through boot menu. This option (unless it is blocked by the device manufacturer) is present in most models of the modern fleet of computers and laptops. The Boot Menu is an essential part of any BIOS or UEFI BIOS.Using the boot menu, the user can quickly switch to one or another module, but the next time the computer is started, it will still be loaded from the media set to boot by default.
You can boot from a USB flash drive through the Boot Menu as follows:
 The Boot Menu interface of your computer or laptop may differ from that shown in the example, it all depends on the device model and BIOS type. There may also be a different key to enter (or a combination of keys), for example:
- many devices with system Asus boards- F8 button;
- Lenovo laptops (additional option) - a separate button on the case with an arrow symbol;
- some Acer laptops and monoblocks - switching to the BIOS via F2 and activating the "F12 Boot Menu" option in its settings;
- HP laptops and monoblocks - the F9 button, or the sequence of Esc + F9 buttons.
We activate boot from a flash drive in different BIOS
As in the case of entering the boot menu, in motherboard BIOS boards can be accessed by pressing a certain key (less often, combinations of several keys) during computer startup. The most common buttons are Delete or F2. Other options depend on the computer model and BIOS type, for example:- outdated BIOS from Award - combination Ctrl+ Alt + Esc;
- Phoenix - F1 (F2) button;
- Microid Research - Esc;
- IBM - F1;
- some Lenovo devices - blue ThinkVantage button;
- some Toshiba laptop models - a combination of Esc + F1;
- HP/Compaq - F10 button.
AMI
First of all, we connect the prepared USB flash drive to the computer, launch it and enter the BIOS, as described above. Next, you should proceed according to the following scheme:
Award (Phoenix)
This is one of the most common and old BIOS. We set up booting from a USB flash drive according to a typical scheme:
H2O
This BIOS is found on laptops from different manufacturers. Movement, selection and other actions are carried out here using the keyboard buttons. We set up booting from a flash drive in the H2O BIOS according to the following scheme:
Booting from a flash drive to a PC with UEFI
The latest motherboards have got a convenient BIOS UEFI graphical interface. The change in the order of boot modules has also become more understandable. It is important that most of these motherboards it is possible to control the mouse.
Is it possible to boot without BIOS?
This method works on devices under Windows control 10 s and system boards with embedded UEFI BIOS. We boot from a USB flash drive using standard tools:
Possible problems when entering BIOS
Currently, the Windows system is configured in such a way that it can be impossible to get into the BIOS due to the default fast boot option activated. The problem is solved quite simply: Loading personal computer with a USB flash drive, you may need it when installing the operating system or restoring it in case of any problems. Also, the method is used to launch a Live CD for various purposes. You can boot from a USB flash drive either through the Boot Menu, or by configuring the BIOS in a special way.
Reading 6 min. Views 854 Published on 02.02.2017
In order to install an operating system on a computer, you need to configure it to boot from a USB flash drive or disk. Therefore, in today's article, we will consider how to boot from a USB flash drive in BIOS. This must be done to begin installing Windows. Since if you just insert a bootable USB flash drive with the system, then nothing will happen. Your old OS will start to boot. If you have not yet downloaded the latest version of the operating system, then read the article - How. Let's now proceed directly to the configuration process itself.
We use the Boot Menu to boot from a USB flash drive.
After restarting the computer, it is not always necessary to enter the BIOS of the motherboard to configure. First, let's try to use the Boot Menu (boot menu). To do this, before the system starts to boot, you must press the "F8" key, thereby a special window should appear with a list (boot menu) of connected drives. In this menu, you need to select our flash drive with the OS recorded on it.
After that, it should start, namely copying the installation files to HDD. After the computer restarts itself, Windows installation will start from hard drive.
If for some reason you are unable to open the boot menu, then let's start figuring out how to boot from a USB flash drive in BIOS. But first, I want to briefly tell you what a BIOS is. 
BIOS (basic input / output system - "basic input / output system")- a special set of built-in software, which implements the application programming interface required to work with computer components and connected devices. 
In order to get into the BIOS settings, you need to have time to press the “Delete” or “F2” button or any other, depending on when the computer boots up. On the monitor, you will at this point in time display the logo of the motherboard manufacturer or information about the processor, memory and hard drives. At the same time, something like this will be written at the bottom of the screen:
- "Press Del to Enter Setup"
- "Press F2 for Settings" or similar.
After clicking on one of the buttons, you will have to get into the BIOS settings. Depending on the board, the software for the basic I/O system may be different. I propose to consider the most popular options, as well as configure them to boot from a USB flash drive.
If AMI BIOS is installed on your board, then in order to set the disk boot order, you and I need to perform the following steps:

Note! The USB flash drive must be connected even before you enter the BIOS, otherwise it will not be detected for you.

If your motherboard is with AWARD or Phoenix BIOS, then to configure Windows boot from a flash drive, do the following steps:

On many modern laptops, the InsydeH2O bios is installed and many are faced with the problem of setting the disk boot order. Let's deal with this problem together. We will do everything step by step so as not to make a mistake.

Note! If you need to install a boot from a CD or DVD, then in the first place you need to put the item "Internal Optic Disc Drive"
- After the settings have been made, go to the "Exit" menu section and select the "Save and Exit Setup" item, thereby we will save the changes made and exit the BIOS.
Currently, many motherboard manufacturers install UEFI software instead of the usual BIOS, which has a graphical interface, as well as mouse control support and a Russified menu. Thus, it makes it easier for us to solve the problem of how to boot from a USB flash drive in BIOS.
If you are lucky, and when you enter the BIOS you see that the graphical interface has loaded in front of you, then you need to go to the advanced settings by pressing the "F7" key or the corresponding button in the main window. In the menu that appears, you need to go to the "Download" tab and in the "Disk loading order" item, put our bootable USB flash drive in the first place. 
After making the changes, press the "F10" key and select the "Save settings and restart the computer" item.
Let's summarize.
In today's article, we have discussed how to boot from a USB flash drive in BIOS. At the same time, I tried to show in as much detail as possible how this is done in different versions of the BIOS. As a rule, all settings come down to placing the first in line, a bootable USB flash drive or a disk with the system. Many users have difficulty with this, since the interface is in English. But as you can see, the developers are doing their best to adapt the BIOS for all users. This is clearly visible in the new UEFI software.
If you needed to install Windows 7 from a USB flash drive via BIOS, then our article will be a great help to you.
Installing a new operating system on a computer is a fairly common problem that can occur due to the slightest malfunction of the system or the actions of an inept PC user.
This issue also became relevant in connection with the statement of official representatives of the Windows company about the suspension of technical support for the XP operating system.
To date, almost all users have completely switched to the so-called seven.
Our step-by-step instructions will help you quickly and easily bring your computer back to life.
Preparing your computer to reinstall Windows
Before you start working on new software, you need to properly prepare your PC. First you need to remember what important information stored on your computer and save it to a portable storage device.
Particular attention should be paid to the local drive C, it is on it that the largest amount of information is stored. Almost all users store their media files (photos, videos) in the My Documents folder or directly on the desktop.
These files are often located on the disk along with the already installed OS. You can also use to save information. free space another local drive.
very important before reinstalling Windows check if there are drivers for the network card on the PC.
If you install new system via USB, and then it turns out that the distribution does not have drivers for the network card, then you will not be able to configure the drivers and the Internet connection.
For your own confidence, it is better to once again make sure that the drivers are available. Also, be sure to check if you have drivers for your sound card, audio card, video card, etc.
Preparing a flash drive for software installation
To install the operating system from a flash drive, we recommend that you adhere to the following rules:
- The minimum size of the flash drive must be 4 GB. This is the amount of space required to save all important components and files;
- Mandatory preparation of the Windows 7 distribution kit for recording and saving its image (*iso format);
- Choosing a program to create a disk image.
Advice! One of the best disk imaging utilities is UltralSO. latest version located on the developer's site
Install and run the utility on the PC, and then select the pre-selected disk image in it. Step-by-step instruction using the program will help you quickly understand all the subtleties.
- launch
2. Now you have the main working window
3. Proceed to recording the hard disk image
4. Now you need to connect the flash memory and enable formatting. When the process of formatting the flash drive is completed, you can start recording.
5. At the end of the recording, there will be Windows on the space of your flash drive, with the help of which you will reinstall.
Comment! To create a flash drive to install the system through the BIOS, you can use the toolsWindows.
Configuring Bios to work with a bootable USB flash drive
Single connection installation flash drive to a PC to install new software is not enough, you need to first configure the computer so that when you turn it on, it starts to boot from it.
All settings are made in BIOS. Any laptop, computer has a BIOS that stores important settings, among other things, it remembers the order in which devices should be loaded. It is this setting that we now need for further fruitful work.
To start the BIOS, you must hold or press a certain key on the keyboard when you turn on the computer.
You can find out which key we need from the information on the monitor. Typically, these keys are Esc, Delete, F2. If you entered BIOS, then one of the following screens will appear in front of you:
If the login attempt fails, restart the computer again and try to start the BIOS again. To make it easier for you, we have posted a table with the main options for enabling Bios.
Keyboard shortcuts to enterBIOS depending on manufacturerBIOS
Basic keyboard shortcuts for launchingBIOS depending on laptop and computer manufacturers
After you get into BIOS, you need to find the option that is responsible for loading devices. Usually it is in the menu and the word BOOT is present in its name. Other options are not excluded, you may even have to look.
Here are some examples:
As a rule, the choice of the main device for loading occurs by pressing the arrows on the keyboard, although sometimes there are other ways to control it. If you can’t figure it out on your own, then refer to the help that glows in the BIOS.
In our case, the USB-HDD (there may be another name) acts as the first boot device. After selecting it, you must exit the BIOS with saving all settings using the Save and Exit Setup item.
After this step, the computer should restart and we will move on to the main stage for which we are here.
Installing Windows 7 using a bootable flash drive
If everything was correctly written to the space of the flash drive, and the correct settings were made in the BIOS, then you will see the following message on the monitor screen in front of you, which says that you should press any key to activate the download.
If there is no such inscription, then you will have to check your actions. To do this, go to BIOS and make sure that the boot from USB flash drive setting is saved. If there are no errors in the BIOS, then most likely you were unable to create a bootable USB flash drive and you need to repeat the whole process again.
If there is an inscription, then congratulations, your installation Windows new versions through the bios started. Some installation images, in addition to the operating system itself, also contain various additional programs, then you will have to select the required item from the menu.
It is also worth saying that some of the disks by default perform most of the settings described below. You should not worry about this, since all settings can be changed after the software installation process is completed.
A welcome screen appears in front of you, on which you select the desired data. After the configuration is done, you should click on the "Next" button, and then "Install".
In a new window, the terms of the license agreement appear in front of us, which you, of course, read very carefully, and then agree by checking the box in the designated box and clicking the "Next" button.
The final stage of installation
In the new window, you will have to choose which type of installation we want. We need a complete type. Next, you will have to work a little with the disk, on the space of which it will be written a new version software.
To do this, select the required disk partition in the menu and click on the "Disk Settings" button, after which we start formatting.
We have already described how this is done above. Here you just need to change from USB-HDD to the name of your drive. This is a very easy action that should not cause you any difficulties.
Once the reboot is complete, Windows Setup will continue.
- We enter names for the computer, laptop and for users.
- Set a password if needed.
- We enter the name license key, if it exists (you can skip this step).
- Select security settings ("Recommended settings").
- Set date, time.
- We are setting up the network.
Thanks to these simple steps, you can install Windows 7 through BIOS using a USB flash drive.