Unfortunately, not every user, when buying a new hard drive imagines that after installing it into the system unit, it will immediately be impossible to work with the hard drive, considering that it is enough to insert the appropriate cables into it and fix it with screws, and the system will determine the device itself. First of all, after installing the equipment, the hard disk must be initialized. Windows systems will not do this automatically, so all operations will have to be carried out independently.
Installing a new hard drive
Before directly dealing with the problem of how to initialize HDD, you should deal with its correct installation in the system unit with the connection, observing some rules and precautions.
To do this, with the computer turned off and the power supply disconnected, you need to remove the side cover. Then, which is very important, before installing the hard drive into the slot, you should definitely remove the electrostatic charge from your body, in the simplest case, simply by touching with both hands the spout of a conventional water tap or the chassis of a disabled system block. After that, the hard drive is fixed with screws and connected to the motherboard with the appropriate cable and jumpers in compliance with the Master / Slave rule (main or dependent drive), after which the side cover of the case is installed in place.
Initializing the hard drive in the BIOS settings
Now you can proceed with the initial configuration of the installed hard drive. First you need to turn on the computer and go to the settings section of the BIOS primary input / output system. Usually, the Del, F2 keys or some combinations are used for this, which will be shown on the monitor screen at the time of start.

Here, in the main section, which shows all the devices currently connected to the motherboard, find your hard drive, given its interface (SATA or IDE). If the hard drive is detected, you can proceed to the main setup using the BIOS exit followed by an automatic reboot. Otherwise, if the device is not in the list or the line Not Detected is present, after exiting and turning off the PC, you need to re-check the connection.
How to Initialize a Hard Drive: Windows Basic Tool
We proceed from the fact that the hard drive is defined in the BIOS. Now you need to initialize the disk. After a full boot, Windows will automatically recognize the new device and install the appropriate drivers for it (you can make sure that they are available by viewing the drivers folder in the System32 directory, where the disk.sys and partmgr.sys files will be present). At this stage, the disk itself is not visible in Explorer, although it is physically present in the system.

Disk initialization is performed using the system's native tool in the disk management section. You can call this section from the "Control Panel" through the administration system with the choice of the computer management menu or from the right-click menu on the computer icon, but using the "Run" console looks simpler and faster, in the line of which the diskmgmt.msc command is written.
Running initialization and setting the boot record type
Now the disk is being initialized. First, we select our hard drive in the list of present devices (it can be labeled as “Disk 1”, “Disk 2”, etc.), after which we right-click to call up the menu and use the initialization string in it.


If the hard drive has a volume of more than 2 TB, you will need to set the GPT attribute (otherwise it will be impossible to use a large volume). If an error occurs while initializing the disk, you will need to take appropriate measures to eliminate it. This will be discussed separately.
Volume creation process
At the next stage, disk initialization involves the creation of a partition. This is done in order to computer system was able to "see" the disc.

On the selected disk, right-click again, and the creation line is selected from the context menu simple volume, after which the corresponding "Wizard" will open, in which the continue button is pressed.
Further, disk initialization provides for specifying the size of the created partition in megabytes (recalculate immediately, since 1 GB contains not a thousand, but 1024 MB). This is usually not required because the system specifies the volume size automatically.
At the next stage, you need to assign a letter to the section, by which it will be determined by the system. Here you need to be very careful not to give the disk an already used identifier that other removable media (CD / DVD-ROM, USB devices, etc.) may correspond to, as they may later appear inoperative due to the fact that The system simply does not recognize them.
File system selection and formatting
Finally, disk initialization is approaching the final stage, at which it will be necessary to format the created partition.

Here as file system it is better to specify NTFS (it is considered more stable than FAT32, and can save files larger than 4 GB), leave the cluster size at the default value of 512 bytes (this will allow you to more economically allocate and use the resources of the created partition), enter as the volume label the name that will be displayed in the system ( file manager and context menus), and uncheck the quick format (for the first time it is strongly recommended to perform a full format, which will avoid problems in the future). Directory compression should not be used, since this can only lead to a slowdown in the disk, related to the speed of reading or writing information to it.

Next, go to the completion window and, if all the parameters are set correctly, click the formatting start button (Finish). If any parameters need to be changed, the button to return to the previous menu is used. At the end of the process, the system will display a message on the screen in the form of an autorun window, if it is enabled. But sometimes you may get a warning that the disk has not been initialized.
What to do if initialization errors occur?
With new hard drives, there are usually no such problems. But if the system gives a message that the disk is not initialized, you can use the command line (cmd in the Run console) to fix it.

It first uses the diskpart command, to view and select a disk - list disk, and to clean the partition table - clean. After that, you can format manually using the create partition primary, select partition 1, active and format fs=ntfs commands sequence, which are entered without punctuation marks and pressing the enter key after each of them.
In other cases, you can use specialized programs like Partition Magic, but if none of the tools help, you will have to re-check the connections or look for malfunctions in the hard drive itself (perhaps these are physical damages). For these cases, you can try to apply HDD program Regenerator, then perform all the above operations again.
fb.ru
How to initialize a hard drive

After installing a new drive in a computer, many users are faced with the following problem: the operating system does not see the connected drive. Despite the fact that it physically works, in the explorer operating system not displayed. To start using the HDD (the solution to this problem also applies to SSD), it should be initialized.
Carrying out HDD initialization
After connecting the drive to the computer, you need to initialize the drive. This procedure will make it visible to the user and the drive can be used to write and read files.
To initialize a drive, follow these steps:

After that, the disk (HDD or SSD) will be initialized and will appear in the "My Computer" explorer. They can be used in the same way as the rest of the drives.
We are glad we were able to help you resolve the issue.
Poll: Did this article help you?
Not reallylumpics.ru
The problem of loading the operating system is quite common. And it has nothing to do with her ability to work. It also happens that the hard drive does not initialize at all (an I / O error), or some other problems arise. In this material, several typical situations and solutions applicable to them will be considered. We will immediately make a reservation that issues related to breakdowns or physical deterioration of the hard drive will not be considered, as well as virus infection.
The hard drive does not initialize: possible problems
The most common situation is related to breakdowns. They will be discussed a little later. But at the moment, you can determine several options for why the hard disk is initialized incorrectly or not detected at all.

Among all that is described on the same Internet, several situations can be noted separately:
- disk failure;
- wrong boot priority in BIOS;
- disk errors;
- operating system crashes.
The hard drive is not initialized: what to do first?
To begin, consider typical mistake. Let's say there is a situation where the WD hard drive is not initialized. In this case, the system simply "spits". The message that the hard disk is being initialized (CRC error) can only indicate that failures have occurred in the system partition, and this can in no way be connected with the hard drive (or rather, with its state).
To begin with, when the system at boot displays a message stating that the hard disk is not initialized and the OS cannot be loaded, you should check the startup parameters in the BIOS (primary input / output system). It is very likely that when the user receives the message, they will see text indicating that the OS boot device was not found.

Thus, the solution suggests itself the simplest - to include in BIOS settings initial boot from the hard drive (Boot Device Priority - Hard Drive).
System tools
In the event of a download failure, first you need to check the checksums of the CRC entries, which were mentioned above. Such an error is similar to what can sometimes be observed when unpacking incompletely downloaded archives with the WinRAR program.
Basically, the situation is the same. However, when booting the system, if it works, initially you just need to perform a disk check with automatic fix errors (it is clear that you cannot format the system partition).
If Windows boots from removable media...
The system can also be started from a removable device (either an installed OS or a bootable device). In this case, immediately, without delaying things, you need to check. You can use the built-in commands for this, and third party programs.
In the simplest case, when, for example, the second system is on virtual disk(in a section), the check can be done using the same chkdisk command, specifying the disk label. But, as practice shows, this is usually not even the problem.

If not initialized external hard disk, not to mention the built-in one, you will first have to at least check the connections of the loops. But this, as it turns out, is not the main problem. Possibly for external device the appropriate drivers are simply not installed, or they do not work correctly. Or maybe the device itself is simply not turned on.
You can check the operation of external media through the standard "Device Manager", which is called either from the "Control Panel", or by the devmgmt.msc command from the "Run" console, which is available in any Windows system(It can be launched through the regular Start menu).
If the system does not boot: check the status from the command line
To check any type of hard drives, if the system does not want to boot, you can offer the option of booting from a circuit medium using utilities like LiveCD or even a Windows installation distribution kit that has a boot sector that allows you to open boot from external media instead of HDD.

If you use the Windows distribution, during the start process you need to press Alt + F10 or select the recovery console with the "R" button. Next, on the command line, you need to register sfc / scannow (this is at least for starters). In the extended version, it is worth using the commands to restore the boot record:
- Bootrec.exe /FixMbr.
- Bootrec.exe /FixBoot.
- Bootrec.exe /RebuildBcd.
The last command to apply is optional and is used only to overwrite the boot area (sectors).
recovery programs
As for applications that can restore the operation of Windows systems, it is rather difficult to decide on their use.

At the very least, you can recommend bootstrap utilities and then programs like HDD Regenerator. It is believed that it is this application, running in DOS mode, that can perform the so-called remagnetization of the disk, even if the hard disk is not initialized as such.
Data recovery
It is clear that the user does not see the boot sector on the HDD. The section reserved for the start operation, even more so. The maximum is the swap file. And this is the main problem. The fact is that this is not even a file, but a reserved place on the hard drive responsible for loading data when there is not enough RAM. If there is a sufficient amount of "RAM", it can be turned off altogether, since accessing RAM is many times faster than the same operation applied to a hard drive.

But you can recover information. To do this, it is enough to use any program that allows you to do this. One of the most powerful is the R.Saver utility. True, it is desirable to pre-load in safe mode or at least try to roll back the system, if possible.
In general, this approach solves quite a few problems, including some errors and boot record failures. If this option does not work either, you will have to format the disk (hard drive). But overwriting the boot sector via the command line is worth taking advantage of.
In addition, it is the system commands that can fix the MBR entry without the use of third-party tools. As a last resort, you will have to use partition formatting. Thereafter necessary information it will be possible to recover. But only on the condition that the sector was not overwritten, that is, there were no files saved after the data was deleted. Otherwise, nothing good will come of it. Although ... You can try to do something in any case. There will be nothing wrong with that.
What is the result?
To begin with, it is believed that you need to check the disk for errors, if it is detected at all. On the other hand, if initialization is not possible, you will need to use special programs capable of recovering HDD data, moreover, in the boot workspace. But, even booting from removable media, you can solve a lot of problems related to starting the system.

If it comes to the effects of viruses, except for disk programs with the general name Secure Disk, you can’t advise anything. These are available in both Kaspersky Lab and Doctor Web. The bottom line is that they load their own interface even before the system starts, while scanning even RAM, and not just the hard drive (viruses, like any other programs currently running, can upload their files there). Thus, the problem that sometimes the hard disk is not initialized when the system boots up can be related to just such a situation.
One last thing
But as a final tip, it's best to use the check and restore commands from command line. Although it works in DOS mode, it never fails and allows you to fix even such problems that cannot be fixed by the usual means of the system, no matter how hard you try. As a last resort, if the disk is in the process of being mounted, you can go to the disk management section and use the appropriate initialization command.
fb.ru
What to do if the hard drive does not initialize and why this happens
To figure out why the hard drive is not initializing on your computer, you need to pay attention to the sounds it makes and analyze the information that appears on the screen. Remember also the events that preceded the failure. Were you able to initialize the drive before?

Mechanical damage
A hard drive (hard drive, HDD), SSD, that is, built-in data storage, is the most unreliable component of a computer or laptop. In case of mechanical breakdowns, it may not turn on at all or make unusual sounds, such as knocking, clicking, crackling, clattering, howling.
They can be translated into human language like this: “I can’t read information.” In combination with persistent failures, during initialization, this means that it is impossible to operate the hard drive. You should contact service center, whose experts will find out whether it is possible to fix this hard drive or at least copy the information on it.
viral infection
Another very common reason for a hard drive not initializing is due to a virus infection. Sometimes viruses declare this themselves, often making demands for any payments. You don't have to give in to blackmail. The easiest way in this case is to boot from another device and cure the infected with an antivirus. To avoid such situations, you should use a high-quality antivirus (both Kaspersky and DrWeb will do), which includes a program like Secure Disk that loads even before the operating system starts and checks for viruses both the hard drive and RAM.
Crashes in system data
If the hard drive containing the operating system does not initialize, immediately after executing the Primary Input/Output System (BIOS) program, you may receive a CRC data error message indicating that the information cannot be read correctly. Other messages are also possible. Messages like Boot Disk Failed or Primary Master Disk Fail mean that the zero track of the device is damaged, without which it is impossible to start reading.
Disk Boot Failure indicates that there is a data error in the system master boot record (MBR or GPT). The phrase Invalid Drive Specification indicates a discrepancy between the device parameters and the information about it that is stored in the BIOS. The reason for this can also be failures in the MBR, or an I/O error due to mechanical damage to the reading heads or contacts in the interface.
To begin with, in these cases, you should check the BIOS settings. Here you need to pay attention to which device is assigned for the initial boot and whether the hard drive parameters are recognized correctly. In some cases, changing the boot device can help.
System data corruption can be repaired Windows tools or using utilities such as ACRONIS DISK DIRECTORY, however, you can immediately start active actions on a failed device only if there is no data on it. Existing information can be damaged during corrections, therefore, first of all, you should think about how to restore personal data. To do this, as in the case of viruses, you will need to boot from another device and use utilities such as R.saver, R-Studio or Get Data Back. You should restore data to another device so as not to damage files that have not yet been processed. Damage to a significant number of sectors of the hard drive indicates that it will soon fail and we must prepare for its replacement.
The reason that the hard drive is not initialized may be changes in the software made before the failure occurred. For example, changing drivers or installing updates for the operating system, other system products. In this case, it is advisable to restore the system from the last restore point created before the patches were made. To be able to initialize a system restore, access to the device on which the corresponding data is located is required.
When installing the operating system on a formatted high-capacity hard drive (more than 2.2 TB), problems may arise due to the fact that not all Windows versions able to work with GPT master boot record. You can change the recording format to MBR, however, not the entire disk space will be used. If it is not possible to upgrade to a more modern OS, it is better to use a smaller capacity device for the system.
Additional hard drives
What to do if initialization fails hard disks containing alternative operating systems or other information? First, check if any letters are assigned to them. To do this, right-click on the "Computer" line, select "Storage Devices" in the "Management" item and then "Disk Management". If the device you are looking for is visible, but the letter is not assigned to it, the problem is solved very simply. It is enough to select this line, press the right mouse button and change the letter to any free one.
There may be other reasons why disks are not initialized. If they have already been used before, then they may have worked as part of a dynamic volume, or they were encrypted. In these cases, it is unlikely that you need someone else's information; it is enough to re-format the devices. To prepare for this, you can use a utility like ACRONIS.
External device initialization error
If the external hard drive or SSD does not initialize, then first make sure that it is turned on. Also check if the interface is correct. Try to replace the interface, connect to a different SATA (or USB) connector motherboard. As in the case of the HDD, you should check if a drive letter is assigned to the device.
Keep in mind that SSD technology is developing rapidly, so it is better to check the features of your device on the Internet. If using the SATA interface, check if the BIOS is set to AHCI mode for the controller that controls your SSD. Update the drivers for this controller. Initializing an SSD drive with SATA interface may not pass due to a connection to a port with a large number. Such ports may be supported by additional controllers or may operate at lower speeds. You can recognize them by their color - ports that have a color other than SATA-1 should not be used.
Some drives come with software that allows you to transfer the operating system to them. If the problem occurs after such a migration, rebuild the system from scratch. If you have Windows XP installed, you may need to upgrade to a later version of the operating system. Perhaps you need to switch to latest version BIOS. See the video below for more details.
Comments powered by HyperComments
HDDiq.ru
The hard drive is not initializing: what to do?
 Today, quite often there are problems when loading the operating system. It has nothing to do with her performance. Sometimes situations arise when the hard drive does not initialize at all or other problems occur. In this article, we will consider several quite typical situations, as well as solutions that can be applied to them. It is worth mentioning right away that this article will not address issues related to physical wear and tear or hard drive breakdowns. Also, issues related to viral infection will not be considered.
Hard drive not initializing: possible problems
The most widespread situation is associated with the occurrence of breakdowns. But this will be discussed later. At the moment, several variants of problems can be identified, due to which the hard disk is not detected at all or initialized incorrectly. Among all that is described on the Internet, there are several of the most common situations:
Disk failure;
Wrong boot priority in BIOS;
Operating system failures; - disk errors.
What should I do if the hard disk does not initialize?
First of all, let's look at the most common mistake. Suppose there is a situation in which the WD hard drive is not initialized. The system in this case simply "spits". A message appears stating that the hard disk is not initializing (CRC error). This may indicate that the system partition has failed. This may have nothing to do with the condition of the hard drive. To begin with, when at boot the system displays a message stating that the hard disk is not initializing, and the operating system cannot be loaded, you need to check the startup parameters in the primary I / O system or BIOS. The user, when receiving a message, will most likely see a notification indicating that the operating system boot device was not found. In this case, the simplest solution suggests itself - enable the initial boot from the hard disk in the BIOS settings.
Use of the system's own resources
If a download fails, it is recommended to first check the checksums of the CRC entries, which were discussed earlier. This error may be similar to those that are sometimes observed when trying to unpack incompletely downloaded archives in the Win RAR program. The situation is basically the same. However, when booting the system, if it is functioning, you should initially simply check the disk with the option to automatically fix errors. It is clear that it is impossible to format the system partition in this case.
What if Windows boots from removable media?
The operating system can also be started from a removable device. In this case, the check must be carried out immediately, without postponing things indefinitely. For this purpose, you can use both the built-in commands of the operating system and third-party programs. In the simplest case, when the second system is on a virtual disk, you can check using the chkdisk command, specifying the disk label. Practice shows that this is usually not the problem. If the external hard drive refuses to initialize, then first you should check the cable connections. As it turns out, this is not the main problem. It may be that the appropriate drivers are simply not installed for the external device, or they do not work correctly. Perhaps the device itself is simply not turned on. To check the operation of external media, you can use the standard "Device Manager". You can call it either in the "Control Panel", or using the devmgmt.msc command in the "Run" console, which is present in any operating system of the Windows family.
What to do if the operating system does not boot: checking the status using the command line
If the system does not want to boot, then to check hard drives of any type, we can recommend booting from removable media using utilities such as Live CD or a Windows installation distribution kit that has a boot sector that allows you to open boot from external media, and not from a hard drive. If you are going to use the Windows installation distribution, then during the start process you must press the Alt + F10 combination or use the R key to select the recovery console. After that, you need to write sfc / scannow on the command line. If you prefer the advanced option, then you must use the commands to restore the boot record: Bootrec.exe/FixMbr,Bootrec.exe/FixBoot, bootrec.exe /RebuildBcd. The last command is optional and can only be used to overwrite the boot area.
Recovery programs
As for applications that are capable of restoring the health of operating systems of the Windows family, it is quite difficult to make a choice here. You can recommend bootstrap utilities, as well as programs like HDD Regenerator. This application, running in DOS mode, is supposed to be able to remagnetize a drive even if the hard drive is not recognized as such by the system.
Information recovery
It should be clear that the user does not see the boot sector on the HDD. Moreover, he does not see the section that is reserved for the start operation. This is the main problem. The thing is that this is not a file, but a reserved place on the hard disk, which is responsible for loading information in cases where there is not enough RAM. It can be disabled if there is enough RAM, since accessing RAM is many times faster than the same operation with respect to the hard disk. However, it is still possible to recover the information. To do this, you must use any program that allows you to do this. One of the most powerful programs this kind is considered R.Saver. It is recommended that you boot into safe mode beforehand, or at least try to perform a system rollback if possible. This approach, in general, allows you to solve many problems, including some boot record errors. If this option does not bring the desired result, you will have to format the hard drive. However, overwriting the boot sector with the command line is worth taking advantage of. It is with the help of system commands that you can fix the MBR entry without using third-party tools. You may need to format the partition. After that, it will be possible to restore the necessary information. However, this will be possible only if the sector has not been overwritten, that is, after deleting the data, no files have been saved. Otherwise, nothing will work. In any case, you can try to do something. There will be nothing wrong with this.
What happens in the end? If the disk is not detected by the system at all, then first you need to check it for errors. On the other hand, if disk initialization in the system is not possible, then it is necessary to use special programs that can restore information on the HDD in the boot work area. Even if you boot from removable media, you can solve many problems that relate to the start of the operating system. If the problem concerns the effects of viruses and other malicious objects, then in addition to disk programs under the general name Secure Disk, nothing more can be advised. Dr.Web and Kaspersky Lab have similar software products. The essence of these programs is that they load their interface even before the start of the operating system. In this case, not only the hard drive is scanned, but also the RAM, since viruses and executable programs can upload their files there. Thus, the problem associated with the fact that sometimes the hard disk is not initialized when the system boots up may be related to just such a situation.
Conclusion
If you give some recommendations in the end, it is best to use the check and restore commands from the command line. Although it works in DOS mode, it never fails and allows you to fix even those problems that cannot be fixed by the usual means of the operating system. If the disk is at the mounting stage, then you need to go to the disk management section and use the initialization command.
computerologia.ru
A common question on the Internet is: “I bought a new hard drive and connected it. Why can't I see a new disk in the system? The fact is that after the physical installation of the hard drive in a computer or laptop, it is necessary to programmatically initialize and mark it. So, how to set up a connected new hard drive in Windows 7? There is nothing easier.
Update 2016: Despite the fact that the illustrations are taken a long time ago from Windows 7, this instruction is also suitable for Windows 10 and 8.
Step 1. Click right click on the system shortcut " Computer"And select" Management»:
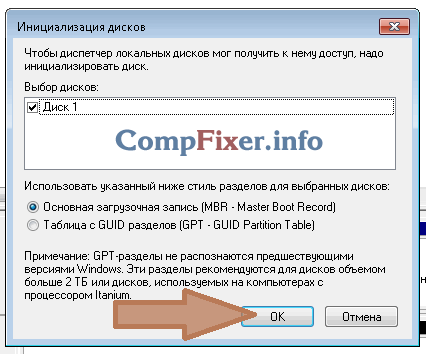
Step 2 In the window that opens, on the left, select " Disk Management". After that, a dialog box should open on the right side " Disk initialization» . In it, click " OK»:

_____________________________
Attention! If the ambassador of clicking on " Disk Management» dialog box does not open, right-click on the left side of the disk image in the area of \u200b\u200bthe inscription "No data" or " Not initialized” and select “ Initialize disk". (See 2 pictures below.)


The task is to call the same window " Disk initialization". In it, you must check that opposite "Disk n" is checked and click OK.
Step 3 Right-click on the right side of the new disk image and select " Create a simple volume»:

Step 4 Click "Next":

Step 5 Select a partition size. By default, the maximum partition size is set. Those. The partition will take up the entire hard drive. If you want the new disk to have several partitions, then select the size of the first partition in this item. For example "10240". Then the new partition (aka "partition") will take up 10 GB of disk space.
If you did not select all available space to create the first partition on a new hard disk (which was the default), then after the created partition, unallocated space will remain on the disk. To create additional partitions in the unallocated area, repeat this instruction with step 3 .
After selecting the partition size, click " Next»:

Step 6 Select a drive letter. Click "Next":

Step 6 The file system type in most cases should be left "NTFS". Select a volume label, such as "Games" or "Archive" and click "Next":

Step 7 Click "Finish" to exit the Disk Initialization Wizard:

After that, you will see that the disk has begun to be formatted:

Wait until the signature appears on the right side of the disk image instead of the word "Formatting" "Healthy ...":

Now you can open " Computer"And check if a new section has appeared with the desired letter.
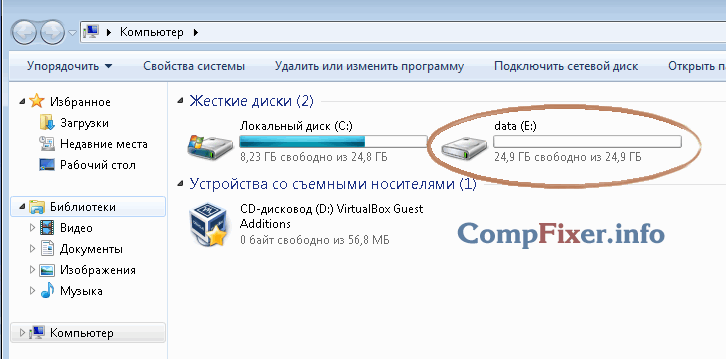
Markup done. You can use storage!
Users when using computer technology and mobile gadgets are faced with such a term as initialization. In this article, we will try to study in detail what this process is and its scope.
What is initialization
This concept means preparing for work and determining the parameters for debugging applications for error-free operation. The principle of its action is directed from the outside with respect to the object that is being initialized. First of all, this procedure responsible for setting certain parameters and rules by which work will be carried out software.
There is also the concept of hardware initialization. It is best to consider it on the example of loading personal computer: when the PC is connected to the mains, it does not perform any functions, controllers and microcircuits contain random numerical sequences, and the processor does not execute the given code. To boot PC it is necessary for the processor to execute the "Reset" command. After it is implemented, the controllers will start executing the specified code, while it will be written to a special storage of volatile memory (ROM). The data that is stored in ROM is transferred to the BIOS, where it is used to control external devices that are connected to the computer.
Hardware initialization is an important procedure that helps the system determine the types of connected devices and check their operation.
Initialization Directions
There are several directions:
- initialization programs and applications all types;
- hard magnetic drives;
- devices and subsystems printing;
- applications and modems on mobile devices.
Where is initialization used
In the following, we will discuss in detail the situations in which this procedure is applied. In fact, there are many more such options and special cases, for example, initialization of the Flash player, router during recording, scanner during connection, monitor driver. But we will consider only the main cases.
Programs
Initializing a program means setting the initial values of variables or resetting these parameters to zero before it is launched on the computer. The parameters for proper operation are often found in special configuration file along with the installation. 
HDD
Initializing a hard drive can include formatting it into a different file system format, creating a partition or volume. It should be noted that this procedure is required for parameter settings new hard drive. This is necessary in situations where the equipment is not displayed in the explorer.
Print Subsystem
Initialization for printing subsystems is necessary in cases where the user needs to print a document on paper. This requires an external printing device - a printer. In order for the process to go smoothly, you need to define initial parameters. The system accesses the device and sends a signal to scan its capabilities. At the end of the procedure, the user is offered a print option that the equipment can perform. 
On the phone
Initialization on the phone, as a rule, is associated with the definition of the parameters of the SIM card, SMS messages and applications. It usually occurs when you first start the mobile system or when installing programs. If the phone displays the message " Please wait, initialization in progress”, which means that the software is being configured. It is also possible when connecting the phone to a modem or router to determine the network settings. 
Download initialization
This procedure is launched when downloading a file from the Internet, for example, through an Internet browser. In this case, packet data is exchanged between the user's computer and the server where the downloaded files are located. Before downloading, the browser initializes and activates the link, allowing the object to be downloaded. Getting to the PC, it analyzed by the system, parameters and conditions for launch and installation are created.
Common initialization errors
Often, users encounter various errors. An initialization error indicates that the synchronization or validation process failed. Next, the main initialization problems for owners of various devices will be discussed in detail.
Error 0x0175dcbb
Occurs when starting the SIMS 3 game, less often in other games. Connected with installing third party mods and with incorrect graphics driver configuration. The solution is to uninstall the extensions and reinstall the driver. 
Print Error: Errors initializing the current printer
Most often found when installing drivers printer via Wi-Fi. When installing the driver at the end of the installation, the "Device initialization" window pops up. The solution is to install the USB driver.
Page initialization error
This problem occurs for users of the operating system Windows Server. It is related to malfunction. secure storage services. Fixing it is quite easy, you just need to restart the service and restart the PC, the problem will be fixed. 
Failed to initialize 3D rendering
This warning is related to incorrect operation driver 3D-accelerator. Applications that use this module simply cannot detect it. The problem is fixed simply by restarting the video card driver in the device manager or reinstalling it. 
Application initialization error 0xc0000005
A similar message, like the previous one, is related to the graphics accelerator. Application during startup makes access to RAM and is denied because access to it is blocked. Access can be blocked both by the operating system itself and by a video adapter configuration error. The way out is to reinstall the driver or restore the system to a state where such a malfunction was not observed. 
SIM card initialization error
This failure occurs among smartphone owners. Some time after starting the smartphone, an error appears - Failure to initialize, or similar. It lies in the fact that the phone does not see the installed card. This may be the result of both a software failure and a hardware failure. To solve the problem, you need to restart the device or insert the card into another slot. 
The problem of loading the operating system is quite common. And it has nothing to do with her ability to work. It also happens that it is not initialized at all (an I / O error), or some other problems arise. In this material, several typical situations and solutions applicable to them will be considered. We will immediately make a reservation that issues related to breakdowns or physical deterioration of the hard drive will not be considered, as well as virus infection.
The hard drive does not initialize: possible problems
The most common situation is related to breakdowns. They will be discussed a little later. But at the moment, you can determine several options for why the hard disk is initialized incorrectly or not detected at all.
Among all that is described on the same Internet, several situations can be noted separately:
- disk failure;
- wrong ;
- disk errors;
- operating system crashes.
The hard drive is not initialized: what to do first?
First, let's look at a common mistake. Let's say there is a situation where the WD hard drive is not initialized. In this case, the system simply "spits". The message that the hard disk is being initialized can only indicate that failures have occurred in the system partition, and this can in no way be connected with the hard drive (or rather, with its state).
To begin with, when the system at boot displays a message stating that the hard disk is not initialized and the OS cannot be loaded, you should check the startup parameters in the BIOS (primary input / output system). It is very likely that when the user receives the message, they will see text indicating that the OS boot device was not found.

Thus, the solution suggests itself the simplest - enable the initial boot from the hard drive (Boot Device Priority - Hard Drive) in the BIOS settings.
System tools
In the event of a download failure, first you need to check the checksums of the CRC entries, which were mentioned above. Such an error is similar to what can sometimes be observed when unpacking incompletely downloaded archives with the WinRAR program.
Basically, the situation is the same. However, when the system boots, if it works, initially you just need to do it with automatic error correction (it is clear that you cannot format the system partition).
If Windows boots from removable media...
The system can also be started from a removable device (either an installed OS or a bootable device). In this case, immediately, without delaying things, you need to check. To do this, you can use both built-in commands and third-party programs.
In the simplest case, when, for example, the second system is located on a virtual disk (in a partition), the check can be performed using the same chkdisk command, specifying the disk label. But, as practice shows, this is usually not even the problem.

If the external hard drive is not initialized, not to mention the built-in one, you will first have to at least check the cable connections. But this, as it turns out, is not the main problem. It is possible that the appropriate drivers are simply not installed for the external device, or they do not work correctly. Or maybe the device itself is simply not turned on.
You can check the operation of external media through the standard "Device Manager", which is called either from the "Control Panel", or by the devmgmt.msc command from the "Run" console, which is available on any Windows system (it can be launched through the regular Start menu).
If the system does not boot: check the status from the command line
To check any type of hard drives, if the system does not want to boot, you can offer the option of booting from a circuit medium using utilities like LiveCD or even a Windows installation distribution kit that has a boot sector that allows you to open boot from external media instead of HDD.

If you use the Windows distribution, during the start process you need to press Alt + F10 or select with the "R" button. Next, on the command line, you need to register sfc / scannow (this is at least for starters). In the extended version, it is worth using the commands to restore the boot record:
- Bootrec.exe /FixMbr.
- Bootrec.exe /FixBoot.
- Bootrec.exe /RebuildBcd.
The last command to apply is optional and is used only to overwrite the boot area (sectors).
recovery programs
As for applications that can restore the operation of Windows systems, it is rather difficult to decide on their use.

At the very least you can recommend bootstrap utilities and then programs like HDD Regenerator. It is believed that it is this application, running in DOS mode, that can perform the so-called remagnetization of the disk, even if the hard disk is not initialized as such.
Data recovery
It is clear that the user does not see the boot sector on the HDD. The section reserved for the start operation, even more so. Maximum - paging file. And this is the main problem. The fact is that this is not even a file, but a reserved place on the hard drive responsible for loading data when there is not enough RAM. If there is a sufficient amount of "RAM", it can be turned off altogether, since accessing RAM is many times faster than the same operation applied to a hard drive.

But you can recover information. To do this, it is enough to use any program that allows you to do this. One of the most powerful is the R.Saver utility. True, it is first advisable to boot in safe mode, or at least try to roll back the system, if possible.
In general, this approach solves quite a few problems, including some errors and boot record failures. If this option does not work either, you will have to format the disk (hard drive). But overwriting the boot sector via the command line is worth taking advantage of.
In addition, it is the system commands that can fix the MBR entry without the use of third-party tools. As a last resort, you will have to use partition formatting. After that, the necessary information can be restored. But only on the condition that the sector was not overwritten, that is, there were no files saved after the data was deleted. Otherwise, nothing good will come of it. Although ... You can try to do something in any case. There will be nothing wrong with that.
What is the result?
To begin with, it is believed that you need to check the disk for errors, if it is detected at all. On the other hand, if initialization is not possible, you will need to use special programs capable of recovering HDD data, moreover, in the boot workspace. But, even booting from removable media, you can solve a lot of problems related to starting the system.

If it comes to the effects of viruses, except for disk programs with the general name Secure Disk, you can’t advise anything. These are available in both Kaspersky Lab and Doctor Web. The bottom line is that they load their own interface even before the system starts, while scanning even RAM, and not just the hard drive (viruses, like any other programs currently running, can upload their files there). Thus, the problem that sometimes the hard disk is not initialized when the system boots up can be related to just such a situation.
One last thing
But as a final tip, it's best to use the check and restore commands from the command line. Although it works in DOS mode, it never fails and allows you to fix even such problems that cannot be fixed by the usual means of the system, no matter how hard you try. As a last resort, if the disk is in the process of being mounted, you can go to the disk management section and use the appropriate initialization command.
04.09.2009 05:49
The easiest way to initialize a hard drive is with the Windows 7 Management Console.
1. Open Control Panel -> Administrative Tools -> Computer Management. (You can also right-click the Computer icon and select context menu choose Control).
2. In the left menu of the Windows 7 Management Console, select .
3. Right-click the mouse to the left of the hard drive you want to initialize. In the context menu that appears, select .

4. In the window that opens, check the box new disk, select Master boot record(MBR), press OK and wait for the initialization process to finish.

Volume creation
After the initialization is complete, you need to create a volume (partition) on the hard disk so that it appears in the Computer folder and that you can use this disk.
1. Right-click on the initialized hard disk and in the context menu that appears, select .

2. In the New Simple Volume Wizard window that opens, click Further and enter the size of the volume in megabytes.
3. In the next window, assign a drive letter so that the drive appears in the Computer folder and click Further.

4. In the next window, select the options for formatting the new volume (partition):

- File system(we recommend NTFS, because it is more resistant to failures and can store files larger than 4 GB, unlike FAT32);
- Cluster size(we recommend the minimum - 512 bytes, because this will allow the system to use disk space more economically);
- volume label– the name of the hard drive under which it will be displayed in the Computer folder;
- Quick Format(we recommend unchecking the box to carry out full formatting at least for the first time);
- Apply folder compression– the parameter is disabled by default (we recommend leaving this feature disabled and not using NTFS compression, as it slows down hard work disk, although it saves space).
5. In the next (last) window of the wizard, check set parameters. At this point, the volume has not yet been created or formatted, so if you want to change something, click Back and make changes. If everything is ok, click Ready to start creating and formatting the volume.