Installing Windows 7 is a simple and streamlined process, but it is far from ideal. Therefore, situations may arise when the installation wizard simply does not see certain computer devices, preventing the user from normally completing the started procedure. And if you have such difficulties, read the contents.
Windows 7 installation does not see USB mouse and keyboard (we solve the problem with BIOS settings)
If your Windows 7 installation does not see a mouse or other input device, the first thing to do is check USB ports into which these peripheral devices are inserted.
Blue ports (USB3.0) can not supported master, and therefore you should at least during installation move the equipment to the gray ports ( USB 2.0
).
In most cases the problem will be resolved. Otherwise, do the following in order: actions inBIOS(later in the article, these actions will be described step by step):
- Disable(Intel) "xHCI Mode » in the tab « Advanced » ;
- Try a different item value "USB Legacy Support" ;
- Reset BIOS.
Check the functionality of your mouse and keyboard after each step, starting from the first. First you need to go into the BIOS. More details on how to login BIOS on different devices (desktop computers or different brands of laptops) you can look in this article: how to enter the BIOS. Restart your computer and at the motherboard logo, enter « Setup Menu » by pressing the key F1 (F2, F12, Delete- depending on BIOS). Now let's get started:
Step 1 – disable (Intel) xHCI Mode
You can find this option in the tab « Advanced » on the menu BIOS.
- Let's go to « Advanced » , navigating with arrows on the keyboard;
- Change the mode to « Disabled » in point « xHCI Mode » ;
 Figure 1. Set xHCI Mode to Disabled.
- Save settings by going to the tab « Exit » and selecting " Exit Saving Changes »;
- We check the mouse and keyboard and try to install the OS again.
- Line « xHCI Mode » absent;
- Execution of item « Action 1» did not give any result.
Step 2 – switch USB Legacy Support mode
Unlike described above, the option «
USB Legacy Support"
available for editing on the vast majority of systems.
It is also located mainly in the tab «
Advanced »
. We need to change the mode of this function to the opposite ( "Enabled" on «
"Disabled"
or vice versa).
 Figure 2. Changing the USB Legacy Support value.
Do not forget save changes in the tab «
Exit
»
by selecting the option " Exit
Saving
Changes
", the computer will restart automatically.
We check our devices by running the Windows installation again. If the peripheral still doesn't work, you should try reset motherboard settings.
Step 3 – reset the BIOS (if the previous steps do not help)
To return the BIOS to factory settings, you must:
- Go to tab « Exit » (usually follows Boot);
- Select the item " Load Setup (Optimal) Defaults » → confirm the action by pressing « Yes " The computer will restart.
Solving a problem when using a PS/2 keyboard and mouse
Failures in these devices occur quite rarely and are mainly associated with BIOS and hardware failures. Before you do the following Necessarily Turn off the computer's power. This precaution is due to the fact that the ports PS/2 It is highly recommended not to touch it while the system is running. If you are using standard PS/2 periphery, you should:
- Check and clean the connector/port of the keyboard and mouse from various types of dirt;
- Try similar USB equipment;
- Swap the mouse and keyboard connectors;
- Update Motherboard BIOS boards up to the latest version.
The computer does not see the bootable USB flash drive and/or other USB devices when installing Windows 7
The solution to this problem is quite simple in most cases. And before you start delving into this chapter, you need to do the following: If the installationWindowsdoes not seeUSBdevicesat all, please contact . It provides some general steps to resolve the most common problems.
Windows 7 Setup Wizard does not see the hard drive (SSD) or asks for drivers
Before you begin performing actions that affect the software, you need to make sure that the drives are working and the computer settings are correct. Note. Next actions are also relevant forSSD. If in the window for selecting a disk to install absent the desired “hard drive” (hard drive), try first:
- Check HDD/SSD cables and mounts;
- Disable extra drives, leaving only the one on which the OS will be installed;
- Switch mode « SATA Mode » With « AHCI » on « IDE » (any other available);
- Turn off computer;
- Enter BIOS (or « Setup Menu » ), by pressing the button F1 (F2, F12, Delete) immediately after turning on the computer at the stage when the logo of your motherboard manufacturer is displayed on the screen;
- Using the arrows, find the item in the menu « Configure SATA as » or « SATA Configuration / Mode » (depending on your BIOS);
- Change mode « AHCI » on « IDE » or « RAID » ;
 Figure 3. Set the value IDE for the Configure SATA as line.
- Save settings by selecting the item « Exit Saving Changes » in the tab « Exit » . The computer will restart with the changed configuration.
- The OS installation still does not see your HDD or SSD;
- Mode « SATA Mode » has already been posted on « IDE » .
Manual installation of HDD or SSD drivers
It is recommended that you move on to this chapter after fully reading the previous one. This will help eliminate unnecessary actions.In most cases, the installation image already contains software for many drive controllers (SATA drivers). However, if the board model of your computer/laptop is quite recent (or, conversely, old), drivers may simply be missing.
Therefore, we need to “specify” them ourselves at the selection stage system disk. The following instructions will describe this process in more detail. Let's get started.
STEP 1 – finding what you need software
.
Download drivers from the website of the manufacturer of your laptop or motherboard. First of all, we focus on files that include one or more examples of words: INF,
SATA,
RAID,
RST.
STEP 2 – unpack and reset to media with the OS image.
Unzip the downloaded file into separate folder→ copy it to any place on installation flash drive.
note that the drivers we need must not contain executable ". exe" files. Will only fit unpacked(such drivers usually include the following folders: amd,
x64
, as well as many .
inf files).
STEP 3 – specify the required software in the disk selection window.
Insert the flash drive into the computer → we reach the disk selection stage for installation. Here you need to find a button(or "Review"
) and click on it.
An explorer will open in which you need to specify the required driver .
 Figure 4. Select the desired folder with driver.
HDD(SSD) will be detected if selected suitable drivers. Now you can continue the process by selecting the appeared SSD drive.
The drivers are installed and the drive is displayed. However, the wizard does not see or does not allow you to select the desired section
In this case try remove markup HDD/SSD directly in the window disk selection. Attention! The following actions lead to formatting drive and, consequently, to complete loss of data. Make sure that all your important files are saved on a separate drive.To do this you need:
- Press the button "Disk Setup" at the disk selection stage;
- "Delete"
all available partitions to begin installation on unallocated space
- Check the integrity of the OS image on the installation disk;
- Re-write the image to another disk at the minimum speed;
- Use flash drive(preferably USB version 2.0) instead of a CD;
- Make sure the drive is working: check the connection, power supply contacts, functionality of the motor and drive.
The above steps will help solve your problem. Otherwise resetBIOS and try a different OS image/build.Also, in extremely rare cases, reinstalling the driver for DVD drive. Detailed information can be found in the “” chapter, and drivers for the drive can be found on the manufacturer’s website.
Conclusion
If none of the above methods help, try looking for the problem in the computer components (on your own or with the help of a specialist).
Every user is certainly faced with the need to reinstall the operating system on their computer or laptop. Recently, it is more rational to carry out such an installation using a regular flash drive, making it bootable.
This installation is fast and reliable, and to create bootable media Now it's easier than ever. But sometimes the user may encounter one problem that prevents him from performing a normal installation of the system - BIOS does not recognize bootable USB flash drive.
When connected to computer device It turns out that the flash drive is simply not detected by it, as if it doesn’t exist. Even after entering the BIOS (UEFI), the user does not detect the drive in Boot Menu. Below we will explain why the PC does not see the boot drive in the BIOS, how to correct the situation and make it visible.
Why is the bootable USB flash drive not visible in the BIOS?
The main reason why bootable flash drive not visible in the BIOS - a discrepancy between the boot modes specified in the BIOS and those supported by the drive itself. Why is this happening? Because modern computers have 2 boot modes: Legacy and UEFI. On older devices there was no such choice. So, only one of these modes is enabled in the device.
If the UEFI mode is set, then the drive on which the system image for Legacy mode is written will not be displayed in the BIOS. Accordingly, you won’t be able to select it as a boot one. In this mode, images for Windows 7 systems are usually recorded. If Windows is installed, then, as a rule, there are no problems.
What to do to make the BIOS see the bootable USB flash drive
2 options for solving the problem.
In a situation where the BIOS does not see the bootable USB flash drive, you can do one of the following two actions:
- In the BIOS you need to disable support for the second mode, which will not be used. After entering the BIOS, go to the Boot tab and simply set the mode you need to the value "Enabled". Sometimes this item is not easy to find. For example, it might look like choosing an operating system. In this case, the proposed options may be:
- Booting Windows 8 or 10 systems for UEFI mode.
- Booting another system (Other OS) also for Legacy mode.


If you are using a bootable USB flash drive designed only to boot in Legacy mode, you must disable Secure Boot in the BIOS. To do this, go to the field "Secure Boot" indicate value "Disabled". On some laptops and PCs, you only need to select Windows 7 to disable Secure Boot.
To see if Secure Boot is enabled on Windows systems 10 or 8, just press the combination Windows + R on your keyboard, and then enter the expression in the line "msinfo32". After pressing "Enter", information about the system installed on your computer will be displayed, where you can find an item displaying the status of your secure boot. 

- Rewrite the data onto the flash drive again, choosing a different boot mode. This option is only possible for new images created recently. If you are recording an image that is a year old or older, it will only support Legacy mode.
If the recorded image is supported for both modes, it is not necessary to change the BIOS settings. It is enough to rewrite the system image. However, please note that for recording Windows images 7 and XP will require mandatory disabling of Secure Boot.
It is very easy to create a bootable USB flash drive in the Rufus program. Before you start recording data, you can choose which boot mode the drive will be written to. The default (for most cases) is MBR mode for UEFI and Legacy. But you can choose MBR with UEFI or GPT with UEFI mode.
Important note! Many users do not understand one important point. For a flash drive to be visible in the BIOS, it must be bootable. That is, it is not enough to simply write an image of a system onto a USB drive and then install the system from it. You just need to create a bootable drive using one of the special programs.
You might be wondering how to use a USB flash drive to increase RAM computer().
Using these tips, you can easily install any operating system on your device using a bootable USB flash drive.
Today I will tell you how to enable booting from a flash drive in the BIOS of various manufacturers. No matter what version you have, the order of body movements will be as follows:
1. We insert our bootable USB flash drive into the USB connector of your computer. I recommend inserting it into the port located directly on motherboard, i.e. from the back system unit.
2. Turn on the computer and press the key Delete(or F2) to get into the BIOS. Depending on the manufacturer and BIOS version, other keys (Esc, F1, Tab) may be used, so you need to carefully read the prompts on the screen.
In Bios, we can only navigate between tabs using the keyboard.
Below I will describe in detail this process using the example of the most used BIOS versions.
Attention! Remember that if you are installing the operating system from a flash drive or CD and have selected the boot device in the BIOS rather than in the boot menu, then after the first automatic reboot of Windows you must enter the BIOS again and return booting from hard drive. If this is not done, autoboot from a flash drive or CD will work again, and Windows will begin the first stage of the procedure again installations.
Setting up Award Bios to boot from a flash drive
Award Bios:
First, let's check if the USB controller is enabled. Let's go to “Integrated Peripherals”. Use the arrow on the keyboard to move down to the “USB Controller” item. Press the “Enter” key and select “Enable” in the window that appears (also using “Enter”). Opposite “USB Controller 2.0” there should also be “Enable”.

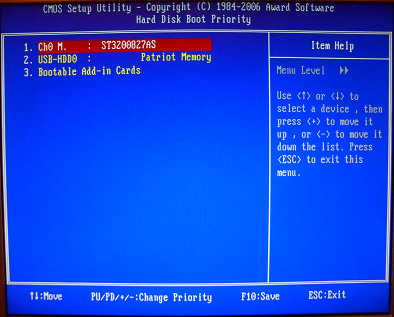
Then we go to “Advanced BIOS Features” – “Hard Disk Boot Priority”.Now in my example the hard drive comes first, but the flash drive should be there.

Setting up AMI Bios to boot from a flash drive
If, after entering Bios, you see such a screen, it means you have AMI Bios:

 Opposite the items “USB Function” and “USB 2.0 Controller” should be “Enabled”.

Then exit this tab by pressing “Esc”.
Let's go to the tab “Boot” – “Hard Disk Drives”.

 It should be like this:
 We leave here via “Esc”.
Select “Boot Device Priority”. Here, the first boot device must be a flash drive.

Then we exit the Bios, saving all the settings made. To do this, go to “Exit” – “Exit & Save Changes” – “OK”.

Setting up Phoenix-Award Bios to boot from a flash drive
If, after entering Bios, you see such a screen, it means you have Phoenix-Award BIOS :
 First, let's check if the USB controller is enabled. Go to the “Peripherals” tab – opposite the “USB Controller” and “USB 2.0 Controller” items there should be “Enabled”.
 Then go to the “Advanced” tab and opposite “First Boot Device” set “USB-HDD”.
 After that, exit the Bios, saving the changes. To do this, go to “Exit” – “Save & Exit Setup” – press the “Y” – “Enter” key
 That's practically everything you need to know in order to boot from a flash drive. In my article, I described the process of setting up the BIOS of the most popular versions: Award And AMI. The third example presents Phoenix-Award Bios, which is much less common.
The described procedure may differ slightly in different BIOS versions. But the main thing is that you understand the principle of setting itself.
By the way, I would also like to add: in order to choose which device to boot your computer from, it is not necessary to change the settings in the BIOS. You can immediately call up a special menu after turning on the computer to select boot devices (this can be done by pressing the F8, F10, F11, F12 or Esc key). In order not to guess with the keys, look carefully at the monitor immediately after turning it on. We need to have time to see an inscription like this: “Press Esc to selest boot device.” In my case, it was necessary to press “Esc”.
It happens that the BIOS does not see the bootable USB flash drive. This can happen on any personal computer with absolutely any operating system, be it Windows XP, "seven" or "eight". What to do if BIOS This is a very popular question among all users. In addition, any owner has encountered such a problem at least once in his life. personal computer or laptop. Some people in such a situation immediately contact service centers. And some even go to the store where they bought the flash drive, indignant and complaining that it doesn’t work.
Of course, it may also be that the whole issue is really a faulty device. But sometimes BOIS does not see the flash drive for a number of other reasons. And even if everything was fine before, the problems that have arisen now can be caused by various malfunctions that simply “accumulated” in the system. Or the flash drive may not have enough power of your system unit. Or... Below are the most popular reasons why problems arise with identifying flash drives and other USB devices, as well as ways to solve these problems.
Why doesn't BIOS recognize removable media?
When you connect a device via a USB port, it is automatically detected, and Device Manager reports that a new device is connected. In some cases, it also asks you to install drivers or updates. But sometimes the BIOS does not see the bootable USB flash drive or cannot synchronize its operation. What to do in this case? There are several most likely causes and solutions to this problem.

USB controller: setup
The BIOS is part of the operating system, which is where problems with a flash drive lie in most cases. Where exactly is the problem? The most obvious reason why the BIOS - USB controller is not working correctly or is simply disabled. How to deal with the problem? Turn it on! To do this, in the Award BIOS section, find the Integrated Peripherals subsection, and then go to the second menu item - Advinced (where there will be advanced BIOS settings). Then we find the USB Configuration category, go into it, press Enter and pay attention to the inscription that appears opposite the USB parameters. Disabled and Enabled may light up there. If the controller is in a disabled state, then you need to turn it on using the pointer buttons. To save the changed settings, be sure to press F10.

If the controller is connected, but the BIOS does not see the flash drive, you can try it on another port of the system unit. This one may be faulty or incorrectly configured, which is preventing it from functioning.
Sometimes none of the ports can detect the flash drive. In this case, the USB controller itself makes sense. This problem especially often occurs after a reinstallation or rollback of the operating system, when some of the necessary data may be lost or the settings are reset to “default”. Therefore, re-downloading all latest versions drivers can solve the problem with the flash drive.
Compatibility issues
The vast majority of modern peripheral devices only support USB version 2.0, which, of course, will not be recognized on computers whose interface is configured for 1.1. In this case, to solve the problem you just need to install the supporting software, which, as a rule, always comes with the device - on the same disk with drivers or separately. Sometimes required applications can be downloaded from the official websites of USB drive manufacturers.

System file INFCACHE.1 - the root of all evil
If you have tried all the above methods, but the problem has not disappeared, then you can try another, but more drastic method. Just remove it from your computer system file INFCACHE.1. You can find it in the WINDOWS root directory, on your hard drive C, or wherever your operating system is installed. The full path to this file looks like this: WINDOWS:system32DriveStore. You can also find it through a search or using If after deleting this file the problem disappeared, then all the problems were related to cache memory corruption. The next time you turn on your computer, the INFCACHE.1 file will be restored by itself.
Is it still a matter of BIOS?
Instructions for setting up this part of the system software will help solve problems with the flash drive in some cases. For example, if, as mentioned above, the problem is a disabled USB controller. Correct setting BIOS is a simple matter, but important. Almost any user can cope with this, even with little experience working with a personal computer.

So, in order to get into the parameters, you need to press the F2 key (in some cases DELETE) at the moment when the BIOS system boots. Next you need to go to the Advanced tab, where you can manage advanced features, select the Integrated Peripherals section and press Enter. By performing these simple manipulations, you can see if the controller is working, as well as other means that affect the functioning of the ports and the automatic detection of connected USB devices.
BIOS does not see other devices connected via the port
If the computer cannot detect not only a flash drive, but also other external media and devices connected via USB (for example, a printer, speakers, camera or phone), then this case requires special and radical measures.

Remove the casing (protective side plates) from the computer. As a rule, they are either bolted to the case or fastened with “latches”, then we connect a flash drive or other device directly to the USB port on the motherboard. In most cases, this may be enough for the BIOS to see the device. But if this does not happen, then you can try installing the appropriate driver package for correct operation and eliminating incompatibility problems. If this doesn’t help, there is still a way out!
Other reasons why the BIOS does not see a flash drive and other USB devices
It often happens that many different devices are connected to the computer, requiring large quantity energy. For example, a scanner or a powerful sound system. And just these two connected devices may be enough to cause a power shortage when connecting even such an economical medium as a flash drive. What can we say about trying to connect a camera to the computer in order to reset or view photos on the big screen. In this case, the BIOS does not see the flash drive (or other device) due to the too low level of electricity that can be spent on this port. In other words, the device may need more energy than a USB connector can provide. As a result, it simply does not have enough power to turn on and function.
In order to eliminate this problem, you need to find out the USB controller of your personal computer. You can clarify this in the "Device Manager" on the "Properties" tab in the "Power" column. USB 2.0 devices typically require 500 mA, while newer 3.0 devices consume 900 mA. Based on this, it can be assumed that sometimes, in order to connect a device, you first need to disconnect one or even several previously connected but currently unused devices. If you charge your phone or player from a computer, and the flash drive is not detected at the same time, then you should try disconnecting the charging cord for a while. In 90% of cases, this will be enough for the BIOS to see the connected device.
Or maybe the flash drive is to blame?
Have you tried everything but nothing helps? Then there is a possibility that the problem is in the device itself. You can read reviews about your flash drive. BIOS may not be the reason why it is not detected if you come across a device with a factory defect, for example. It's also possible that this model requires some special manipulations or the presence of a USB-HUB for correct operation. There can be many options, so you should explore everything existing methods defining the problem.

Conclusion
If you identify a problem due to which the BIOS does not see the flash drive, and its solution is unsuccessful, then, of course, you should contact service center. But before that, simply disable the power management function of the USB controller from the operating system. To do this, go to the “Device Manager”, find the “Universal Serial Bus Controllers” tab, select the “USB Root Hub” subsection and double click Call up the “Power Management” window, uncheck the corresponding box and click “OK” to save the changes. And we repeat this procedure for each USB hub. Perhaps this is what will save you from going to the service center.
Quite often, when working on a computer, it becomes necessary to use a bootable USB flash drive. The average user, as a rule, uses it to install the OS and run any programs from DOS.
Due to the prevalence of bootable flash drives, many users experience problems with them. A frequently encountered difficulty is that . This entails the inaccessibility of its functionality to the user.
You may find it useful:
Hardware faults
The problem of the absence of a bootable flash drive in the BIOS occurs when certain hardware malfunctions of the computer or flash drive occur. When faced with this problem, you need to check:
- Flash drive performance;
- The computer's USB port and card reader or extension cord are in good working order if the flash drive is connected through it.
If the flash drive is equipped with an indicator light, but it does not blink when connected, this may indicate a hardware malfunction. Errors at the hardware level of a flash drive are diagnosed using specialized software (for example, Victoria).
Victoria HDD - great program for diagnosing drive malfunctions
Troubleshooting hardware problems is often difficult to accomplish. In some cases, it is easier, faster and cheaper to simply replace the equipment. If the BIOS does not see the bootable USB flash drive due to hardware faults, it can help:
- Using another flash drive and/or another USB port;
- Connecting a flash drive to a computer directly without using adapters;
- Using the rear panel USB port;
- Connecting the USB port to power if it is not connected to it.
If the above methods for solving the problem do not lead to a positive result, the malfunction is related to software.
Software problems
Due to problems at the software level, most situations arise with the absence of a bootable flash drive in the BIOS. Its software malfunctions almost always arise due to incorrect creation of the bootable USB flash drive.
User inattention during the process of creating a bootable drive, errors in the operating system and BIOS microcode - all this leads to various software problems with the flash drive. In particular, the BIOS does not see the bootable USB flash drive. This problem can be solved in the following ways:
- By re-creating a bootable flash drive with strict adherence to the instructions and/or using special software for this. So, if a bootable USB flash drive is created manually, you need to format it in file system FAT32;
- Eliminating problems with the operating system or BIOS microcode by updating, reinstalling or flashing them;
- By enabling the parameter in the BIOS settings USB controller. To do this, you need to find the “USB Controller” function and move it to the “Enabled” position.
