Most often the function restoring the computer to working condition required if some program was installed and after that the system began to slow down. You should also restore the system to an earlier state if the computer was exposed to virus attack. In most cases, the computer is infected or trashed programs so much so that the recovery operation can only be performed from safe mode. How to boot your computer into safe mode – when you turn on the computer, press F8 and select “safe mode” in the menu that appears.
So, I will briefly describe the recovery procedure in the operating system Windows 7. Click right click mouse on the “computer” icon (desktop) and go to the last item “properties”.In the window that appears, select.

At this stage we need to make sure that your computer is enabled data recovery on drive C. If the function is enabled, proceed further by clicking on the “Recovery” button.

The System Restore window will appear. Here I recommend selecting “Select a different restore point.”

And here you are already estimating the approximate date when the computer began to slow down. Here, opposite the dates, it will be indicated which programs were installed, which will also greatly help you when choosing operational state of the system. Be sure to check the box "show others" restore points" to display all recorded restore points.
Restoring the system to a working state

The next window is for informational purposes, check the selected date and click on the “Finish” button. Next, we confirm the start of the recovery operation.


We smoke for a few minutes, drink coffee, and don’t touch anything. After the system reboots, you will see a success message. system recovery. If you are still not satisfied with the state of your computer, try rolling back the system to an earlier date. Let me remind you that this action does not affect your files, such as photos, videos, etc. Restoration only affects system files, Windows programs and registry.
For advanced users, there is a more reliable and interesting option for creating a Windows backup and restoring the system, which requires the ability to work from under the BIOS.
Friends, I have long promised my regular readers to write an article about system recovery. Many of us have already encountered this situation more than once when we install some program, make some operating system settings, accidentally delete service files and do much more, which ultimately leads to incorrect and unstable functioning of the OS.
Will I tell you today? What needs to be done to return the operating system to working condition.
Friends, do not forget that there are no hopeless situations.
The algorithm discussed below will be useful to everyone. There are no people who don’t make mistakes and always do everything right. As wise people say: “Only those who do nothing make no mistakes.” But you should also be able to correct mistakes.
And for everyone who wants to find out, if necessary, cancel recent actions on the computer, I wrote a detailed algorithm.
Recovery checkpoint
So, Friends, a recovery checkpoint is a copy of the operating system service files, program settings, as well as the system registry at a certain point in time.
The operating system, as a rule, creates recovery checkpoints automatically at certain intervals in case of installing any software or as directed by the user.
It should be noted that when “rolling back” to the operating system restore point, the user’s personal files, such as music tracks, graphic files, documents, etc., are not affected.
Attention! Returning to a restore point allows you to restore the operating system, but not the user's personal content.
1. Click on the “Start” button at the bottom right of the screen and select “Control Panel”. The main Control Panel window of the Windows 7 operating system will open:
2. Click on the very first section “System and Security” and in the window that opens, select the subsection “Restore the computer to a previous state”.

3. In the window that appears, click on the “Run system recovery” button.

4. The system will collect the necessary information and launch the System Restore Wizard. In the first window that appears, you just need to click the “Next” button.

5. Next, the second Wizard window will open, where you need to select a restore point from the list provided. If you have just made some settings and want to cancel them, then select the topmost entry indicated. You can also select any recovery point entry that suits you.

You can also run “Search for affected programs” by clicking on the corresponding button. The operating system will scan its service records, determine which programs will be deleted or restored during a rollback to a restore point, and present the analysis results in a separate window. After reviewing the lists of affected programs, click the “Close” button.
![]()
7. A warning window will appear on the screen that it will be impossible to interrupt the system recovery. And once again they will ask you to confirm your intentions by clicking the “Yes” button.

After this, the system recovery process will begin. Which usually takes a little time - about 2-3 minutes. After which the system will reboot and you will see this window:

Your computer has been restored to the specified state. Now you can check the operation of the OS and other programs to ensure they are working correctly. Be sure to test the result of the system restore.
If the operating system was unable to restore the system, then the window will be different. This often happens when an antivirus program is running. Disable it and try again.

If you were able to successfully solve the “” problem, then I congratulate you. But in some cases, restoring the system did not lead to an improvement in the situation, but rather to its deterioration. The system began to freeze, some programs would not load at all, desktop icons disappeared, etc. In this case, it is best to cancel System Restore.
To do this, we carry out the entire algorithm, starting from point 1. When you complete step 3, the following window will open:

Select “Cancel system restore” and then follow the algorithm presented above.
So, Friends, we looked at a rather important question: “how to restore the system?”, We learned how to “roll back” the system to restore points and cancel “rollbacks”.
It should be noted that restoring the system in the specified way possible, but only if there was no serious damage to system files, for example, as if the system was infected with a virus. In case of serious malfunctions of the OS, this tool is ineffective and you cannot avoid resorting to one of the advanced methods of system recovery.
In one of the following articles, I will talk about just such a tool - an emergency recovery disk.
Hello, dear readers of the Internet Business blog! Restoring your computer system may be necessary if you see the following failures:
- the operating system runs at a snail's pace,
- programs freeze
- the menu opens by itself and disappears,
- Windows displays numerous error messages while running,
- The computer makes strange noises from time to time.
There is something to be upset about! If this happens, you will want to return to the time when the computer worked well. Do you think time can't be turned back? Believe me, it's possible! The wonderful tool Windows 7 will act as a time machine System Restore.
How to restore the system? Every day Windows 7 remembers vitally important parameters The OS saves them, creating a restore point. When serious failures occur on a computer, its normal operation can be returned from a restore point, that is, transported to a prosperous past that was saved by the system.
It is important to know that when you access a recovery point, your documents are not deleted by the recovery system. But programs that were installed after the restore point was created will be lost and will need to be downloaded again. You can cancel System Restore and use another restore point.
How to restore your computer system
Click on the button Start, select All programs. Go to section Standard, open submenu Service, select menu System Recovery s, after which a dialog box will appear.

You can use another way: Start ==> Control Panel ==> Recovery ==> Running System Restore. The same dialog box will open.

2. Select a restore point.
The following commands are available in the computer system recovery program:
Cancel system restore. This command is needed in case you are not satisfied with the result of the restore; it appears only after using the restore point.
Recommended system recovery. Use the suggested restore point, this is the best chance to fix the situation with your computer. As a result, the installed Latest updates, drivers or software, since they could cause failures.

Show other restore points. This command is always available; after selecting it, a list will open from which you can select any recovery point by creation date.

You can test how these settings affect your computer. To do this, click on the button Find affected programs, and you will receive a list of those programs that will be affected by the selected option.

3. Check again that all open files are saved and click on the button Further, then Ready.
After a short pause, the computer will reboot and work normally. Even if there are no crashes on your computer, I advise you to create your own restore point. Give it a descriptive name, for example “Before the doctor was needed” and you can easily find the desired restore point by name.
Creating a restore point
1. In the menu Start click on the folder Computer right click and select command Properties.

A dialog box will open on the screen System, which displays all the most important functions of the computer.


A dialog box will appear Properties of the system.
3. Click on the button Create in the tab System protection.

In the dialog box System protection Enter a name for the new restore point.

Save the restore point by clicking on the button Create. By creating a restore point in advance, you will always be able to choose the state to which it is best to return in the event of a system failure.
If you discover that your computer is infected with viruses, before you disinfect it with an antivirus program, delete all existing restore points. They may contain viruses!
Removing recovery points infected with viruses
In the dialog box Properties of the system you need to click on the disk C (System), then on the button Will set up b.

In the dialog box System protection click on the buttons Delete ==> Continue ==> OK. Close the window and start removing viruses.
After you have disinfected your computer, create a new restore point. Name it accordingly, for example, “After disinfection.”
Restoring your computer system is a simple but very important task. Windows support 7 in working order. When you know the functions of your computer well, it is no secret to you how to restore the system; you do not need to look for a specialist or knowledgeable friends. You can handle this task perfectly on your own!
Good luck and see you on the pages of the Internet Business blog!
I would really appreciate it if you use these buttons! Thank you!“System Restore restores the state of your computer’s system files to a previous point in time. This allows you to undo changes made to your computer system without affecting your personal files.
Sometimes, as a result of installing a program or driver, unexpected changes occur in your computer or unexpected behavior occurs in Windows. Usually, uninstalling the program or driver will fix the problem.
Restoring Windows 7 and 8
In the last article we looked at how to make a Windows restore point. Now we will learn how to restore the Windows system from this point. If you have not yet read the previous article, I advise you to do so.
We all, sooner or later, install some unknown crap on our computer, and at our own peril and risk. Without thinking about the consequences, we install various programs on our PC in order to test their “wonderful” ability to do something incredible (as we are assured before downloading the program).
Restoring and restoring Windows 8 to its original state
Before the release of the Windows 8 operating system, returning a computer to its original state was neither easy nor quick. But now, with the help of new features, this can be done in minutes. I can’t even believe it, right? However, this is one of the better opportunities Windows 8.
At work, I have to constantly test various programs, so my computer needs regular maintenance.
Windows 7 System Restore
Most often, the function of restoring the computer to a working state is required if some program was installed and after that the system began to slow down. You should also restore the system to an earlier state if the computer was subject to a virus attack. In most cases, the computer is infected or littered with programs so much that the recovery operation can only be performed from safe mode.
System Restore in Windows 7
Hello, I have already written an article about how to enable system restore and how to create a restore point. Now is the time to write about how to perform a system restore in Windows 7. To put it simply, now I will write about how to perform a system rollback.
If you have some kind of problem with your computer, for example, it has become very glitchy, or even worse, it won’t start at all, then the first thing you need to do is to try a system rollback, thereby we will return the settings and system files from the backup that was created for example two days ago, when the computer was still working normally.
Almost every laptop (except for completely old models) has a hidden system recovery. Under no circumstances should the folder called “Recovery” be deleted.
It stores important information about your system.
Instructions
To reset your computer, go to the Start menu and look for Add or Remove Programs. Click on the shortcut and wait until the list appears in a new window installed programs. Select the one you want and click “Change”. After this, the program installation wizard will open and prompt you to select the action you need to perform. Select “Restore” and wait for the process to complete. But this option is not always suitable, since the selected program may be completely removed from the computer.
The most successful way may be to roll back the system to the previous value. To perform it, you also need to go to the “Toolbar” from the “Start” menu and select “System Settings”. Click on the appropriate icon and click the button labeled “Run System Restore.” After which a new window will open, on the right side of which the following text will be written: “To begin, select the task you need to complete.” Check the option “Restore your computer to an earlier state” and click “Next”. Then, in the calendar on the next page, select the day in bold, and in the window on the right, select a restore point. Click the “Next” button again and wait for the system rollback process to complete. After this, the computer will restart and offer to save the settings you have made.
Please note that changes to all previously saved documents will not be affected by a system rollback. This way they will remain the same. So you don’t have to worry about their safety.
If the "Toolbar" is not displayed in classic look, and by category, to restore the system, you will need to select the “Performance and Maintenance” section, then select the “System Settings” item. It is indicated by a wrench icon. Next, you should follow the steps described in the first paragraph.
Another way to roll back the system can be implemented through “Start”, in the menu of which in the section you will need to find “All programs” and then go to the “Standard” folder. Find “System Tools” in it and select “System Restore”.
Sources:
- how to restore computer settings
It happens that in the hope of improving the performance of a device, for example, a video card, you update the driver for it. But instead of the expected result, you get even slower graphics performance. In this case, it is most convenient not to install old driver, and roll back the update.
Instructions
Open the Start menu. Right-click on the Computer icon. In the drop-down menu, click on “Properties”. The “Systems” window will open in front of you.
Select the device whose driver you want to roll back. Right-click on it and select the "Properties" menu item. Go to the "Driver" tab and click the "restored" button.
If after rolling back the driver the system functionality is not restored, then click the “Delete” button. Then install the old driver again.
If reinstalling the driver did not solve the problem, then restore the system to the date when everything worked properly.
The world-famous multimedia player iPod is constantly being improved by Apple programmers. Almost every year new firmware for this player is released, which increases the functionality and also adds new features to this player. But for each user, a certain version of the firmware looks different: one person likes the new features, while another may not like these features. Apple's update system allows you not only to update the firmware version, but also to return it to the previous one.

You will need
- iTunes software, iPod player.
Instructions
When updating, you may encounter the appearance of new functions that may not suit you; to roll back the new firmware, you need the iTunes program, preferably the version that was produced for the first time. Uninstall this program, and after rebooting, install the recently downloaded version.
If an error appears indicating that there is a violation in the integrity of the iTunes Library.itl file, open the folder C:\Documents and Settings\User\My Documents\My\iTunes (for Windows XP) or C:\Users\User\Music\iTunes (For Windows Vista) in Explorer. Then rename it to iTunes Library_old.itl file
Upload old version firmware or find it on your hard drive. Start your iPod in DFU mode. Connect it to your computer, then launch iTunes. Press and hold 2 keys (Home key and Power key) until the device is completely turned off. One second after the player turns off, press the player's power button and keep the Home button pressed.
After some time, iTunes will detect your player, but the player screen will not light up. You can now release the Home button. This operation is required, otherwise the player will simply turn on. In the program, select the “Recovery” mode. Hold down the Shift key, then specify the location of the firmware. After performing a firmware recovery, all data from the player’s media will be erased.
Video on the topic
Sources:
- how to install firmware on samsung
Almost every person knows that equipment tends to fail, and it’s the same with computers - over time, they can break down or work unstably, causing constant freezes or crashes. Often the solution to this problem lies in resetting your settings; you need to go to the factory settings.

You will need
- Computer, knowledge of the basics of working with a motherboard.
Instructions
Often, a computer malfunction occurs when you don't expect it. Return to allows you to return your computer to stable operation. As a rule, more than 50% of failures occur due to shift system settings motherboard, the so-called values. When the processor is set to extremely high values, it starts to heat up. When the temperature reaches its limit, the user personal computer also notices system malfunctions.
To avoid the motherboard from working properly after malfunctions occur, you must return the BIOS to default settings. This can be done without opening the system unit. To do this, you need to turn on the computer or restart it if it was turned on. When loading the BIOS, press the Delete key on your keyboard.
In the opened BIOS menu Find the menu line Load Bios Default, then press the F10 key (save and exit BIOS). In the dialog box that opens, you will see a request to perform the selected action, press the Y key. After the computer restarts, the BIOS will return to the settings.
If for some reason this cannot be done, you can use other methods, for example, removing the battery from the motherboard - this will allow you to return to the default settings. You may need a "+" screwdriver for this.
Turn off the power to the system unit and turn its back side towards you. Use a screwdriver to remove several screws to remove the side cover.
Find a small battery (it looks like a tablet) and pick it up with any sharp object. After removing the battery, wait a few seconds (at least 5-7 seconds), then put it back in its place. All that remains is to put the side cover of the system unit in its place and screw in the screws.
Sources:
- return laptop to factory condition
Game developers have their own concept for releasing games: initially, a basic version of the game is created and released, and then various patches are created as gamers use it. If you have installed a patch for the game World of Warcraft and do not know how to return the previous version (the add-on did not suit you), use the advice described below.

You will need
- Installed on a computer World game of Warcraft.
Instructions
During installation, most of the files inside the game folder are replaced with copies. By default, many games create directories that contain source files. Of course, you can try to simply install it again from the original disk, but this creates a chance that the saved recordings will not work.
To restore the necessary files, you need to use the special Repair program, which is included in the distribution of any Blizzard product. But for it to work correctly, you need to prepare absolutely all the game files. Copy them from the C:Program FilesWorld of Warcraft folder to any other directory (this is done just in case, for recovery).
Return to the original directory with the game, select all folders except the Data directory. Please note that you need to delete the folders, but the files that go below the directories do not need to be touched.
After that, open the Data folder and delete 2 files from it: patch.MPQ and patch-2.MPQ. These files are nothing more than a newly installed patch. Then open the realmist.wtf file (located in the C:Program FilesWorld of WarcraftData folder
uru) using any text editor and clear its contents. Enter the following sentence: set realmlist eu.logon.worldofwarcraft.com. Don't forget to save the file when closing by clicking "Yes" in the dialog box that appears.
In the main game folder, find and double-click the Repair.exe file. When the message Cannot connect to the server to appears, run the file again. In the Blizzard Repair window that opens, check the 3 boxes next to the existing items and click the Reset and Check files button. After the message Blizzard Repair has successfully repaired World of Warcraft appears, close the utility window.
Now launch the game and check its version. If you wish, you can install another version on top of this one.
The operating system that the computer runs on determines the time and date using its own clock. If the computer is connected to the Internet, then from time to time one of the OS components contacts the time server to “check the clocks” and make the necessary adjustments to its own system time. However, this only compares seconds, not hours or dates, so the user can mislead the internal “watchmaker” and manually set the desired day and hour.

Instructions
To make today yesterday for a computer, you need to “rewind” its system time by a day. This can be done from the panel BIOS settings when you next boot the computer, and from the operating system itself. The second method is much more convenient, so try starting changing the system time with it. In Windows OS, left-click on the digital clock in the lower right corner of the screen - in the notification area of the taskbar. This is the action in latest versions systems - Windows 7 and Vista - opens a window with an analog clock and calendar.
Click on the inscription “Change date and time settings” - it is placed under the calendar and clock and is intended to access the system clock settings you need.
On the “Date and Time” tab (it opens by default) look for the desired button It won’t take long - it says “Change date and time.” Click this button and another window will open in which the calendar and clock are duplicated, but this time their readings can be changed.
In the calendar, click on yesterday's date, and you can complete the operation. If you need to change the time, do it in the window under the analog clock. Then click OK in both this window and the next.
In earlier versions of Windows, the procedure is slightly different. In Windows XP, double-click the digital clock in the tray and immediately after that you can begin changing the date and time - these settings without additional intermediate windows.
There is another way to open a component with date and time settings, which is equally applicable to different Windows versions. It consists of “manually” calling the required OS component by file name. Press the Win + R key combination, enter the name of the file timedate.cpl and click on the OK button.
Sources:
- how to return a computer to the store
After installing new hardware or software, your computer may become unstable. To correct this situation, Windows has a built-in option to restore the system to an earlier state.

Instructions
To run System Restore, you will need administrator rights. From the Start menu, select All Programs, then Accessories, System Tools, and System Restore. Select the required action: restore the system or create a restore point. To continue, click “Next”. If you choose to restore, mark the date closest to the date when the system started to malfunction.
Open the program launch window using the Win+R combination or click “Run” in the “Start” menu. Enter the command %SystemRoot%system32
estore
strui.exe. The System Restore window will open. This code can also be written into the address bar of any folder on your computer.
There is another way to find System Restore using command line. Enter the msconfig command and go to the “Tools” tab. In the list of tasks, find “System Restore” and click “Run”.
From the Start menu, select Help and Support. Type "System Restore" into the search box. In the “Select a task” list, find the item you need.
You can start system recovery by selecting the appropriate boot option. After turning on the computer, press F8 and in the menu that appears, use the Up and Down keys to select “Load last known known configuration.” Select the desired date from those proposed by the system.
To set recovery options, in the “Control Panel” click on the “System” icon and in the properties window go to the “System Restore” tab. The properties window can be called differently. Right-click on the computer icon and check the “Properties” option.
Return to mobile phone initial settings can be made at any time. Only in this case it is necessary to take into account that in this case the user will lose all previously set parameters - from calls to changes in the call log and a number of other settings.
A rollback point, or restore point, is a saved state of the system for a specific date. Rollback points can be created manually by the user and automatically by the system on a weekly basis or before a configuration change, such as installing a driver or program. In this case, only the state of system files is recorded. Documents created by the user (text files, photos, videos, music) are not saved.
How to create a rollback point
This feature must be enabled in order for restore points to be created. Right-click on the “My Computer” icon, select “Properties” and go to the “System Restore” tab. Uncheck the box next to “Turn off System Restore.”
If Windows XP is installed on your computer, to manually create a restore point, press the Win key and in the “Programs” group, go to the “Accessories” section, then “System Tools” and select the “System Restore” program. Check “Create a restore point” and follow the instructions.
It is imperative to take into account that the allotted space should be enough for the operating system image, as well as all previously installed computer programs. Based on this, the minimum volume should be at least 3.5 gigabytes. Of course, ideally, about 40 gigabytes should be allocated for the Security Zone. This amount of memory is due to the fact that here it will be possible to save not only the system image itself, but also archives with documents and other important files created using Acronis True Image. In this case, nothing will be lost if Windows crashes. It is worth noting that Acronis Secure Zone is a hidden section, and therefore will not be visible in Windows Explorer. Once the size is determined, click the “Next” button.
Be sure to check the “Activate Startup Recovery” checkbox. Using this option, if the system cannot be booted, you can still restore Windows. To continue, click “Next”.
After this, Acronis True Image will offer the user a list of intended operations. To continue, click “Proceed.” Within a few minutes you will observe the functioning of the program. After this, we can assume that the Security Zone for storing the system image has been created, the “Startup Recovery” option has been activated, all that remains is to work on creating the system partition. To do this, in the Acronis True Image window, click on the “Create archive” task.
Since you will need to create a system image for copying, check “The entire hard drive or individual partitions on it” and click “Next”. In the proposed list of partitions, select the system one on which Windows is located, and click “Next” to continue. Then you need to select a location to store the backup image - Acronis Secure Zone, mark it in the list and continue by clicking “Next”.
To back up a partition for the first time, you need to select “Create a full archive.” In subsequent cases, it will be possible to add changed folders and files to it, creating incremental archives. But at the same time, you need to remember that errors, glitches, and viruses inevitably appear on your computer during operation. In this regard, restoring a system containing viruses and errors makes no sense. But there is still a way out in this situation: it is recommended to create an archive immediately after installing Windows and configuring all the necessary parameters. Then, the state of the operating system will be almost ideal.
While working at a computer, you can create other images and periodically update them with incremental archives. As a result, the user will always have two types of system partition - a state close to ideal and a current state. When you have decided on the archiving mode, click “Next” again. Then select “Use default settings.” If necessary, you can enter a comment. This is not a mandatory procedure, but it is thanks to this that in the future the user will be able to distinguish one image from another without any problems. Afterwards, click “Next”.
This completes the preparatory procedures for creating the archive. To start the process Reserve copy you need to click the “Proceed” button.
If a system image is created in advance in the Acronis Secure Zone, then restoring an incorrectly functioning Windows will not be difficult. Let's say that the operating system has stopped loading. Then, when you try to boot, the message “Press F11 for Acronis Startup Recovery Manager...” will be displayed; when you see it, you can press F11 without hesitation. This button will launch the Acronis True Image bootloader and begin recovery. When offered download options, you will need to select “Acronis True Image (full version)”, and then wait a couple of seconds for the program to download. In the window that appears, select “Recover data”. After launching the Data Recovery Wizard, click “Next”.
Afterwards, select the archive to restore. You will need an image of the system partition that was previously saved in the Acronis Secure Zone, click “Next”. After this, you need to note what exactly you want to restore: and “Next” again. After that, select the partition to be restored and “Next”. Then select the partition to which the system image will be restored. It will be necessary to replace partition C: with a non-working Windows system with partition C: with a working system taken from the Acronis archive. To do this, mark “NTFS(C:)” and click “Next”. After, select the partition type and select “Active” for the system partition. Then you will need to set the size for the partition to be restored. At this point, you can skip making changes and click “Next”. After that, assign a partition letter. For system, select “C:”. You can also configure Acronis True Image to scan recovered files and archives. If you are currently restoring one partition, then when the program asks about restoring others, select the answer “No, I don’t want” and finally click “Next”. Then it is recommended to carefully check the recovery options and click on “Proceed”. Over the next few minutes, you will watch the progress of this operation.
After the system partition recovery process is completed, a message will appear indicating that the data was successfully recovered. Next, click the cross in the upper right corner to close the Acronis True Image window. As you can understand, this program is quite easy to work with, and its advantages are quite significant. After all, if there is an archival Windows image There will be no need to reinstall the system.
In order to avoid data loss, just follow a few simple rules:
- At certain intervals, make backup copies of important information or create images of system partitions.
- Use reliable protection against viruses and hacker attacks. Regularly update your antivirus and correctly configured firewall. It is also strongly recommended to do a full scan of your computer for viruses.
- Install updates that can fix critical problems in programs.
- Even if Windows is stable, you still need to create restore checkpoints.
- To experiment with different programs, it is recommended to use a virtual computer. It can be created in programs such as Virtual Box or VMware Workstation.
Most often the function restoring the computer to working condition required if some program was installed and after that the system began to slow down. You should also restore the system to an earlier state if the computer was exposed to virus attack. In most cases, the computer is infected or trashed programs so much so that the recovery operation can only be performed from safe mode. How to boot your computer into safe mode– when you turn on the computer, press F8 and select “safe mode” in the menu that appears.
So, I will briefly describe the recovery procedure in the operating system Windows 7. Right-click on the “computer” icon (desktop) and go to the last item “properties”. In the window that appears, select.
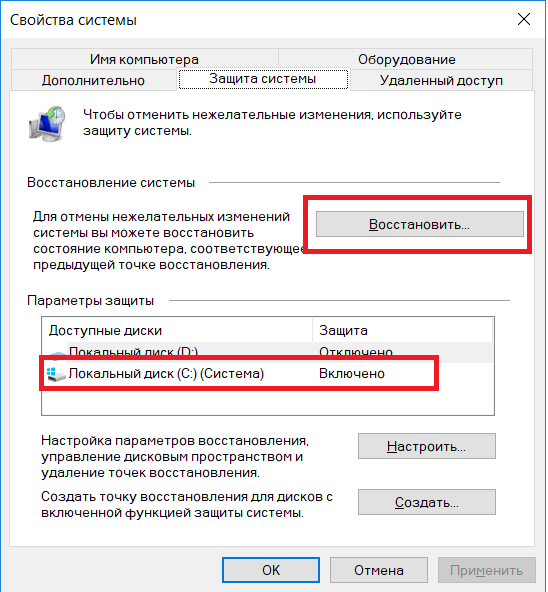
At this stage we need to make sure that your computer is enabled data recovery on drive C. If the function is enabled, proceed further by clicking on the “Recovery” button.

The System Restore window will appear. Here I recommend selecting “Select a different restore point.”

And here you are already estimating the approximate date when the computer began to slow down. Here, opposite the dates, it will be indicated which programs were installed, which will also greatly help you when choosing operational state of the system. Be sure to check the box "show others" restore points" to display all recorded restore points.
Restoring the system to a working state

The next window is for informational purposes, check the selected date and click on the “Finish” button. Next, we confirm the start of the recovery operation.


We smoke for a few minutes, drink coffee, and don’t touch anything. After the system reboots, you will see a success message. system recovery. If you are still not satisfied with the state of your computer, try rolling back the system to an earlier date. Let me remind you that this action does not affect your files, such as photos, videos, etc. The restore only affects Windows system files, programs, and the registry.
For advanced users, there is a more reliable and interesting option for creating backup copy Windows and system recovery, which requires the ability to work from within the BIOS.
Very often a situation arises when a computer or laptop begins to work unstably after installing a particular program, or after being infected with a virus. In this case, a function that will return the computer’s state to a few days ago will be very useful, thereby undoing unwanted changes to the system. This Windows OS feature is called System Restore. We will tell you how it works and how to use it in this article.
Restoring Windows to a previous state
This option is really very useful. You can always use it after the computer becomes unstable after making certain changes, such as, for example, installing a program or updating a driver.
But there are two conditions that must be met to successfully use Windows System Restore:
- The recovery option itself must be activated;
- There must be a restore point with a rollback date that suits you.
In order to check whether the recovery option is activated on your computer, you need to do the following:
Right-click on the “Computer” icon on the desktop or in the “Start” menu and select “Properties” from the menu that opens.

System protection
In the window that opens, opposite drive C should be “Enabled”. This means that recovery is system disk activated.
Checking the activation of the recovery function
As already written above, the second point is to have a restore point, the date of which suits you. Well, let's say you want to roll back to the state of the computer that was yesterday, and the closest point is only a week ago. In this case, you must understand that if you use this restore point, then everything that has happened to the computer over the last week (installation of programs, configuration of services) will be canceled.
To view the list of available recovery points, you need to click the “Restore” button in the same “System Protection” window.
If there is a “Display all restore points” checkbox at the bottom, then you need to check it.
If there is a point in this list that suits you by date, then to restore the computer to this date you need to select the point in the list with a single left click of the mouse and click “Next”, agreeing with all the suggestions of the recovery specialist.

Selecting a restore point
After this, the computer will restart and return to those few days ago.