By default, the Control Center app automatically applies the color and quality settings that best suit your video. You can view and adjust these settings using the following pages in the Video group.
- Color - Contains options for enabling preset video settings and controlling the color quality of video images.
- Quality - Contains options for sharpening, smoothing, and enhancing the quality of video images. This page also contains settings for configuring video playback on multiple displays (theater mode).
Depending on your system configuration and whether your computer is running on battery power, some video features may need to be enabled before use. If necessary, these functions can be enabled on the page Video > Overall video quality.
Switchable graphics systems
If your computer supports switchable graphics and you use the GPU selection method to assign applications to specific GPUs, two versions of the Color , Quality and Overall video quality, which allows you to configure both GPUs:
- High performance graphics adapters- Use this version of the page to configure video settings for the AMD discrete GPU.
- Energy efficient graphics adapters- Use this version of the page to configure video settings for the integrated AMD GPU.
The specified video settings and basic video color settings are applied to both GPUs.
On the page Video > Overall video playback quality contains options to enable video playback features and change video settings. The options on this page are divided into two categories:
- Video when running on battery/- Contains options to enable or disable playback enhancement features.
- Video playback- Contains options to enable smooth video playback and apply video playback quality settings on the web and third-party video players.
Enable/Disable Video Enhancement Features
The video enhancement features on a laptop are disabled by default, regardless of whether it is running on battery or AC power. Thus, standard video playback quality and performance are provided against the backdrop of a balanced/optimized power saving mode. Thanks to the choice of options Override system power policies, the user can configure the system so that the video enhancement features are always used regardless of the power source and the selected Windows® power plan.
On some laptops, video enhancement features are disabled only when switching to battery power. To continue using the video enhancement features even when on battery power, select the appropriate options Video on battery.
Note: The availability of these options depends on the type of system you are using.
Video enhancement features provide optimized video playback and performance, but may increase power consumption.
- Go to page Video > Overall video quality.
- In area Video on battery/Override system power policies enable or disable the following options:
- Allow all functions that improve video playback- Ensures that all video processing features, including AMD Steady Video, are always available, even when the system is running on battery power. Selecting this option may improve video playback quality, but at the expense of power consumption.
- Only allow AMD Steady Video- Uses AMD Steady Video (if available) to stabilize shaky video playback, but disables all other video enhancement features to save battery. Select this option to balance image stability with power consumption.
- Click the Apply button.
The video playback quality changes according to the selected options.
Enabling Smooth Playback and Adjusting Video Quality
If you experience tearing in the image due to dropped frames, use the video playback settings on the page to ensure smooth video playback. Video > Overall video quality.
These settings can also be used to apply the video settings currently configured in the Control Center application to third-party video players and video streaming from the Internet. By default, only some video settings are enabled (video post-processing settings are disabled until changed).
- Go to page Video > Overall video quality.For some systems, there may be two versions of these pages; select the page corresponding to the GPU you want to configure.
- In area Video playback respectively enable or disable the following settings:
Tip: For faster access to this area in the expanded view, click Video playback in Group Video > Overall video quality.
- Force smooth video playback- Provides smooth video playback without dropped frames.
- Apply current video quality settings to internet video- Applies all video settings currently set in the Control Center application to Internet video.
- Enable AMD Video Quality menu features for supported video playback applications- Enables video quality features for all supported applications, improving the quality of video playback on third-party video players. This setting is not available if the default video quality feature is enabled for all supported applications.
- Click the Apply button.
Video color options
Page Video > Color contains settings for adjusting the color quality of video images. The settings on the page are grouped into two areas.
- Video base color- Contains AMD video presets and settings for adjusting video color levels.
- Optional video color- Contains settings for fine-tuning the color levels of video images.
Tip: For faster access to these areas in the expanded view, click Video base color or Optional video color in the respective group Video > Color.
Note: The settings apply only to applications that support hardware acceleration. The availability of some options depends on the characteristics of the particular system.
Using video player options
When you play videos on your system, you can configure them to use only those color settings that are controlled through the video player. When using video player settings, the base video color settings on the page Video >Color are ignored.
- Go to page Video > Color
- In area Video base color select Use video player options.
Video base color in Group Video > Color.
- Click the Apply button.
The color of the video is adjusted according to the color settings of the video player. The base color options on the page become inactive.
Selecting preset video settings
The Control Center application has a number of preset settings for adjusting the brightness, contrast, saturation, hue, and gamma of your video. Each preset setting contains a predefined combination of parameters designed for use in specific conditions. You can adjust the current video settings by selecting a preset setting, using application-specific settings, or by creating your own combination of settings.
For laptops with switchable graphics that provide both integrated and discrete graphics processing unit (GPU) configuration options, changes to the specified video settings apply to both GPUs.
- Go to page Video > Color.
- In area Video base color select Use AMD Settings.
Tip: For faster access to this area in the expanded view, click Video base color in Group Video > Color.
- Select Use AMD Settings, then select the appropriate preset video setting.
- Standard - Use the color settings for standard video viewing.
- Intense - Use color settings designed for brighter, higher contrast video images.
- Theater - Use color settings designed for home theater.
- Vivid - Use color settings designed for brighter video images.
- Custom- Use custom color options. Selecting this option will make other basic video color settings available for configuration on the page.
- Click the Apply button.
Changing Basic Color Options
Basic color options include brightness, contrast, saturation, and hue. Use these options to adjust color levels in video playback.
Note: The settings apply only to applications that support hardware acceleration.
For notebooks that support switchable graphics, which provide the ability to configure the integrated and discrete graphics processing units (GPUs) at the same time, basic color settings apply to both processors. Therefore, these parameters are not displayed on the page. Video > Color for discrete (high performance) GPUs.
- Go to page Video > Color.There may be two versions of these pages for some laptops; select the page corresponding to the GPU you want to configure.
- In area Basic color options select Use AMD Settings.
Tip: For faster access to this area in the expanded view, click Basic color options in Group Video > Color.
- Select Use AMD Settings and adjust the following settings accordingly.
- Brightness - Brightness is the overall intensity or lightness of an image.
- Contrast - Contrast is the difference between the brightest and darkest parts of an image.
- Saturation - Saturation is the intensity of the color in an image.
- Hue - Hue determines the red, green, and blue components of an image.
Note: Some video formats do not support these settings.
The preset video setting option is automatically selected Custom.
- Click the Apply button.
Change advanced video color options
Use advanced video color options to further customize the color quality of video images. With these adjustments, you can remove excess red from skin tones, brighten whites, and fine-tune other color levels to improve the quality of video images.
Note: This page is not available on all systems. The availability of some options depends on the characteristics of the particular system.
- Go to page Video > Color.For some laptops there may be two versions of these pages; select the page corresponding to the GPU you want to configure.
- Make sure that in the page area Video base color chosen Use AMD Settings.
- In area Optional video color adjust the following settings accordingly.
Tip: For faster access to this area in the expanded view, click Optional video color in Group Video > Color.
- Vibrant Color - Controls the saturation of colors.
- Color Management- Controls the saturation of colors. Use the Gain sliders to control the brightness of each color, and the Hue sliders to more closely match each color to its adjacent colors on the color wheel.
- Flesh Tone Correction- Eliminates excess red in skin tones.
- Raise brightness of whites- Raises the blue value for brighter whites in video playback.
- Dynamic Range- Controls the video brightness range. A wider range provides more detail.
- Video Gamma - Controls the overall intensity of colors.
- Click the Apply button.
Video Quality Options
Page Video > Quality contains settings for adjusting video image quality. The settings on this page are grouped into two areas:
- Video Quality - Contains options for sharpening and noise reduction in videos.
- Video demo mode- Contains options to showcase the AMD video enhancement features available for the graphics card.
Note: The settings apply only to applications that support hardware acceleration. The availability of some options depends on the characteristics of the particular system.
Changing video quality settings
To improve sharpness and reduce distortion and noise in your video, use the settings in the Video Quality area of the page. Video >Quality. Video quality settings require application support and only apply when supported by your video player and GPU/graphics card.
Note: To ensure that the settings are applied correctly, use the vector, motion, or adaptive direction deinterlacing mode and ensure that the screen resolution is ≤ 2560×1600.
- Go to page Video > Quality.There may be two versions of these pages for some laptops; select the page corresponding to the GPU you want to configure.
- In the Video Quality area, enable and configure the following settings. You can set preferences by moving the slider or by selecting a value from the list box. Tip: For quicker access to this area in Advanced View, click Video Quality in the Video Quality group Video > Quality.
- Sharpening- Controls the overall sharpness of the image.
- Noise Reduction - Eliminates excess noise from images.
- Blocking suppression- Smoothens images and reduces torn edges in video that has been overcompressed.
- High Frequency Noise Reduction- Eliminates motion blur in videos that have been overcompressed.
- Blurring the contours- Allows you to smooth the display of banding in equal contrast color spaces.
- Enable Dynamic Contrast- Automatically adjusts video gamma and contrast levels to improve image quality. This feature is especially useful for enhancing color clarity and clarity in overly bright or faded images.
- Enable Noise Reduction for Scaled Compression- Automatically reduces noise in scaled video compression.
- Smooth movement- Reduces motion noise and provides smoother, smoother movement of objects by increasing the number of frames when displaying video content.
- Click the Apply button.
Configuring Deinterlacing and Frame Change Detection Options
By configuring deinterlacing and frame change detection settings on the page Video > Quality, you can enhance the contrast and quality of video converted from film.
Deinterlacing allows you to create a sharp image from two interlaced fields of a video image. Frame change detection provides automatic compensation when playing movies transferred from film to video.
Note: The settings only affect applications that support hardware acceleration.
- Go to page Video > Quality.There may be two versions of these pages for some laptops; select the page corresponding to the GPU you want to configure.
- In the Video Quality area, do one of the following:
Tip: For quicker access to this area in the expanded view, click Video Quality in the Video Quality group. Video > Quality.
- To automatically use the deinterlacing mode that best suits your videos, select Use automatic deinterlacing.
- To use a specific deinterlacing mode, select the appropriate mode using the slider:
- Horizontal instability- Without applying the deinterlacing function.
- Bob - Removes every second video line; recommended for movies.
- Adaptive - Takes into account the amount of motion in the video image. In this case, a filter is applied to the moving block, and the effect of horizontal instability is applied to the remaining blocks.
- Subject to motion- Adopts advanced motion detection technology.
- Vector adaptive transformation- Provides smoother and less jagged edges in interlaced video playback.
- Given the direction- Provides smoother edges for horizontal lines in interlaced video.
- To enable frame change detection to improve video quality, enable Frame change detection.For example, frame detection can be used to convert a movie with a frame rate of 24 fps to a video recording of 30 fps. to view in NTSC mode.
- Click the Apply button.
Setting the video display mode
Use area Video demo mode On the page Video > Quality to demonstrate the benefits of the video options available in the Control Center app. When demo mode is enabled, all video enhancement features supported by your graphics card are enabled. In addition, a window appears that compares the playback video with and without enhancement features.
Note: These settings are only supported by certain graphics cards.
- Go to page Video > Quality.There may be two versions of these pages for some laptops; select the page corresponding to the GPU you want to configure.
- In area Video demo mode enable or disable as needed Enable demo mode.
Tip: For faster access to this area in the expanded view, click Video demo mode in Group Video > Quality.
If the video demo mode is enabled, select one of the following options:
- Full screen mode (improvements disabled)- The demo window shows video playback with enhancements disabled.
- Full screen mode (improvements included)- The demo window shows video playback with enhancements enabled.
- Split screen mode- In the demo window, the video plays at the same time with the enhancement features enabled and disabled. To enable AMD Steady Video Simultaneous Demo, you must first select this option. The availability of this setting depends on the characteristics of specific graphics cards.
- Click the Apply button.
Demo mode is automatically disabled each time you restart your computer or log in.
AMD Steady Video
AMD Steady Video is a technology designed to stabilize shaky video playback. Home videos shot with handheld cameras and other devices may be unstable. AMD Steady Video processes video as it plays and can remove unwanted motion for a more stable image. The AMD Steady Video page contains settings to stabilize the playback of shaky videos. It also provides settings for the AMD Steady Video feature demonstration and indication of its use.
If the computer is running battery, you may need to enable the AMD Steady Video feature in the battery status options on the Video > Overall video quality.
Note: The settings apply only to applications that support hardware acceleration. The availability of some options depends on the characteristics of the particular system.
Enable/Disable AMD Steady Video
Enabling AMD Steady Video support may help reduce video shaking in handheld video recordings. When AMD Steady Video is enabled, you can customize the amount of image processing applied to videos.
Note: AMD Steady Video settings affect both AMD CPU and AMD graphics. Only select AMD graphics cards are supported. The AMD Steady Video feature uses AMD technology to balance video processing workloads between the CPU and graphics card.
- Go to page Video > AMD Steady Video.
- Enable or disable the feature Enable AMD Steady Video.
- Click the Apply button.
AMD Steady Video support is enabled or disabled as appropriate.
Note: If your computer is running on battery power, you may need to enable the AMD Steady Video feature in the battery health options on the Video > Overall video quality.
If AMD Steady Video is enabled, you can change the amount of stabilization applied to videos.
You can also show or hide the AMD Stabilization logo during video playback. You can also choose to use the simultaneous playback configuration in the video demo mode.
Setting stabilization power, video delay and zoom settings
When AMD Steady Video is enabled, you can control the amount of image compensation applied to shaky video recordings. AMD Steady Video Options in Standard View allows you to select preset AMD Steady Video options, consisting of specific values for stabilization power, video delay, and scaling. You can also use a custom combination of values specified in the advanced view.
For better control of these values, use the AMD Steady Video options in Advanced View instead.
- Open page Video > AMD Steady Video in standard or extended representation, depending on the type of adjustments needed.
- Make sure AMD Steady Video support is enabled.
- Do one of the following:
- Standard View - Use the Total Power slider to select the desired set parameter AMD Steady Video or custom setting. Increasing the setting value can provide more stable video.
- Advanced View - Adjust the following settings as needed. You can move the slider to adjust the setting, or you can select a value from the list box.
- Power - Controls the amount of stabilization applied to videos. A larger value of the parameter provides more stable video recordings. A lower parameter value will result in the fewest side effects.
- Video Delay - Controls the number of frames to delay video recording. A larger value of the parameter provides more stable video, but may cause video and audio outputs to be out of sync.
- Scaling- Controls the amount of scaling. AMD Steady Video compensates for jittery edges by zooming into the center of the video. A higher zoom level can improve the quality of the stabilized video.
- Click the Apply button.
The amount of compensation applied to movies varies depending on the option selected.
Configuring AMD Steady Video Demo and Indicator Settings
If AMD Steady Video is enabled, you can choose to compare raw video and video stabilized with AMD Steady Video at the same time.
Note: These options are available only for systems that support AMD Steady Video.
- Go to page Video > AMD Steady Video.
- Make sure AMD Steady Video is enabled.
- Do any of the following:
- To demonstrate the benefits of AMD Steady Video in the video demo mode, select Display video on adjacent displays in demo mode and make sure the option is also selected Split screen mode in the page area Video demo mode.When this option is selected, the screen will display a side-by-side comparison of raw video and video stabilized with the AMD Steady Video feature.
- To display the AMD Stabilization logo for video enhanced with AMD Steady Video, select Show indicator if compensation function is active.If this option is selected, the logo is temporarily displayed in the lower right corner of the video.
- Click the Apply button.
Fast Video Conversion
If Windows system® 7 is equipped with a video converter that automatically converts video files when they are dragged into a portable media player, a video card can be used to speed up the conversion process.
Note: This acceleration feature is only available if you selected the drag and drop transcoding software component during the AMD software and driver installation.
In this article, I will clearly show you how to set up a video card for maximum performance in games. This article is for those who have updated their drivers to the latest version with a modified interface.
To enter the video card driver control panel, you need to click on the desktop right click mouse and select "Radeon Settings".

In the window that appears, select the "Games" tab.

Then select "Global Options". When choosing global options, we set the settings for all installed games that you have.

In the global parameters, set the settings exactly the same as in the picture below.
1. Anti-aliasing mode: use application settings
2. Smoothing method: multiple sampling
3. Morphological filtering: off
4. Anisotropic filtering mode: use application settings
5. Texture Filtering Quality: Performance
6. Surface Format Optimization: Off
7. Wait for vertical update: off
8. Opengl Triple Buffering: On
9. Shader Cache: Off
10. Tessellation mode: use app settings
11. Energy efficiency: off
12. Frame rate control: off

Thanks to these settings, the FPS in games will be stable, and the game will be much more comfortable.
Standard AMD drivers include a utility to help you unlock the full potential of your powerful graphics accelerator. Up to driver version 15.11.1 inclusive, this was AMD Catalyst Control Center. Its latest version was developed 4 years ago and now it can be used for graphics accelerators up to and including the R9 280/290 series. Official support this program has been discontinued.
Video cards released before 2015 do not have the functionality implemented in the latest video accelerators, so it makes no sense to install the latest drivers on computers with such video cards. They may not be installed with the old video card, and also contain functionality that is not supported by the old hardware, which will take over the computing resource. The new AMD utility that replaced it has approximately the same functionality, so it is easy to master if you know how to handle the good old Catalyst.
Why do you need a special utility for video cards
This software is designed for fine work mode adjustments video accelerator, which launches itself by the ccc.exe system process. Managing such parameters:
- general performance indicators;
- desktop appearance and screen settings;
- setting the required performance during normal operation and during video file processing;
- setting up sharing of several video accelerators in CrossFire mode;
- fine tuning of values for optimal gaming performance;
- setting power consumption parameters;
- keeping AMD utility programs up to date, as well as informing the user about company news;
- providing information about the version in use software and hardware features of the video card;
- video core frequency control;
- selection and setting of parameters of monitors connected to different outputs.
Video adapters released on the 28nm process before 2015 and now without problems suitable for any modern games. Their only drawback is significantly higher power consumption at maximum load than modern video cards.
To ensure a quality gaming experience and optimally adjust power consumption, Catalyst serves. In addition, it will adjust the distorted color reproduction of the monitor, problems with contrast and brightness indicators.
Where can I download and how to install CATALYST
Although Catalyst is no longer supported, AMD has a page http://support.amd.com/en-us/kb-articles/Pages/latest-catalyst-windows-beta.aspx# , with download links for Catalyst version 15.201. 1151.1010:
Unfortunately, as of early June 2018, these links don't work. When they are activated, a window appears containing a message about problems loading the file: 
But, as you know, the seeker will find. Download latest version Catalyst Control Center for Windows 7, 8, 10 is available from other sites, for example:
When downloading, you must correctly choose version corresponding to your operating system. In this case, you also need to pay attention to its bit depth (32 or 64 bit). The distribution kit for the 64-bit version of the system takes up 308 megabytes of space.
The installation of the utility is carried out together with the driver package and is intuitive. When you double-click on the downloaded file (most often called ati catalyst install manager), a window will appear prompting you to select the path for unpacking the driver and utility files, you can leave it as it is: 
Then in the pop-up window you need to click next and select the item quick installation:
You will also need to agree to license terms:
After that, you need to restart your computer and you can use the program: 
The whole process can be seen on the video:
Launching and configuring the utility
The interface of the program is very simple, but it is still necessary to consider it in more detail.
First, a window appears prompting you to configure playback quality video files: 
When you go to the video quality tab can be configured sharpening, noise reduction, blocking, and deinterlacing: 
For powerful video cards such as Radeon R9 280/290, all settings can be set to the maximum. But if you are using a laptop or a weak video card, then it is better not to use the proposed improvements, as the computer may start to slow down a lot.
The program interface has many options that need to be considered in more detail.
Menu home page
contains links and addresses of AMD, its support team and twitter: 
Allows you to create and assign specific keyboard shortcuts to presets: 
Desktop contains several submenus that allow you to control display options that are related to a monitor or multiple monitors. You can control multiple displays connected to your computer: 
Conveniently Organized change access desktop resolution, color, refresh rate and rotation.
It is possible to calibrate the color gamut of the monitor, adjust the brightness and contrast settings: 
Opportunity Access screen rotation designed in visual style: 
The commands in the video section allow you to adjust the video quality parameters: 
Available on the games tab: 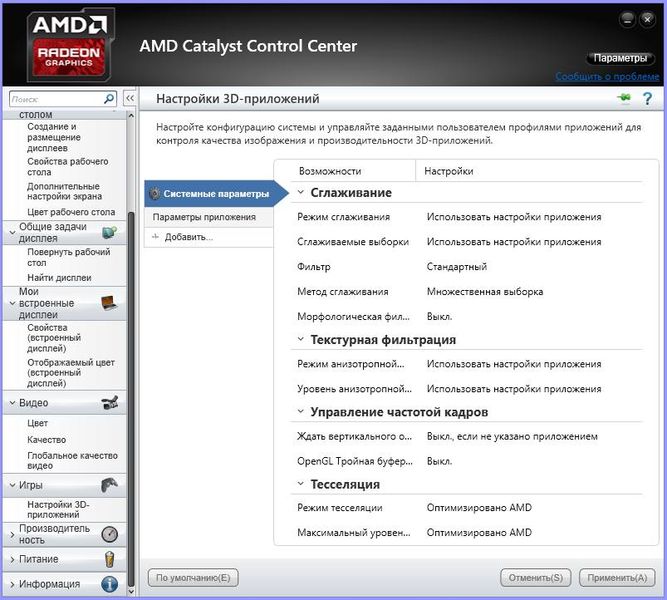
The information section shows information about the installed drivers: 
Submenu hardware devices shows the detailed features of the video adapter: 
You can also see full settings on video:
How to configure CATALYST to speed up your work
You can speed up the performance of the video subsystem in the video tabs and 3D applications. In addition, it is necessary to offload the processor and reduce the use random access memory, by disabling automatic execution of unnecessary services.
Speed up performance while watching a video You can if you set to a minimum all the relevant options. In addition, you can reduce the resolution, lower the screen refresh rate on the desktop properties tab: 
The global video quality submenu contains the forced smooth video playback item, from which you need to deselect: 
The color submenu does not affect performance, you can adjust the color scheme to your liking: 
Important is submenu quality on the video tab: 
Here you also need to deselect all items to reduce the load on the video system. Deinterlacing can be left in automatic mode, and if possible, disabled.
At availability of items"accelerated video conversion" or "enable hardware acceleration" they must be enabled in order to activate the hardware blocks of the video processor.
Game mode optimization in CATALYST
A significant increase in performance in games can be obtained by disabling all options that load the video core. In the submenu " Smoothing» Turn off all types of anti-aliasing or leave the choice to the applications themselves. Filtering is left standard, and the smoothing method is switched to multiple sampling: 
In the submenu texture filtering disable anisotropic filtering, reduce texture filtering to a minimum, or switch to performance. Surface Format Enhancement is also disabled when this submenu is present. In the frame rate submenu, turn off vertical refresh and triple buffering.
IN tessellation submenu All items must be set to optimized.
Overclocking system performance produced in the performance tab. Drivers containing Catalyst have built-in Over Drive technology, which makes it possible to overclock the video system using the capabilities inherent in the driver. IN mobile devices its installation is not provided. A netbook with an AMD graphics card has limited overclocking capabilities: 
When using a discrete graphics card on a desktop computer, you may experience additional options, which are used to adjust the quality and performance for a specific user. The general rule, if you want to increase performance, is to disable everything unnecessary. Also, if you have an AMD OverDrive menu, you can try increase the frequency GPU, memory, power consumption limit, adjust the fan speed. But at the same time, the risk of damaging the video card increases. This tab looks like this: 
Power tab opens access to the power consumption mode adjustment: 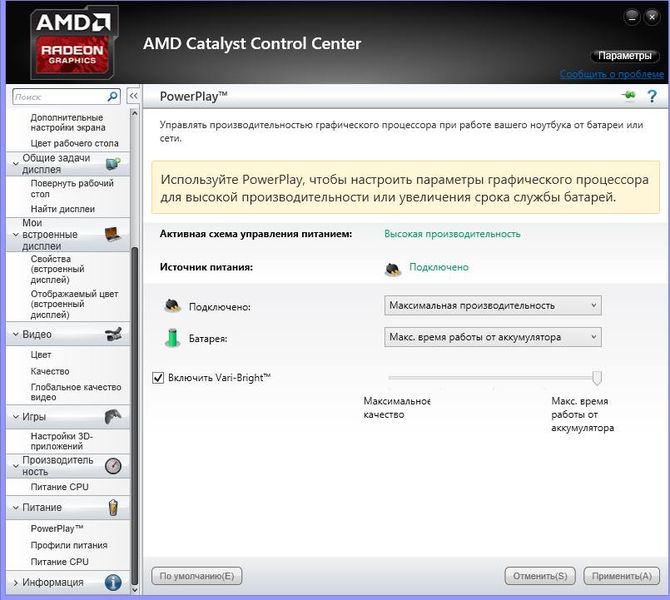
In the submenu nutrition profiles You can change the idle display timeout, sleep time, and brightness: 
How to Update AMD Drivers
The software update tab allows you to update your AMD software: 
When you click this button, a pop-up window appears, allowing you to select a new set to install: 
Since support for the Catalyst by AMD has been discontinued, the download page will take you to general information
Online. To get updates, click download now: 
The resulting package is installed in the same way as during the initial installation. The update will replace the Catalyst program with a new package from AMD Radeon Crimson Edition with a similar interface: 
This software package is designed for AMD video cards released in the last few years. The menu is simpler and clearer. Utility now contains access to games, video playback, Relive capabilities, monitor settings, and displays system features. The purpose of the tabs is similar to the AMD Catalyst Control Center. Through the video menu, you can adjust the color display values, the brightness value, and the contrast values.
Relive needed when recording video files, for example, while playing a game.
In the display submenu, you can change the desktop resolution, colors, scale the image.
The system tab allows you to see which driver is being used, frequency indicators, kernel information, and detailed technical parameters of the computer.
Uninstalling the CATALYST software package
Uninstalling the entire AMD driver package is best done using special utility amdcleanuputility to clean the system from AMD. Regular uninstaller operating system does not completely remove drivers and utilities, so crashes may occur later. The utility is located by default in the folder with installed drivers along the path C:\ProgramFiles\Amd\CIM\Bin64. It is also available on the AMD website: https://support.amd.com/en-us/kb-articles/Pages/AMD-Clean-Uninstall-Utility.aspx 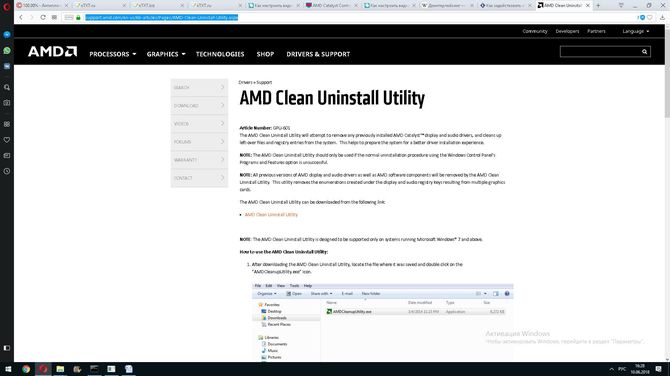
To uninstall the entire AMD software package, click on the cleanup program icon, resulting in the following warning: 
This useful tool myself will uninstall and then prompts you to reboot.
As a result of various failures, sometimes the catalyst Control Center does not start, the tray icon disappears, usually located in the system tray. To restore it, you need reinstall AMD driver package. Before this, it is desirable to perform a complete cleaning of the system from the failed AMD programs.
Using the proven software package Catalyst is still appropriate on computers released before 2014. Use does not require special qualifications and fully reveals the capabilities of the computer.
AMD releases not only a wide range of video cards for different price categories, but also provides a complete set of software that allows you to configure their equipment for various purposes. This list includes drivers, control panels, game applications, and more. In this article, you will learn how to set up your graphics card for AMD Radeon gaming using various utilities and programs.
Setting methods
Let's look at each of the methods for tuning and improving the performance of a video card in the form of step-by-step guides. The instructions will follow:
- for updating drivers;
- configuration through the proprietary control panel;
- setting in ;
- in-game optimizations.
Each of the methods allows you to achieve an increase in performance in various computer games.
Drivers
The first reason why modern games will slow down even on a powerful video card is outdated drivers. You can update them and speed up the video card in this way through:
- AMD official site.
- Standard Windows application.
You can download the package from the official site. To do this, open the http://www.amd.com/ru resource and go to the "Drivers and Support" section. In the "Manual driver selection" column, select your video card model, operating system version and download the archive.
Before installing a new driver, be sure to uninstall the old one. To do this, open Device Manager. You can do it like this:
- Right-click on the "Computer" icon and select "Properties".
- Next, go to the "Device Manager" section.
- In the "Video adapters" branch, find your video card and right-click on it. In the properties, you can find the characteristics of the AMD Radeon graphics card and driver settings.
- Click on the "Uninstall driver" button. After removal, the screen resolution may be reduced.
Now let's start installing new version drivers. Unpack the downloaded archive to any folder on your hard drive and run the installer. During the installation process, the display may flicker and disappear for a few seconds. Once the process is complete, be sure to restart your computer.

This is how you can speed up the graphics card in modern games, because with the release of almost every major project, AMD releases new versions of the driver with optimizations and fixes for previous errors.
You can also install the driver using standard means operating system:
- Go to "Device Manager".
- Right-click on your graphics card and select "Properties" from the menu.
- In the second properties tab, click on "Update driver".
- Next, select the automatic way to search for updates and wait for the procedure to end.
- The system itself will find new versions of the software and offer to install.
AMD Catalyst Control Center
This utility is an analogue of the control panel from Nvidia. It is automatically installed with the driver package from the official website, so we recommend that you use the first method to update the software. Via standard search Windows drivers won't install the control panel for you.
Standard setting
To open the application and configure the AMD Radeon graphics card for gaming, you need to right-click on the desktop and go to the AMD Catalyst Control Center. In the window that opens, click on the "Settings" button. Here you can select extended or standard view. If you are an advanced user, you can adjust each parameter and characteristic of the video card separately using the advanced options. However, we do not recommend that you experiment in this section without knowing what settings this or that parameter is responsible for.
Select the "Standard View" item and open the "Games" section. Next, go to the "Performance in games" subsection. Setting the AMD Radeon graphics card for games is presented in the form of visual sliders with a choice of graphics quality. Set parameters will change the picture in the game regardless of the internal settings. So you can achieve high performance on weak video cards or, conversely, improve the picture on more powerful systems.

In the first tab, you select anti-aliasing options between disabled, 2X, 4X, and so on. The picture will show the changes in graphics quality. The next step is to adjust the smoothing method. To get more FPS in the game, move the slider towards the “Performance” position.
The third point is anisotropic filtering. Here you need to uncheck the box next to "Use application settings". After that, the video card will ignore the game and set its own settings. This is where the options in the standard view end.
Detailed setting
Click "Options" again and now select "Advanced View". The AMD Radeon graphics settings software allows you to set the parameters that will be used in all launched games.
Now you need to open the "Games" subsection on the left side of the window. Here you can choose different modes and options. You also have the ability to set anti-aliasing, filtering and frame rate settings for each game separately. This feature allows you to achieve maximum performance in different applications. This utility allows you to configure AMD Radeon on Windows 7, 8 and 10 without any problems.

Using Gaming Evolved
AMD also has a separate application that is similar to Nvidia GeForce Experience. Its main task is to collect information about installed games and optimize them for the power of your personal computer.
In the list of all found games, you will see everything that is installed on the PC. If a game has not been added, it can be added manually. The application also collects statistics on played hours and so on.

In the table you will see the current graphics settings that are set by the game itself, and in the next column a list of the optimal picture quality settings, at which you will achieve the maximum balance between performance and a beautiful image.
Using a separate slider, you can choose settings aimed at performance, quality, or a compromise between the two extremes. The principle of operation of the application is the same as in the case of the AMD Catalyst Control Center.

Do not change the graphics card settings in advanced settings without proper knowledge. Otherwise, you will have to restore all default values or reinstall the driver again.
Always keep an eye out for new driver versions. All new projects suffer from poor optimization after release, so GPU manufacturer software can help in this matter.
Conclusion
Now you know how to set up an AMD Radeon graphics card for gaming so that your computer outputs maximum amount frames per second without a significant reduction in graphics quality. The methods described in the article will be relevant for weak computers, where every frame counts.
If during the battle the FPS on the laptop is always too low, we suggest doing the following:
I. Make sure the computer is compatible with system requirements.
II. Set a high performance energy plan.
III. Disable all performance slowing systems and Internet programs.
IV. Check how many video cards are installed in the laptop.
V. Switch the video card to discrete.
Va. Instructions for Nvidia video cards.
Vb. Instructions for AMD video cards.
VI. If all else fails, create a support ticket.
I. First, make sure your laptop is compliant.
II. High performance energy plan.
1. Click "Start".
2. Go to "Control Panel" > "System and Security".
3. Select Power Options.
4. Set "High Performance". If necessary, adjust the brightness of the monitor, as the brightness may change when switching performance.
III. Disable all performance slowing systems and Internet programs
Antiviruses (in extreme cases), clients for downloading files (for example: uTorrent, Download Master, Zona, FlashGet and others), programs that provide text and voice communication (for example: Skype, ICQ), close the browser and others, unnecessary applications. Especially in this situation, it is worth highlighting the antivirus, since during the game it checks various files and this loads the system to a certain extent.
IV. In order to find out the number of video cards on your laptop, follow these steps:
1. Click the Start button, enter the word “device” (without quotes) in the search bar, and select “Device Manager” from the list of results.


The presence of two display adapters in the list means that your laptop supports switching between video cards.
If there is only one display adapter in the list, most often, the laptop does not support such switching.
V. Switching video cards
So, we have determined that the laptop meets the system requirements of the game, can switch between video cards, and has a properly configured power plan. Now you need to properly configure the video card for the game, since, most likely, the laptop automatically uses the built-in Intel graphics card and this causes a drop in FPS. To use a discrete graphics card, follow these instructions:
Va. Control PanelNvidia. For video cardsNvidiaGeForce
If your system has a video cardAMDRadeon or onlyIntel, then go to section Vb.
Make sure your laptop has the latest drivers for the Nvidia GeForce graphics card. To install / update drivers, the manufacturer recommends using the GeForce Experience program, which monitors the release of a new driver for your video card and automatically updates it. After installing the driver through the GeForce Experience program, be sure to restart your computer.
Nvidia GeForce video cards are configured through the Nvidia Control Panel.
To open this panel, right-click on the desktop, select "NVIDIA Control Panel" in the drop-down window.

1. In the control panel, go to the "Manage 3D Settings" tab. In the global settings, set the Nvidia processor as preferred and click "Apply".

2. Go to the tab " Software settings". In the first paragraph, click Add, then Browse. Find the file Castle.exe (located in the folder with the installed game PrimeWorld\Castle\Castle.exe) and PW_Game.exe (located in the folder with the installed game PrimeWorld\PvP\Bin\PW_Game. exe), then click "Add Selected Program".
In the second item in the drop-down menu, select "High performance Nvidia processor".

Important! After adding Castle.exe, don't forget to click "Apply", then add PW_Game.exe and click "Apply" as well.
Restart your computer and launch the game. If you do not notice an increase in the FPS value or it is not significant, then follow these steps:
Launch the Nvidia Control Panel. Go to the "Adjust Image Settings with Preview" tab, select "Custom Settings Focusing on:" and drag the slider all the way to the left so that "Performance" appears. Click "Apply", restart your computer and launch the game.

Vb. ATI Catalyst Control Center. Forgraphics cardsAMD Radeon
If your system only has a video cardintel, then go to section VI.
Before starting the settings, make sure that your laptop has the latest drivers for the AMD Radeon video card installed. To install\update drivers, download the utility to determine the most suitable drivers for your system AMD Driver Autodetect from AMD official site. The utility does not need to be installed - just run it and it will automatically offer to download the necessary driver. Be sure to restart your computer after installing the driver.
To change video card switching options in the ATI Catalyst Control Center, follow these steps.
1. Click the Start button and in the search field enter the text CCC (in the English layout), then from the list of results select CCC - Advanced (Advanced options):
2. From the Catalyst Control Center menu, select Switchable Graphics.
3. Select Browse to find the executable file for the application you want to customize. In our case, these are the executable files Castle.exe (located in the folder with the installed game PrimeWorld\Castle\Castle.exe) and PW_Game.exe (located in the folder with the installed game PrimeWorld\PvP\Bin\PW_Game.exe).
The changes you make will be applied immediately. Restart your computer and launch the game.
Don't forget to finish your work unnecessary programs at the time of game launch.
If, after following the suggested instructions, the FPS level does not change, then switch the game to windowed mode and lower the graphics settings to the minimum.
VI. If the instructions did not help increase FPS
Create a support ticket by immediately attaching the file and detailed description problems (under what conditions does a drawdown usually occur, does the sound freeze along with the picture, and so on). Also indicate which instructions you have already followed.