A shared folder in Windows 7 is one of the system directories that can be accessed by several user accounts, both locally and over the network. Most often, shared folders are used for sharing files, since everything that is placed inside them becomes available to all users who have rights to connect to this folder.
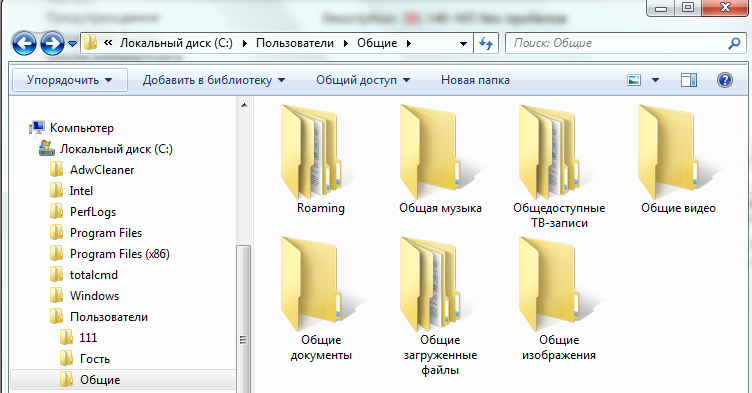
By default, only one folder is created as a public folder in Windows 7 - C:UsersPublic (System drive >> Users directory >> General). Inside it there are thematic subdirectories: “General Music”, “General Documents”, “General Downloaded Files”, “TV Recordings”, “Images”, “Videos”, etc., as well as folders created by users and programs.
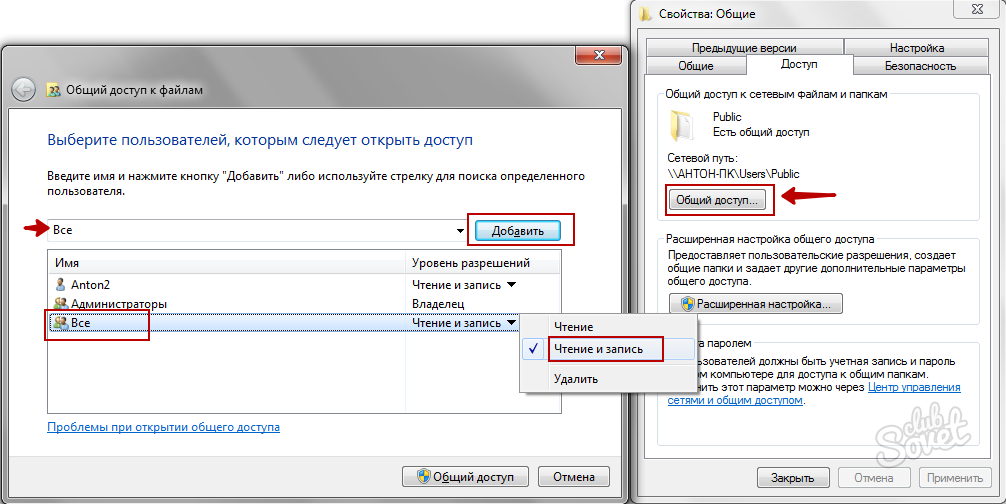
Equal rights to access shared folder have all accounts on this computer. You can verify this by expanding its properties and going to the “Access” tab. At the top of the window, where it is mentioned general access to network resources (files and folders), it says “Shared access available” and the button of the same name is active.

Clicking on this button opens a window with a list of accounts and groups. Among them there is a group “Everyone” with rights to read and write to this folder.

The owner, the Administrators group of this computer, can edit the list of users (delete and add) and change their permission level - read only or read and write.
Opening access to shared folders over the network
In addition to “Public” on Windows 7, you can open public access to any other folder. But in order for users from the network to connect to it, you need to enable the appropriate permissions for them.
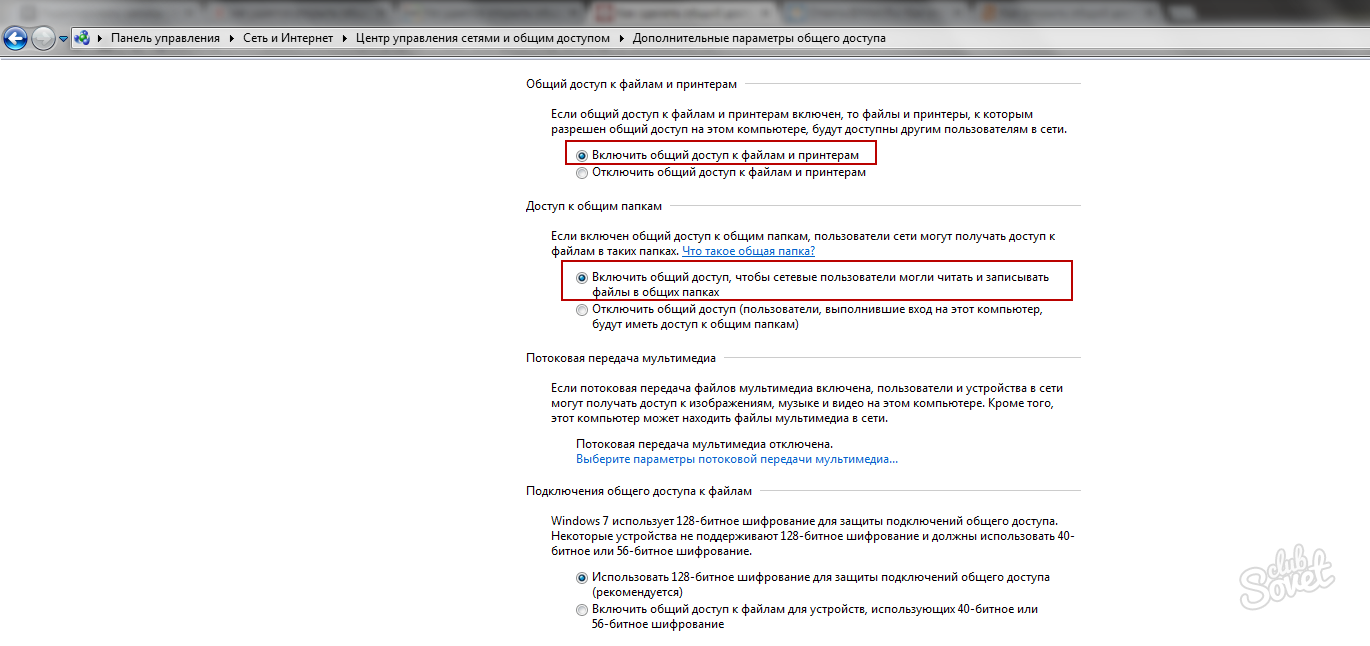
- From the control panel, as well as context menu network icon in the tray, go to “Network and Sharing Center”. Click “Edit additional” in the transition bar. sharing settings."
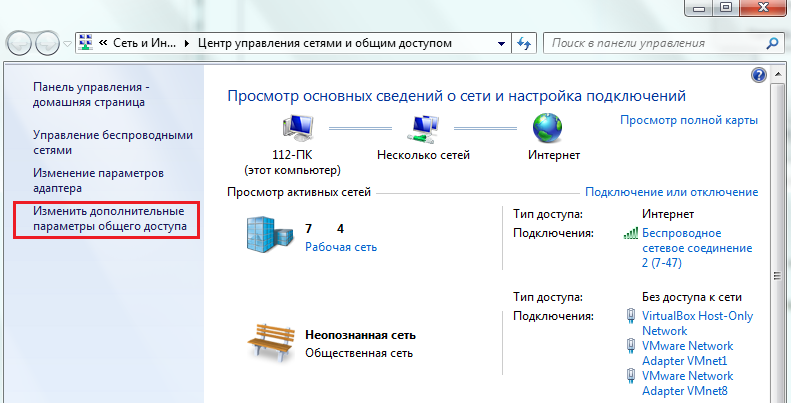
- Expand the profile tab local network— “Work or home” or “General” - depending on your settings.

- In the “Printer and File Sharing” and “Shared Folder Sharing” items, check the “Enable” checkbox and click “Save Changes”.

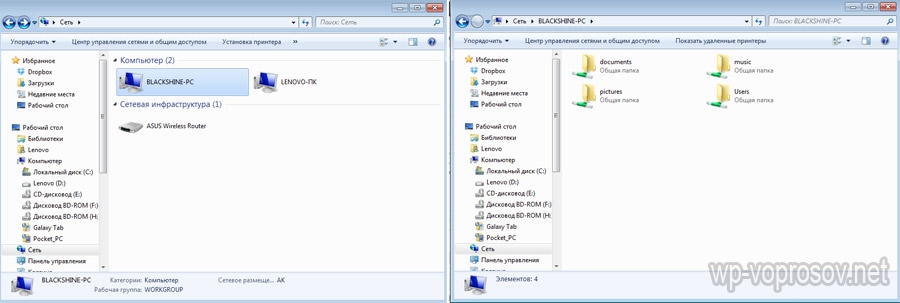
After this, other users on your network will be able to see all shared resources in their network environment. To view your network environment on Windows 7, you need to go to the “Computer” folder and in the transition area click on the “Network” shortcut. Double click On a computer from this list, you can see all its shared folders, that is, folders to which public access is open.

Share any folder on your computer
A user with administrative privileges can make almost any folder public if they wish. To do this you need to change its settings a little.
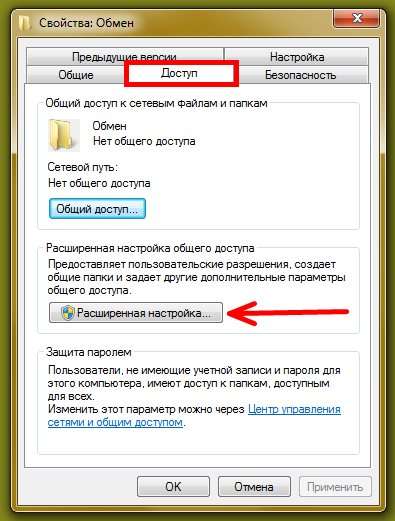
- Open Properties and go to the Access tab of the selected folder. As you can see, in our example there is no public access to it yet. Click the Advanced Setup button.

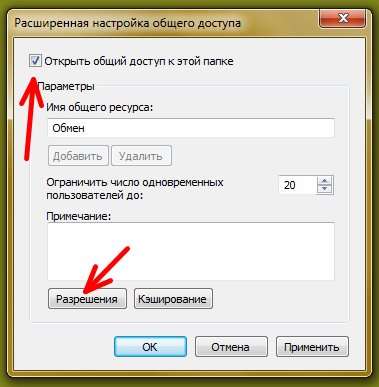
- Check the box next to “Share…”, limit, if necessary, the number of simultaneous user connections and open “Permissions”.

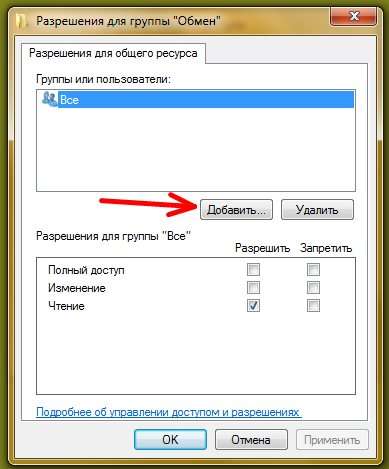
- In the permission settings, as we can see, only one group is specified - “Everyone”. Here we can assign this group the desired access rights to our folder or, for example, delete it and add other accounts to the list. To do this, click the “Add” button.

- In the user selection window you need to enter a name account. Usually Windows 7 automatically finds the user by name, but if this does not happen, click “Check names”.

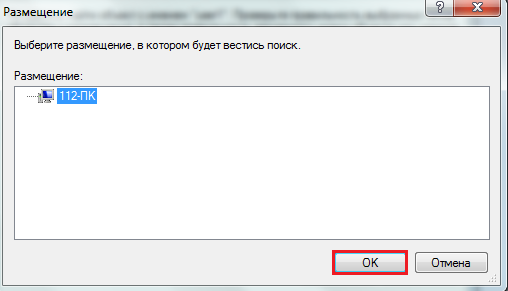
- In the next window, click “Location” to tell the system where to look for an account with that name.

- Select the desired location from the list of available ones. In our example, there is only one - the local computer.
- If a user with this name is not found, the system will display a corresponding notification; if so, it will appear in the list of groups and users of the shared folder. All that remains is to give him the necessary access permissions, and then save all the changes.

- After these steps, the folder will become public (shared), and the network path to it will appear on the “Access” tab.

- You can find out that a folder is shared without looking at its properties: if you select it with the cursor, the “Sharing” icon and the corresponding inscription will appear on the bottom panel of the parent folder.

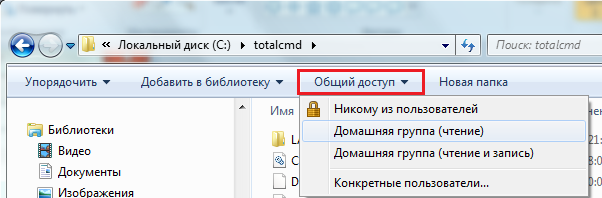
In addition to the above, in Windows 7 there is also quick access to permission settings for shared directories. This is the Share button in the top horizontal menu. By clicking here, you can quickly select which users are allowed to use the folder and with what rights.
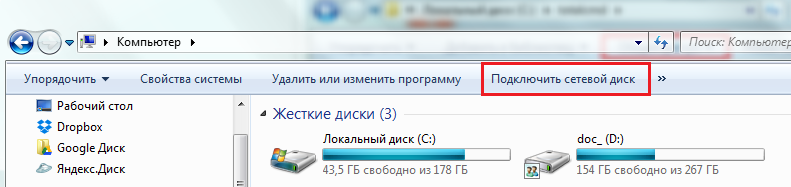
How to open a shared folder in Windows 7
As already mentioned, you can get to a public folder on another PC by clicking on the “Network” icon in the transition area of the “Computer” folder. If you need to use the folder often, you can create a shortcut to it on your desktop. In addition, the folder can be connected to the computer as network drive.
To do this, go to the “Computer” directory on your PC and click “Map network drive” in the top menu.
Assign a letter to the new drive, click Browse, and use File Explorer to navigate to the desired location. You can also manually enter the network path to it in the “Folder” line. The path is written like this: \Computer_name\Folder_name. If you do not remember this data, they are indicated in the properties of the shared directory on the “Access” tab.
To connect the network drive, click “Finish”.
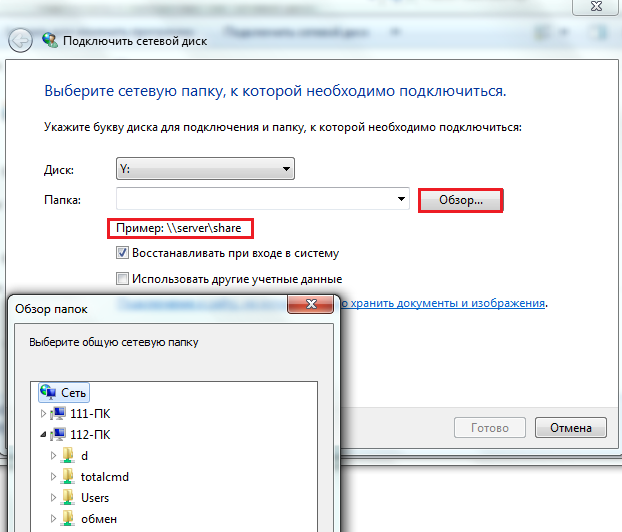
After this, the disk will appear in the “Network Location” section of the “Computer” folder.

You can log into a network drive under the user account of that computer or as a guest. If you log in as a user, enter your account name and password in the window that opens, and to be able to log in as an anonymous guest, you need to:
- so that the guest account on the PC whose folder you are connecting to is activated;
- so that the guest has the appropriate permissions in the security and sharing settings of this folder.
Instead of Guest, you can set permission for the Everyone group. If this condition is not met, operating system remote computer will deny you access.
Enabling a guest account
To enable a guest account, open the control panel, select the “User Accounts” applet and then select “Manage another account.”

Select a guest from the list and in the next window click “Enable”.

Setting folder permissions
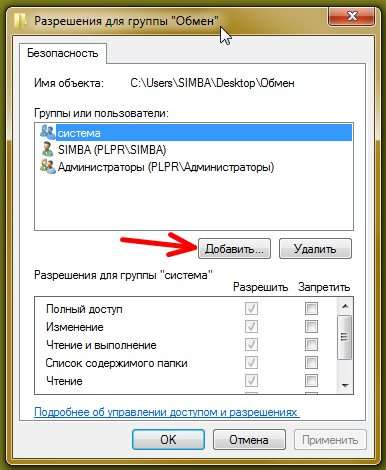
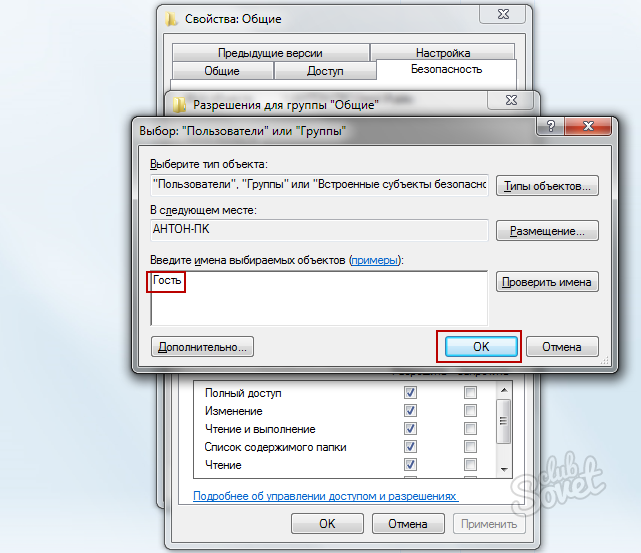
Open the properties of the shared folder and go to the “Security” tab. Here, in the list of groups and users, you need to add a guest. To do this, click the “Change” button under the list, in the next window click “Add” and then in the user selection window, in the field for entering names, enter “Guest”.

After saving the changes, on the Security tab in the folder properties, assign the desired rights to the guest. After this, it will be possible to remotely connect to the shared folder without entering a password.
By popular demand, today I will give brief but informative instructions on how to create a direct Wi-Fi connection between computers on which you have installed Windows system 7, and combining them into a grid, that is, we will open shared access to folders on both computers. Go!
First, we go through the same steps that were already discussed in the article about. Namely:
1. After turn on wifi modules on both computers, go to the “Start > Control Panel > System and Security > System” section. Under "Computer name, domain name, and settings" working group"Go to the "Change settings" page and then click "Change". Default to Windows home the group is called WORKGROUP - you can leave it, but check that on the second computer it is called exactly the same. I gave it the name "homelocal"
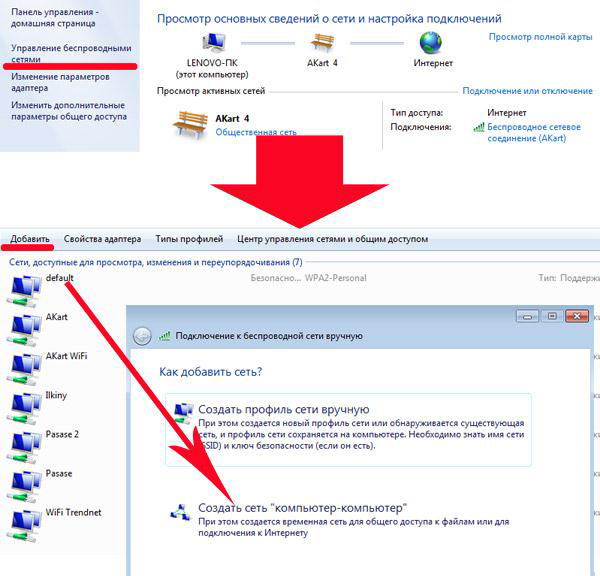
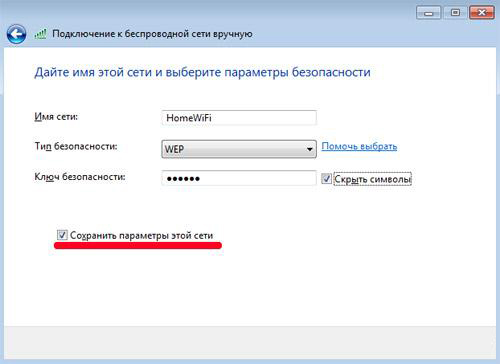
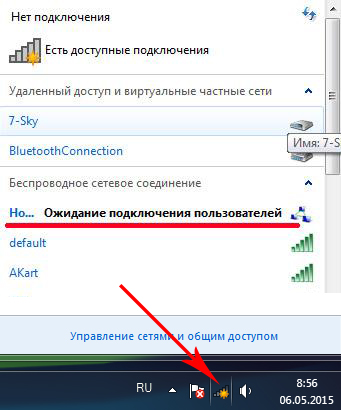
5. Go to the second computer and connect via wifi to this one new network by entering its password. We indicate that this network is "Home"
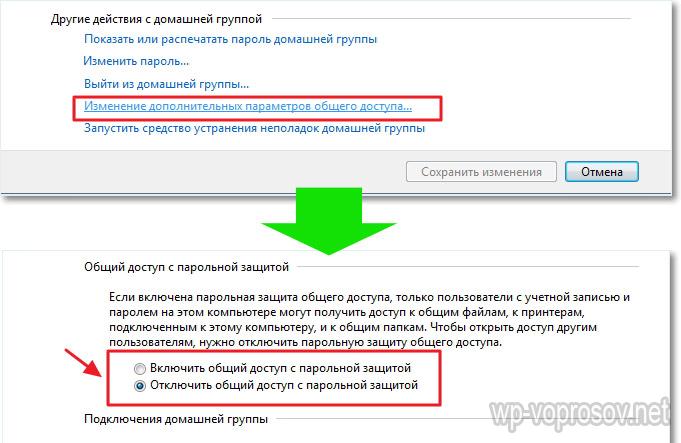
6. Return to the “Network and Sharing Center” on the first computer and go to the “Change additional sharing settings” section.
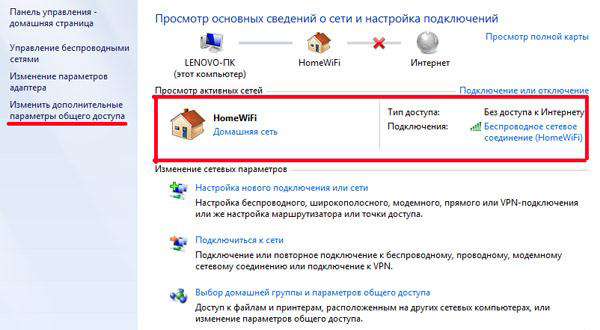
7. Here you need to configure unhindered sharing of folders on this computer— wherever there is a similar setting, check the permission boxes. We also disable “Password protected access”.
8. We do the same thing on the second computer, starting from step 4.
How to open shared folders in Windows 7?
9. All that’s left to do is open public access to a folder. To do this, find the desired folder in Explorer and click on it right click mouse and go to “Properties > Access > Advanced settings”. Check the box “Share this folder” and save the setting with the “Apply” button.
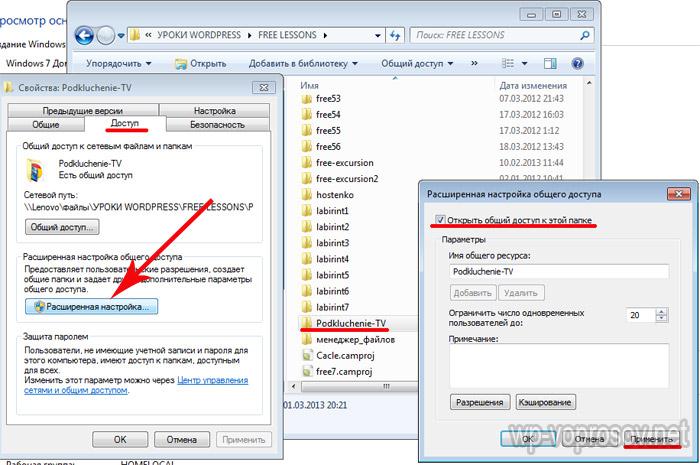
10. We do the same with all folders that need to be shared on both computers. After that, by going to the “Network” section, you will see both computers, and by going inside them you will see the shared shared folders on Windows 7.
That's all, actually. If you can’t connect to these folders, try rebooting and connecting again, or disabling firewalls - built into Windows or from third-party antiviruses - they can block your attempts to connect.
Finally, how to do the same thing, but on Windows XP
In Windows XP, organization public access to folders, drives and printers is performed at the user level. On the one hand, this is of course very convenient: when trying to access a particular folder, you don’t have to remember and enter different passwords. But at the same time, it is necessary to create accounts on each computer for all users who will need access to the resources of this computer over the network. If you don’t want to create accounts for all users on computers, you can activate a guest account. True, in this case, any user within the local network will be able to access your shared resources. But let's talk about everything in order.
When we have it at our disposal, we can begin to use it directly. One of the options for using the network is to provide sharing drives and folders computers.
You cannot share any individual file on a local network; to make a file available to other network users, you must share folder in which it is stored. Remember that by sharing a folder, you thereby give access to all folders and files located in it.
On Windows XP networks, there are two sharing modes:
- Easily share computer resources
- Enhanced computer resource sharing
Easily share files and folders
Simple file and folder sharing is enabled by default. You can verify this by clicking “Start” – “Control Panel” – “Folder Options” – “View” tab. There should be a checkbox next to the “” item:  If there is no checkbox, then your computer is using advanced sharing.
So, let’s say I want to “share” the “Reports” folder, which is located on the local drive C on my computer.
To open shared access to a folder or drive, you need to right-click on the required object - select “Properties” - go to the “Access” tab.
If we are sharing a disk or folder for the first time, we will need to click on the following link:  And then select “Just enable file sharing”:
  In the window that opens, check the box next to “Share this folder”:
  This way, you will give network users access to the files contained in this folder in read-only mode. They will not be able to change the files located in this folder or write their own files to it.
In the “Share Name” field, you can enter network name folder under which it will be displayed in the list of shared resources on the local network. But this is optional.
If you check the box next to “ Allow modification of files over the network”, then allow users to copy their files to this folder, as well as change the documents contained in it.
Then click “Apply” – “OK” in this window. After this, the folder will become public and a hand symbol will appear on it: 
For security reasons, you should not give full access to system folders (Windows, Program Files) and folders containing important data. It's best to create a special folder or folders for shared network files and give full access to only those folders.
For users on your network to be able to access shared folders, you must enable the “ account” on the computer where they are located. Guest" This will allow any user to access the shared folder from any computer on the network.
To check whether a guest account is activated on your computer, right-click on the “My Computer” icon on the desktop and select “Manage”. In the window that opens, on the left, in the “Utilities” section, select the “Local users and groups” item. Having opened it, go to the “Users” folder - in the right field we find “Guest” and double-click on it with the mouse:  In the next window, the “Disable account” checkbox should be unchecked:
 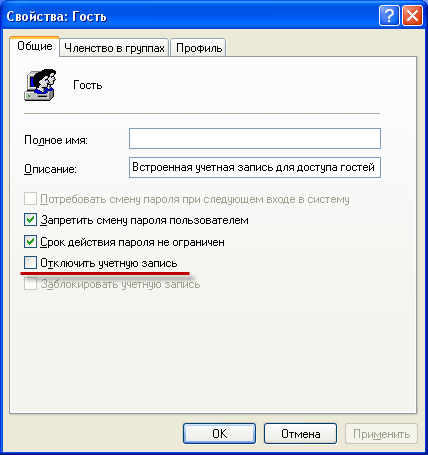 That's all there is to it easy sharing to files and folders. As a rule, this mode is sufficient when working in home network. However, on a local network of an organization, a more serious delineation of user rights is required. In this case, you must enable “Advanced file and folder sharing.”
Advanced file and folder sharing
If you want to use advanced sharing of files and folders on network computers, then you need to go to “Start” – “Control Panel” – “Folder Options” – “View” tab and here uncheck the box next to “ Use simple file sharing (recommended)" The “Guest” account must also be disabled for security reasons.
Allowing shared access for folders in advanced mode is the same as in simple mode: Click the desired folder or disk with the right mouse button - select “Properties” - go to the “Access” tab and check the box “Share this folder”:  In the “Shared resource” field, you can enter the network name of the folder under which it will be displayed in the list of shared resources on the local network.
In the “Note” field, if you want, you can enter a description of the folder (for example, “working documents”, etc.).
You can also limit the number of users who can use the shared folder at the same time. But it makes sense to do this only in very large networks or on weak computers.
And now we come to the most interesting moment in organizing shared access - the differentiation of access rights for network users in relation to a folder. Differentiation of access rights - this is the creation of certain rules, according to which network users (each individually or a group of users) will be able to perform certain actions with the contents of a shared folder: full access, modification, or only reading its contents.
To set these rules, click the “ Permissions" You will see a window like this: 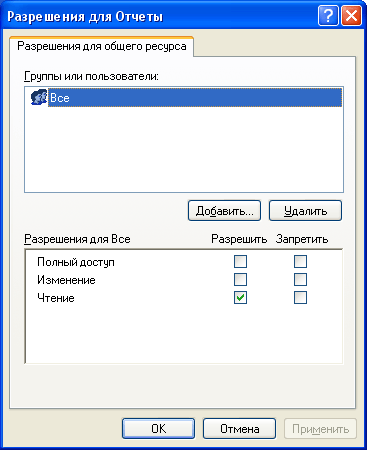 Here you can add a user or group to the list and define permissions for it by checking the boxes next to the appropriate items.
Please note that the method described above (advanced mode) will work without problems if both computers (on which the folder was shared, and which is trying to access it over the network) have same usernames with same passwords. In other words, if you, working under the user Vova , have posted a folder for public access, then in order to access it from another computer, a user must also be created on it Vova with the same password (as on the first computer). Moreover password must not be empty, otherwise Windows will refuse to share the folder. If the above condition is not met, problems may arise with access to shared directories (drop-down windows with messages like “access denied,” etc.).
So let's add users here and set permissions for them:
Click the “Add” button. In the next window, click “Advanced”:  In the window that opens, on the right, click the “Search” button:
  I want to allow access to the folder to users logged in on this computer (including the user Vova
). Therefore, at the bottom of the window, scroll through the entire list and find the name “Users” - select it and click “OK” - then “OK” again:
I want to allow access to the folder to users logged in on this computer (including the user Vova
). Therefore, at the bottom of the window, scroll through the entire list and find the name “Users” - select it and click “OK” - then “OK” again:  In the next window, I decided to give rights to read and change files in this folder - so check the appropriate boxes and click “Apply” - “OK”:
  That's all! Now I can easily access this folder from another computer (where the user is registered Vova
) and change the files in it.
That's all! Now I can easily access this folder from another computer (where the user is registered Vova
) and change the files in it.
To see all computer resources open for public access, go to “ network" Then select “Show workgroup computers.” When you double-click on the name of any computer, its resources will be displayed, open for public access to other computers on the network.
We have already talked about how to create one in Windows XP or share access to it, so I will not repeat it.
Creating the same shared folder in Windows 7 is a little more complicated, so I'll show you everything in order.
I want to warn you right away. Never Do not share system folders such as the Windows and Program Files folder. This should not be done for security reasons.
- It's best to create a folder on your Desktop. Call it whatever you want. The name does not matter, as long as it was clear to all your network users. I usually name the folder Exchange.
- Right-click on this folder and select the link from the drop-down list Properties.
Go to the tab Access and press the button Advanced setup...
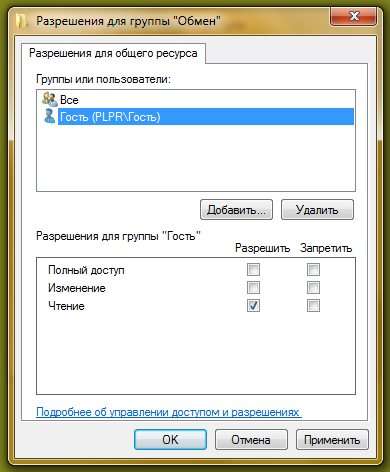
Check the box next to the entry Share this folder and click on the button Permissions.
In the field under the inscription Enter the names of the selected objects write the word Guest
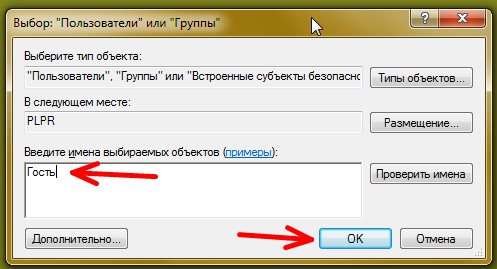
- Assign permissions for the Guest by checking the boxes and clicking the button Apply And OK.
- Now go to the tab Safety and press the button Change...
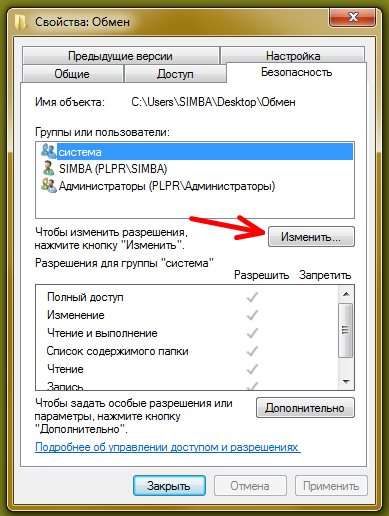
- Next press the button Add
Some system folders in Windows are hidden from the user so that he does not accidentally delete or change important files on which the operation of the OS depends. In addition, sharing of folders is usually limited. To remove these restrictions, you must set the appropriate settings.
To make hidden folders visible, open the Start panel and click on Computer. At the top left, find the Organize option, expand the drop-down list, and select Folder and Search Options. In the window that appears, open the “View” menu, scroll down the list and under the “Hidden files and folders” option, select “Show hidden folders, files and drives.” Click OK. You have gained access to all hidden directories. Sharing a folder will allow accounts to different users obtain rights to exchange files and other permitted actions within it. Access can be done both locally and over the network. By default, Windows 7 has one shared folder - Public. You can store videos, music, photos and other files in it for sharing or viewing.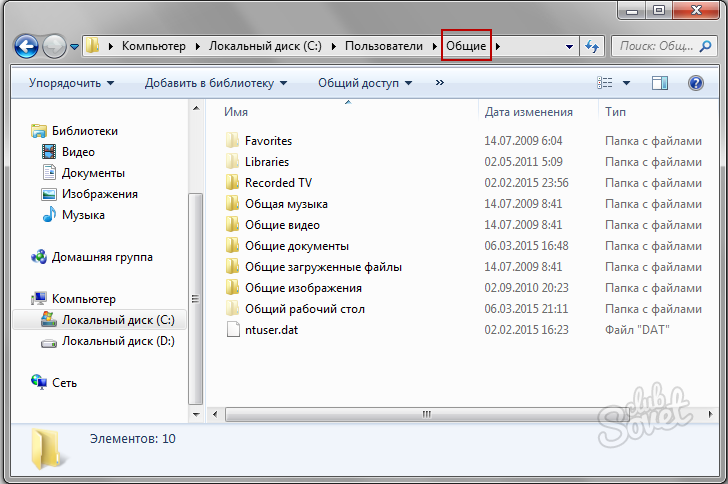

It is not recommended to share the root directory system disk, and Windows folders and "Users". Even if you bypass the restrictions imposed by the system, this may negatively affect the operation of the computer. Use the folder to exchange data Public, copying files there to the appropriate directories: music to the “General Music” folder, photos to the “General Images” folder, etc. This method will always come in handy if you have difficulty accessing a regular folder that is not related to Public.