Check spelling in Word
can be done automatically when typing. Word checks both spelling and grammar. Spelling is the correct spelling of words without errors, and grammar is the correct composition of sentences, phrases and their semantic relationship.
How to enable spell checking inWord.
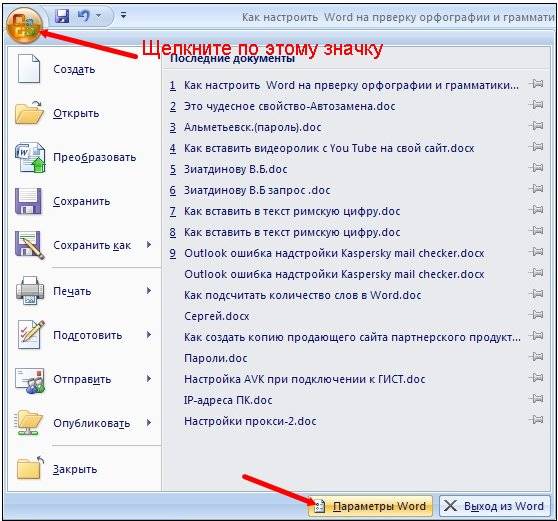
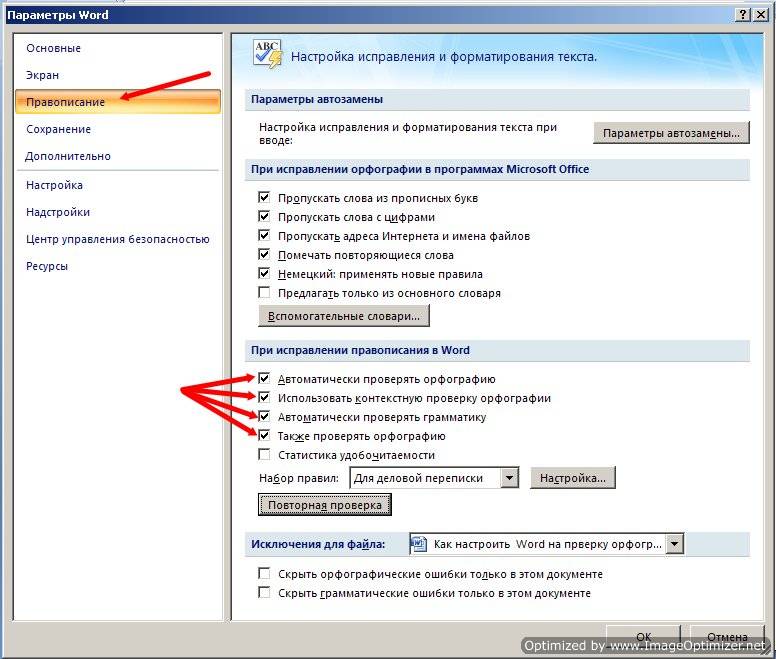
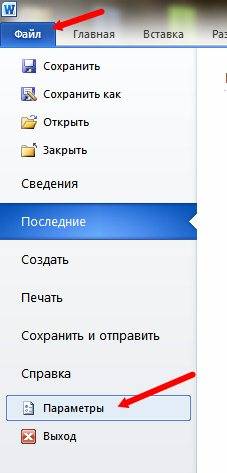
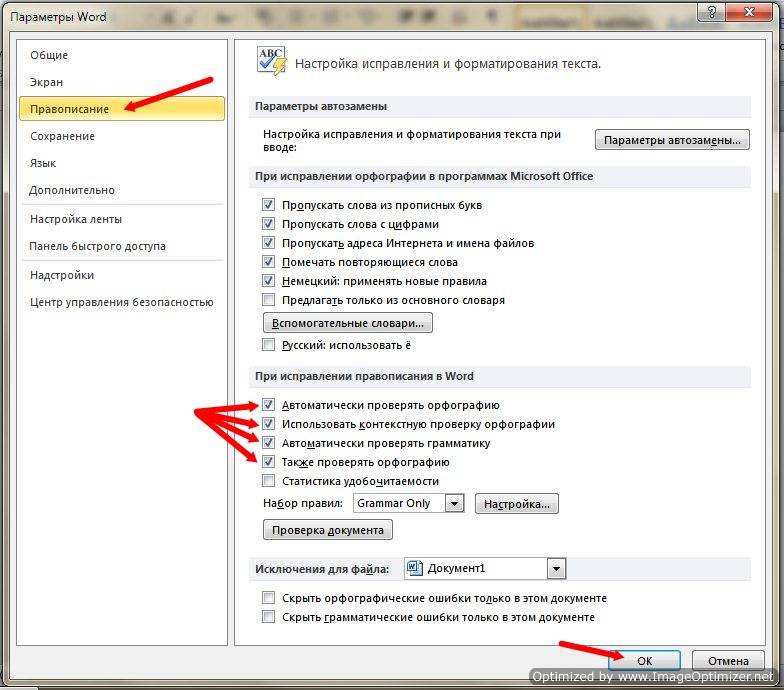
Click the “Office” button in the upper left corner. In the dialog box that appears, click the button “ Word Options" From the left list of the new dialog box, select the “Spelling” function. And here we check the boxes for the necessary functions. We have a check mark next to the “Automatically check spelling” function.
Click "OK". Now Word will check all the words we write automatically and underline misspelled words.
Spell checking in Word.
If we type text in Word and make a mistake, the word with the mistake will be underlined with a red wavy line. For example: To find out what the error is in this word, right-click on this word. The following dialog box will appear.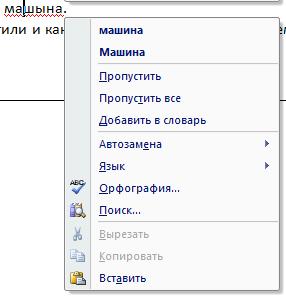 In the dialog box that appears at the top, options for correctly spelled words will be offered. Click on the selected word with the left mouse. And our misspelled word will be replaced with the selected word without an error.
It happens that a word is written correctly, but is still underlined with a red wavy line, like an error. Why this happens and how to fix it, see the article “Checking spelling in Word”.
It also happens that a correctly written word is underlined as an error, etc. this word is not in the dictionary against which all words are checked. If we write this word often, then we can add it to the dictionary. To do this, just select the function “Add to dictionary
" And if this word was written once and we will not write it often, then context menu select the “Skip” function.
To ensure that errors in underlined words are corrected automatically, you need to set up AutoCorrect. How to set this up, read the article "AutoCorrect in Word".
To learn how to remove a misspelled word that was accidentally added to the dictionary, see the article “How to remove a word from the Word dictionary.”
But, in the same dialog box, you can click on the “Spelling” function. Then a dialog box like this will appear.![]() Our misspelled word is written at the top of the dialog box. And at the bottom of the window in the “Options” section, word options without errors are given. Select the desired variant of the word and click the “Replace” or “Replace All” button if there are several such words in the text.
Our misspelled word is written at the top of the dialog box. And at the bottom of the window in the “Options” section, word options without errors are given. Select the desired variant of the word and click the “Replace” or “Replace All” button if there are several such words in the text.
Spell check dictionaryWord.
note
,
What language dictionary is used to check our text? We look at the “Language of the dictionary” - we have “Russian (Russia)”. You can use the arrow to select another language (English, German, etc.) Sometimes Word shows an error, simply because the language in the dictionary is not the correct one.
Checking grammar in Word.
When we compose a sentence not according to the rules of the language, or make a mistake in composing a sentence (grammar), the words in the text will be underlined with a green wavy line. In our example, these are the words “text in Word”. Right-click on these words and select “Grammar”. In the “Grammar” dialog box, our entire sentence is written at the top, and combinations of words with an error are highlighted in green font. An explanation of the error is written at the bottom of the dialog box.
 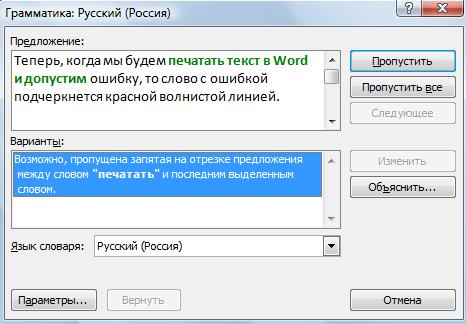 We changed the word “let’s allow” to the word “will do”. All. There is no error. If we specifically need to write this way, then in the “Grammar” dialog box, click the “Skip Sentence” button. The wavy line that underlines the word will disappear.
If we started checking the spelling of a document from the middle of the page, then after checking to the end of the document page, the question “Check from the beginning of the page?” will appear. If we need it, click “Yes”.
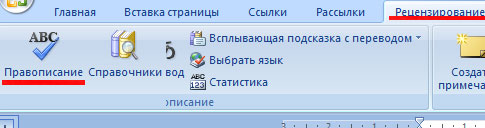
You can check one sentence or part of the text; to do this, select a fragment of text and click the “Spelling” button on the “Review” tab.
Word checking can be enabled even if they are not underlined. Let's highlight these words. On the “Review” tab, click on the “Spelling” button.
Attention!
If the words are underlined with a green wavy line, then the sentence is not composed correctly - it is very long, a comma is missing, etc. Click on the underlined word and a window with hints will appear.
One more thing.
Word is set up so that the first letter of the first word in a sentence is always capitalized. And, if we wrote and we need to write here with a small letter, but it was corrected to a capital letter. We can override this fix feature. For example: we wrote a small letter "a)", but Word corrected it to a capital "A)", because this letter is at the beginning of the sentence, as he thinks. Place the cursor on this letter. A blue rectangle appeared under this letter.Move the cursor under this rectangle and slightly to the right. An arrow button like this will appear.Click on the arrow and in the dialog box click on the “Cancel automatic entry” function capital letters" The letter will be corrected to small, as we wrote initially ("a)"). Disable spell checking in Word
You can by unchecking the "Spelling" box in the "Word Options" section by accessing the "Office" button.
Disable spell checking in Word
You can by unchecking the "Spelling" box in the "Word Options" section by accessing the "Office" button.
You can set a password in Word. See the article "
We recommend using the methods described in this article in the order they are presented. If you have previously tried one of these methods and failed, you can quickly move on to another method from the list below.
Method 1: Install spell checkers
- Close all programs.
- On the menu Start select item Control Panel.
- IN Windows Vista double click the item Programs and components. In previous versions Windows systems double click the item Installation and removal of programms
In Windows 7, in the Programs section, click Remove a program.
- Select an item Microsoft Office Version
and press the button Change.
Note: Word Version hereinafter denotes the version Microsoft package Office installed on your computer.
- In the dialog box Microsoft Office Version select team Add or remove components and press the button Further.
- Expand the node Office Common Tools, click the icon to the left of Spell checkers and select Run everything from my computer.
Method 2: Enable the EN-US Spell Checker add-on.
- In Word, click the Office Button and then the Options button Word.
- On the left, select Add-ons.
- At the bottom of the dialog box Word Options in the Manage section, click the drop-down arrow and change the selection from COM add-ins on Disabled objects, then press the button Go.
- In the dialog box Disabled objects check if there is an entry EN-US Spell Checker (nlsdata0009.dll) in field Select the items you want to include.
- If item Speller EN-US (nlsdata0009.dll) listed, click it and click the button Turn on.
- Click the Close button to close the window Disabled objects, and the OK button to close the Word Options window.
Method 3: Enable automatic spell checking
- Click the Office Button and select Word Options.
- In the Word Options dialog box, select Proofing.
- Check the box Automatically check spelling In chapter When correcting spelling in Word.
- Uncheck the boxes under Exceptions.
- Click OK to save your changes and close the Word Options window.
Method 4: Select the language you want and uncheck "Don't check spelling"
- Select all the text in the Word document.
- Open the Review tab.
- On the Review tab, click the Select Language button.
- In the Language dialog box, select the language you want and click OK.
- If checkbox Don't check spelling installed, remove it.
Method 5: Use the Fix it solution to change the registry
Attention! The article contains information about making changes to the system registry. Before doing this, it is recommended to create one backup copy. Make sure you know how to repair the registry if a problem occurs. More information about backup To restore and modify the registry, see the following Windows Online article:
- Download
Notes- The wizard may only be available in English. However, the automatic troubleshooter can be used to Windows versions in any languages.
- You can download the troubleshooting solution to any computer, save it to a flash drive or CD, and then run it on the computer you want.
Solving the problem yourself
To resolve this issue, follow these steps:- On the menu Start select item Execute.
- In the window, type REGEDIT and press ENTER.
- Find and click right click mouse the following registry subkey:
HKEY_CURRENT_USER\Software\Microsoft\Shared Tools\Proofing Tools\1.0\Override
- Click the button Delete.
- Close Registry Editor.
- Quit and restart Word.
The problem is resolved?
- Check if the problem is resolved. If yes, skip further instructions in this section. If the problem cannot be resolved, contact support.
- We appreciate your comments. To provide feedback or report issues with this solution, add a comment to the "Fix it for me" blog or send us a message at
You can use Spell Check in Office 2010 not only after you've finished working on a document, letter, or presentation, but also while you're creating it. The scope of spell checking is much wider than simply correcting errors in the text. In this article I will tell you how:
Spelling is more than spelling, and not just in Word
You, of course, noticed that programs Microsoft Office underline some words with wavy lines. This is because they include automatic spelling and grammar checking.
Figure 1 - Spelling errors are highlighted in red, and grammatical errors in green.
There are also blue wavy lines - they indicate that the word does not correspond to the context. I couldn’t come up with an example for the Russian language right away, but you will sea what I mean by inserting this English phrase, for example, into Word 2010. It’s up to you to correct errors immediately or leave them until last (you can even turn off the underlining if it’s distracting). In Word 2010, the Spelling section is one of six main options, which indicates the importance of proper writing in the early 21st century (at least from Microsoft's point of view).
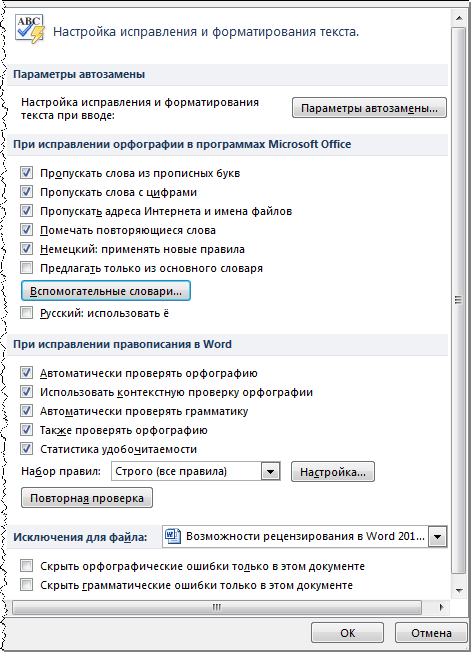
Figure 2 - Microsoft Office and Word 2010 spelling options
Spelling settings for Office 2010 programs can be divided into three parts:
- Automatic text replacement options
- spell checking settings that are common to everyone Microsoft applications Office
- spell checking settings for the program you are working in
Each Office 2010 application has its own set of automatic text correction capabilities, and the most comprehensive of them, of course, is Word 2010.
Depending on the language Microsoft versions Office spell checking settings may contain language-specific options.
In the Russian version of Office 2010, the letter “ё” was given a separate parameter - Microsoft Office developers believe that most users agree to 32 letters in the Russian alphabet (the checkbox is unchecked by default).
Even more differences will be found in the spell check settings, since each language has its own grammatical and stylistic rules. Because Word and Outlook are the primary text-writing environments, they place greater emphasis on spelling than other Office 2010 applications.
I'll tell you about the features that help me work faster and more efficiently in Office 2010. I'll start with those that I set up before working with text.
Automatic replacement options
If you start new line with numbers, Word or Outlook 2010 will prompt you to start a numbered list - this is automatic replacement in action, don't resist. It also helps correct common typos, such as "odanko" to "however." Along with customized features, I use custom options to save time while typing.
Computer articles often contain words written in Latin characters - names of software products and companies. If there are twenty mentions of “Word 2010” in an article, each time you have to switch the keyboard layout twice - a total of 40 times! It’s much easier to set up automatic replacement of abbreviations with frequently used words before starting work.
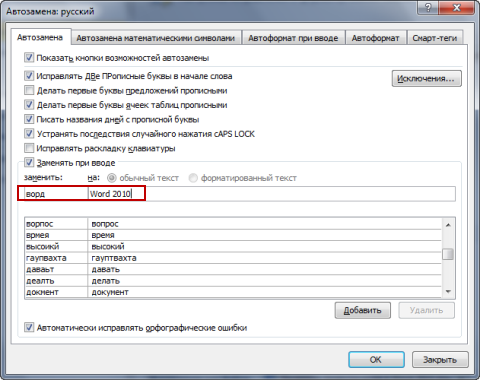
Figure 3 - Automatic replacement of frequently used words saves time
A few examples:
- Word - Word 2010
- mo - Microsoft Office
- v7 - Windows 7
- RMB - right mouse button
The rest will be told to you by the subject of the material and your imagination. In Word 2010, be sure to look at the AutoCorrect Math Symbols tab if you see them in your articles. The list of words for all Office applications is the same, but each language has a separate dictionary, which is convenient - you can use the same abbreviations in Outlook 2010.
You can refuse automatic word replacement without going into settings. All you have to do is hover your mouse over the replaced word, and your intuition will tell you the rest.
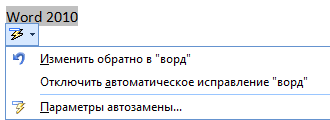
Figure 4 - You can disable automatic replacement for a specific case or for all
To speed up typing, I sometimes use abbreviations, for example, in notes to Word documents 2010. If an abbreviation is indicated by a period, by default the program considers this to be the end of a sentence and begins the next one with capital letter, which doesn't suit my purpose.
There are two ways to solve this problem. The most important thing is to uncheck the “Make the first letters of sentences in capital” checkbox (Fig. 3). If you approach the issue selectively, you can configure frequently used abbreviations by clicking the “Exceptions” button. The list already contains, for example, such common abbreviations as “fig.” and “see”, and you can always add your own.
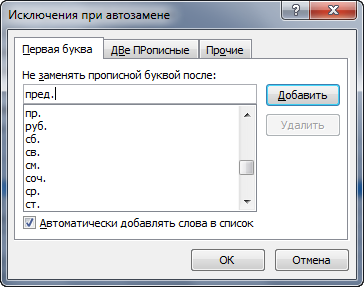
Figure 5 - The abbreviation is added to the list
Automatic replacement is closely related to the Office 2010 vocabulary. It can be expanded, and I'll talk about this next.
Auxiliary dictionaries
Spell checkers are based on a dictionary, whose entries are compared with words in the text. If a word is not included in the dictionary, it is considered misspelled. It is often necessary to use words in articles that are not commonly used, but are understandable to the target audience and acceptable, for example, registry tweak.
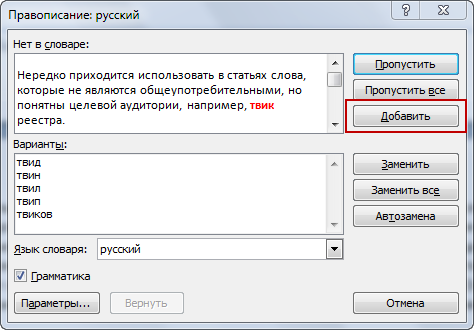
Figure 6 - Adding a word to your own dictionary
The easiest way to expand the program's vocabulary is while checking spelling. In this case, you just need to click the “Add” button, and Office 2010 applications will forget about their complaints. By adding a word to the auxiliary dictionary, the program does not distract you with questions. By default it has a multilingual dictionary custom.dic, all added words go there. Thanks to the underlining of errors, it is convenient to perform the same action from the context menu.
Please note that in the same dialog (Fig. 6) you can enable automatic replacement of a word with one suggested by the program, which helps you deal with your typos. They can also be added to the automatic correction list from the word’s context menu.
At the beginning or as you work on a document, you can add several words to the dictionary at once, or delete unnecessary ones, which happens much less often. This can be done from the spelling settings of any Office 2010 application (in Word 2010 - see Fig. 2, “Auxiliary dictionaries” button).

Figure 7 - Features of auxiliary dictionaries in Word 2010
Along with dictionaries in Microsoft Office programs, you can also use a thesaurus, which will help diversify your writing.
Thesaurus
I strongly associate the word “thesaurus” with a dinosaur, and this feature has, indeed, been included in Microsoft Office since time immemorial. The degree of its necessity for the author depends on the level of language proficiency. The thesaurus will tell you words that are close or opposite in meaning. If you can't think of an alternative to a word used in a sentence, look at the list of synonyms. Just highlight the word and select “Synonyms” in the context menu.
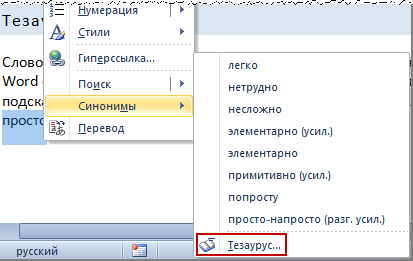
Figure 8 - In the context menu of the selected word, you can view a list of synonyms and open a thesaurus
By selecting a synonym from the list, you will replace the highlighted word. Please note that next to the word its stylistic characteristic is indicated, which helps you choose the option that is most suitable for the context.
For example, when you use a strict set of spelling rules, colloquial words will be underlined with a squiggly line, so the feature will help avoid replacing the spelling with soap. When you open the thesaurus, you will see other synonyms and antonyms. Here you can already move from word to word by clicking on them, and the ability to insert into the text is also available.
I use a thesaurus when checking spelling and proofreading text. Sometimes only when reading aloud do you notice that in a sentence one word is used several times or sounds bad. In this case, the thesaurus will help you choose a replacement.
Even if you have a good vocabulary, you may be skeptical about the capabilities of a thesaurus. However, your opinion may well change for the better if you happen to write a text in a foreign language.
Now we can talk directly about checking the spelling of documents and letters. I have no doubt that you have launched it with the key more than once
Editing and creating spell checker rule sets
In addition to spelling, Word and Outlook check grammar, which in Office 2010 includes things like punctuation and style.
Selecting a Rule Set
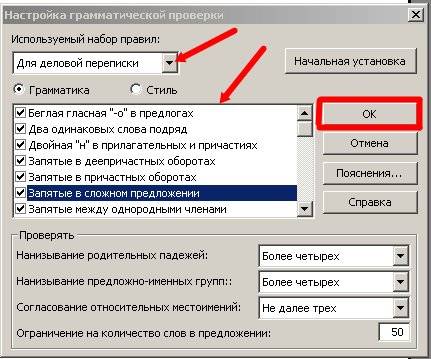
In my opinion, the ability to define a set of rules is very interesting. Word 2010 offers three built-in rule sets and three custom ones.
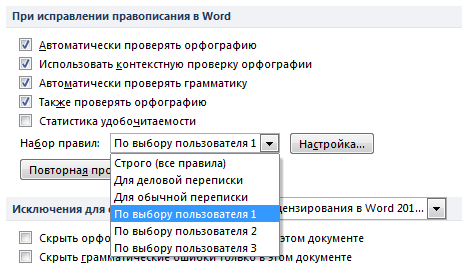
Figure 9 - In the "Spelling" section of the Word 2010 options, you can select a set of rules and configure it
To see the difference between the three built-in sets, go to the settings of any of them. The set of strict rules checks all parameters of grammar and style, and also has fairly strict requirements for genitives and “which” agreement.
The rules for business correspondence include all grammar parameters and most style parameters. Word 2010 will have the least complaints if you use rules for personal correspondence.
Creating your own set of rules
Unlike business correspondence, which seems appropriate for reviewing technical articles, I do not consider colloquial words and expressions acceptable in them. I consider overly complex sentences to be another undesirable attribute of computer articles. The list does not include the “IT Articles for OSZone.net” set, but I created one for myself.

Figure 10 - Own set of rules for checking articles published on OSZone .net
And then it turned out that the beta version does not remember custom rule sets!
Unfortunately, the ability to save your own rules was not fixed in either the final release or SP1, although I personally reported the bug to the product team at least twice.
Literacy in writing is important, probably, in all languages except Albanian, but following all the rules does not at all guarantee that the text will be easily understood by readers. You can measure this using readability statistics.
Readability Statistics
When writing an article, you should always consider the target audience. Even if technically simple material is described complex language, the share of readers who have not mastered it will be higher. For example, in the audience of the OSZone.net portal there are many schoolchildren who have not yet reached high school. But, say, they may well need material on creating a PowerPoint presentation. Therefore, efforts must be made to write articles in understandable language.
Statistical data collected by programs about your text will help you evaluate your work. They will be displayed after checking spelling if you check the "Readability Statistics" checkbox in the spelling options of Word 2010 (Figure 2) and/or Outlook.
In addition to information about the number of words and characters, the statistics include indicators of ease of reading.

Figure 11 - Based on reading ease indicators, this article should be understandable to a ninth grader
The findings about reading ease and the level of education required to understand the material are based on tests created by Rudolf Flesch and J. Peter Kincaid. Of course, these formulas were developed for in English, and the level of education is focused on the USA, but this does not in the least interfere with evaluating the text.
Educational level can be thought of as the number of years of education (school, university, etc.) sufficient to understand the material. A score of 9.0 for this article means that you need to study for nine years to understand it without difficulty.
You can make adjustments for the level of school education in Russia and neighboring countries, depending on your knowledge in this area or the degree of patriotism. In any case, as I expected, to understand this article it is enough to have a school education.
Reading ease is calculated using a different formula. The higher the final value, the easier the text is perceived. Anything over 90 should be easy to read for an 11 year old. Texts with ease of reading in the range of 60 - 70 can be easily understood by a teenager aged 13 - 15 years. If the values fall below 30, then you won’t be able to understand the article without a university diploma (or a bottle).
In US government organizations, a minimum reading ease requirement is established for many documents and forms issued to citizens for completion.
The result of this approach is obviously an overall time saving, so it's not just Microsoft that includes readability statistics in its programs - Google Docs, for example, has the same feature.
However, you shouldn’t get hung up on statistics. If all sentences in a document consist of two or three words, the numbers will show that it is enough to finish kindergarten to make it easy to read. But it is unlikely that such creativity will be highly appreciated by those for whom you are actually writing your article.
Conclusion
With all the variety of spell checking options, do not forget that programmatically It is impossible to cover all the subtleties of the language. For example, when checking punctuation, the program may suggest an extra comma or not notice the obvious absence of one. Contextual spell check can't catch everything either possible mistakes. Carefully reading the text will help identify errors in punctuation or language absurdities. When in doubt, use common sense and Russian language reference books.
In this article, I talked about how you can use the Office 2010 spell checker to improve your work efficiency, improve the style of your text for its intended purpose, add variety to your writing, and evaluate its ease of comprehension. Write correctly!
Spell checking in Word. Writing competently, especially on websites or blogs, is the main condition for people to come to you. It’s very unpleasant when you see a bunch of gross mistakes. You can understand when a person simply used the wrong key, but when you see an obvious “loser”, it is repulsive. I, too, often rush after my thoughts and may miss a letter or even a whole word, or a comma. Helps me a lot when writing articles Microsoft program Word. If configured correctly, it will be an indispensable assistant in your creative endeavors. This program has great potential. As you write the text, she can check spelling, grammar, correct your mistakes on her own, suggest which word is best to use in this writing style, select synonyms and much more. Again, I repeat - the main thing is to configure it correctly.
It is much faster and more comfortable to work in text editor, when pre-created or ready-made with thoughtful .
A window will open Options. Select a tab Spelling .
Today we'll set up Word to check spelling and grammar.
In order for the program to automatically check spelling and grammar in your text, open the menu Service. Select a team Options .

In field Spelling check the box Automatically check spelling ;
In field Grammar check the box Automatically check grammar And Also check spelling .
On property Do not highlight misspelled words There is no need to check the box, otherwise if you make a mistake, the program will not show it to you, and you may not notice.
You can leave all other settings as they are.
Next, press the button Settings under the window Set of rules and go out the window Settings grammar check . In the window Rule set used select the set you need. Personally I use For business correspondence .
Set the switch to Grammar and check all the functions in the window below. Leave everything else as is and press the button OK .
Spell checking in word 2007
To set up automatic spell checking in Word 2007, click at the very top left on the beautiful icon with the program logo, and go to the very bottom of the list that opens. Click on the button OptionsWord .
In the next window, go to the tab Spelling and check the boxes where necessary.
After all the changes, do not forget to click the button at the very bottom OK, to save the settings.
Spell checking in word 2010
In text Word editor The 2010 spell checking setting is slightly different from the setting in Word 2007.
You must first enter the menu File. Then go down to the entry Options .
And already in the window OptionsWord make the settings described above.
After setting up spell checking in Word, the program itself will check and indicate errors by underlining with a wavy line. The red line means a spelling error, and the green line means a syntax error.
Regarding commas, the program does not always correctly indicate their location, so sometimes think for yourself. But about spelling, she is not wrong.
If the program does not know some word, i.e. this word is not in her dictionary, then you can add this word to the dictionary yourself, just check before doing so, at least on the Internet for the correct spelling.
Perhaps the most popular tool for editing text and checking its spelling offline is the program. It is fully functional and has the necessary set of tools to eliminate lexical, spelling, punctuation and formatting errors. You can enable automatic spell checking in Word and highlight problematic words and phrases right while you are typing, when problematic words are automatically underlined and highlighted.
Once you download and install Microsoft Office, you can jump into Word and start writing. If, for some reason, errors are not automatically highlighted for you ( spelling is underlined in red, grammatical in green), then you can enable text spell checking in Word by following these steps:
Enable for Word 2010
1. Find the “Review” tab on the top panel, then “Spelling” or press the “F7” key on your keyboard to enable manual error checking. The editor will go sequentially through the text and point out problem areas.
2. To enable automatic checking, click the File button (round icon in the upper left corner) Word Options - Spelling and check the box next to “Automatically check spelling and grammar”

Enable for Word 2007
To enable spell checking, do the following: Office - Word Options - Spelling - select "Automatically check spelling". Now not a single mistake will be hidden from you, and you will be able to type any text correctly.
Enable for Word 2003
Replace the word Office with the word Service and follow the same path as for Word 2007. Next, confidently type the text and you will see how the editor begins to underline misspelled words.
If you have not found a solution, I recommend visiting the official page Microsoft help Office Word, where you will find how spelling and grammar check works, learn how to use autocorrect when correcting errors http://office.microsoft.com/ru-ru/word-help/HP010117963.aspx