The article tells how to restore folders if they have disappeared from the Desktop.
If folders on your Desktop have mysteriously disappeared, this may mean that you or someone around you has previously pressed the wrong buttons on your computer. You can randomly press such keys on the keyboard that it will completely disable the computer.
In today's review we will talk about how to find and restore folders if they have disappeared from the Desktop.
How to return missing folders to the Desktop?
Desktop folders can often disappear due to the fact that they simply extend beyond the visible area of the screen. This may happen because you accidentally changed the screen resolution. Sometimes users, when setting up a monitor, press buttons on it at random and change the resolution.
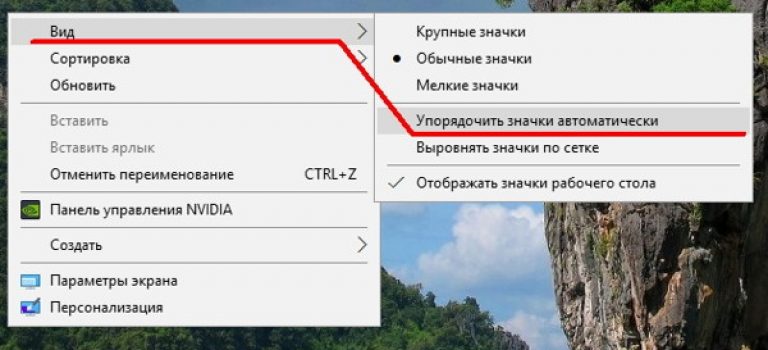
In order to restore folders on the Desktop, they need to be organized, so do the following:
- Click on an empty area on your desktop right click mouse, in the menu that opens, go to “ View" and then click on " Arrange icons automatically».
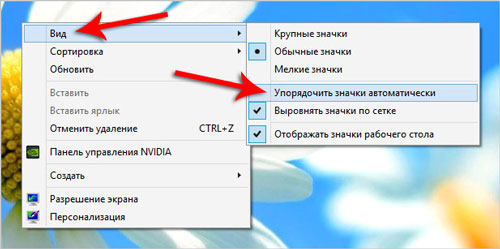
Folders have disappeared from the desktop, what to do, how to find, restore
- After this, all folders and shortcuts on the Desktop should line up as shown in the screenshot
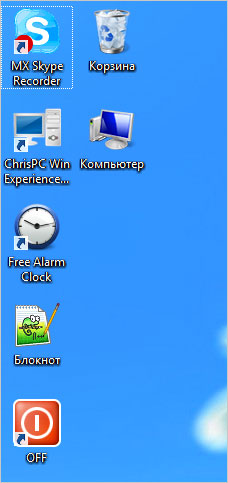
Folders have disappeared from the desktop, what to do, how to find, restore
This action can return all disappeared folders to the Desktop. But if suddenly this does not happen, then do other steps:
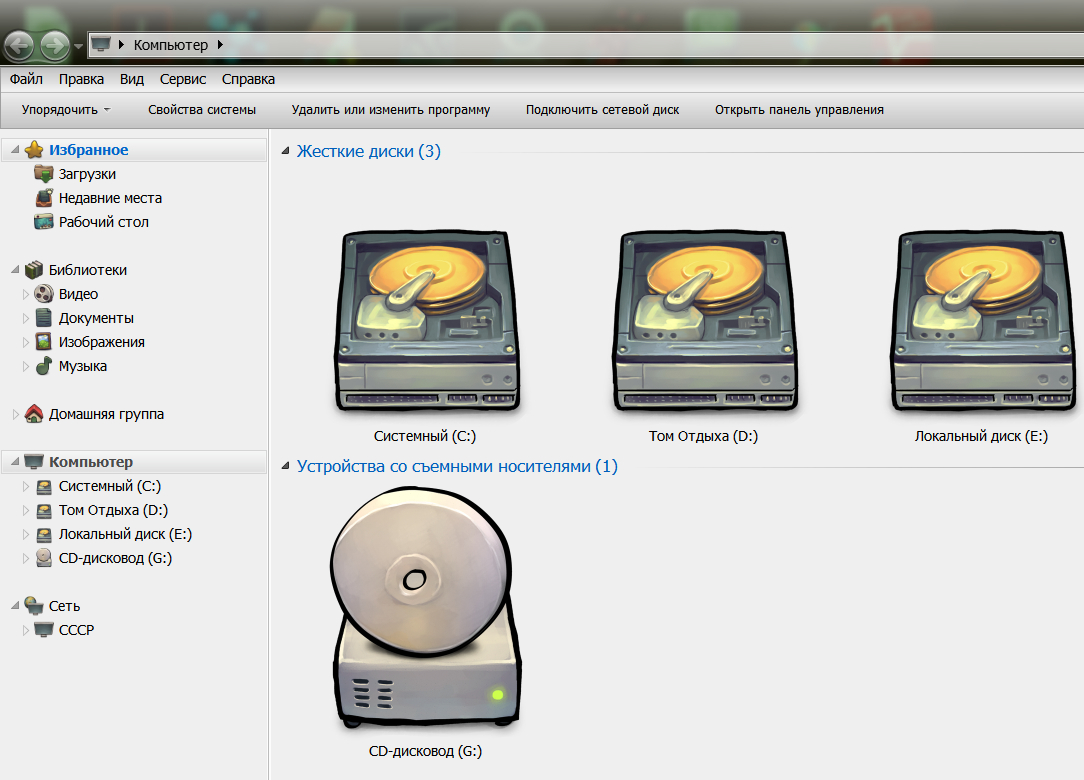
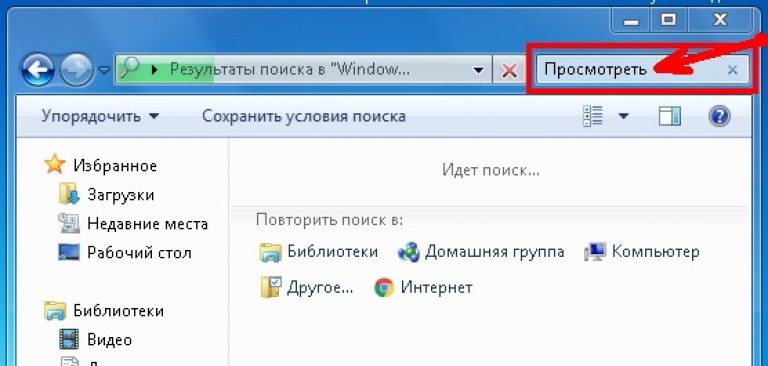
- Go to " My computer" or " Computer"depending on version" Windows" and in the top search bar enter the name of the missing folder. This way you will find this folder on your computer, at the same time recognizing the place where it has moved. But if this does not happen, it may mean that your folder was simply deleted from the computer.

Folders have disappeared from the desktop, what to do, how to find, restore
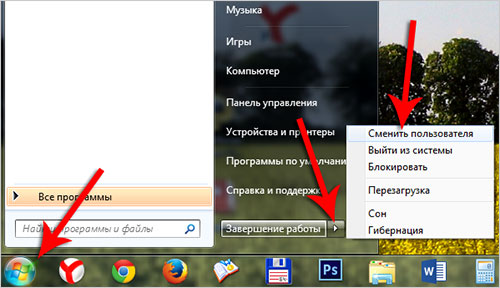
We can offer another option if you are not the only one sitting at your computer, and each user has their own account. You could simply log in under a different account and, therefore, not seeing what you wanted on the monitor. In this case, do the following:
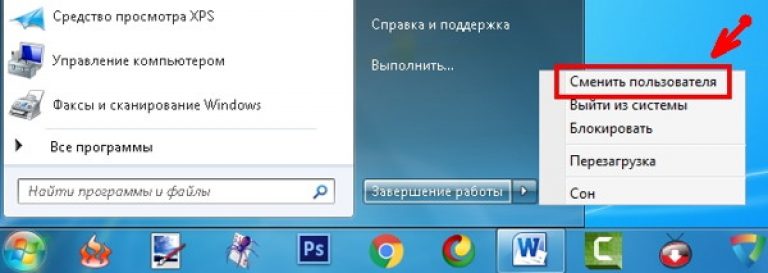
- Enter the menu " Start" and as shown in the screenshot, change the user. After this, all your folders will be on your Desktop.
Folders have disappeared from the desktop, what to do, how to find, restore
But if all the methods listed above did not help, do not despair. In fact, there may be many more reasons. Perhaps the problem was the presence of viruses on the computer, so it wouldn’t hurt to check again operating system antivirus program.
It is also possible that the folders you need may be hidden. To make them visible again do the following:
- Go to " Computer" (or " My computer»)
Folders have disappeared from the desktop, what to do, how to find, restore
- In the top menu, click on the item " Service»
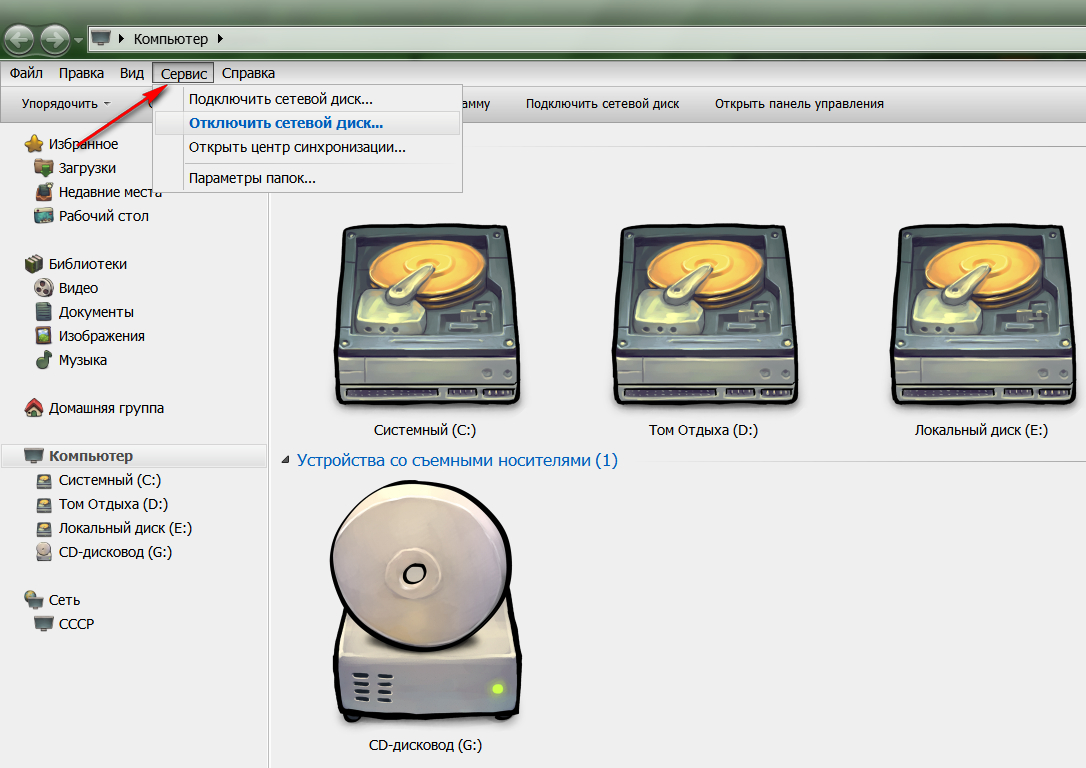
Folders have disappeared from the desktop, what to do, how to find, restore
- Next, click on “ Folders settings…»
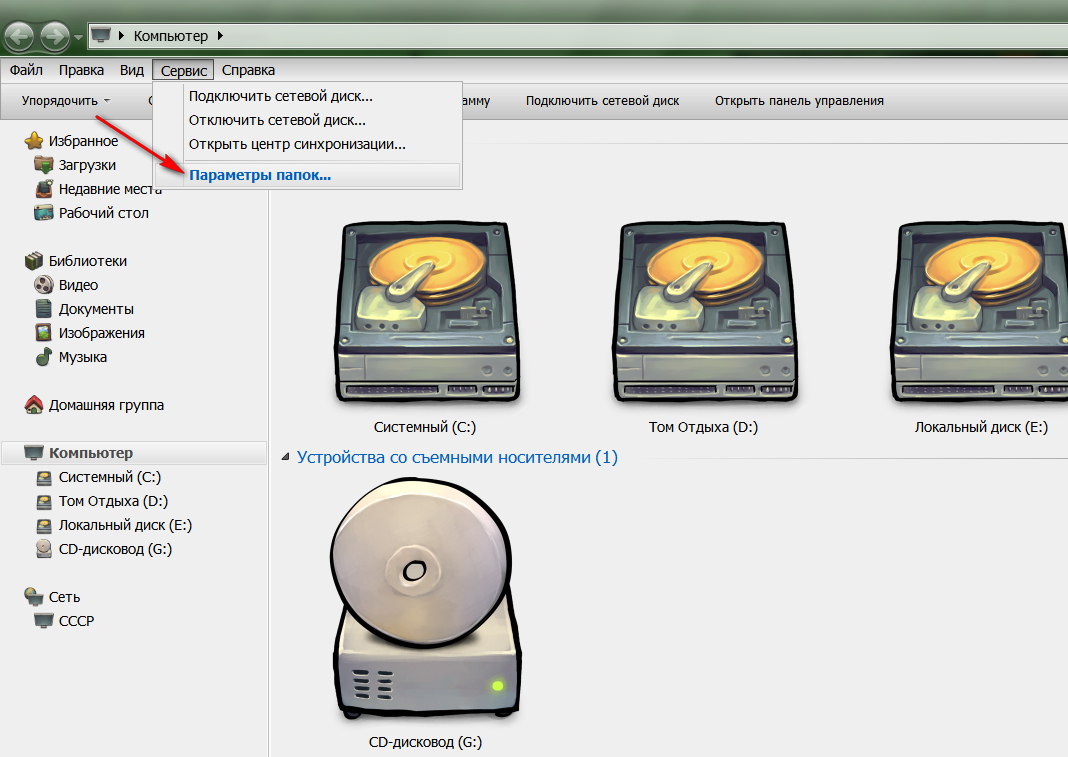
Folders have disappeared from the desktop, what to do, how to find, restore
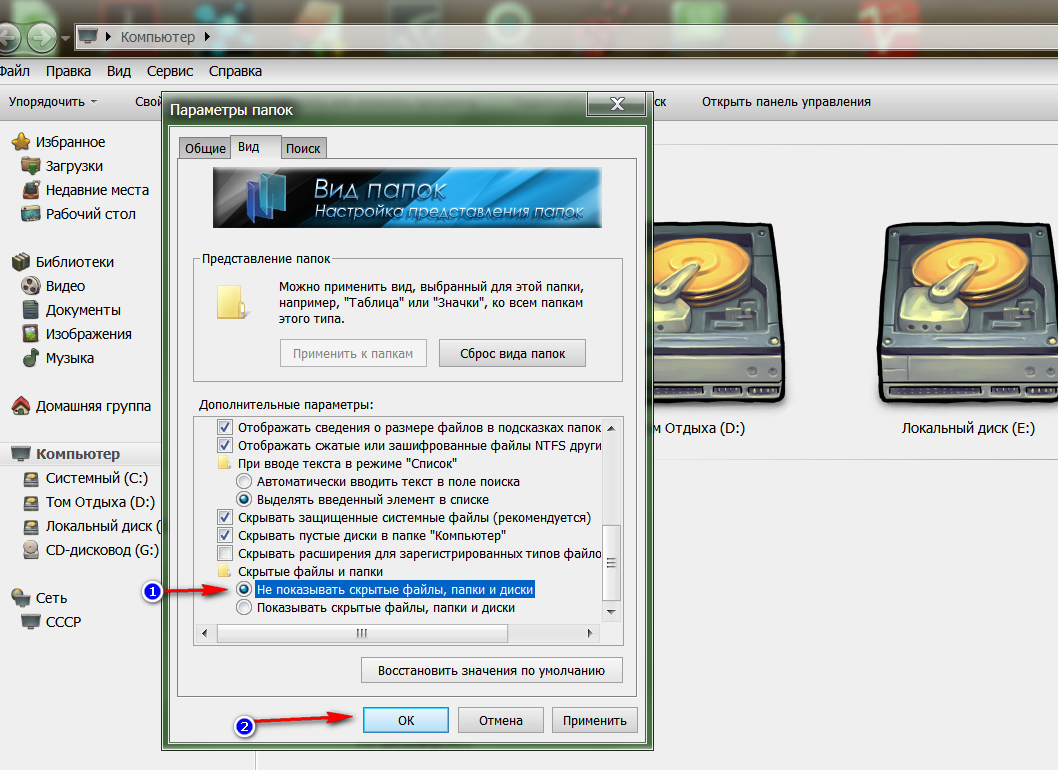
- Then in the window that opens, go to the “ View»
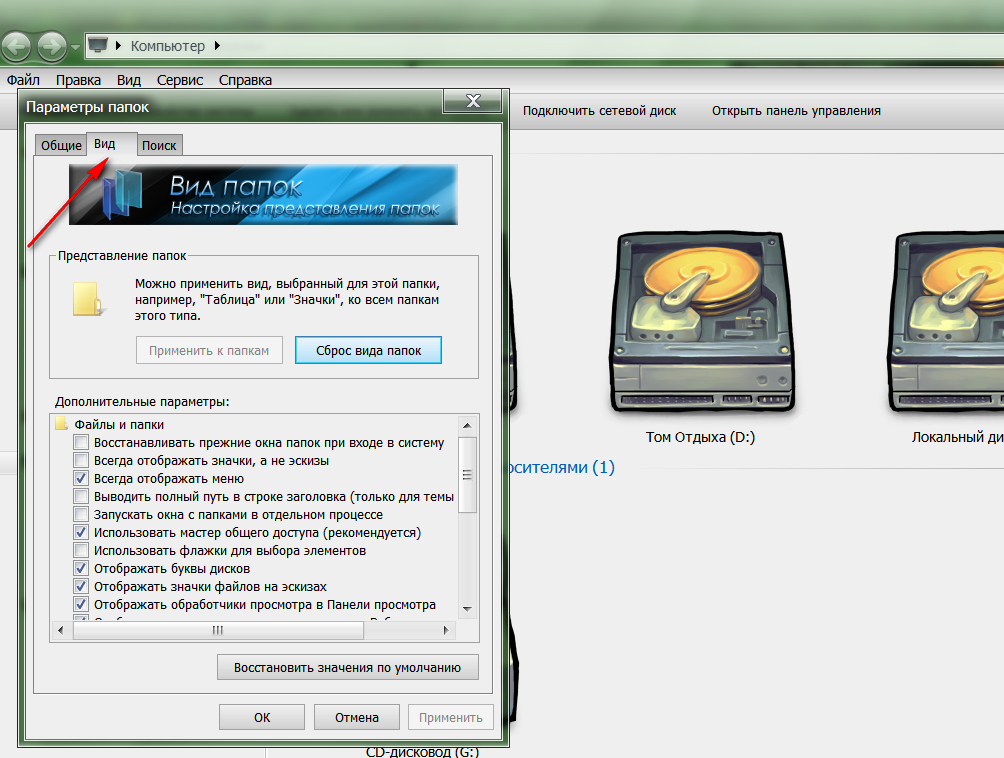
Folders have disappeared from the desktop, what to do, how to find, restore
- After that, scroll the slider down, check the box next to “ Show hidden files, folders and drives" and press " OK».

Folders have disappeared from the desktop, what to do, how to find, restore
- If the folders on the Desktop were indeed previously hidden, they will now appear on the Desktop again. Now you will need to make them visible by default. Right-click on the folder and go to “ Properties».
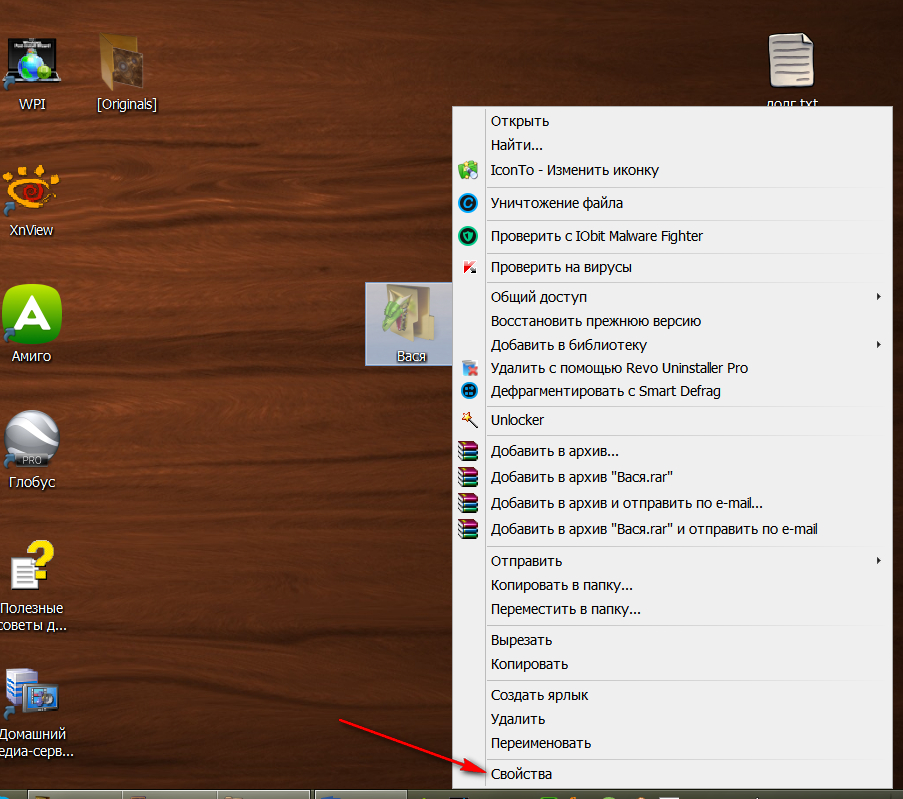
Folders have disappeared from the desktop, what to do, how to find, restore
- Next, uncheck the box “ Hidden" and press " OK»
![]()
Folders have disappeared from the desktop, what to do, how to find, restore
- Then follow the path again " Tools-Folder Options-View" and put the checkbox back to " Do not show hidden files, folders and drives", click " OK».
Folders have disappeared from the desktop, what to do, how to find, restore
These are the methods you can use to recover disappeared folders from the Desktop. Otherwise, the folders could have simply been deleted from your computer. How to recover files deleted from your computer, read on our website at this
Video: How to recover missing shortcuts from your desktop?
Video: Icons disappeared from the Windows 8 desktop
Something bad happened and you lost your files. Let's try to narrow it down first possible reasons and make a diagnosis. And then, if possible, solve the problem.
First you need to understand why the need to restore them arose. This could be a human factor, when you yourself accidentally deleted files or “cleaned” a disk or flash drive with a quick format. Or they even tried to incorrectly redistribute the space hard drive by using Disk Utility or iPartition if you have Bootcump and two installed systems Mac OS X and Windows.
Data may also be partially lost due to program failures, power surges, or incorrect handling of your Mac. For example, you accidentally turned off your computer while running and the file structure was damaged.
A completely different situation is when you accidentally dropped a disk on the floor, and after that it “knocking”, which means the spindle bearing is jammed or the magnetic heads are out of order. In this case, it is better to contact a specialized data recovery center, which will cost several thousand rubles.
We will talk, first of all, about files deleted after emptying the Trash (except for Secure Epmpty Trash - safe mode), because it is quite possible to restore them - “traces” remain on the disk.
Using Time Machine
Connect the drive Reserve copy and run Time Machine. You will see reservation windows. To get to the desired moment in the “past”, use the time scale. If exact date file deletion is unknown, scroll back arrow. Just click on it and Time Machine will automatically show the date last change. Or use Spotlight in the search field of Time Machine's Finder window. Enter the data in this window and click the same “back” arrow. Time Machine itself will find your file among the backups. Now click the "restore" button and lost file will be automatically copied to your desktop or to a folder you specify.
But a situation may arise when the disk or the system itself is so damaged that Time Machine cannot read the data. Then other utilities will come to the rescue.
Using recovery utilities
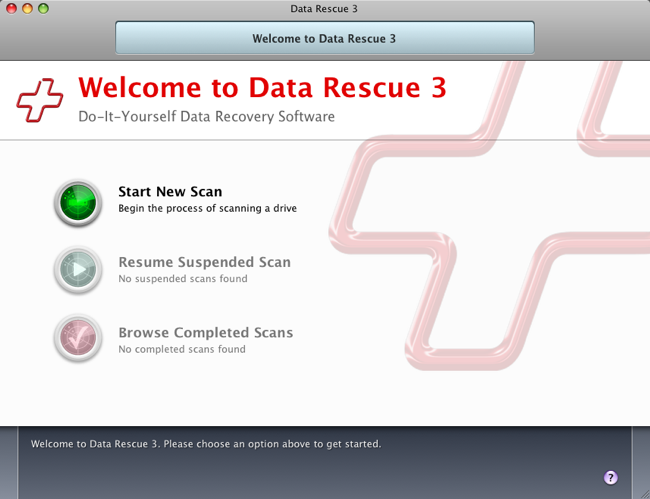
From Prosoft Engineering. Unique, thanks to its algorithm, recovery program deleted files or data from problematic media. Data Rescue is safe because it does not try to recover the disk itself, but only tries to “rip out” all possible files. It is distinguished by a simple and convenient interface, visual effects, function preview, the ability to pause scanning and an expanded list of recognized file types.
Data Rescue allows you to recover data even from digital cameras and music players.
Let's say you accidentally erased your favorite song: “Cheerleader” in .mp3 format. Launch Data Rescue and click Start New Scan.
Select the drive to scan from which our file or its partition was deleted (Select Drive or Volume), and click Next.

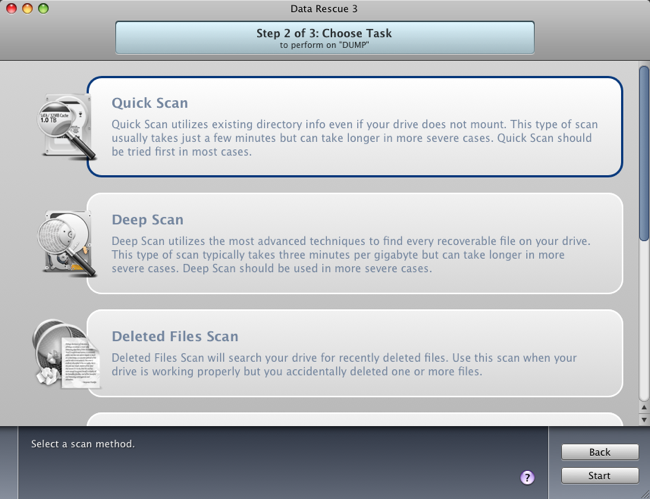
Then we assign the scanning mode. Simply click on the appropriate button in the main window. A good place to start is with the Quick Scan Directory. Click on Start.
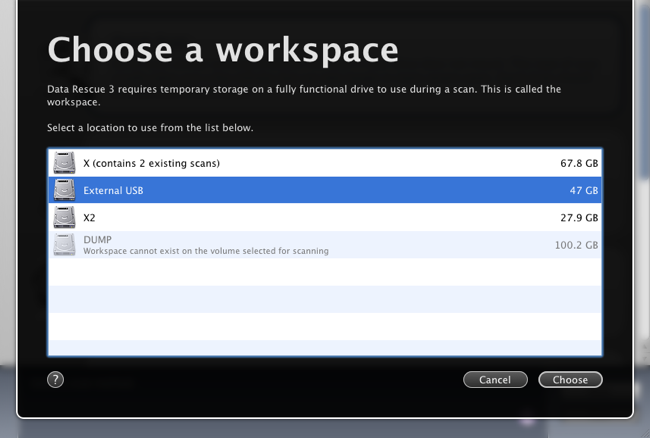
The program will ask for a folder to save the scan results (Choose a workspace). We choose and say Choose.
Run the Start Now process and wait for the results. (You can pause or cancel this procedure on the go.)
But the song was never found, and a full scan had to be done to get good results.
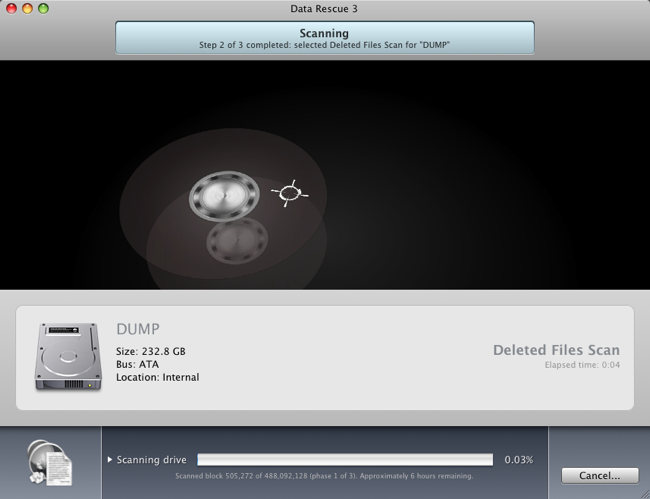
Select the Deleted File Scan mode and click on Start.
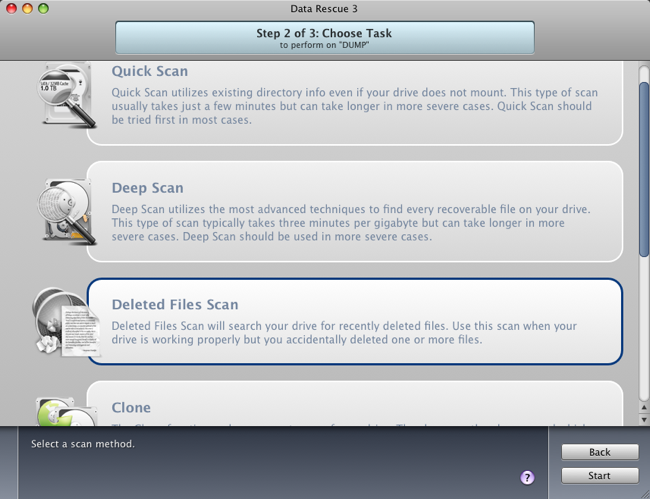
The search procedure this time took a full five hours, since I did not remember where exactly this file was stored on the disk.
We look through the results and look for our “Cheerleader”.
Data Rescue can organize them into separate folders by type and arrange them into separate folders: images (JPEG, TIFF, PNG, GIFF), video (Quicktime, MPEG-1), audio (MP3, AAC/M4A) and text (Generic ASCII text, RTF, XML, PLIST, Postscript (non-binary). Find in the folder Reconstructed files/Recreated image files our song Audio/MP3/Cheerleader.mp3
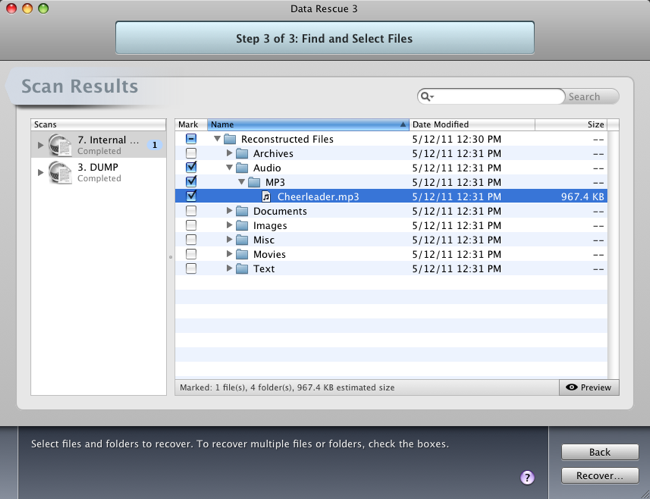
Check the box next to it and select Destination for Recovery and click Recover.
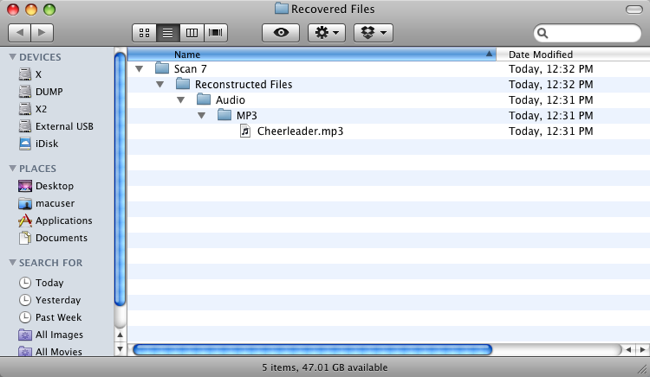
We copy the file back to the desired directory, launch iTunes and enjoy your favorite song.
Of course, Data Rescue has many more “subtle features”, but it completed our specific task honestly. The price of the program varies from $99 per regular version up to $249 for Pro version. And she's worth it.
From R-tools Technology Inc. It can also restore “dead” files.
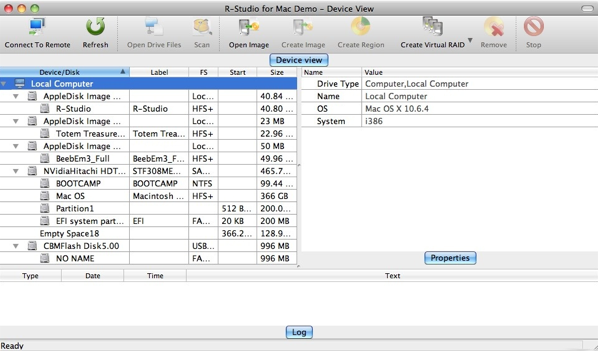
R-Studio helps you recover data even if the disks have been formatted. “Views” the contents of files to assess the chances of recovery. It will be able to “deal” with NTFS partitioning (Windows) if you have Bootcump installed and you use both systems or if your external drive is formatted so that it can be connected to a Mac and PC at the same time. Instructions for setting up the use of R-Studio are included with the installation image. The price of the utility is $79.99.
From the developer Cleverfiles.
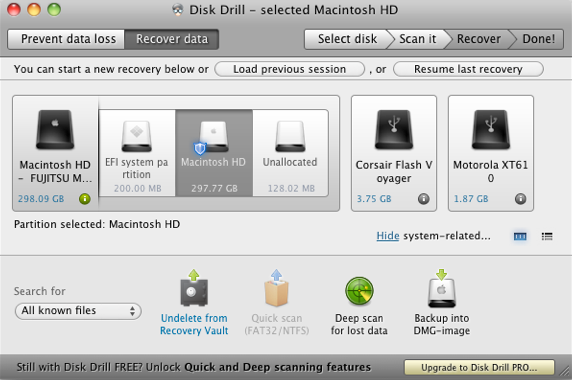
Like R-Studio, it recovers files from file Mac systems/PC (HFS/HFS+, FAT, NTFS). Similar to Data Rescue, it works in three scanning modes: search for deleted files, quick scan and full scan with detailed disk scan. The utility is free and its settings are also simple.
Unbunder from Yazsoft.
Lost file recovery programs are indispensable. Is it possible to make files “magically” appear back in the trash even after deletion? This is where Unblunder comes in handy. It is enough to install the utility and declare it as the starting one in system settings user of your Mac. Now in the Protect Unblunder's menu double click We set the parameters for storing information on your disks.
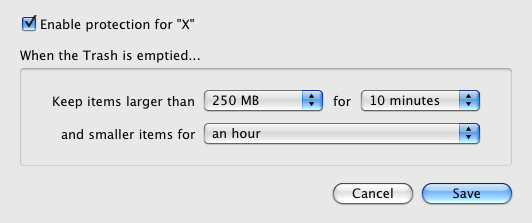
By default, there is a five-minute recovery interval for files larger than 250 megabytes. Smaller data can be recovered within one day.
But we will change the parameters, for example, we will leave Keep items larger than 250 MB, and increase the time from 5 minutes to 10. And we will say to store them not a day, but an hour (one hour). Click Save.
Now, after starting your Mac, a magic wand icon will appear in the menu bar. Just click on it, select Recover Deleted Items and in the window that appears, double-click on the name of the deleted file.
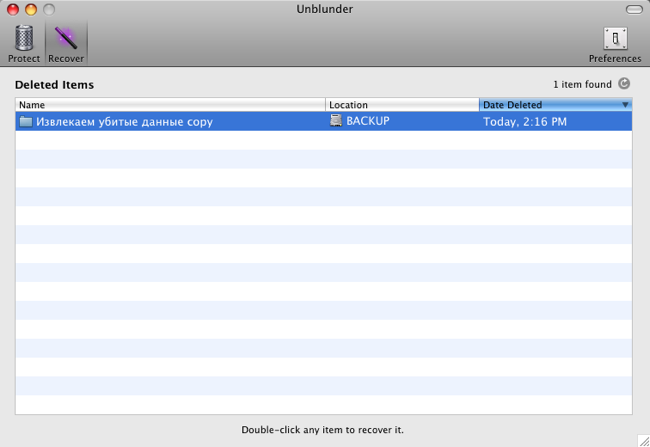
The erased file will appear in the trash again and all you have to do is remove it from there.
Unblunder's price is $10.
So never lose hope. And don't forget to do backups files dear to your heart.
Have you lost folders from your desktop and don't know how to get them back? Then you've come to the right place. Sometimes this happens and the reason for such a loss is quite banal. Getting them back is a matter of one minute, and we don’t need any programs for this. Let's look at several ways to return your folders to your desktop, and start with the simplest.
Typically, desktop folders and files simply become invisible due to the fact that you changed the screen resolution, and the folders were located at the edges of the desktop. In this case, they simply “went” off the screen.
In order to return them, you need to arrange the icons. This is done simply.
- Right-click on an empty space on your desktop and select from the drop-down context menu paragraph – View – Arrange icons automatically .
It happens that you accidentally dragged one folder into another and did not notice it. Then you need to look for it using Search. To do this, do the following:
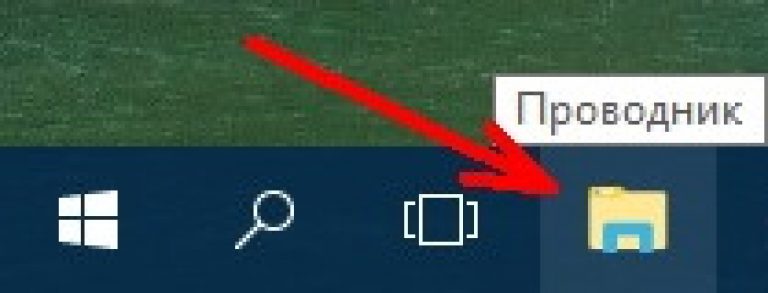
- INWindows 10 open Conductor,
And just like in the previous example, enter in the upper right corner in the field Search name of the missing folder.
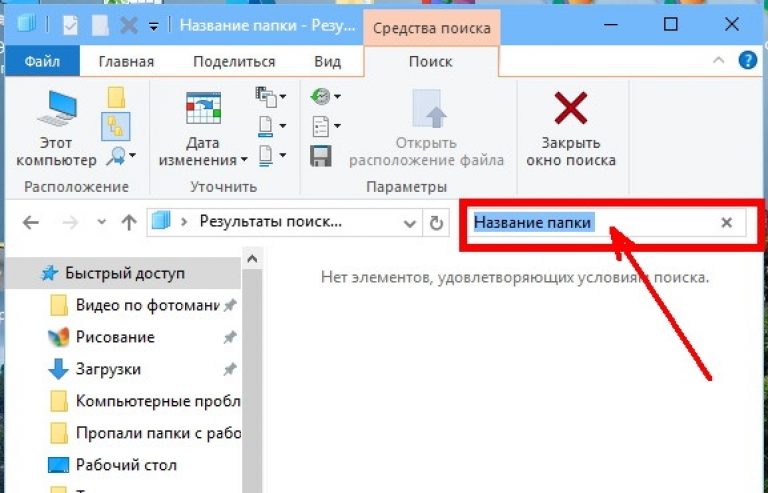
What to do if all folders from your desktop are missing?
If almost all or all of the folders on your desktop have disappeared, then you are most likely logged in as a different user. In this case, you need to either restart the computer or change the user (in Windows 7 this can be done without rebooting).
If, after a reboot or user change, the folders have not returned, then most likely a glitch occurred, as a result of which a new user was created instead of yours, and yours became inactive.
Then we do the following:
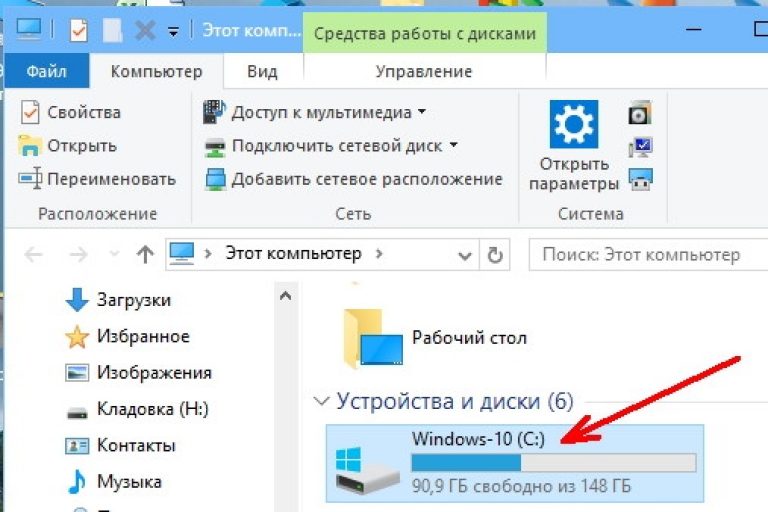
- Let's go in My Computer or open Conductor, and find the disk “ WITH:».
Open it and look for the folder “ Users" (in Windows 10), or the folder " Users"(in Windows 7).
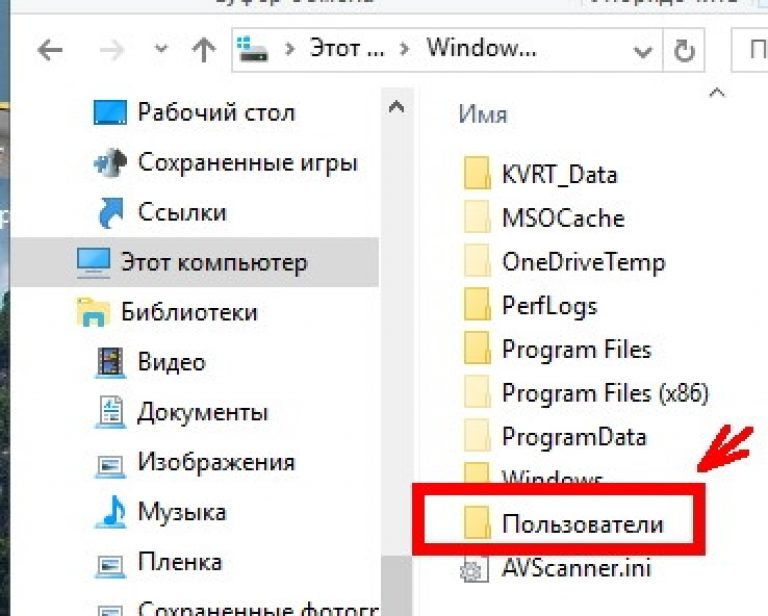
Open these folders and look for a folder there with the name of the user under which you log in to the system. I have this folder " Lyudmila" In Windows 7, a warning may pop up that you do not have rights to open this folder. Press the button " Continue».
2015-09-03 | Published in: Flash drive 54 commentsHello dear friends! Just recently, Brother asked for help; he lost folders and files on his external hard drive. According to him, the situation was standard, he connected an external HDD, as usual, I opened it and saw that half of the folders were simply displayed as regular files, simple white icons, and most importantly, that these same icons showed a size of 0Kb, although the space on the external hard drive was practically full. And so let's do everything in order and with pictures I will show what happened and what I did to restore the missing folders and files.
I asked Brother what he did to restore the missing folders? To which the answer was given - Checked all external hard for viruses, no viruses were detected, I tried different data recovery programs for the hard drive and flash drive, the result was zero.
Of course this external hard I no longer have the disk, I gave it to my brother, he, in turn, formatted the disk and put all the working folders back. But I took screenshots, which I will demonstrate now.
This is what the picture looked like after the folders on the external hard drive disappeared. As you can see, the folders took the form of regular files with a size of 0KB, although the space on the external hard drive was full. See screenshot below.
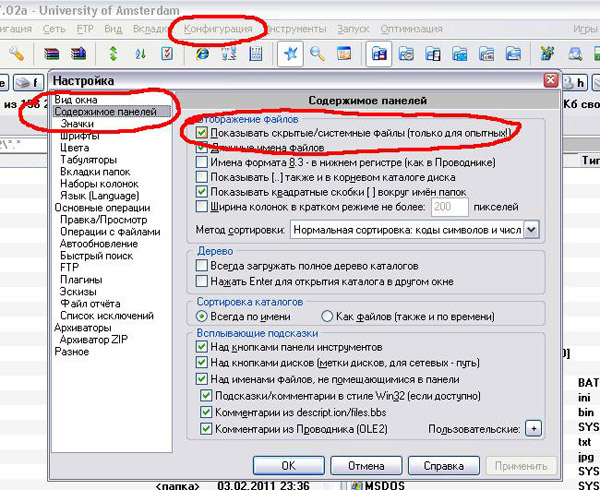
So let's get down to business . What did I do to recover files on an external hard drive. I used the program Total Commander, you can download it from any torrent or normal website. Instead of an external hard drive, I'll use my "C" hard drive as an example. Connect your storage device on which the folders or files have disappeared, no matter what it is, an external hard drive or a flash drive.
Open the Total Commander program, select the media.
In this window, click on the "Panel Contents" tab and check the "Show hidden/system files" checkbox. Click "Apply" and "Ok".
You will immediately notice that a red exclamation mark has appeared on all files.
Look carefully if empty files if they didn’t accept it, as in my case, then only one folder should appear and there will already be other folders with your information in it.
As you can see in my case, an additional folder has appeared found.000.
There were also folders in it, and already in them were lost (hidden) films, games, documents, family photos.
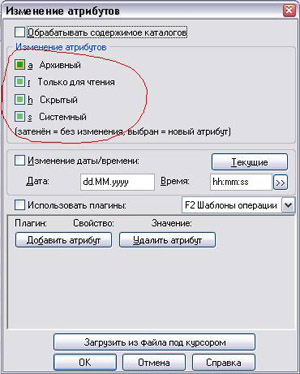
Next, what needs to be done. Select all folders and files from exclamation mark, to do this, hold down the Shift key and click on each folder and file. Next, click on the “Files” item and on the “Change Attributes” tab.
Following the forum topic, folders disappeared from the flash drive. This note contains recommendations found in it. Situation description: Folders on a storage medium no longer appear as if they had been deleted. However, the amount of space they occupy remains unchanged, i.e. the space is still occupied by the disappeared folders and the files in them. Most likely this indicates that the information was not deleted, but that the folders simply became invisible. This happens as a result of the actions of some viruses. Below I list ways to make folders visible again:
Enable showing hidden files and folders in Explorer
The simplest case is when the “hidden” and “system” attributes are set for folders, and Windows is configured in such a way as not to show hidden files and folders. It is enough to enable the display of such data and remove the attributes as described in the article: displaying hidden files and folders.
Remove attributes using command line
Another way to make data visible is using the command line.
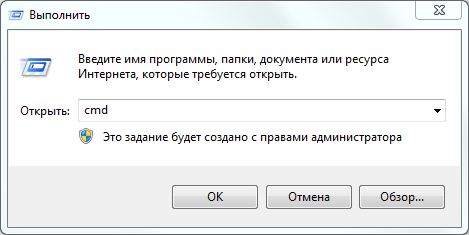
1) Open the command line: Start -> Run -> enter: cmd -> click “OK”;
2) In the black command line window, enter:
(where X is the drive letter or flash drive)
3) Select and copy the line below:
Attrib - s - h - r - a /s /d *.*
4) Right-click on the black command line window and press Enter.
Wait until the utility replaces the attributes of all files. After this, the files and folders will become visible.
File manager Total Commander
First you need to enable the display of hidden ones. To do this, go to the “Configuration” menu, then “Panel Contents”, check the box for “Show hidden system files”.
Open the flash drive, select the directories with an exclamation mark and remove the attributes: go to the “File” menu, then “Change attributes”. Remove the attributes and click “OK”.
File Manager Far Manager
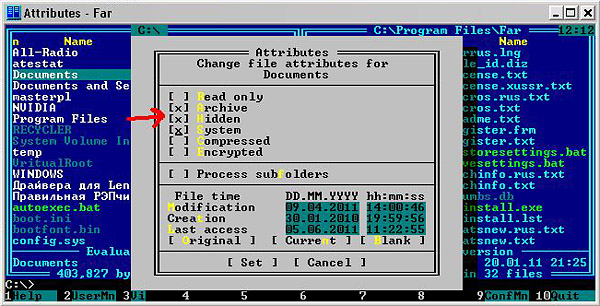
You can also use file manager Far Manager, which by default shows any hidden and system folders, and also allows you to remove unnecessary attributes. Download it, install and run. Further:
1) Open the flash drive in Far Manager: press the combination “Alt-F1 ; (left panel) or “Alt-F2 ; (right panel), then select the letter of the required media from the list.
2) Using the “Insert” key, select the hidden folders, press “Ctrl-A”, remove all unnecessary checkmarks from the “Read only” and “System” items, leave only “Archive”, and confirm with the “Set” button.
Here you can clean the RECYCLER folder, delete shortcuts (.lnk), unnecessary executable files (.exe), and, of course, the autorun file. inf, if present.
After these steps, the data on the flash drive will be displayed in normal form.
Some viruses go further - they rename or move folders to the E2E2-1 directory, which is not displayed in Windows Explorer. This is only relevant if file system The media is FAT32; this problem does not exist in NTFS. To find out what file system is on the flash drive, open “My Computer,” right-click on the flash drive, and select “Properties” from the drop-down menu. In the window that opens, look at the “File system” line.

For example, if your flash drive is connected as drive “E”, then go to:
Start -> Run -> cmd -> OK
In the black window that opens, you must enter the commands one by one, confirming each with the Enter key:
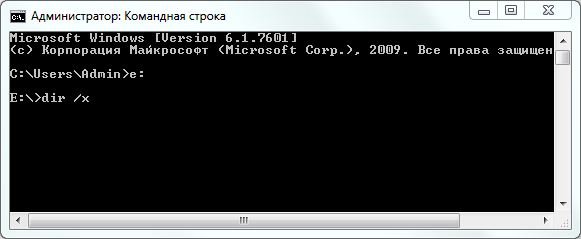
The first command makes drive E active. If the letter of the carrier is different, instead of E before the colon, indicate your letter.
The second command displays a list of folders and files on the media. If E2E2~1 is listed, run the command which will rename the folder:
3) ren E2E2~1 NewFolder
After this, the NewFolder folder will appear in Explorer. Instead of NewFolder, you can specify any other folder name if you wish.
In conclusion
That seems to be all about the restoration of missing information after the virus. Just do not forget that before the listed actions it is necessary that the virus itself be neutralized by an antivirus, otherwise the problem will recur.