Certain groups of users - visually impaired people or creative individuals - are thinking about how to change the font on a Windows 10 computer. They need this so that the text in windows, icons, applications becomes larger, easier to read, or has an interesting design and is pleasing to the eye. . These tasks are completely solvable using the internal capabilities of the system.
The easiest way is to change the size of the text using “System Settings”. You can get there like this:
1. Click on the gear icon located on the left side of the Start menu.
2. Click on the magnifying glass, enter the word “parameters” in the search bar and select an application with the same name from the results.

3. Call the “Context menu” by hovering the cursor over any part of the desktop and right-clicking, then select “Display settings”.

4. Press two buttons on the keyboard at the same time - Win (floating window) + I (English letter, but you do not need to change the language layout).
5. After going to “Parameters” using any of the listed methods, open the “System” section.

To change the font size you need:
- Among the available subsections displayed in a list on the left side of the window, select “Display” (usually it opens immediately, since it is in the first position in the list);
- Scroll down a little to the “Scale and layout” item. The functionality of this tool allows you to select the orientation (by default “landscape” or “portrait”, it is also possible to flip the image), screen resolution and text size;
- In the “Change text size” item, you need to click on the small black rectangle to display possible scale options - from 100 to 175% in 25% increments;
- Choose a size that is comfortable for the eyes.

After completing the described steps, the font will increase, but not everywhere. For the settings to take full effect, you must log out and log in again (restart your computer).
If the proposed text size options do not suit the user for some reason, he can enter an arbitrary value in the range from 100 to 500%. To do this you need:

2. In the window that opens, scroll down a little to the “Custom scaling” section.
3. Enter your value in the empty field and click “Apply”.

4. In the same window, just above, you can activate automatic blur correction by moving the slider next to the corresponding setting to the “On” position.

Changing the style
Sometimes for some reason (standard text writing is unpleasant to the eye or you just want to add a little creativity) you need to change the font style. This is also quite doable, although a little more complicated than setting up the scaling.
The method described below works in all versions of Ten since 1803.
This is important because in earlier editions the location of the necessary functional elements is different. Therefore, you should first check the version of the OS installed on the machine (click the magnifying glass, enter winver.exe, run the application) and, if necessary, update it (go to “Update Center”, writing this phrase in the “Start” search bar).

View your options
First, you need to decide which font to choose as the main one for the system and applications. Looking at the options already available in Windows 10 will help with this. This can also be done through “Settings”; how to access them is described just above. Only in this case, instead of “Systems”, you need to open the “Personalization” section. Further:
1. In the list of subsections located on the left side of the window (“Background”, “Colors”, etc.), select “Fonts”.
2. On the right side of the window you can see all the text writing options available on the machine.

3. If you want to check the availability of a specific font, you can enter its name in the search line.
4. To view all options, you can scroll through them using the scroll bar located on the right edge of the window or with the mouse wheel.
You can “get to know the font you like better” and customize it for yourself, for this:
1. Click on the name of the element (it is advisable to select options that support the Cyrillic alphabet, that is, in which the sample is written in Russian and with a style of 2 or more).

2. In the font settings window that opens, you can try to write arbitrary text in a special line to see how it will look in practice in all available styles (“italic”, “bold”, “regular” and others).

3. If you scroll down to the “Metadata” section, you can view detailed information about the selected element (name, location on the PC), select the main version of its style, or delete the font.

Adding new ones from the Microsoft Store
If viewing the fonts did not bring results, that is, none of the available ones satisfy the user’s needs, then you can download new options from the Microsoft Store. To do this you need:
1. At the top of the same window, click on the active link “Get additional fonts in the Microsoft Store.”

2. Select the element you like and click on it.

3. Click the “Get” button.

Change system via REG file
To change the font set as the main font on your computer in Windows 10, you need to:
1. Open a window with a list of fonts in “System Settings” and leave it open so that at a certain moment you can see the name of the element you like.
2. Create a new “Notepad” editor file (right-click on the desktop or in any other directory, select “Text Document” from the “Create” command suggestions).

3. Open it and copy the following text:
Windows Registry Editor Version 5.00
"Segoe UI (TrueType)"=""
"Segoe UI Bold (TrueType)"=""
"Segoe UI Bold Italic (TrueType)"=""
"Segoe UI Italic (TrueType)"=""
"Segoe UI Light (TrueType)"=""
"Segoe UI Semibold (TrueType)"=""
"Segoe UI Symbol (TrueType)"=""
"Segoe UI"="New font"
4. In the last line (where it says “Segoe UI” =) change the value of the “New font” parameter to the name of the font you like, which will have to be written manually, since copying is not provided in the “Parameters”.

5. Go to the “File” menu section at the top of the document.

7. Set any name, for example, “My style”.
8. After the name, put a dot and add the extension - .reg.
9. Confirm the action by clicking the “Save” button.

10. Close all windows and go to the directory where My style.reg is saved - the previously created document.
11. Right-click on this file and select the “Merge” command (usually the top one in the context menu).

12. Confirm your intention to interfere with the operation of the system registry by clicking “Yes” in the system request window and OK when it reports that the operation has been completed.

13. Restart your computer.
Attention! Making any changes to the registry when entering characters incorrectly or other inaccuracies can lead to a system failure - partial or complete failure of Windows 10. Therefore, you should be careful when carrying out these manipulations. Inexperienced users should not resort to this method.
Restore system default
If you are tired of the new system font and want to return the standard text writing options in Windows, then you need to:
1. Go to “Font Options” (“Start” → “Control Panel” → “Fonts” or “C drive” → “Windows” → “Font”).
2. In the left part of the window, find and expand the “Font Options” subsection.

3. Click on the “Restore font settings...” button.

It’s not difficult to customize fonts, but it is strongly recommended to first create a backup copy of the OS to roll back changes in emergency situations.
Have you ever wanted to change the standard select? I think yes. However, doing it yourself, and beautifully, is not an easy task. To facilitate this labor-intensive process, quite a lot has been invented JavaScript plugins. And today we will analyze one of them.
It's called " Multi-Column-Dropdown". You can download it from the link:
http://goo.gl/A2tzG8
Then connect CSS And JavaScript Plugin.
Load the CSS:
"MultiColumnSelect/MultiColumnSelect.css"
Include js plugin:
"MultiColumnSelect/MultiColumnSelect.js"
Make a structure HTML pages, as shown in the example at the same link in paragraph
Set up your HTML
Then call the plugin as shown in paragraph
Call the plugin
Everything is commented in detail there, but in English. I will translate into Russian.
- multiple- use select with one choice or with many?
- useOptionText- use text from settings. Set to false if you want to use images
- hideselect- hide standard select
- openmenuClass- class for button switch
- openmenuText- text for the button
- openclass- class added to the button when opened
- containerClass- class for the parent container
- itemClass- class for menu items
- idprefix- assign as id for items. For example, "item-" = #item-1, #item-2, #item-3...
- duration- animation duration
- onOpen- hover function
- onClose- function triggered when abducted
- onItemSelect
Here is such a simple, but beautiful and even effective plugin, and, most importantly, you can change the styles for your select without loss of functionality.
Ubuntu comes with a set of standard, pre-installed programs, including the Firefox web browser and the Thunderbird email client.

Although these programs have their fans, there are also people with other tastes. Users often wonder how to change the default browser or install a different email client.
For most standard programs in Ubuntu, such as a browser, email client, text editor, music and video player, there is a very simple way to replace them. Not everyone knows about the settings panel in which these very changes can be made, so let's open new horizons.
Mozilla Firefox is a solid and reliable free browser, but not every user is ready to use it.
In order to change the default browser in Ubuntu you need to first install a new one:
Free web browsers such as Epiphany, Chromium and IceWeasel are available from the Ubuntu Software Center.
Well-known browsers like Google Chrome, Opera and Vivaldi can be downloaded from their official website.

- Open 'System Preferences' from the Unity main menu
- Select the ‘Details’ tab
- Select ‘Standard Applications’
- Change the 'Web' section from 'Firefox' to any browser of your choice
- And that is all.
How to change default email client in Ubuntu

Ubuntu comes with the standard Thunderbird email client, which means that clicking on any email link will automatically open that client.
It's most convenient if you're used to Thunderbird, of course. But for most people this is not the case; For most, something like Geary or the Gmail email service is more familiar.
To change the default email client in Ubuntu open System Settings > Details > Standard apps. Select the 'Mail' menu item and indicate your preferred client there.
To make Gmail the default email client on Ubuntu, install the ‘gnome-gmail’ package first by clicking on the link below. After installation, open System Settings > Details > Standard Applications. Select the 'Mail' menu item and enter 'Gmail' there.
If you have already worked with WordPress, then you have probably seen that all useful content in the form of images, style sheets, themes and plugins in WordPress is stored in the folder by default wp-content. But what you probably didn't realize is that you can change the name of this folder to something else and the engine will still work!
One of the benefits of renaming "wp-content/" is that it will make your site look less WordPress-y, while this property can also add some sort of security or something.
Now we will show how all this can be done.
Create a new folder
In our example we will rename the folder wp-content V assets. Please note that after renaming this folder, all activated plugins or themes will be deactivated and will not appear on their assigned pages, since WordPress will not be able to find them in the default location - the wp-content folder.

Config modification
Now you need to make a few changes to the file wp-config.php, but it’s still better to make a backup copy of this file before making changes to it. And then, in case of something unexpected, we can always return it from backup.
First, add the following line before require_once(ABSPATH . 'wp-settings.php');(usually located at the very bottom) to tell WordPress that the path wp-content was changed to assets.
Define("WP_CONTENT_FOLDERNAME", "assets");
Then we'll add the following line just below the previous one to point WordPress to the new folder path.
Define ("WP_CONTENT_DIR", ABSPATH . WP_CONTENT_FOLDERNAME) ;
After adding the line above, WordPress will again detect and display a list of installed themes and plugins.


To fix this, add this line to specify the new folder link.
Define("WP_SITEURL", "http://" . $_SERVER["HTTP_HOST"] . "/"); define("WP_CONTENT_URL", WP_SITEURL . WP_CONTENT_FOLDERNAME);
That's all. Now all plugins, themes and any other media you upload will be saved in our new folder.

It should be noted!
There are some plugins and themes that don't really follow development standards. They specify “wp-content” as the path and link “hard-coded”, stitching the path into the file rather than defining them on the fly. In such cases, plugins and themes may not work fully or not work at all.
Moreover, it also breaks links to images that are already attached to posts and have been uploaded to the folder wp-content.
Therefore, the above modification should be used with caution, and, ideally, it is of course better to do this if you are just about to install WordPress, or have just installed it. Otherwise, the site may completely break down, and a huge number of details will have to be corrected.
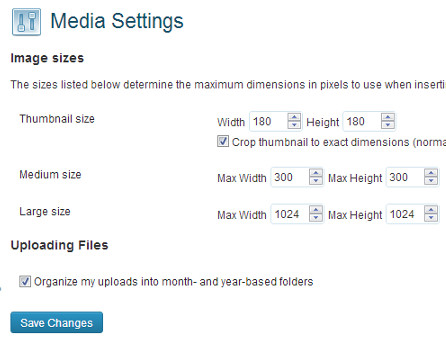
How to Change Default Media Path in WordPress
The new media loader introduced in version 3.5 is probably one of the most significant changes in that version. Another important change, but less discussed, was the disappearance of the setting in the admin panel for changing the download directory from the menu Options. The reason for this removal from the interface was that it was not used as often as other options. Also, changing it could lead to disastrous consequences for the site if the user did it accidentally. Removing the setting simplified the interface, leaving only the ability to organize folders by month/year. Below we will tell you how to change the default path to media files in WordPress 3.5+.
Note: Follow the steps below if you are NOT new to WordPress. Or if you understand what you are doing.
To change the default path to media files you need to edit the file wp-config.php, located in the root directory of your WordPress installation. If you want your downloads folder to look like this wp-content/files then you need to put the following code in wp-config.php:
Define("UPLOADS", "wp-content/"."files");
If you want your downloads folder to be outside the wp-content directory, for example http://www.example.com/files/, then you need to set the downloads path in wp-config.php like this:
Define("UPLOADS", "".."files");
Remember that you can choose to sort your downloaded files by month/year at any time. Settings » Media.
In the latest version of its operating system, Microsoft has done a lot to improve the appearance of Windows 7. However, everything, even the best, gradually gets boring and users begin to look for an opportunity to change their usual working environment. A banal change of desktop wallpaper does not count - today we will talk about a deeper change in the “windows”.
Themes and styles
The program does not require installation, but you must run it as an administrator ( Right click - Run as administrator). After this, the utility will automatically patch your system, making it possible to install various themes. Then you need to specify the path to the necessary files from the theme you downloaded and click on the Install Theme button. The theme will appear on the right in the list of installed themes. Now just select the desired design option from the list and click Apply Theme to change the appearance of your system.
Start button
To change the appearance of the Start button, use the program Windows 7 Start Button Changer. The utility comes with ten design options for the start button. After selecting the appropriate option, Explorer will restart and you will see the updated Start button.

Program icons
You can also change the icons of installed applications using standard Windows tools - by selecting the desired image in the file properties. But for all installed programs this takes quite a long time, so it’s better to use the application 7conifier, which not only allows you to change a lot of icons in one fell swoop, but also comes with several eye-pleasing themes.

You can easily switch between sets of icons in the program interface, and also restore the default set if you followed the program's advice and made a backup copy when you first launched it. With 7conifier you can create your own icon sets.
Well, as a result, after applying all the above programs, your system will take on a completely new look. For example, this one.