Personal Monitor
Control program
at the computer and staff
Keep an eye on children or employees discreetly.
Record all user actions
personal monitor for mac os x
Free version
for 3 days
Five reasons to use Mipko Personal Monitor on your Apple Mac
1. Be calm about your loved ones
Does your child occasionally use your Mac to chat with friends or surf the Internet? With the Mipko Personal Monitor tracking program, you do not have to restrict your child’s freedom by prohibiting him from visiting certain sites. Why ban if you can observe? Launch Mipko Personal Monitor, and the program will record a variety of child activities on your Mac. When your child finishes working, you can launch Mipko for Mac in visible mode and view a full log of all his actions.
2. Have peace of mind about your Mac
One of the reasons you probably chose a Mac is to immerse yourself in the work you love. Therefore, you should install Mipko Personal Monitor, at least to gain confidence that no one else is working with your documents or communicating on the Internet on your behalf.
Mipko Personal Monitor can work both in visible mode and in covert surveillance mode, without giving away its presence in any way. When the operating system starts, Mipko Personal Monitor will automatically record the login time and record all subsequent user actions in the log. Returning to your computer, you can open the log and find out about everything that happened to it in every minute of your absence.
3. Know the truth. All the truth
Mipko Personal Monitor automatically and discreetly records a variety of activities performed by users on your Mac. What keys were pressed, what websites or applications were launched - you will know all this. Additionally, Mipko Personal Monitor takes and saves screenshots so you can get a clear picture of your computer activity. Is a regular keylogger capable of this? It is difficult to imagine a more complete recording of user actions at the computer.
4. Stay committed to the Apple philosophy, even in small things
Apple's philosophy is expressed by the succinct phrase “it just works.” The same can be said about the program for Mac - Mipko Personal Monitor. Firstly, you don't have to waste precious time learning the program interface. Secondly, Mipko Personal Monitor does not slow down the operating system and other running programs. Thirdly, you only need to indicate your wishes for the operation of the program when you first start it. And then she will do everything herself, without requiring your participation.
5. Have peace of mind with a reliable assistant
Users who use Mac OS X rarely have to think about external threats such as viruses or spyware. But this does not mean that you should forget about threats from within - the leak of personal data from your computer. Know that your Mac is equipped with an invisible all-seeing eye that takes care of all the worries of monitoring uninvited guests.
Easy to install

Download Mipko. Launch the program. Click Install. Everything will take a minute or two.
Websites visited

Mipko remembers web pages visited through Apple Safari, Google Chrome and Mozilla Firefox.
Screenshots

Get the full picture. Mipko takes snapshots of web pages you visit, social media posts, and regular snapshots of your entire desktop.
Chat entries

Snapshots of VKontakte, Odnoklassniki and Facebook messages are saved. Chat messages sent and received via Apple Messages and Adium are also recorded.
Typed text

Mipko monitors keyboard input and records all typed and copied text.
Reports by mail

Enter your email address and receive regular reports and screenshots.
Search and filters

Search for events by text, date or category to quickly understand everything.
Unnoticed

You can hide Mipko or protect it with a password. The program will not be visible until you press the key combination.
And further
Automatic cleaning of old or large recordings;
Bookmark important events;
Select the programs you want to record;
Recording actions with a computer and programs.
SYSTEM REQUIREMENTS:
To run Mipko 4.0, you need the macOS 10.15 Catalina, 10.14 Mojave, 10.13 High Sierra, 10.12 Sierra or 10.11 El Capitan operating system.
It is difficult to maintain the system in proper form, relying only on native Mac OS X applications. We decided to make a selection of useful and, most importantly, free utilities for all occasions. The article offers a set of various applications, ranging from system cleaners and tweakers to organizers and display managers . Clicking on the utility name takes you to the developer's home page.
Internet update
AppFresh
If you want to keep all your apps, widgets, and settings panels up to date, download AppFresh. AppFresh displays all version information of installed programs in one window and allows you to quickly update outdated applications.
System alerts
Growl
Growl is a universal system utility for notifying users. Growl displays a message from any program, for example, about the arrival of an email message, the completion of downloading files/torrents, the name of a song in iTunes, etc. The list of supported programs is huge.
System monitoring
iStat Pro
iStat pro is a widget with a large number of parameters for monitoring any Mac system processes, including the status of the processor, memory, disks, network, battery, temperature, fans, boot, uptime and many others.
iStat Menus
Eight separate menus in the menu bar to control all Mac system parameters. iStat Menus allows you to monitor CPU, memory, disks, network, temperature, fans and power, Bluetooth, date and time.
WhatLCD
Easily and naturally WhatLCD will tell you all the information about your monitor connected to your Mac. To obtain detailed information about the display, just install this small utility.
System prevention and cleaning
iBackup
iBackup backs up files, folders and applications on a schedule. The utility supports plugins for backing up personal settings: dock, background image, time, firewall, bluetooth and others. In addition, iBackup can back up program settings in Mac OS X.
Preference Cleaner
Settings files may become corrupted and cause applications to become unstable. In the case of a large number of presets, it is easier to delete damaged files than to look for the source of the problem. PreferenceCleaner is a utility that makes it easy to delete program settings files on Mac OS X.
Onyx
Onyx is a tool for comprehensive cleaning and prevention of Mac OS X. The utility allows you to clean the system and perform flexible configuration of Mac OS X without a terminal. To clear the cache or turn off Spotlight indexing, you must enter an administrator password. The developer provides a free version of the utility for each Mac OS X system: Jaguar, Panther, Tiger, Leopard and Snow Leopard.
Permissions Reset
Permissions Reset is a simple utility designed to solve the most annoying problem in Mac OS X - permissions problems. Are you unable to save work files to your documents folder or edit another user's document? Use Permissions Reset!
System tweaks
smcFanControl
smcFanControl allows you to control your Mac's fans using the settings panel in the menu bar. In some cases, the utility can be quite useful.
Secrets
Secrets is a settings panel for activating all the hidden Mac settings: disabling widgets, bouncing dock icons, changing the format of screenshots, enabling viewing of folder contents in Quick Look, and much more.
Lab Tick
If you are annoyed by the uncontrolled backlight of your MacBook keyboard, then use Lab Tick. The utility allows you to adjust the brightness of the keyboard backlight.
iTool
iTool is a free multifunctional tool for comprehensive system prevention. The graphical interface helps you quickly select the desired task. Besides keeping your system clean, iTool enables some hidden features of Mac OS X.
DejaMenu
DejaMenu displays any application's menu items as a context menu. For keyboard geeks, DejaMenu offers hotkeys to speed up access to program settings and eliminate the need to use the mouse.
Screeni
Screeni is a free applet that launches a screensaver instead of a desktop background image. The screensaver takes up a fair share of processor time, so to reduce the load on the system, we recommend using one of the non-resource-intensive screensavers: Computer Name, Flurry, Spectrum or Changing Pictures.
Dock Spaces
Dock Spaces is a small application for setting up multiple docks. The utility allows you to create up to ten different docks and switch between them using the icon in the menu bar. For example, you can create a dock for music or video programs, a dock for system cleaning, a dock for communication, etc.
System interface
Hide Folders
Hide Folders is a free application for hiding documents or folders. With one click you can hide/show files or folders with all their contents. A simple program that allows you to protect valuable files from being modified or viewed by other users.
Menu Eclipse
Menu Eclipse is a small utility for changing the transparency of the menu bar. Now you can not be distracted by the top line of the menu and protect this part of the LCD display from burnout!
HotBox
HotBox is a background application for scaling objects to full screen: just press the hotkey and highlight the desired object. The use is simple: by pressing a key, a cross appears to highlight the desired area, after which it is scaled to fill the entire screen. HotBox can be useful for watching videos or flash.
MagiCal
MagiCal is a free menu bar calendar. The utility supports many settings for displaying the date and time and can supplement or replace the built-in system clock. In addition, MagiCal offers a convenient drop-down calendar that can be placed anywhere on the screen.
Screen Shade
ScreenShade is a tool for expanding the brightness control function of the screen (or screens) of Mac OS X. The utility is useful for those who often use the computer in low light conditions.
Organizers
File Actions
A small application for automatic file organization. The utility regularly checks unparsed files and puts them into folders according to specified rules. Installing and configuring File Actions is the easiest and fastest way to keep your Mac organized.
The Unarchiver
The Unarchiver is an advanced replacement for the built-in archiver in Mac OS X. The utility supports many formats, including Zip, Tar-GZip, Tar-BZip2, Rar, 7-zip, LhA, StuffIt and many others.
SyncTwoFolders
SyncTwoFolders is a utility with a self-explanatory name for simple synchronization of two folders. Suitable for multiple accounts to synchronize the contents of system folders (for example, the desktop).
XShelf
For quick access to items, place any files or folders from the Finder on the XShelf. You can drag individual files or a group of objects onto XShelf, as well as text, links, etc. XShelf allows you to get rid of fiddling with Finder windows when moving files and folders.
Permanent eraser
Permanent Eraser provides highly reliable file deletion using the Gutmann method. The utility overwrites the data thirty-five times, distorting the original file name and size when deleting it from the system. After this, it is unlikely that they will ever be restored.
DMG Canvas
DMG Canvas creates disk images (.dmg). The procedure for creating an image consists of simply dragging and dropping the required files into the application window. You can use a file created in a graphics editor as a background. The utility allows you to immediately see the disk icon. To create an image, click the Build button.
iDMG
iDMG is a simple application for creating DMG files using drag'n'drop. The utility supports AES128 and AES256 encryption and different file systems.
SnapNDrag
SnapNDrag allows you to take screenshots by clicking on a button and dragging them from the program window to the desired location. For example, to send a picture by mail, you need to drag it from SnapNDrag into the mail program. No need to remember key combinations, mess around with temporary files and dialog boxes.
NameChanger
NameChanger is an excellent utility for batch renaming files.
Today we will show several such methods. Take the time to explore them all, and then you can choose the one that suits you best.
Dock
The easiest way to see what apps are currently running is to look at the Dock. If you see a shining indicator under the application icon, then this application is open and running.
There's nothing wrong with this method, but it's limited because it only shows windowed applications—those that run in the OS X GUI. It also doesn't allow you to do anything directly with the running application.
Finally, the aforementioned glowing indicators are small and can be difficult to see, with some people not seeing them at all. Fortunately, there are more interesting ways to view lists of applications running in OS X.
Use the Command+Option+Escape combination and you will see the Force Quit window, which in OS X can be thought of as a simple task manager.

In this window, you will see an easy-to-read list of all active (running) applications in OS X, which will include all the applications you would see in the Dock.
Despite the window's name, you can use it to view a list of running applications and programs without quitting them.
The obvious advantage of the Command+Option+ESC window is the ability to directly influence the application. In particular, an application can be terminated if it becomes unresponsive. Basically, this window is a simplified version of the “Control+ALT+DELETE” task manager from the Windows world.
The main limitation of the Force Quit window is that it only shows windowed OS X applications and cannot see various background processes (as is the case with the Dock).
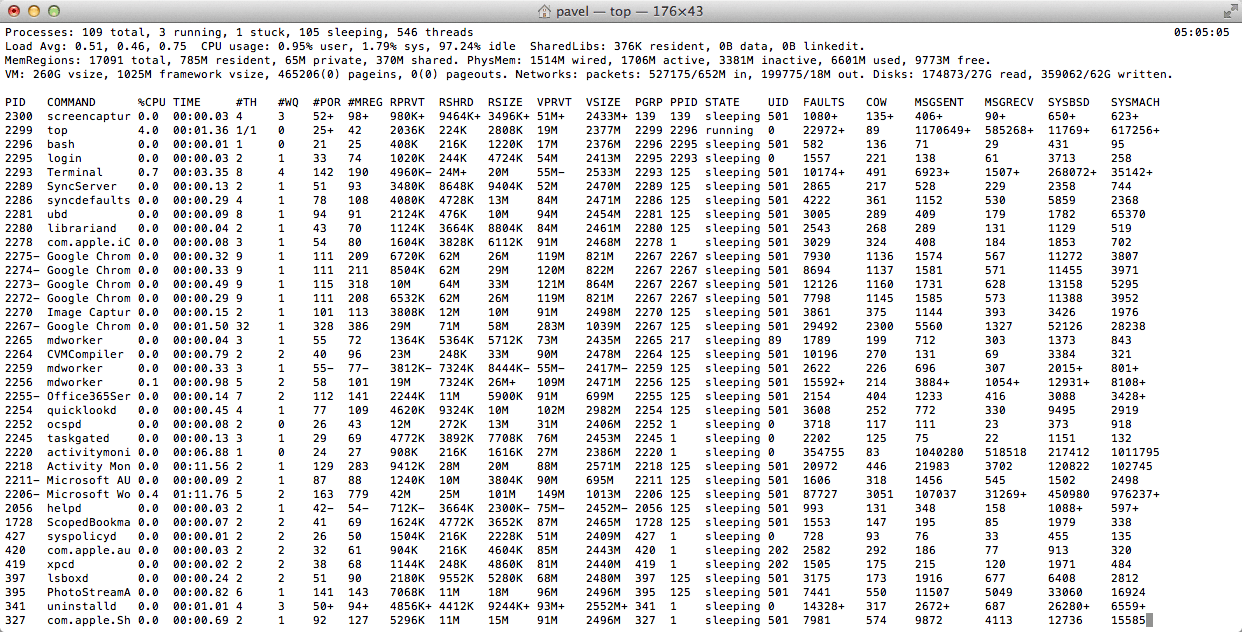
The most powerful utility for managing applications and processes in the OS X GUI is System Monitor. This is a powerful task manager that will show not only all running and active applications, but also all active and inactive processes.
In other words, System Monitor shows almost everything running on a Mac, including the aforementioned windowed applications, background applications, menu bar items, system-level processes, other users' processes, inactive processes, service daemons - or almost anything that is running as a process at any level of OS X.
This utility is located in /Programs/Utilities/, but it can easily be launched through Spotlight or Launchpad.

To simplify the list presented, call up the processes submenu and select what you need, like “All processes”, “My processes”, “System processes”, etc. Don't forget about the search form on the right - it can be very useful when quickly searching for a specific process.

System Monitor offers many tools and options, and is the most advanced way to view advanced information on all active processes without using the command line. This utility allows you to forcefully terminate processes and applications, sort processes by name, by PID, by user, by CPU usage, etc.
Moreover, “System Monitor” will also present you with general statistics on the use of the central processor, memory, disk and network activity, which can be necessary when solving various problems, ranging from identifying the reasons for inadequate use of system memory to understanding the reasons for system slowdowns.

An added bonus is that System Monitor can be kept always on. Plus, you can pin it to the Dock and see CPU, memory, disk, and network activity in real time.

Once you access the Command Prompt, you can use several additional tools to view a list of all the applications running on your Mac. In many ways, these tools can be thought of as command line versions of System Monitor. Today we will look at a couple of such tools: top and ps.
The top command will show you a list of all running processes and various statistics for each process. Typically, sorting by CPU usage or by memory usage is most useful.
You can sort processes by CPU using the command:
Sort by memory usage:
Information from top is updated in real time, but information from ps is not.
By default, the ps command will only show the processes of the current user, so it’s not very convenient to use it just like that. But if you add a flag or two, you can see all the processes. In particular, a good flag combination is aux:
To see the entire output of the command, it is better to expand the Tarminal window. But even in this case, you will be overwhelmed by the number of processes running (a common occurrence). Therefore, it is better to use the above command with the prefix more or less:
This command will allow you to view processes page by page, without scrolling up and down the Terminal window.

To find a specific process (or application), you can use a grep command like:
ps aux|grep Process
You can also search by application name:
ps aux|grep "Application name"
Which of the above methods should you choose? You decide. Some users may use System Monitor or even the Command Prompt, while others may want to use the Force Quit menu. In any case, do not forget to visit the pages of our website, and we will definitely tell you something else interesting about OS X.
The only thing worse than unexpectedly crashing applications are those that stop responding to external stimuli in the face of a user desperately pressing buttons, but continue to function, consuming resources and filling up the RAM with digital garbage. Luckily for us, there are at least 5 methods to combat this problem.
In contact with
How to close a frozen program on MacOS
Method number 1 - hot buttons
Combination of ⌘Command + ⌥Option (Alt) + Esc opens a window for forcing the termination of running programs. The list presented shows the currently running applications, the space on the right is usually empty. If in any line there is an inscription “not responding”, feel free to click on it, highlighting the frozen program. In difficult cases, there may not be an inscription - you will have to call on intuition and observation to help identify the troublemaker.
The only button on the bottom right leaves no alternatives; all we can do is emergency close the selected application. Let's try. But usually we do it easier, as long as we remain within the window of the frozen program, we use a more complex combination of hot buttons ⌘Command + ⌥Option (Alt) + ⇧Shift+ Esc. Hold them down for three long seconds and OS X will automatically close this window.
Method number 2 - using the Apple menu ()
At the very top of the desktop, in the far left corner, there is a magic icon in the form of the company logo , which opens access to the basic functions of the system - in case of a problem, click on it.
 In the drop-down menu, approximately in the middle, there is a line “ Force quit", that's what we need. And then a familiar window opens with a list of currently running applications - you already know what to do, the buggy enemy will be promptly defeated.
Method number 3 - force closing the program from the Dock
Find the shortcut for the frozen program on the bottom panel (in the Dock) and press the button ⌥Option (Alt) and right-click with the mouse - a special service menu will open.

One of the items in the menu that opens is the same forced termination; further steps are obvious.
Method number 4 - use the Terminal
The transition from a window interface to a console interface, a more complex level of interaction with macOS in case the problem turned out to be serious and the previous methods did not bring results. The program is located in the system utilities directory - find it and run it. In the window that opens, type the command “ top” and press the enter key - this is how we instruct the computer to generate and display a short report about its current state. Including reporting on what programs are running and how they behave.
Among the variety of symbols, we are interested in the column entitled “ Command", the names of currently running applications are printed here. You need to manually find the stuck one, and it is worth considering that abbreviations are used for long names - attentiveness will not hurt.
Next to the name of the program you are looking for there is its digital number PID(system identifier) - this is what we need. In the old fashioned way, we copy it into a notepad or, keeping up with the times, take a photo with an iPhone camera.
Press the " q"- this command closes the list and moves the cursor to an empty line, the system is ready to receive new instructions and deal with the problematic application.
This is done with the loud command “ kill", after which, separated by a space, you should write the PID of the intruder. In this case, these are Viber and 403, so the final version looks like “kill 403”.

Click " Enter" - the job is done, but if the system does not respond, you can tighten the order by typing the following command " sudo kill -9 403", should help.
Method No. 5 – using the System Monitoring utility
In this case, this system tool for advanced users can be perceived simply as an expanded version of the menu with a list of running programs. The utility icon is located in the same place as Terminal– find and launch the program.
The extensive list that opens should not frighten you, look for it in the column “ Process name"our frozen application and select it with a mouse click.

At the top and left there is a button " End the process” - this is exactly what it does, unloading software from memory and freeing up system resources on the Mac.
On MacOS, you encounter certain inconveniences while using your computer. Which is quite natural, because the differences are quite significant. Familiar menu elements, functions, modes and options - everything is not the same as before. It’s not difficult to figure all this out, it’s just a matter of time. One of the most used and useful Windows utilities is the well-known Task Manager. Of course, the need for such an application often arises among MacOS users. In this article we will figure out how to open the task manager on a Mac, what utility replaces it and how to use it. Let's get started. Go!
For those who switched from Windows to Mac
First of all, it should be noted that Apple developers did not provide a full-fledged analogue of the Task Manager, however, they implemented a somewhat simplified version of this utility, which is called “Force Quit Programs”. Unfortunately, it does not have the range of functions that the application has in Windows, but it does an excellent job of its direct task - forcefully ending programs and processes.

Minimalistic process completion dialog
Getting into the program window is just as easy. To do this, use the key combination command+option(alt)+esc. After this, a utility window will open in front of you, in which you can see a list of running processes. It's very easy to work with. Select the required process and click the “Finish” button.
![]()
Force Quit Programs window
Using the keyboard shortcut Command + Option + Escape, we make the “Force Quit Application” window appear, after which we select the “End” item to close the program. The operation performed is a more simplified version of the command in System Monitoring, which allows you to free several processes from memory at once.

Force termination of a program from the Dock
You need to perform the following combination: move the cursor over the icon in the Dock and, holding ALT (Option) on the keyboard, click the mouse. As a result, the frozen application will be forcibly closed, without additional confirmation.
Force quitting an app from the Apple menu
Hold down the Shift key on your keyboard and click on the Apple logo in the top menu bar. Now select the command “Finish “...” forcibly”. This method is the easiest to remember. However, it happens that the computer does not react in any way to pressing these keys.
Using System Monitoring
In order to launch the System Monitoring system utility, press the Command + Space key combination and enter the name of the program in the Spotlight window. After the dialog box appears, we find the “frozen” application either by name (as a rule, tasks that are immune to the effects are marked in red) or by identification number (ID), and then click “End process”. This method of unloading unnecessary software from memory is very similar to that used in Windows, only instead of System Monitor there is Task Manager.

Using the Terminal to unload processes
If none of the above methods helped you, the most effective method in this situation is to use the command line. Launch Terminal and enter one of the following commands:
Killall [process name]
For example, with the “killall Safari” command you will kill all processes associated with the Internet browser. And if you know the ID of the open application, which can be found using the “ps” or “ps aux” commands, you can unload the “frozen” program in the following way:
Kill -9 , where 9 is the aforementioned ID parameter.
You should be extremely careful when taking actions aimed at forcibly closing programs. Any termination of processes may cause the operating system to crash. And if you also work with the command line, this can lead to the loss of unsaved data and system settings failure.
Sometimes an unpleasant situation occurs when Mac OS X programs stop responding to keystrokes or mouse presses - “freezing”. Fortunately, this happens quite rarely, but if you have ever encountered such a problem (and I’m sure that at least once in your life you have encountered such a problem), then you will probably be interested and useful to learn about several ways how this “frozen” application can be terminated.
1
Force Quit via Apple Menu.
Hold down the Shift key ⇧ click menu Apple () and in the drop-down menu find the command “Force quit [program name]”- this is that treasured menu item that allows you to “kill” an unresponsive program.
2
Force exit via the Dock menu.
While holding down the Alt ⌥ key, right-click on the frozen program icon (which you want to close)- a menu will appear containing the item “ Force quit" Selecting this menu item will forcefully terminate the program.
3
Forced exit via hotkey combination.
The keyboard shortcut Alt ⌥ + Cmd ⌘ + Esc opens the “ Forced termination of programs" The window that appears lists all open programs. Select the frozen program, and then click on the " Complete" An active frozen application can be forcibly terminated using another keyboard shortcut, bypassing the list. To do this, use the keyboard shortcut Alt ⌥ + Shift ⇧ + Cmd ⌘ + Esc.
4
Forced exit through “System Monitoring”.
System utility System monitoring provides information about CPU, memory and network usage. In addition, through it you can also very quickly “kill” any system process, and not only that. This is done like this: select the “hung” process from the list and click on the big red button “ End the process" After this, a dialog box will appear confirming your actions.
5
Force shutdown of an application using the Terminal.
If all the steps described above do not help, then you still have the opportunity to terminate the frozen application through the command line. To do this, run the utility Terminal and run the following command:
Killall [process name]
A live example for forcing a program to terminate " Calculator" will look like this:
Killall Calculator
Please note that the process name or application name is case sensitive, so Calculator And calculator- these are different things. Don't forget that the team killall works at the system level and its thoughtless execution can lead to the loss of unsaved data since automatic saving will not work in this case.
Attention! Use these methods only in emergency situations, when you are sure that the application is really hopelessly frozen. All of the above methods of forcing programs to terminate immediately “kill” the process without the ability to auto-save data. Keep in mind that all information not saved while the program is running will be lost.
Almost all OS X applications work well and do not cause problems. They can be left open for months, and thanks to the UNIX platform inside the OS X operating system itself, they will work stably. However, there are situations when something goes wrong: the application may freeze or simply behave strangely. In such cases, you can quickly terminate it using various methods.
Quickly close an application from the Dock
While holding down the ⌥ key, right-click the application icon in the Dock and select Force Quit.
In a similar way, you can quickly restart the Finder by holding ⌥, right-clicking the Finder icon and selecting Restart.
Force Quitting OS X Applications
If quitting via the Dock is not an option, for example when you are playing a game in full screen mode, then you can press the key combination ⌘ + ⌥ + ESC to display the Force Quit Applications window. In this case, the active (or hung) application will already be selected, so to quickly end it all you have to do is press Enter twice.
Terminate applications or processes through System Monitor
By launching the System Monitor application, you will see all the currently running processes. Select the unwanted application or process and click the red End process button. System Monitoring allows you to use a filter to search for the required process; this is very convenient, since not all running applications can run in the background, without displaying a graphical interface.
Applications for Mac OS X It's getting bigger every day. In the Mac App Store you can find a lot of nice and interesting programs that you just want to try. But the resources of any Mac are not endless, and some programs, despite their attractiveness, consume a fair amount of RAM and can even cause the system to slow down.
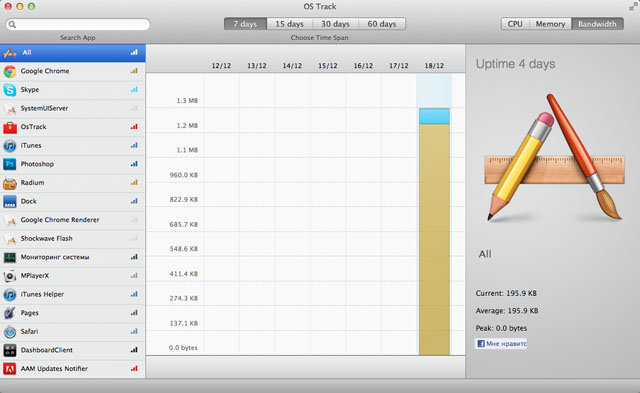
Of course, Mac OS X already has a standard System Monitor tool that helps identify these types of applications. But the interface of the standard utility does not look very clear, to put it mildly. And here a small one comes to our aid free program from the Mac App Store called OS Track.

The interface is much nicer and more beautiful than in standard monitoring. The application works just as simply - after launch, it hangs in the background and collects statistical information on the following parameters: processor load, traffic consumption, RAM usage.

In the main working window of the program, on the left you can see a list of all applications that were launched at least once while OS Track was running; the statistics themselves are located in the center. Statistics information is shown in the form of layered columns, for which a color scheme is used that is closest to the colors of the icons of the analyzed programs. Each “layer” is one process, and the diagram on the right shows more detailed information. Viewing is also available for periods of 7, 15, 30 and 60 days. Statistical data is stored in the program for a maximum of the last 60 days, all older information is deleted.

There is a function to search for the necessary programs by the first letter of the name of the application or process, which is sometimes very convenient and can be useful. The settings menu is almost absent; only one option is available - “Delete all statistics”.
In conclusion, we can say that OS Track is a very good solution for Mac OS X; the program does not load RAM and will always help identify power-hungry applications.
General information about the program:
Type: Utilities.
Devices: Mac.
Version: 1.03.
Developer: Bloop.
Price: For free.
Requirements: Mac OS X 10.6 or higher.
Tested on MacBook Pro.