Most of the things we create Word Documents, can, and, in most cases, consist of several pages and even several dozen pages. Such documents include abstracts, reports, projects, term papers, contracts, business plans, some reports, and other documents. According to generally accepted design standards, the pages of such documents must be numbered.
Some documents should be numbered from the first page to the last, while others, for example, are numbered starting from the second or third page, or from some other.
Today we will talk about the simplest and most commonly used pagination, which we can apply to most of the documents we create. In the examples, I use my working sketches from one of the Power Point articles.
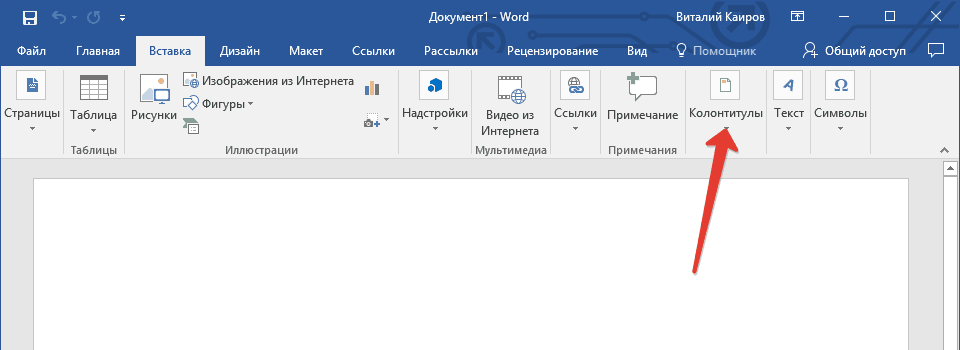
The necessary options with which we number the pages of the document and format (edit), in general, change the numbering itself directly, are located in the "Insert" and "Page Layout" tabs of the top menu:
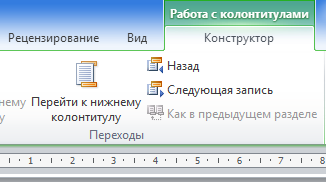
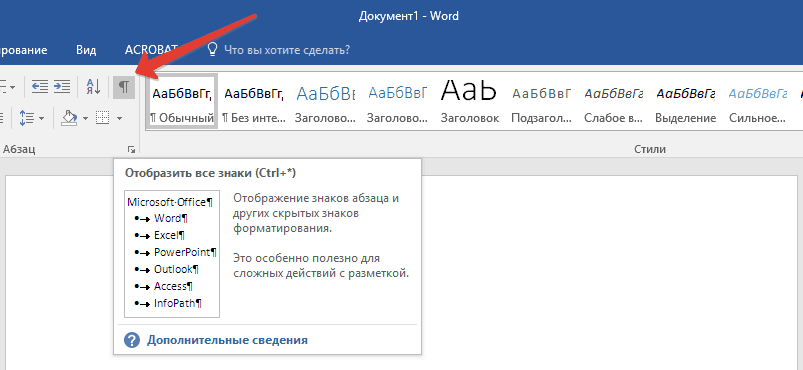
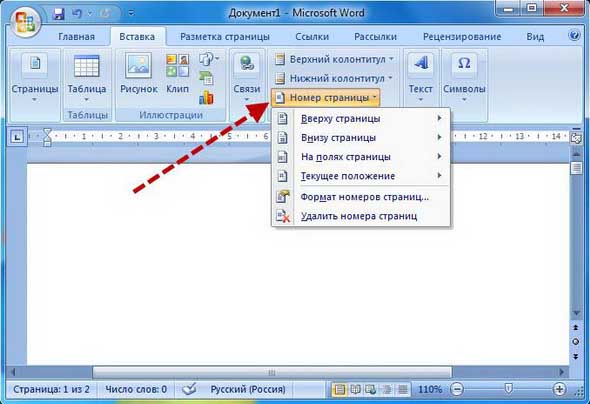
I would call the numbering options in the "Insert" tab the starting ones, since with the help of them we start the page numbering. Let's open the "Insert" tab and direct all our attention to its "Headers and Footers" section, with the "Page Number" functionality located in it:
Let's press this main button "Page number" in order to see a list of options:
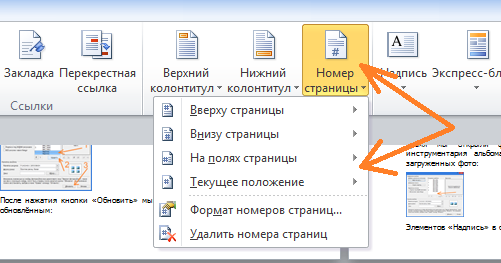
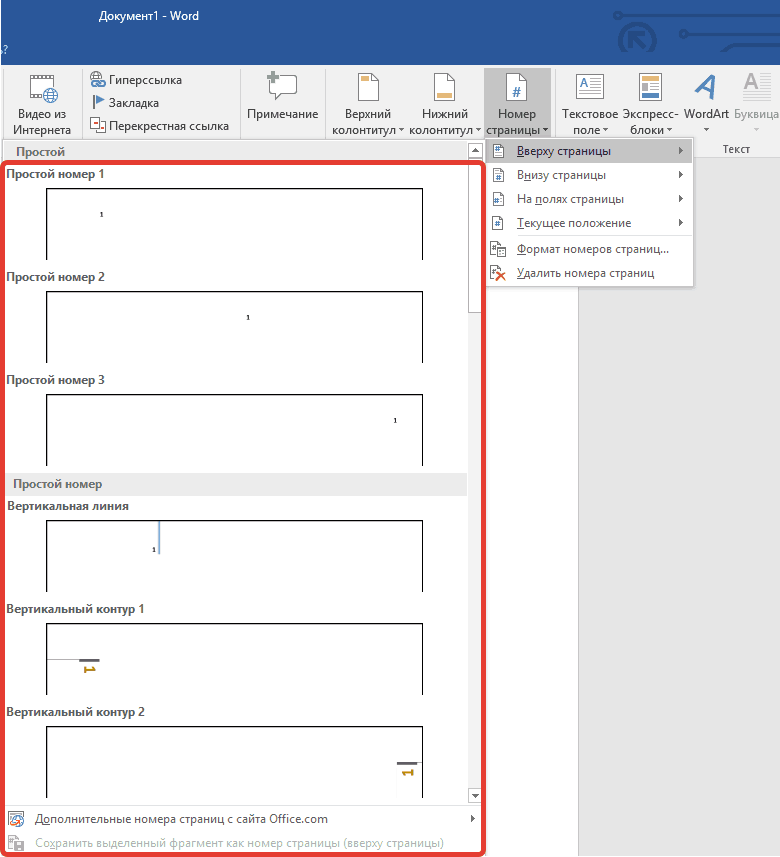
The first three options (counting from top to bottom) contain numbering patterns, that is, options for the arrangement of numbers on the page. The option called "Current position" (4th in a row) also contains numbering templates, but working with these templates is somewhat different from working with the numbering of the first three options. Numbering with the third option is the same peculiar and also different from pagination with the first two options.
But the first two options "At the top of the page" and "Bottom of the page" we, perhaps, can number the pages most often. Let's talk about them first and talk today.
Since the pagination using these options is almost identical and the difference is only in the location on the page (at the top and bottom of the page) and the forms of the numbering itself, in the examples we use the “Top of the page” option.
Let's click to select it:
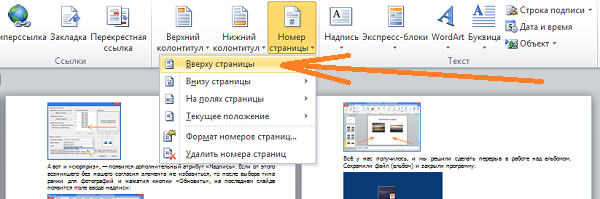
and a list of numbering format templates will open before our eyes:
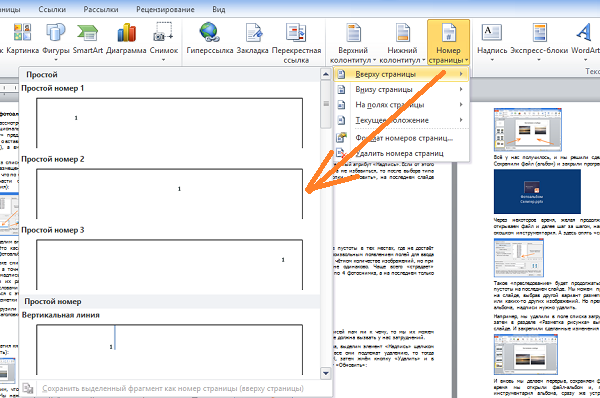
Those patterns that our eyes will see are only a part of all numbering patterns. In order to see other templates and make a choice at our discretion, we need to move the slider on the right side of the window, or click the up / down arrow buttons:
When choosing a template, we must also consider the nature of the document we are working on. The "playful" numbering format is not suitable for business documents.
As soon as we select one of the templates with a mouse click, all pages of the document will be automatically numbered (I specifically chose a template with a clearly visible numbering):
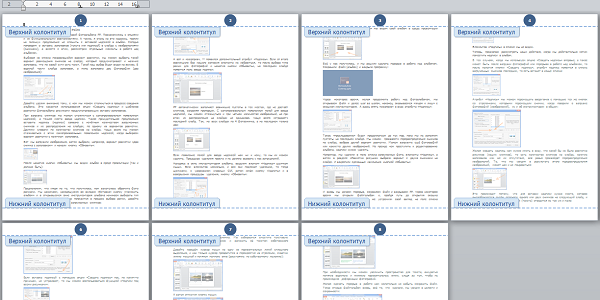
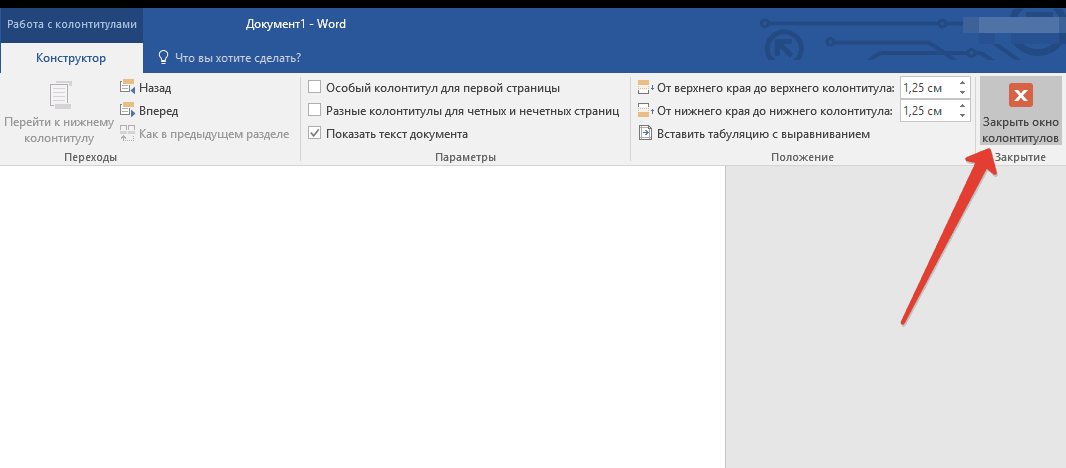
Since the main button "Page number" is located in the "Headers and footers" section, the page numbering occurs in the mode of working with headers and footers with the simultaneous activation of the new tab "Designer":
Therefore, we see all these dotted lines and inscriptions. After the pages are numbered, you need to exit the mode of working with headers and footers. To do this, press the button to close the window for working with headers and footers:
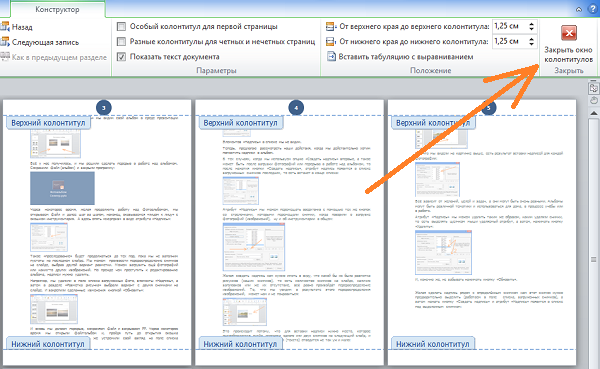
After pressing this button, all dotted lines disappear, but the pagination we need remains:
We can apply numbering as soon as we start creating a document, as well as “in the midst of work” or when editing the text is completely finished and pagination is the final step in working on a document.
Once applied to the pages of a document, the numbering is retained. If we applied the numbering at the very beginning, that is, at the moment when we just started working on the document, then we do not need to worry about the numbering of the following pages. In this case, each new (next) page will be numbered automatically:
In the case when we work in a team on a project, we can only work with a certain part of the document. For example, we got the final part. The rest of the team members each numbered their own part of the document, and the page numbering of our part of the document should begin with the number 65.
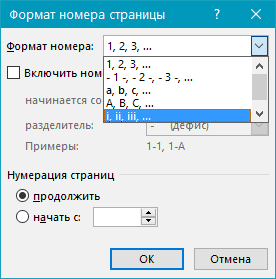
In order for the page numbering to start with the number 65, we need to use the "Page Numbering Format" option by selecting it in the already familiar list of page numbering options:
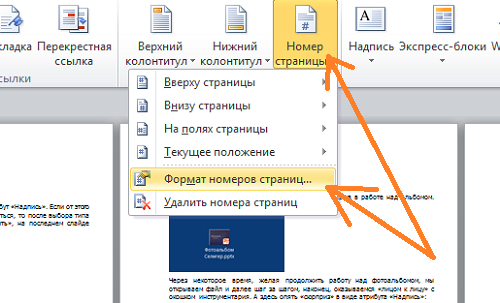
Let's make the choice of this option with a simple mouse click, and a window for setting its parameters will open in front of us. In this window, we can change the format of the numbering itself:
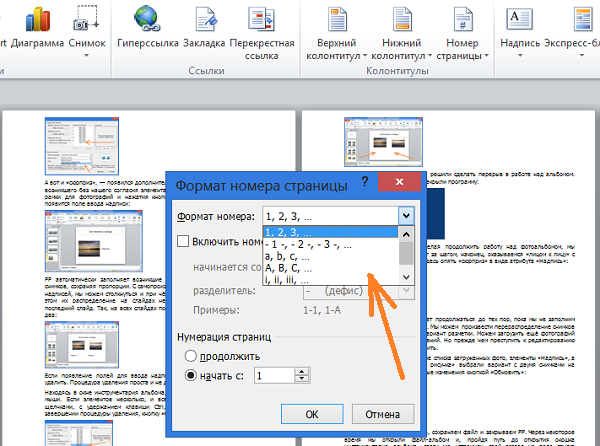
and also set the initial page number, from which the page numbering should begin:
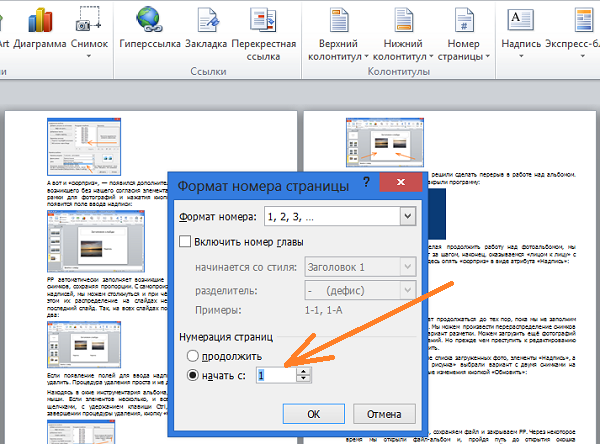
In our example, the numbering should begin with the number 65. We need to write this number (select it with the arrow buttons) in the “Start with ...” input line. Let's do this - write it:
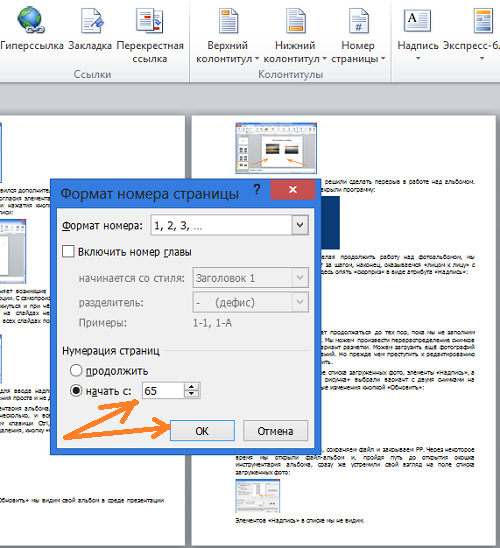
Well, the final action will be pressing the "OK" button.
And what do we see? We see the whole picture. The pages of our document, as they were without numbering, remained just as clean.
But the fact is that we have completed only one part of the settings. Now we need to perform another part of the settings, that is, select the desired template in the list of numbering templates. In other words - determine the location of the numbering on the pages.
Let's select the "At the top of the page" option (it serves as an example for us) and a list of numbering templates will open before our eyes, in which the number 65 appeared:
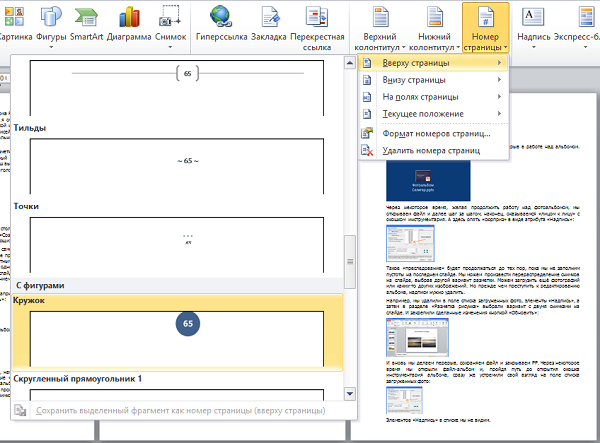
With a mouse click, select the desired template and the pages will be numbered:
And finally, close the window for working with headers and footers:
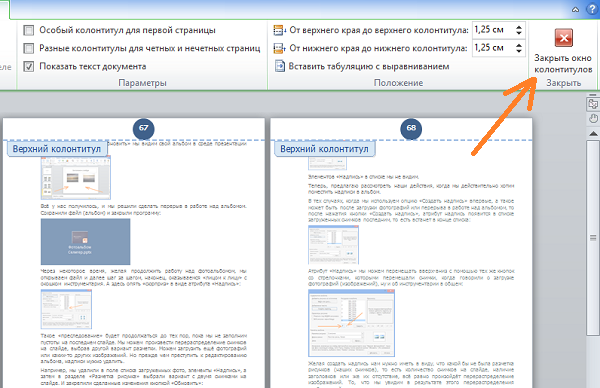
and all dashed lines will disappear:
We can first select a numbering template - let the pages be numbered, and only then in the "Page Number Format" box enter the desired number of the first page (we had number 65). The initial numbering will automatically change, and the first page will already begin with the number 65 (the number from the example).
We already know how to number the pages. And if we need to change the numbering format or it turns out that it is not needed in some document, then we will use the “Delete page numbers” option. We saw this option in the pagination options box.
Instruction
Text editor Microsoft Word provides its users with maximum opportunities. In this editor, you can type texts, select the most suitable fonts and sizes for its design. Separate options allow you to create frames for text, highlight text, add images to the document, change styles, select synonyms and much more. For large documents, page numbering is available. This process quite simple and will be accessible even to a beginner who only knows the basics of Microsoft Word.
The Microsoft Word text editor provides its users with maximum opportunities. In this editor, you can type texts, select the most suitable fonts and sizes for its design. Separate options allow you to create frames for text, highlight text, add images to the document, change styles, select synonyms, and much more. For large documents, page numbering is available. This process is quite simple and will be available even to a beginner who is just learning the basics of Microsoft Word.
Download the Microsoft Word text editor to your computer. This program You can (and most safely) download from the official Microsoft website located at http://microsoft-office.biz/. Download one of the versions of the program offered on the site and install it on your computer following the prompts of the installation wizard.
Any version of the program, starting from 2003, is suitable for work. On the top menu bar on working panel find the "Insert" tab. A list with numerous functions for inserting various objects will appear before your eyes. Find and click on "Page Numbers". A small window will appear, which is called “Page Numbers”.
Decide in which part of the page the future number will be located. To do this, use the arrow to select the desired item in the columns "Position" and "Alignment". Also check the box next to "Number on the first page" if you want it to be present there. If the document format does not require the first page numbering, leave the corresponding field blank.
Click the "Format" button at the bottom of the window. A new window will open "Page Number Format", where you can take advantage of additional features on how to put page numbering in Word. You can choose the most diverse number format, ranging from standard Arabic numerals to Latin letters and Roman numerals. If you want to optionally include a chapter number, then check the box for the desired item and adjust the heading style with the arrows. The last one is the “Page Numbering” column, where you need to specify from which page the sheets of the document will be numbered.
Also in versions Microsoft Office Word 2003 and 2007 pagination can also be enabled via headers and footers. Headers and footers are the areas of the page located on its margins. Headers and footers are located on the sides, as well as at the bottom and top of the page. They are often used for logos or other images, titles, stamps, document headers, footnotes, document titles, date placement. You can also set page numbering in headers and footers. In this case, the document pages will be determined automatically, increasing by one with each page.
To set pagination through headers and footers, on the top toolbar open document Microsoft Office Word, find the "View" menu. Click this button and click "Headers and Footers" in the drop-down menu. After that, a header and footer panel will open on the working field of the program, and an area for entering text at the top of the page. From the Headers and Footers menu, navigate to the bottom of the page by clicking the Header/Footer button if you want the page numbering at the bottom. On the same panel there is a button "Page number". Click this button, and its serial number will appear on the page.
You can open the "Headers and Footers" menu in another, simpler way. To do this, double-click on the bottom of the page - in its bottom margin. Then put the line number in the field. Here you can also choose other values for the header and line numbering. When you open the header and footer, an additional window will open on the working panel of the document. In the left part of the panel, find the "Page Number" section, click the button and in the drop-down box specify the value you need to place the page number (at the top of the page, at the bottom, in the margins of the page) and the page numbering format. It can be a numeric value, alphabetic, alphanumeric, numeric - symbolic. In addition, from the menu that appears when opening headers and footers, you can specify other values for the header by selecting and ticking one of the settings items: a special header for the first page or different headers and footers for even and odd pages.
You can also open the panel with headers and footers by opening the "Designer" menu. Further actions are carried out in accordance with the steps described above.
In the Microsoft Office Word 2010 package, the page numbering in a document is put down as follows. In the top panel, select "Insert" and in the "Headers and Footers" subsection, find the "Page Number" icon. Click on it and select the numbering position (top, bottom, in the margins, current position), after which the program will offer you a whole list of numbering examples. Choose the one you like and left click on it. The numbering will be put down on all pages of the document in the header.
To number pages in Microsoft Office Word 2013, open the document you want to number, on the working toolbar, find the "Insert" tab. Click this button and open the expanded full menu "Inserts". Find the “Page number” item, move the mouse to this inscription, click the button and select the numbering format in the drop-down box. That is, you need to specify how the numbers will be located on the pages of the document: at the top of the page, at the bottom of the page, in the margins of the page, the current position. Select the numbering format and numbering format (numeric, alphabetic, etc.).
Numbering in Microsoft Office Word is much richer than in other versions of the program. So, if you open the full "Insert" menu and click the "Page Number" button, you will see typical variations in the placement of signatures on sheets. Click again on the lines with arrows and select a template that will help you put in page numbers automatically. When you click on a number, a small panel opens in which you can change the font and color of the number.
Page numbering is necessary for the correct organization of the document. Numbering is especially important when you want to print a voluminous document with a table of contents. Numbering will make it easy to find the pages you need and navigate through topics that do not have broken text. AT text editor Microsoft Word can set page numbering in several ways.
Instruction
For Microsoft Office Word 2003 and 2007 editions, the method of including numbering through headers and footers is suitable. Top word line select "View" and click "Headers and Footers" from the drop-down menu. A header and footer panel will appear on the working field of the program, and an area for entering text will appear at the top of each page.
In the Header/Footer panel, you can navigate to the bottom of the pages by clicking the Header/Footer button if you want page numbers at the bottom. On the same panel you will find the "Page Number" button. By clicking on it, its serial number will appear on the page.
Another way that allows you to insert page numbers into a document in MS Word 2003 and 2007 editions is to enable numbering through an insert. In the top menu, select "Insert" - "Page Numbers". A dialog box will appear on the screen. In it, you can select the position of the page number on the sheet (top / bottom) and set the alignment of the page number. If you don't want to home page was its number, uncheck the corresponding checkbox in the dialog box.
In the Microsoft Office Word 2010 package, the page numbering in a document is put down as follows. In the top panel, select "Insert" and in the "Headers and Footers" subsection, find the "Page Number" icon. Click on it and select the numbering position (top/bottom/on
Microsoft Word is the most popular word processor, one of the main components of the MS Office suite, recognized as the generally accepted standard in the world of office products. This is a multifunctional program, without which it is impossible to imagine working with text, all the features and functions of which cannot be contained in one article, however, the most pressing questions cannot be left unanswered.
So, one of the common tasks that users may encounter is the need to put pagination in Word. Indeed, no matter what you do in this program, whether it is writing an essay, term paper or thesis, report, book or regular, large text, it is almost always necessary to number the pages. Moreover, even in cases where you do not really need it and no one requires it, it will be very difficult to work with these sheets in the future.
Imagine that you decide to print this document on a printer - if you don’t immediately fasten it or sew it together, how will you then look for the right page? If there are a maximum of 10 such pages, this, of course, is not a problem, but what if there are several tens, hundreds of them? How much time will you spend on ordering them in case of emergency? Below we will talk about how to number pages in Word using the 2016 version as an example, but you can number pages in Word 2010, as in any other version of the product, in exactly the same way - the steps may differ visually, but not thematically.
1. Having opened the document that you want to number (or an empty one that you only plan to work with), go to the tab "Insert".
2. In the submenu "Headers and Footers" find the item "Page number".

3. By clicking on it, you can select the type of numbering (the arrangement of numbers on the page).
4. Having chosen the appropriate type of numbering, it must be approved - to do this, click "Close Header Window".
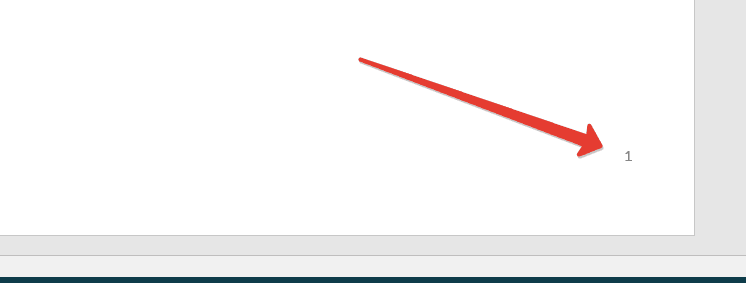
5. Now the pages are numbered, and the number is in the place corresponding to the type you have chosen.
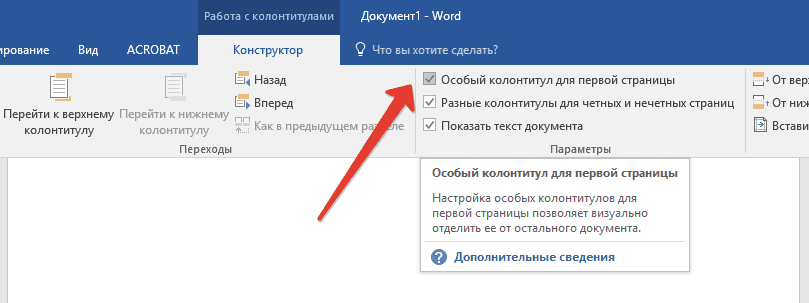
How to number all pages in Word, except for the title page?
Most text documents that may need page numbering have a title page. This happens in abstracts, diplomas, reports, etc. The first page in this case acts as a kind of cover, which indicates the name of the author, title, name of the boss or teacher. Therefore, numbering the title page is not only unnecessary, but also not recommended. By the way, many use a corrector for this, simply glossing over the number, but this is definitely not our method.
So, to eliminate the numbering title page, click the left mouse button twice on the number of this page (it should be the first one).
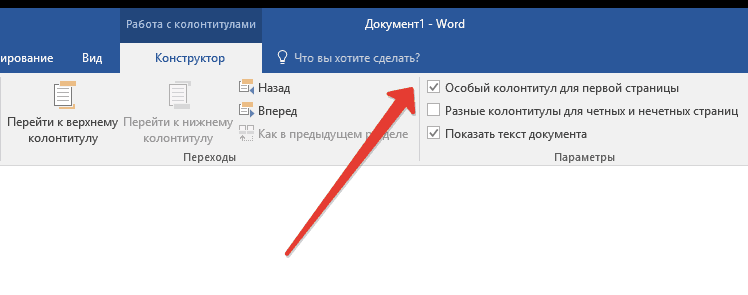
In the menu that opens at the top, find the section "Parameters", and check the box next to « Special header for this page".
The number on the first page will disappear, and page number 2 will now become 1. Now you can work out the title page as you see fit, as needed, or in accordance with what is required of you.
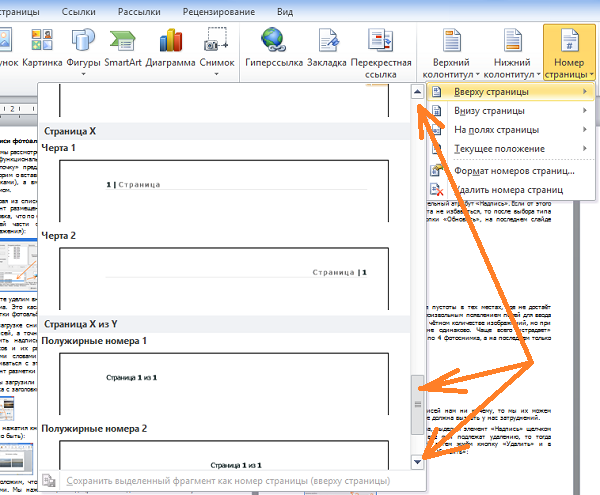
How to add numbering like "Page X of Y"?
Sometimes, next to the current page number, you need to indicate the total number of pages in the document. To do this in Word, follow the instructions below:
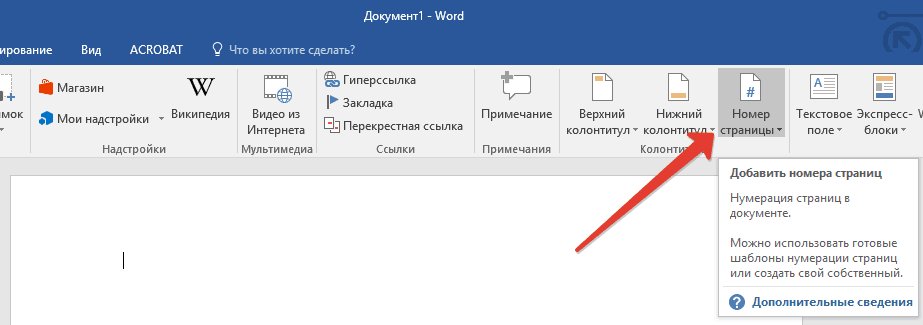
1. Click on the "Page number" button located in the tab "Insert".
2. From the drop-down menu, select where you want this number to appear on each page.
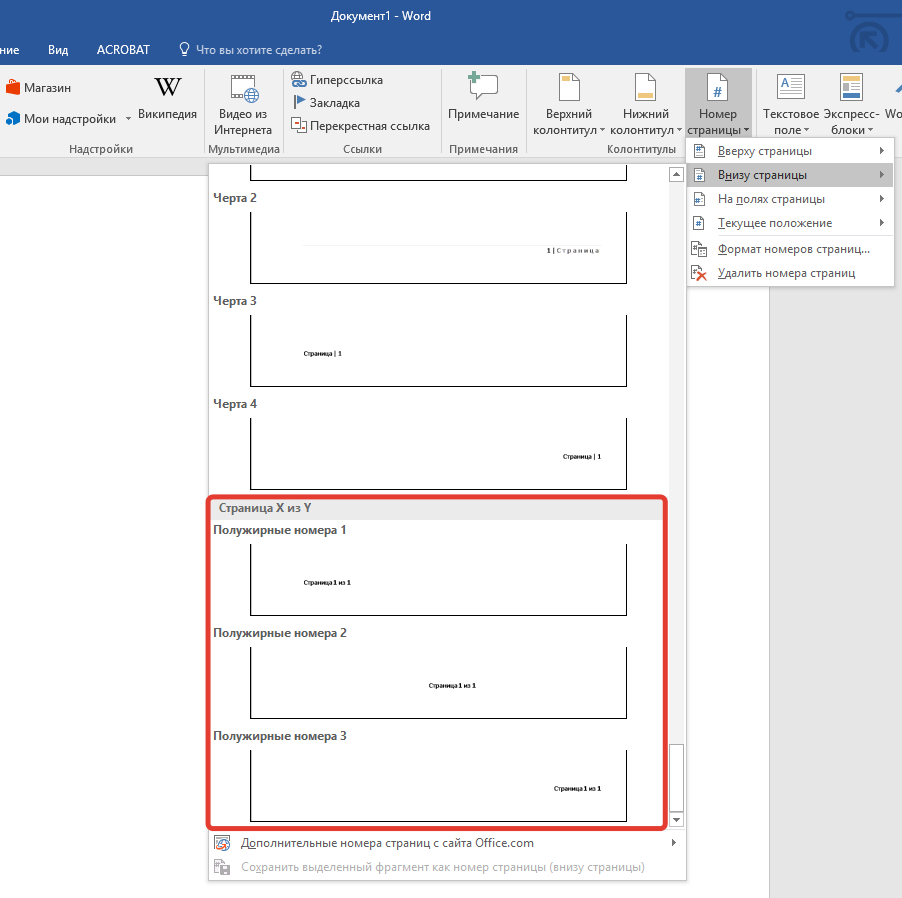
Note: When choosing an item "Current location", the page number will be placed where the cursor is in the document.
3. In the submenu of the item you selected, find the item "Page X of Y" select the desired numbering option.
4. To change the numbering style, in the tab "Constructor" located in the main tab "Working with footers", find and click the button "Page number", where in the drop-down menu you should select "Page Number Format".
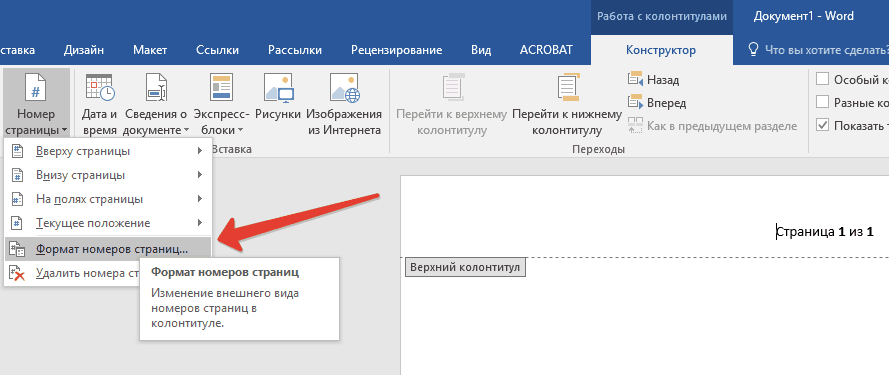
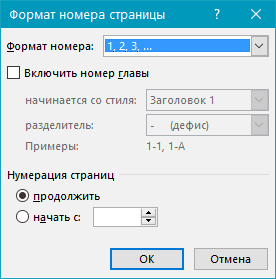
5. After selecting the desired style, press "OK".
6. Close the window for working with headers and footers by clicking the last button on the control panel.
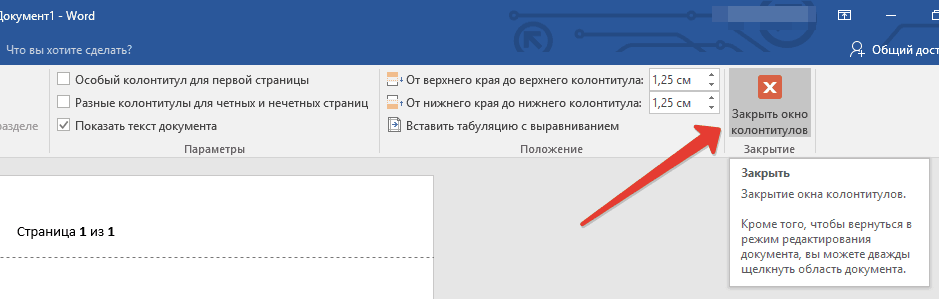
7. The page will be numbered in the format and style you choose.
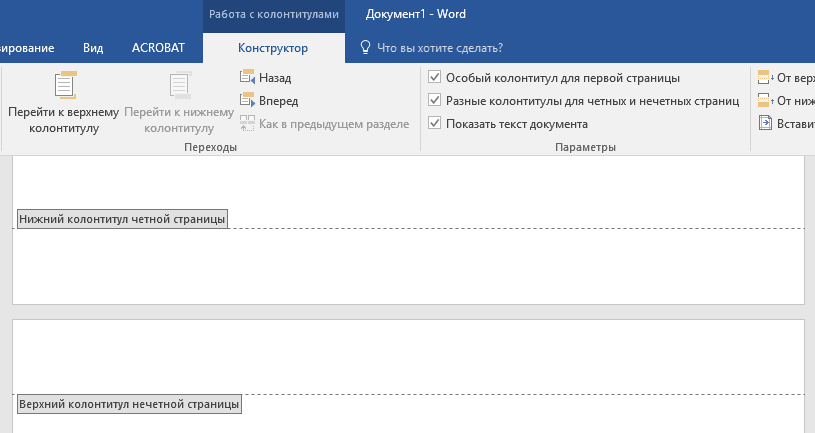
How to add even and odd page numbers?
Odd page numbers can be added to the right footer, and even page numbers can be added to the bottom left. To do this, in Word, you need to do the following:
1. Click on the odd page. This may be the first page of the document you want to number.
2. In a group "Headers and Footers", which is located in the tab "Constructor", click on the button "Footer".
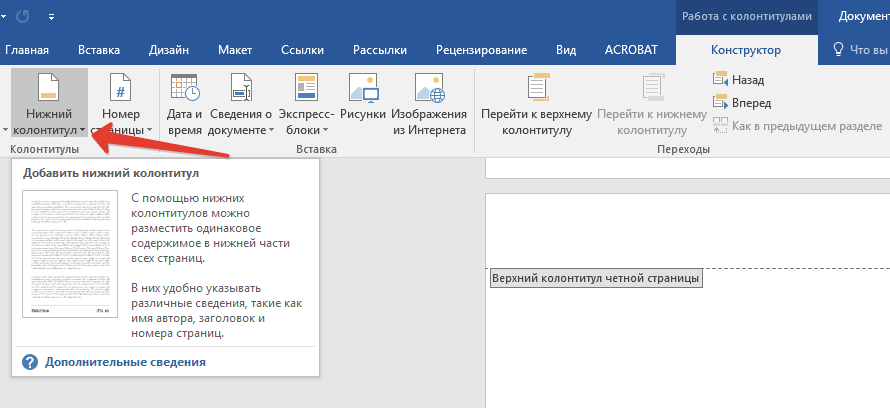
3. In the drop-down menu with lists of formatting options, find "Built-in" and then select "Aspect (Odd Page)".
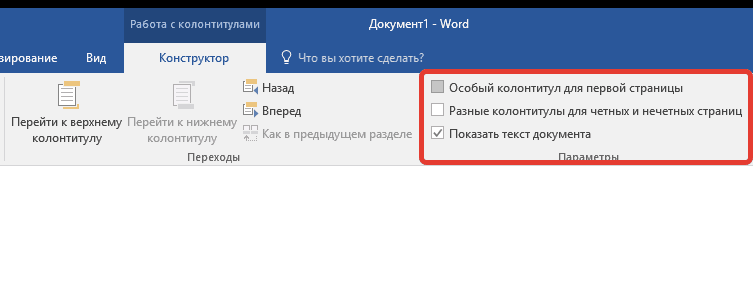
4. Tab "Constructor" ("Working with footers") check the box next to the item « Different headers and footers for even and odd pages".
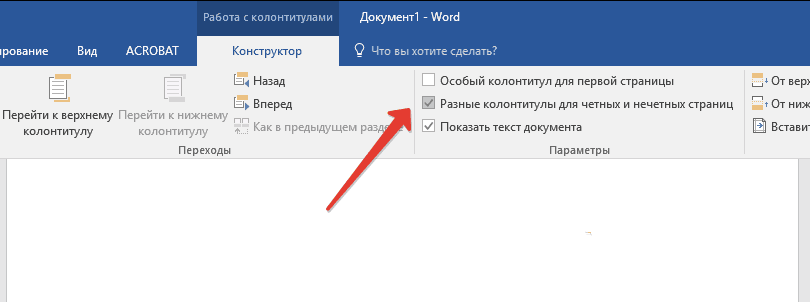
Advice: If you want to exclude the numbering of the first (title) page of the document, in the "Designer" tab, you must check the box next to "Special header and footer for the first page".
5. Tab "Constructor" press the button "Forward"- this will move the cursor to the footer for even pages.
![]()
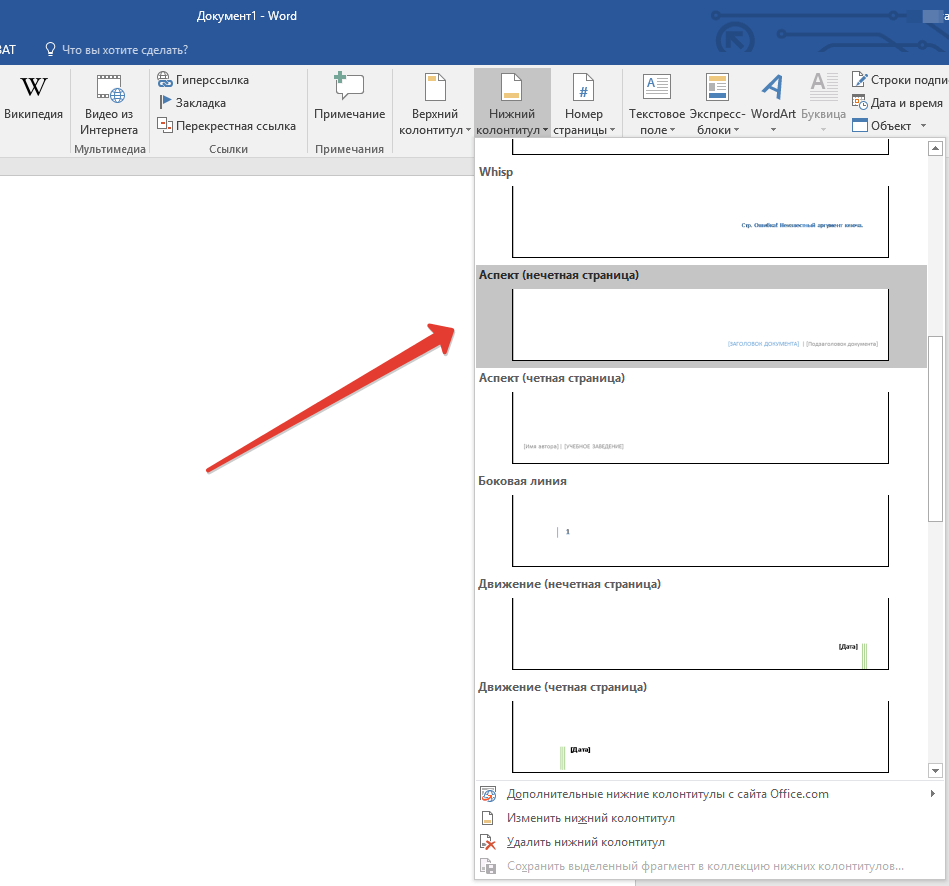
6. Click "Footer" located in the same tab "Constructor".
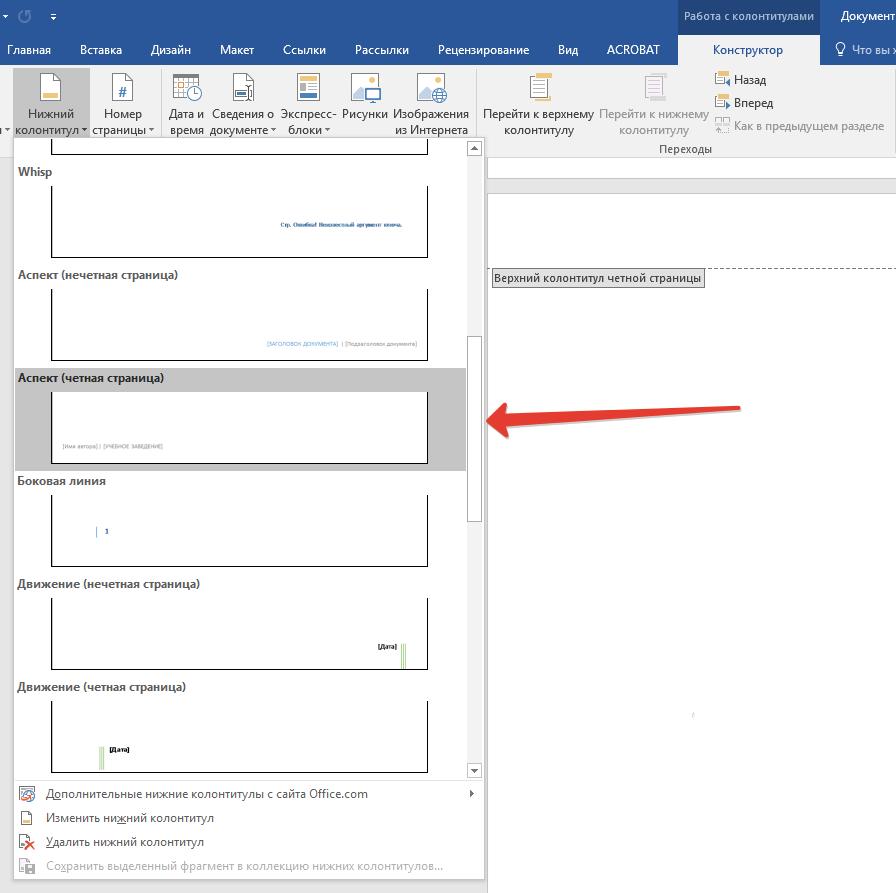
7. In the drop-down list, find and select "Aspect (Even Page)".
How to number different sections?
In large documents, it is often necessary to set different numbering for pages from different sections. For example, there should not be a number on the title (first) page, pages with a table of contents should be numbered with Roman numerals ( I, II, III...), and the main text of the document should be numbered with Arabic numerals ( 1, 2, 3… ). We will talk about how to number different formats on pages of different types in Word below.
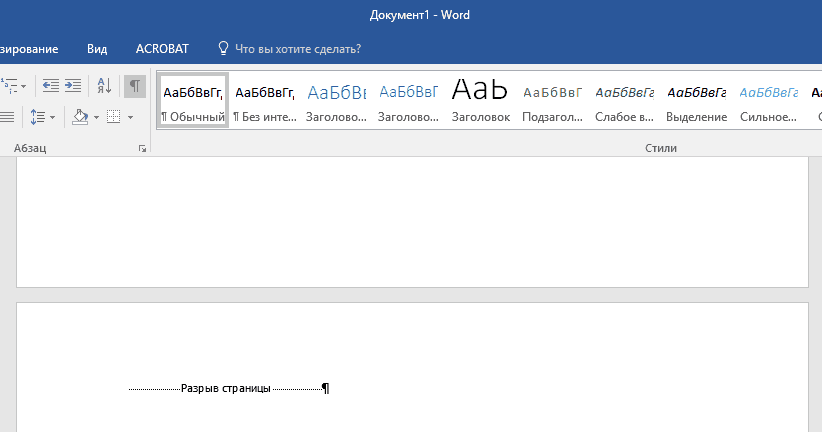
1. First you need to display hidden characters, to do this, you need to press the corresponding button on the control panel in the tab "Home". This will make it possible to see the section breaks, but at this stage we only have to add them.
2. Scrolling the mouse wheel or using the slider on the right side of the program window, go down the first (title) page.
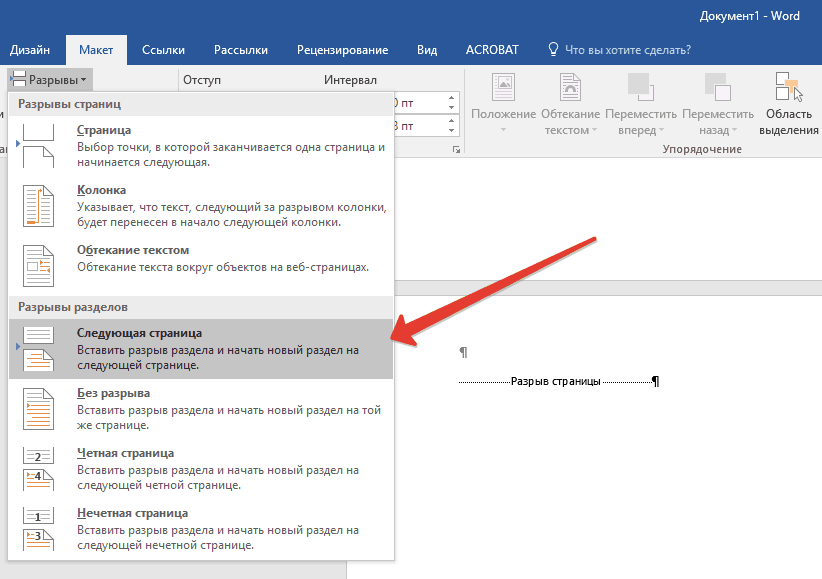
3. Tab "Layout" click on the button "Tears", go to item "Section Breaks" and select "Next page".
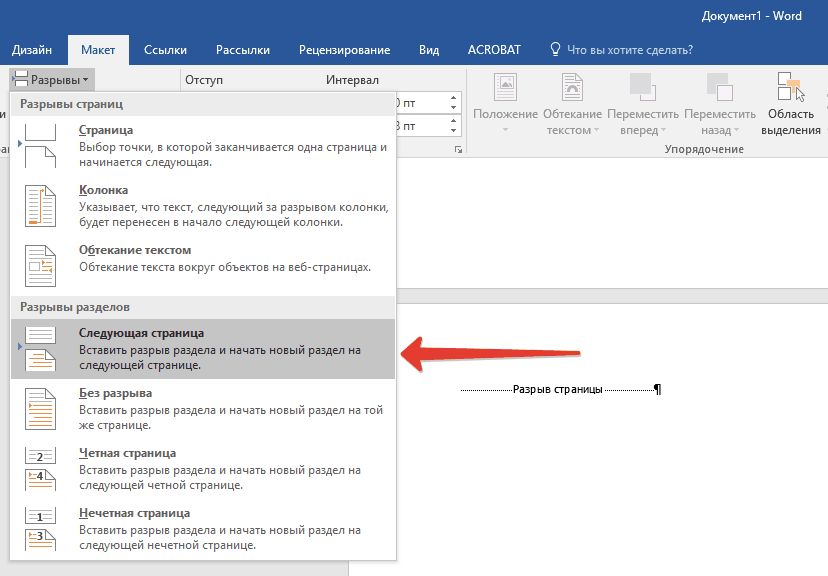
4. It will do title page the first section, the rest of the document becomes Section 2.
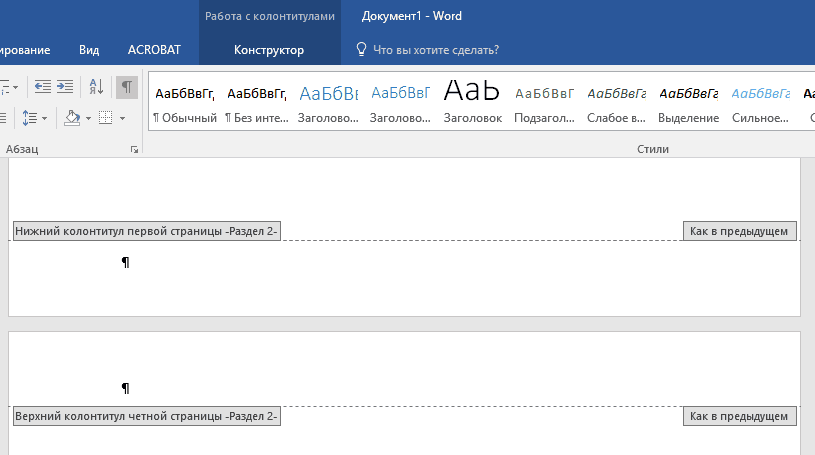
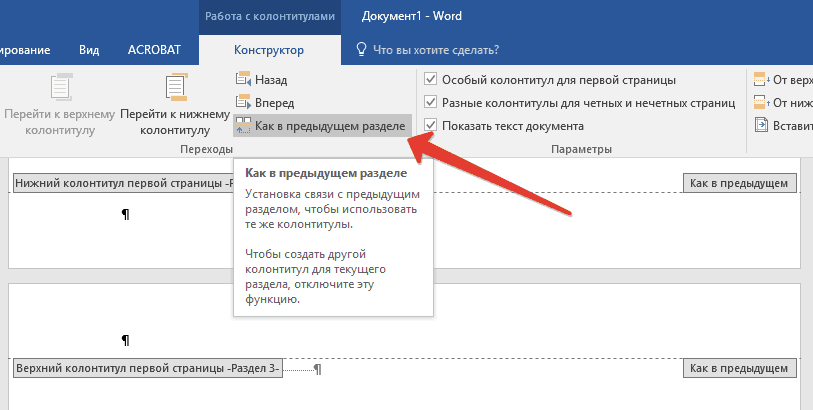
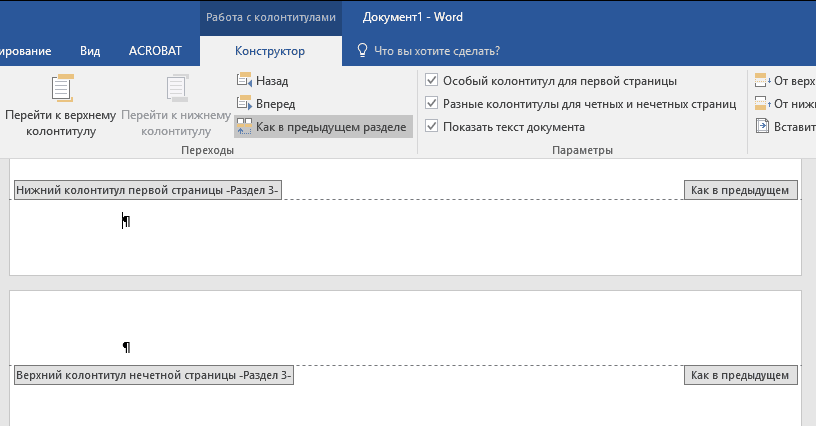
5. Now scroll down to the end of the first page of Section 2 (in our case this will be used for the table of contents). Double click on the bottom of the page to open the header and footer mode. The link will appear on the sheet. "As in the previous section" is the link that we have to remove.
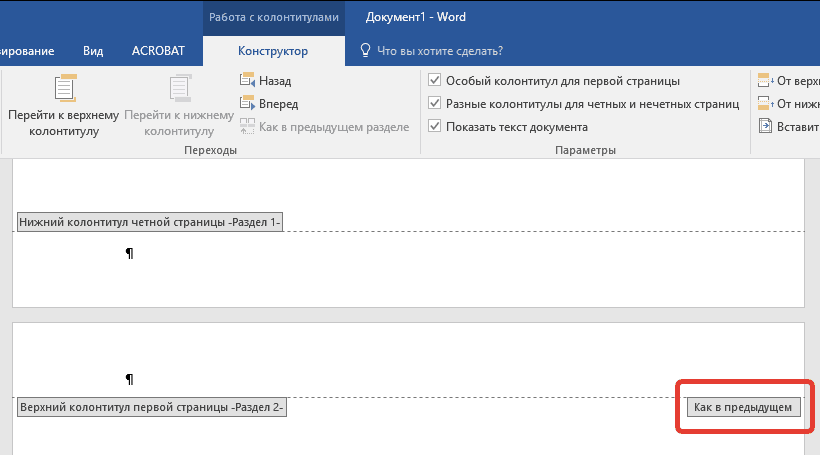
6. After making sure that the mouse cursor is located in the footer, in the tab "Constructor"(chapter "Working with footers"), where you want to choose "As in the previous section". This action will break the link between the title section (1) and the table of contents (2).

7. Scroll down to the bottom of the last page of the table of contents (Section 2).
8. Click on the button "Tears" located in the tab "Layout" and under paragraph "Section Breaks" select "Next page". Section 3 appears in the document.
9. With the mouse cursor in the footer, go to the tab "Constructor", where again you need to choose "As in the previous section". This action will break the link between Sections 2 and 3.
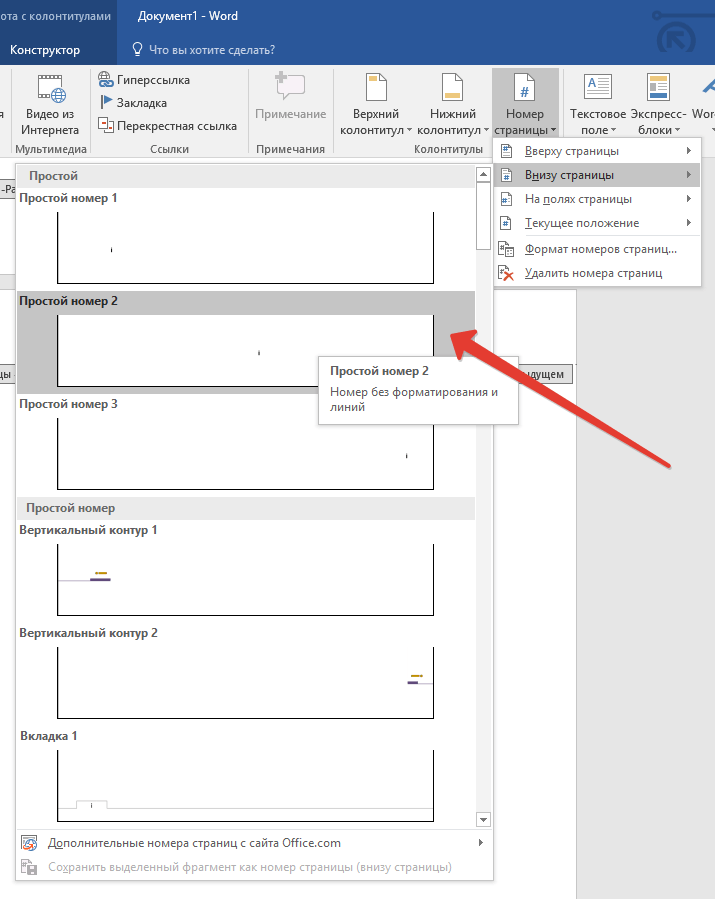
10. Click anywhere in Section 2 (table of contents) to close the header and footer mode (or click the button on the control panel in Word), go to the tab "Insert", then find and click "Page number", where from the drop-down menu select "At the bottom of the page". In the drop-down list, select "Simple Number 2".
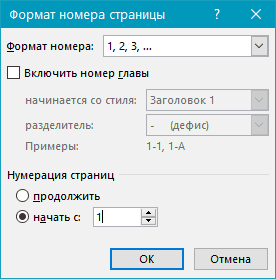
11. Expanding the tab "Constructor", click "Page number" then select from the drop down menu "Page Number Format".
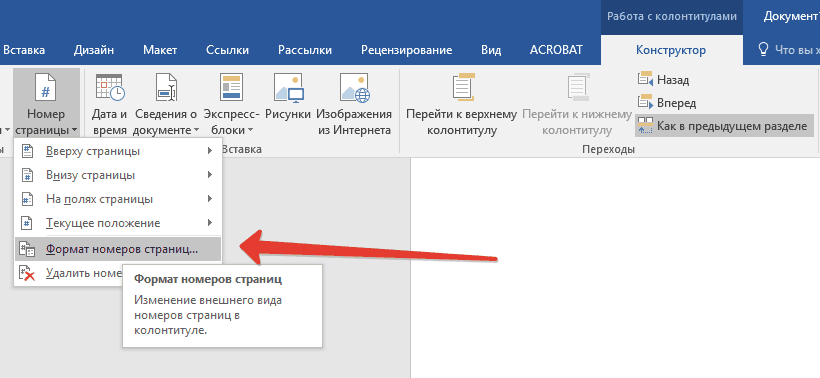
12. In paragraph "Number Format" select roman numerals ( i, ii, iii), then press "OK".
13. Get down to footer the first page of the entire remaining document (Section 3).
14. Open a tab "Insert", select "Page number", then "At the bottom of the page" and "Simple Number 2".
Note: Most likely, the displayed number will be different from the number 1, in order to change this, you need to follow the steps described below.
15. The page numbering of the document will be changed and ordered in accordance with the necessary requirements.
As you can see, number the pages in Microsoft Word (everything, everything except the title page, as well as the pages of various sections in different formats) is not as difficult as it might seem at first. Now you know a little more. We wish you fruitful studies and productive work.
Word is rightly considered the most popular program for working with text files. It provides a number of advantages that cannot be overlooked, in particular, we are talking about a simple and understandable interface for everyone, as well as an abundance of features and functions. This editor allows you to create high-quality text, diversify it, add pictures, format and much more.
In most cases, in Word, they work with documentation, the design of which has serious requirements. For example, a prerequisite is page numbering. As a matter of fact, we will talk about how to put page numbering in the Word.
How to Number Pages in Word 2003
Since all users are different and preferences also often differ, it is quite normal that everyone uses the version of Word that is closer to him. Therefore, for the sake of completeness, I will share information about pagination in each of the versions.
- Word 2003 is slightly different from the new versions in its interface, so I will talk about it separately. So, on the toolbar there is an "Insert" tab, click on it, then select the "Page Numbers" line in the context menu.
- Next, a new window will appear in which you can choose the position (bottom or top) and alignment (right, left, center, inside and outside). In addition, at the very bottom, you can click the "Format" button, and there select an alphabetic or numeric numbering format, as well as set the page from which it will be produced.
How to Number Pages in Word 2007 and Up
AT versions of Word 2007, 2010 and 2013 interface is identical, very, by the way, convenient and thoughtful down to the details. To set the numbering, do this: open the "Insert" section, there you will find the "Headers and Footers" subcategory. The item on the far right is “Page Number”, after clicking on it, it will drop out context menu. It has the ability to adjust the location of the numbering on the page, choose the format of the page numbers, and also remove the page numbers. It is noteworthy that the “Format of page numbers” item allows you to set the page number from which the numbering will start.
As you can see, there is absolutely nothing complicated about numbering pages in Word. The developers have designed everything in such a way that even not the most experienced user can easily understand this function and the whole process will take him only a few minutes.
MS Word is the most convenient and widely used text editor. Millions of users create various documents in it, ranging from business letters to fundamental scientific research.
For the convenience of the user, the program provides a number of additional formatting options, including pagination. This feature is available in all versions. Microsoft programs Word and it is very useful when writing large papers.
You can quickly find by page number necessary information, and in a printed document, it is easy to arrange all the pages in order without fear that they will be mixed up. As an example, let's try to put pagination in Word 2007.
Quick article navigation
Enable pagination
To activate pagination in Word 2007, you must do the following:
- Open the desired document;
- Select the "Insert" tab on the toolbar. Page numbering refers to the "Headers and Footers" section (that is, page design elements that are placed behind the fields and filled mostly automatically);
- In the "Headers and Footers" section, click on the "Page Number" button;
- In the drop-down menu, the program will offer various ways number location: at the top of the page, at the bottom, or in the margins. In addition, it can take place in the right or left corner, or be in the center;
- After the choice of the location of the numbers is made, headers and footers with page numbers will appear in the document.
Numbering correction
When writing abstracts, as well as scientific and research papers, the first 1-2 pages are called title pages - they are taken into account in the amount of work, but are not numbered. In this case, it is necessary to put down the numbers not from the beginning, but from a certain number. This is done in the following way:
- In the drop-down menu "Page number" you need to click "Format page numbers";
- In the dialog box that opens, in the "start with:" item, enter the appropriate value (for example, 2 if you want to start from the second page) and click "OK".
In order to remove the number from the title page, you will need to perform the following steps:
- Go to the "Page Layout" menu;
- In the "Page Setup" section, open the dialog box by clicking on the arrow at the bottom of the panel;
- Go to the "Paper Source" tab;
- Check the box next to "Distinguish first page headers and footers" and click "OK".
Types of numbering
Most often, in documents and student papers, a standard Arabic numeral is used to indicate the page number. In the Word 2007 text editor, it is possible to select an unusual format (for example, Roman numerals, Latin small or Latin capital letters, as well as Arabic numeration with dashes).
Share this article with friends on social networks: