Macros (VBA procedures) (63)
Miscellaneous (39)
Excel bugs and glitches (4)
What is a module? What are the modules?
Any VBA code must be stored somewhere. To store codes in VBA, modules are used, which are stored in the workbook. A book can contain any number of modules. Each module in turn can contain a set of procedures (macros).
All modules available in the book can be viewed through the VBA editor ( alt+F11). Available modules are displayed on the left side of the editor in the Project Explorer.
fig.1
The object explorer itself may not be displayed by default and then it must be displayed: click ctrl+R either in the VBA editor menu- view-Project Explorer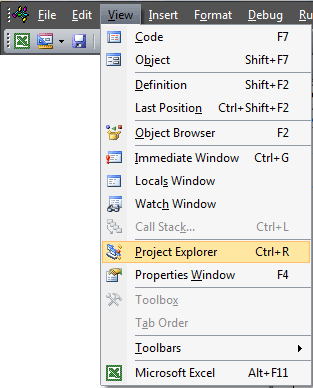
Modules are divided into five main types:
In general, to be more precise, there are only two types of module - a regular one and a class module, because Sheet module, book module, Custom Form Module And class module are essentially class modules. But I deliberately divided them into several types, because. it is these types that are often used for explanations in various textbooks and on various forums and in the Excel books themselves, they are different in appearance and some functionality.
In order to create a new standard module(Module), class module(ClassModule) or user form (UserForm) you just need to right-click in the Project Explorer window, select the item Insert and then the type of the added object( module, ClassModule, UserForm). You can also add a module through the menu: Insert-module type.
Removing is also simple: right-click on the desired module in the project window and select Remove. More about deletion at the end of the article of this article:
STANDARD MODULE
in Fig.1 Module1
.
The most common type of modules, which is used in most cases. It is in them that the macro recorder creates recordable macros. All codes and procedures in such modules are written manually or copied from other sources (another module, from this site, etc.). Basically, it is in the standard modules that most of the codes are contained. They are intended to store the main procedures and Public variables, which can be accessed later from any module. How to create a standard module: in the object explorer window, right-click- Insert-module. When recording with a macro recorder, modules are automatically created and automatically assigned names.
Many codes published in articles on the site must be placed in standard modules. To do this, just create a new standard module, copy the text of the code from the site and paste it.
SHEET MODULE
Sheet1 or Sheet1 - in Fig.1: Sheet1(Sheet1), Sheet2(Sheet2), Sheet3(Sheet3).
Each sheet of the book has its own module. Getting into the leaf module is easier than getting into other modules. To do this, simply right-click on the sheet tab and select the item from the context menu. Source text(View Code)
depending on the version of Excel, this item in Russian can be called the same: View Code or Source :
You can go the more difficult way - through the VBA editor: alt+F11 and in the window of the Object Explorer (Project Explorer) double-click on the object with the name of the sheet or right-click on the sheet module - view code.
When placing the code in the sheet module, you should remember that when copying or transferring this sheet to another book, the code will also be copied, because is part of the leaf. This is both a plus and a minus at the same time. The advantage is that by placing the code in the sheet module, you can use this sheet as a template for distribution with your own buttons for calling these codes (including creating books with code) and all the functionality will be available. The downside is some nuances of referring to cells (for more details, see this article: How to access a range from VBA) and the need to place ALL the procedures used in this sheet, otherwise, when transferred to other books, the codes may work with errors.
The sheet module contains built-in event procedures, each of which is responsible for handling a specific event on that sheet. You can view them like this: select an object (in the figure below, the list is on the left side) Worksheet, and in the right list, select an event (in this list, all procedures available for the selected sheet):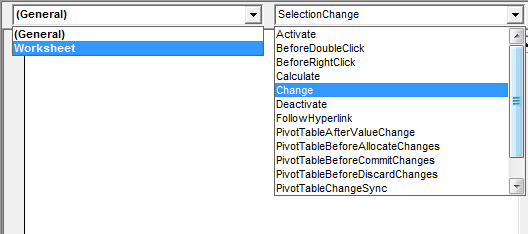
Procedures for which events are already in use appear in bold type.
The names of event procedures are quite informative names and most of them do not need to be carefully deciphered. But the most important parts used in any case, I consider it necessary to describe:
- Activate- occurs when the sheet itself is activated (but does not occur if there is a transition from one book to another and this sheet is active there)
- BeforeDoubleClick- occurs when you double-click on any cell of the sheet. It is important to pay attention to the passed arguments: Target and Cancel. Target - a link to the cell in which the action was performed; Cancel - responsible for canceling the edit mode
- BeforeRightClick- occurs when you right-click on any cell of the sheet. It is important to pay attention to the passed arguments: Target and Cancel. Target - a link to the cell in which the action was performed; Cancel - responsible for canceling the popup menu
- Calculate- occurs when recalculating functions and formulas on a sheet
- change- occurs when changing the values of cells on the sheet. It is important to pay attention to the passed Target argument. Target is a reference to the cell that has been changed. May differ from the cell active at the time of processing
- Deactivate- occurs when moving from this sheet to another sheet of the same workbook
- FollowHyperlink- occurs when following a hyperlink created in this sheet
- SelectionChange- occurs when the address of the selected cell/area is changed. It is important to pay attention to the passed Target argument. Target - a reference to the range of cells that have been selected. Matches the currently selected cells
Quite an important point: if you want to learn more about event procedures, always pay attention to the variables that are passed as arguments to the procedure. In most cases, I recommend using these variables, and not inventing all sorts of possibilities for calculating the object that caused the event to occur. For sheet event Worksheet_Change this is a variable Target. For example, paste the following code into any sheet module:
| Private Sub Worksheet_Change(ByVal Target As Range) MsgBox "Modified cell address: "&Target.Address&_ "; Active cell address: "& Selection.Address, vbInformation, "www.site" End Sub |
Private Sub Worksheet_Change(ByVal Target As Range) MsgBox "Changed Cell Address: " & Target.Address & _ "; Active Cell Address: " & Selection.Address, vbInformation, "www.site" End Sub
After that, write the value 5 in cell A1 and press Enter. The Change event will fire when editing is completed - i.e. at the moment you press Enter. This will move to cell A2 (in most cases, unless otherwise specified in the settings) and a message will appear that shows that cell A1 has been changed, and now A2 is selected. Those. Target is always a reference to the changed cell, regardless of what is currently selected. This event (Worksheet_Change) will not fire when changing the values of cells with formulas. Only manual entry.
Note: for all the codes listed on the site, just open the required module (book or sheet) and paste the suggested code. Correction may be necessary only in cases where the Sheet or Book module of your file already has code in the necessary event procedure.
BOOK MODULE
ThisBook or ThisWorkbook - in Fig.1: This book
.
The book module can only be accessed through the VBA editor's Project Explorer - double-clicking on ThisBook (ThisWorkbook) or right mouse button on the module - view code. The book module also contains "built-in" event procedures. As well as for the sheet, select in the list of objects (top left) Workbook. In the right window for selecting procedures, as well as with the sheet module, there will be all procedures available for the object This book. An example of using book event procedures can be found in the article How to track an event (for example, cell selection) in any book?
But all the same rules apply there - the main thing is not to forget about the arguments available from these procedures and transmitted by Excel itself. For example, the Cancel argument is available for the Workbook_BeforeClose event. This can be used if you don't want the user to close the workbook without filling in cell A1. Here is an example of such code:
Private Sub Workbook_BeforeClose(Cancel As Boolean) If Me.Sheets("Report").Range("A1").Value = "" Then MsgBox "You need to fill cell A1 on sheet "Report", vbCritical, "www.site" Cancel = True "cancel the closing of the book End If End Sub
It can be seen from the code that the "Report" sheet must contain a non-empty cell A1 (the "Report" sheet must also exist in this book). But there is one more thing - some Me. This is a short call to the class module object, in this case it is equivalent to calling ThisWorkbook. And one more example of code for the ThisBook module, which prohibits saving the original book, allowing it to be saved only through the item Save As:
Private Sub Workbook_BeforeSave(ByVal SaveAsUI As Boolean, Cancel As Boolean) If SaveAsUI = False Then "use simple save MsgBox "This workbook is a template. You can save it only through Save as", vbCritical, "www.site" Cancel = True "cancel saving the book End If End Sub
This may be necessary if the book is a template with fields to fill in and you want to prevent accidental saving of the original document. Although this can also be done without macros, the workbook can be saved with read-only permissions.
FORM MODULES
userform- in Fig.1 UserForm1
.
Contained within the UserForm and its objects. In User Forms, basically everything is tied to the event procedures of the form itself and to the elements of this form (Buttons, TextBoxes, ComboBoxes (drop-down lists), etc.). It is very convenient to use UserForms in your applications to communicate with the user. Because it is very convenient to track user actions through forms and you can prevent access to data sheets by hiding them. A form is created in the same way as a module: in the object explorer window, right-click- Insert-UserForm. Examples of codes using forms can be found in the articles: Each user has his own sheet / range, How to leave only numbers or only text in a cell?
CLASS MODULE
ClassModule - in Fig.1 class1
.
In most cases, it is created specifically to track events of various objects. It is unlikely that beginners will need to learn VBA, although it all depends on the task at hand. But usually for beginners, it seems too complicated. In any case, before working with class modules, it is better to learn how to work at least a little bit with ordinary modules and write procedures yourself. How to add such a module: in the object explorer window, right-click- Insert-class module. You can read more about class modules and working with them in this article: Working with class modules. All the basic principles are described there and an example file is attached.
REMOVING A MODULE
The steps to remove any of the modules are the same for all types. To do this, you need to go to the VBA project of the desired book, select the desired module, right-click on it and select from the menu that appears Remove (Module name)...(Remove Module1, Remove UserForm1, Remove Class1, etc.). After that, a window will appear asking "Do you want to export (module name) before removing it?". This means that VBA asks: do you want to save a copy of the module's codes before deleting it? As a general rule, choose No. But if you want to save the text of the codes from the removed module in a separate file, then you agree by clicking Yes. You will be prompted to select a folder to save the module and you can even give it a separate name.
TRANSFER, IMPORT, AND EXPORT OF A MODULE
Sometimes you need to move a module from one book to another. This can be done in several ways. The easiest is to open both books, go to the project explorer - find the desired module - grab it with the left mouse button and, without releasing the button, drag it to the project of another book: 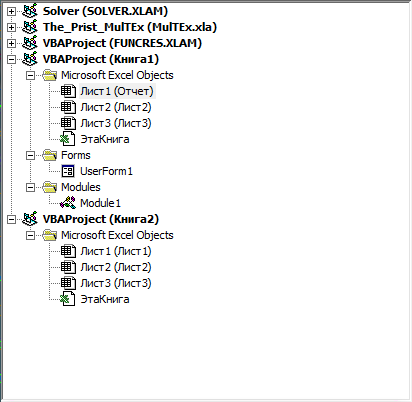
Keep in mind that only the standard module, the class module, and the UserForm module can be moved and copied this way. The codes of the sheet and book modules will have to be transferred as plain text: go to the ThisBook module (from where we want to copy) -copy the entire code -go to the ThisBook module of the second book and paste the copied: 
Module export (save to a separate file)
If you need to save a standard module, a class module, or a form module and not immediately transfer it to another book, then you can export the module. Why might this be needed? As a rule, to transfer codes from home to work, send them to someone on another PC (sending a file with macros may be prohibited by the company's security policy), etc. This is done simply: right-click on the module - export file.
Exported modules have different extensions, depending on the module type. For standard modules this is .bas(Module1.bas), for class modules - .cls(Class1.cls). But for the form modules, two whole files will be created: UserForm1 .frm and UserForm1 .frx. It is important to keep them together - one without the other cannot be imported later into a file. The .frx file stores information about the visual display of the form and its elements, if I may say so. The .frm file stores directly the texts of the codes for the form and service information (the name and size of the form, some global directives and a link to the .frx file). Therefore, it is not recommended to rename these two files without the appropriate skills in the hope that everything will work later.
Module import (transfer previously exported to a new book)
To transfer the exported module to another book, you just need to select the desired project in the object explorer with the right mouse button - import module- select the required module in the dialog box.
Any module can be exported, but not imported. Although sheet and book modules are exported to separate files (by the way, with the .cls extension), they cannot be imported in the way it is supposed to. They will be imported as new class modules and nothing more. Therefore, to transfer codes from modules of sheets and books, you will still have to use copy and paste of codes directly.
And to top it off - you can transfer modules automatically, with VBA codes: How to add procedure code programmatically, copy a module
("Bottom bar":("textstyle":"static","textpositionstatic":"bottom","textautohide":true,"textpositionmarginstatic":0,"textpositiondynamic":"bottomleft","textpositionmarginleft":24," textpositionmarginright":24,"textpositionmargintop":24,"textpositionmarginbottom":24,"texteffect":"slide","texteffecteasing":"easeOutCubic","texteffectduration":600,"texteffectslidedirection":"left","texteffectslidedistance" :30,"texteffectdelay":500,"texteffectseparate":false,"texteffect1":"slide","texteffectslidedirection1":"right","texteffectslidedistance1":120,"texteffecteasing1":"easeOutCubic","texteffectduration1":600 ,"texteffectdelay1":1000,"texteffect2":"slide","texteffectslidedirection2":"right","texteffectslidedistance2":120,"texteffecteasing2":"easeOutCubic","texteffectduration2":600,"texteffectdelay2":1500," textcss":"display:block; padding:12px; text-align:left;","textbgcss":"display:block; position:absolute; top:0px; left:0px; width:100%; height:100% ; background-color:#333333; opacity:0.6; filter:alpha(opacity=60);","titlecss":"display:block; position:relative; font:bold 14px \"Lucida Sans Unicode\",\"Lucida Grande\",sans-serif,Arial; color:#fff;","descriptioncss":"display:block; position:relative; font:12px \"Lucida Sans Unicode\",\"Lucida Grande\",sans-serif,Arial; color:#fff; margin-top:8px;","buttoncss":"display:block; position:relative; margin-top:8px;","texteffectresponsive":true,"texteffectresponsivesize":640,"titlecssresponsive":"font-size:12px;","descriptioncssresponsive":"display:none !important;","buttoncssresponsive": "","addgooglefonts":false,"googlefonts":"","textleftrightpercentforstatic":40))
Working in Excel, you can perform many different tasks, including mathematical ones. A wide range of program tools allows you to perform the required actions that do not require additional applications. One of these functions is the module - in Excel it is not used so often, but it has an important purpose.
What is a module
By definition, a modulus is a mathematical operation that returns the absolute value of a number, that is, the number itself without its sign. Despite the specifics, the use of the module can be found not only in solving mathematical problems, but also in economic models, physics and many other exact sciences.
How to calculate modulus in Excel?
In order to calculate the modulus in Excel, you can use several methods, the simplest of which is the ABS function. It returns the absolute value of the selected number or mathematical expression.

The syntax of the module function is very simple - in Excel, it is enough to enter "=ABS" in the formula bar, and then specify the argument in brackets, which can be a number, a cell reference, as well as some function that returns a numeric value. Also, this operation can be performed by clicking the "Insert function" button, where to select the appropriate function, or by using the search, indicating the word "module" or "ABS".
Calculating the sum of moduli
One of the common operations in Excel is the modulo sum. It allows you to add cell values without taking into account their sign. To perform this action, it is not required to first calculate the modulus of each number, and then use the sum function.

When performing an operation that involves multiple values, a module in Excel can operate on a whole set or range of cells at the same time. So, to calculate the sum modulo, it is enough to use the following query design:
=SUM(ABS(A1:A4))
Here, in column A, the first four lines indicate the values for which it is necessary to perform modulo addition.
Examples
To consolidate the understanding of the description of the module in Excel and the principles of its operation, it is worth considering a couple of simple examples that demonstrate how the function works.
To calculate the modulus of some given number or mathematical example, for example, the difference between 2 and 5, you should use the following notation:
=ABS(2-5)
The result of this query will be the number "3".
If it is required to calculate the sum of the modules of the elements of the matrix, the values of which are recorded in the table, with the range A1:C3, the fastest way to find the answer will be construction.
My colleague once asked me how to use Excel formulas to calculate the sum of absolute values in a given range. This question pops up quite regularly on the forums, and many users often have great difficulty with this seemingly simple action.
Unfortunately, there is no built-in function in Microsoft Excel that can perform modulo sums, so you have to work a little to get the right answer.
Here is our data:
We see that the sum of the numbers in the range A2:A8 gives the result -60 :
10 + 10 + 20 + -20 + 30 + -40 + -50 = -60
If we were considering absolute values (numbers without the “-“ sign), then the result would be 180 :
10 + 10 + 20 + 20 + 30 + 40 + 50 = 180
Option 1 - Using an Auxiliary Column
In my opinion, the best way to calculate the sum of absolute values in Excel is to use a helper column. To cell B2 enter the formula:
Then we stretch it to the cell B8. Function ABS returns the modulus of the number. So now we can just sum the range B2:B8 and this will give us the result 180 .
SUM(B2:B8)
=SUM(B2:B8)
In my example the range A1:A8 is a complete datasheet. Therefore, when adding the formula =ABS(A2) into a cell AT 2, Excel expanded the table and automatically filled in all the cells in the column. Next, I went to the tab Constructor(Design), which is in the tab group Working with tables(Table tools), and check the box next to the option Total row(Total Row). All values in a column B were automatically summed up, and the result was displayed in a separate line.

To calculate the sum in the total line, use the function SUBTOTALS(SUBTOTAL). This is a generic function that can perform summation, just like the function SUM(SUM). But there are also significant differences, for example, SUBTOTALS(SUBTOTAL) completely ignores numbers that have been hidden manually or by filtering. There are a few more differences, but this is of little relevance to the topic of this article.
The helper column approach is nice because it gives you more flexibility if you need to use the data later, for example, in the form of a table or a pivot table. In addition, an auxiliary column can be used to sort numbers modulo.
This is no doubt a very good way, but what to do when you need to fit everything into one formula without any auxiliary columns?
Option 2 - Using the SUM function in an array formula or SUMPRODUCT
Use an array formula or SUMPRODUCT(SUMPRODUCT) to solve such a problem is a very rough approach!

Function SUM in an array formula:
SUM(ABS(A2:A8))
=SUM(ABS(A2:A8))
When entering an array formula, remember to press Ctrl+Shift+Enter.
Formula with SUMPRODUCT:
SUMPRODUCT(ABS(A2:A8))
=SUMPRODUCT(ABS(A2:A8))
Given that it is possible to use a more efficient function SUMIF(SUMIF) to get the same result (see option 3), the path using these two formulas becomes deprecated. Both formulas work great with small data ranges, I'm sure you won't even feel the difference. If you need to sum a large number of values, the speed of work will noticeably slow down.
Option 3 - Using SUMIF
I think that this approach is the most convenient of all previously listed. Using the function SUMIF(SUMIF) values are divided into 2 arrays: with positive and negative numbers and summed up. Zero is ignored for obvious reasons. Then we simply subtract the negative sum from the positive sum (i.e. sum them up). The formula looks like this:
SUMIF(A2:A8,">0")-SUMIF(A2:A8,"<0")
=SUMIF(A2:A8,">0")-SUMIF(A2:A8,"<0")
It can also be written in this form:
SUM(SUMIF(A2:A8,(">0","<0"})*{1,-1})
=SUM(SUMIF(A2:A8,(">0","<0"})*{1,-1})

If we take the first version of the formula, we get the following:
60-(-120) = 180
To complete the picture, we calculate the amount using the second option:
SUM((60,-120)*(1,-1)) = SUM((60,120)) = 180
I think that now you know all the basic ways to calculate the sum of absolute values in Excel. If you use a different approach for modulo summing numbers, please share it in the comments. Good luck!
In Excel. Today we will analyze the formula for writing "module in Excel". The modulus of a number is used to determine the absolute value of a number, such as the length of a segment. Below we give several ways to calculate the modulus of a number in Excel, the main function is ABS, and an additional calculation using the IF and ROOT functions.
As follows from the definition, the modulus of a number is a non-negative number, the value of the number itself. Those. if we have a negative number -7, then modulo it will be equal to 7. The modulus is written as two vertical lines:
|-7| = 7
What is it used for? If we have a vector value equal to -7, where the minus denotes its reverse direction, then to find the length of the vector itself, we need to calculate the modulus of the number (because the length cannot be a negative value).
Also quite often, the use of the module can be found when calculating the negative value of the time, but we have a separate one about this.
In most programming languages, the modulus of a number is found by the ABS function (from absolute value, abs olute). Our beloved Excel is no exception.
In the cell, enter the formula:
As follows from the description of the function, the value of such a formula will be equal to 7.
How to calculate the modulus through IF, an alternative way
In essence, the action of the Modulus function is to determine whether a number is negative or not and pass its value. That is, it is easy to handle the main condition function =IF().
IF(A1<0;A1*-1;A1)

I personally always forget about ABS and write through IF.
Modulus of number and ROOT
As I was told, there is a particularly tricky way to find the modulus of a number through the ROOT function. We raise the number to the second power and find the root from the expression.
ROOT(A1*A1)
I wouldn't have thought of it myself.
An example of a file with 3 calculations is attached.
Number module in VBA
As we have already said in most programming languages, finding a module is done using the ABS function. VBA is no exception.
To write the calculation in code, write something like this:
A=Abs(-7)
Here A will be equal to 7.
In general, like this, if something needs to be clarified, write in the comments and do not be shy.
Share our article on your social networks:The ABS function finds the absolute value of the number passed as an argument and returns the corresponding value.
Examples of using ABS function in Excel
Determine the length of the projection of the segment on the Ox axis, which is given by the coordinates of the start (-7;-4) and end (19;44) points.
Initial data:
To determine the length of the projection onto the Ox axis, we use the following formula:

B4 and B2 are the start and end coordinates, respectively. The difference between these coordinates is the required projection length. Similarly, we find the value of the projection onto the axis Oy. Results:

As a result of calculating the formula modulo, the projection of the segment onto the Ox axis was determined.
Calculating the difference between the smallest negative and positive number
Find the difference between the smallest and smallest absolute values of array elements.
Initial data:

For the calculation, we use the following formula (array formula CTRL+SHIFT+Enter):
The MIN function searches for the smallest value in a range. To find the smallest non-negative number, use the expression MIN(ABS(B3:B12)).
Result:

Modulo sum in Excel for negative numbers
An Excel spreadsheet records all the transactions of an enterprise over a given period of time. Negative values correspond to expense transactions. Calculate the amount of expenses for the specified period.
Initial data:

For the calculation, we use the following array formula (CTRL+SHIFT+Enter):
Calculation algorithm:
- When iterating over the elements of the range B3:B12, each value is checked for belonging to the range of negative numbers.
- The SUM function returns the sum of the absolute values (thanks to the use of the ABS function) taken from a range of selected negative numbers.
- If there are no negative numbers (expenditure transactions), the value 0 (zero) will be returned.
Calculation results:

That is, the total expenses of the enterprise for the specified period amounted to 29020.
Features of using the ABS function in Excel
The function has the following syntax notation:
ABS(number)
The only argument of this function (required) is a number. It characterizes some real number, which will have an absolute value.
Notes 1:
- The ABS function takes arguments that are numeric values, text representations of numbers, or boolean data (TRUE, FALSE).
- If a text string was passed as an argument to the function in question, which cannot be converted to a numeric data type (for example, =ABS("text")), the execution result will be the error code #VALUE!.
- This function can be used as an array formula to work with large ranges of data.
Notes 2:
- The modulus of the number allows you to determine any physical quantity that can mathematically be set as a negative number, but in the real world it is represented only by an absolute (non-negative) value, for example, the length of a segment.
- When writing a macro, you may also need to calculate the absolute values of some numbers. VBA uses the ABS() function of the same name (as in many other programming languages).
- There are two alternative ways in Excel to get the absolute value of some quantity:
- using the functions SQRT and POWER with an exponent of 2. For example, the result of calculations =SQRT(POWER(A1;2)) will always be a number from the range of positive values (assuming that cell A1 contains data of a numeric type);
- using the IF function. For example, to return the absolute value of -5, you can use =IF(A1<0;A1*(-1);A1), где A1 – ячейка, в которой хранится значение -5.