HomeGroup is a feature that first appeared in Windows 7 and is designed to share folders, libraries, and devices across small networks. In this case, it means home network. However, in order to use the capabilities of the network, it must be configured. Only after creating a personal group, users from different PCs will have access to the printer, scanner and the contents of local drives.
How to create a homegroup on a Windows 10 PC?
Before you start creating a homegroup in Windows 10, you should make sure that all computers are connected to the Internet and have installed operating system Windows version 7 or higher. Further instructions will be as follows:
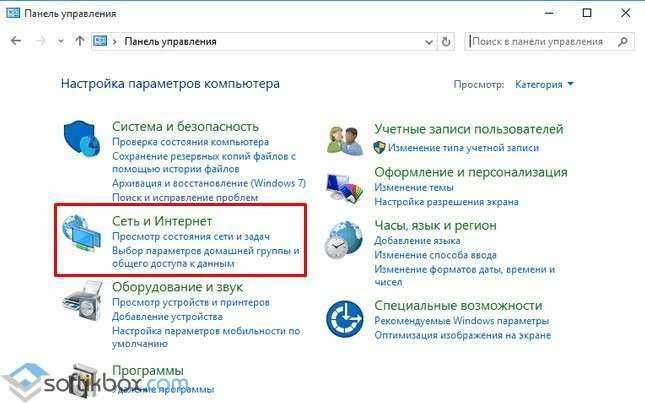
- Click right click Mouse over the Start button and select Control Panel.
- A new window will open. Select "Network and Internet". Click "Homegroup".
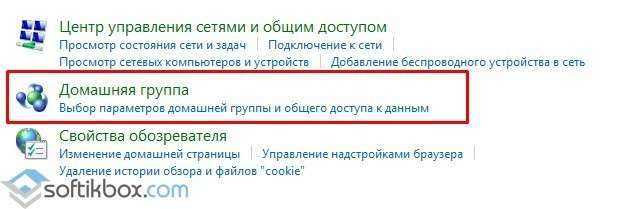
- A new window will appear. In it, click on the link "Change advanced sharing settings ...".
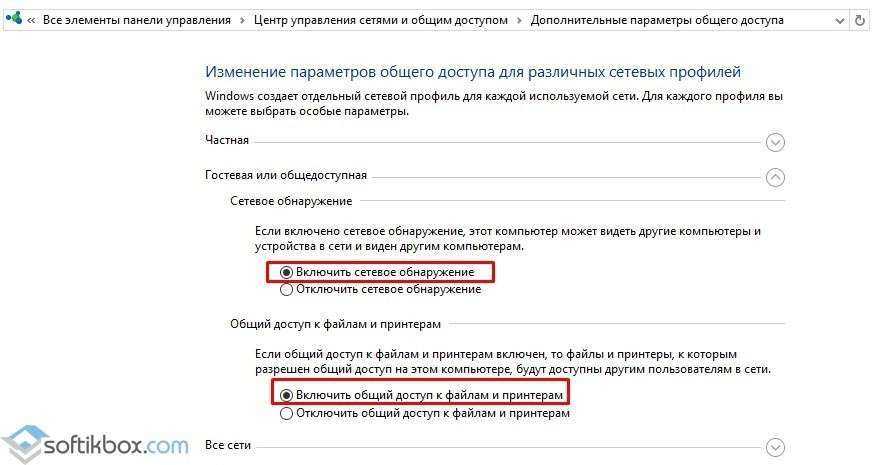
- Check the boxes "Enable network discovery" and "Enable general access to files and printers.
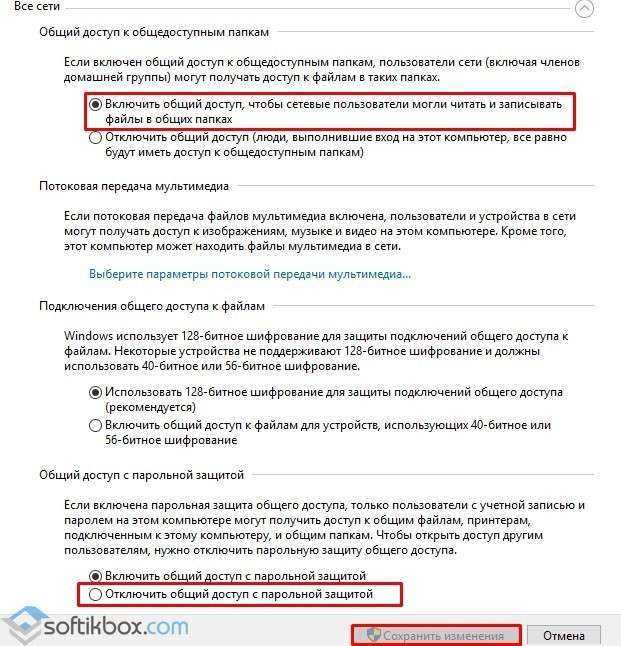
- Now you need to expand the "All networks" branch and check the box "Turn on sharing so that network users can read and write files to shared folders". After clicking "Turn off password protected sharing" (if you want to set a password, then you should check the first item) so that the user of another PC can see the folders without entering secret code. Click "Save Changes".
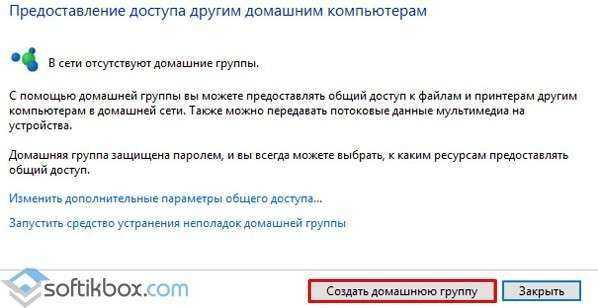
- We return to the "Homegroup" section and click "Create home group».
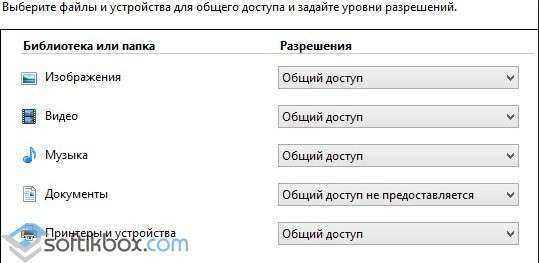
- Specify the folders that users will have access to local network. We press "Next".
- A window with a password will appear on the first PC, it is needed in order to connect all other computers for the first time.
This completes the creation of the homegroup. To connect a PC to a homegroup, do the following:
- Go to the "Control Panel", select "Network and Internet", "Homegroup", "Join".
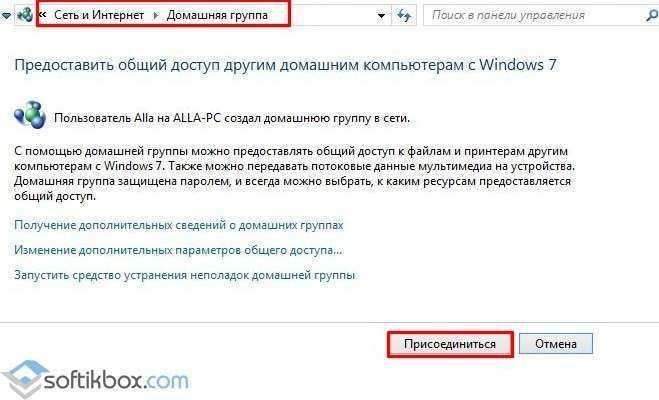
- Next, open the folders for access, click "Next", enter the password and "Finish".
If there are difficulties with connecting a PC or a group object is not available, it is worth performing such actions. Go to the “Windows” folder, then “ServiceProfiles”, “LocalService”, “AppData” (if hidden folders are displayed), “Roaming”, “PeerNetworking” and delete the “idstore.sst” file.
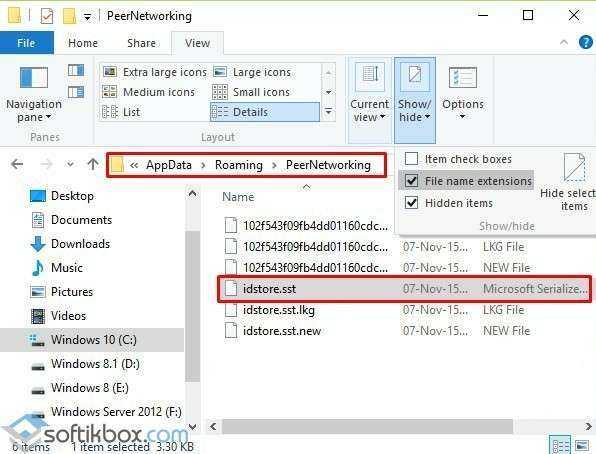
After you need to reboot the system and create a new group.
Find out the password of the homegroup in Windows 10
The standard way to view the homegroup password in Windows 10 is as follows:
- Go to the "Control Panel" and select "Networks and Internet".
- Select "Homegroup". The group settings will appear. Select "Show or print homegroup password".
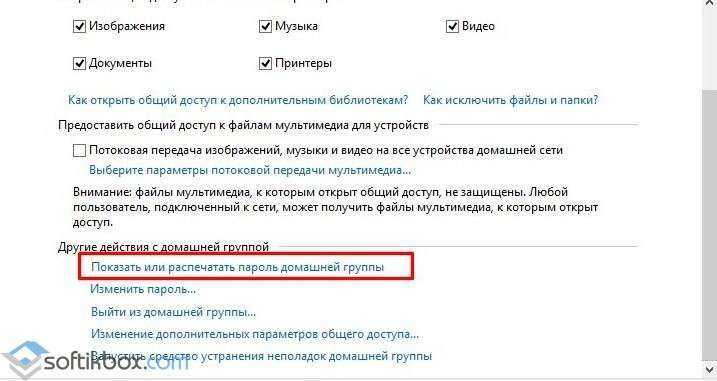
- We look at the password. We can print it.

The password is entered once if you did not set access to the group using a secret code.
To learn how to create a homegroup, see the video:
One of the effective security measures when using network connection is the network password. It should not be too short and simple, as it provides protection against hacking both for wired networks and when establishing a wireless connection like Wi-Fi.
Instruction
Sometimes in the process of using a computer, a situation arises when you need to find out the password for a network connection.
If you have forgotten or do not know the network password, you can change it to a new password by resetting the settings.
If using Ethernet routers, open the settings and reset the values \u200b\u200bthere, returning the previous defaults. Then open any Internet browser, paste the address of the router in the address bar and enter the login “admin” without specifying a password.
Set the desired security settings, enter a new username and write down the password that you will later use when connecting. Click on "Save Changes".
If you are using a different type of LAN, please download the dedicated software to crack the password, install on your computer and log in to any of the networks found. Then change the settings according to the previous points. However, be careful when choosing a site for downloading the program - some of them can introduce a Trojan into the program.
If you need to find out the password to access someone else's WiFi point, you need to use the Windows OS of this computer.
Open the "Control Panel" section on your computer and select "Network Connections". Then open the item "Wireless network connection” and click on the “Set up a wireless network” function.
In the opened section "Master wireless network"click on the "Next" button and do the same in the next window called "Add new computers". Then select the "Set the network manually" section and after "Next" select the "Print network settings" section.
When the Notepad window appears on the screen, view its contents. Among the parameters of the wireless network, you will find the line "Network Key", where the desired password will be printed.
We are all working in networks, we use very a large number of various passwords. And of course, we often forget them. Recall password sometimes it is quite difficult, since most often, it is encrypted with asterisks ******. But, fortunately, you can still find out the hidden password. Here's how to do it.

You will need
- To find out forgotten password you will need free program Asterisk key. The Asterisk Key utility is simple and easy to use, specially designed to recover passwords hidden by asterisks.
Instruction
Download the Asterisk Key program to your computer. The program has a simple and friendly interface, you can quickly install it on your PC.
202646
There is a lot of writing, but I think I can handle it, LET'S GO ....
I will use some quotes from my previous answers FOR DOMAIN ARCHITECTURE.
FOR PEUR NETWORK ARCHITECTURE (WORKING GROUPS)
Modeling the situation
Your PC name=MYPC
Accounts
Pertor=Petrov's friend account, which belongs to working group Guests.
Sidorov=Sidorov's friend account, which belongs to the Guests workgroup.
[U]PS Ask why Guests - the less rights the one you trust has, the more useful your information;)
Open folders
Petrovich for Petrov read-only
Sidor for Sidorov for reading and writing
For_all for everyone who has read/write access to MYPC, with no more than 1 user per folder.
The task was set - we begin to solve.
First of all, we will create users and disable those who we do not need.
To do this, right-click on the "My Computer" icon and select the "Management" item (mouse settings for the right-hander).
The Computer Management dialog box opens. We stomp further Computer Management - Utilities - Local Users and Groups - Users. A list of users will appear.
I recommend disabling Accounts"HelpAssistant" and "SUPPORT_..." in 99% of cases they are never used. Disabling is very simple - double-click on the user, a window opens and check the "Disable account" checkbox.
To ensure that all users are prompted for a password when logging into MYPC, disable the Guest account.
Now we create users. Right-click below the list of users and select "New User...". The New User window will open. We enter the following
User: petrov
Full Name: Petrov Petr Petrovich
Description: My best friend
Password: [access password]
Confirmation: [password confirmation]
"Require password change at next login" - empty
"Prohibit changing the password by the user" - set
"Password does not expire" - set
"Disable account" - empty
Note Place the checkboxes as you wish, but I usually put them like this. The fields "Full Name" and "Description" are optional.
We press "Create". The window closes - the user appears. BUT by default, the OS creates accounts with the rights "Users", and we need "Guests".
To do this, double-click on "Petrov", go to the "Group Membership" tab, select "Users" and click "Delete".
1) Click "Add" - "Advanced" - "Search" - the list of groups will be displayed, click "Guests" and OK.
2) Click "Add" and in the field "Enter the names of the selected objects" enter "MYPC\Guests" (for the English OS "MYPC\Guests"). According to the user Petrov, everything is OK;)
For Sidorov, we carry out a similar procedure. ;)
With a pure soul, close the "Computer Management" window
Now we configure access rights to MYPC
Now I will begin to repeat myself, but if this is not done, there will be a small gap.
Start-Settings-Control Panel-Administrative Tools-Local Security Policy
In the Local Security Policies dialog box
Security Settings-Local Policies-User Rights Assignment
We pay attention to 2 parameters:
1) Denial of access to the computer from the network
2) Access to a computer from the network
These 2 parameters are strongly interconnected, therefore, when specifying values in them, it is necessary that the parameters do not intersect, but even if they intersect, "Denied access to the computer from the network" has a higher priority.
Denied access to a computer from the network
Click on this inscription 2 times and enter the setting.
If the entry All is present in the list of refusals, then no one will gain access to your PC on the network (there are exceptions, but I will not go into details).
If there is a Guest entry, then users who have not passed authorization will not receive access.
Here you can explicitly specify users and workgroups that are denied access.
Clear all previous entries.
And add the following:
"MYPC\Administrators"
"MYPC\Users"
"MYPC\Power Users"
etc. etc. except for the guests.
Accessing a computer from the network
This list contains the names of users and workgroups that are allowed to access your PC.
For our example
Let's pay attention to one more parameter "Reject local login" and put "MYPC\Guests" there. Why?! - To prevent guest users from logging into the OS from your PC (I already explained this in PS).
Comment It will be very cool if you put "MYPC\All" - it's strange that there haven't been any viruses with such a trick yet or I haven't seen them;) You can check it, but not on your PC!!!
Since we are in the "Local Security Settings", at the same time we will check one more parameter.
Security Settings-Local Policies-Security Settings and there will be a boooooooooooo big list like google says. Just kidding, not that big :)
Pay attention to the option "Network access: sharing model and security for local accounts" and set "Normal - local users authenticate as themselves".
After correctly performed operations, double-check the changes made and, to be sure that the parameters are accepted, reboot the PC (although not necessary).
Having gained access to a PC, it is necessary to differentiate access to shared folders.
To do this, the first step is to turn off "Use simple file sharing." To do this, go to "Explorer" - "Tools" - "Folder Options ..."
The Folder Options dialog box opens. Go to the "View" tab. In the "advanced options" list: find the line "Use simple file sharing" and uncheck it. Don't forget "OK".
Find the Petrovich folder on your local hard drive, right-click on it and select "Sharing and Security". A new dialog box will open. Go to the "Access" tab - put the dot "Share this folder" - click the "Permissions" button - delete "Everything" - click the "Add" button - enter "MYPC\Petrov" - click 2 OK.
Note If the partition is NTFS, the "Security" tab will be present in the folder properties - here we simply add the user "MYPC\Petrov" and assign certain rights to it from the list at our discretion.
OK and done with Petrov.
Similarly for Sidorov, but do not forget that he must have read and change rights in his Sidor folder. This applies to the "Access" and "Security" tabs.
Find the For_all folder on your local hard drive, right-click on it and select "Sharing and Security". A new dialog box will open. Go to the tab "Access" - put a dot "Share this folder". We put a dot "no more" in the right field will indicate the number 10 - reduce it to 1. Press the "Permissions" button and allow changes for everyone. Now OK. Do not forget about the "Security" tab, if the section NTFS.
As a result, only those users who can log into your PC via the network will have access to the for_all folder, and no more than one active user.
Don't forget to tell your friends their accounts and passwords ;)
That's all - the task is completed. Thank you for your attention