Updated - 2017-02-14
Local network with Internet access. If you have several computers at home and all your household members are constantly working on them, and only one of them has Internet access, then you have probably wondered more than once: - How to connect all these computers to high-speed ADSL Internet via one modem?
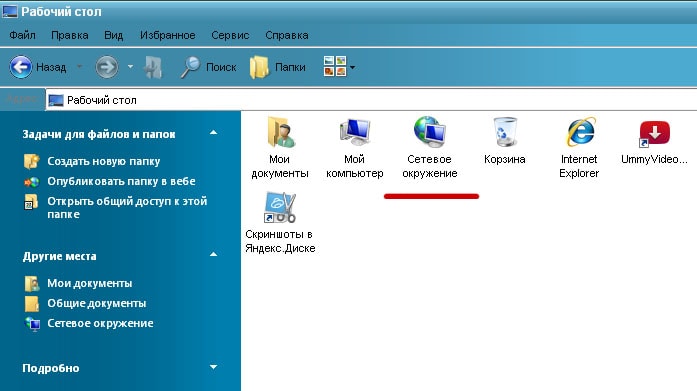
Local area network with Internet access
That's what we'll talk about now. Moreover, not all computers are necessarily desktop. This can be done with laptops too. I will describe all the settings for Windows XP. Although the same can be done for other systems. The difference is only in access to the settings of the network card. In all operating systems, network card settings are hidden in different ways.
The only difference is in the way to them, because. at different systems different control panels. No matter how good and fancy new OS(Vista and Windows 7) but I prefer Windows XP. Its settings (especially for local network) are the most flexible and simple.
I have three computers at home, and everyone is constantly busy. And for a long time Internet access was only on one computer, which is very inconvenient. But then the moment came when we realized that it was time to do something. We gathered a small home council and decided to create our own small local network with general Internet access.
What do we need to build a local network with Internet access
Bought a switch for five ports,
and three network cables: one - 3 meters and 2 to 10 meters.

network cards in all three computers embedded in motherboard, so we bought only one - to connect the modem.

We already have a modem.
In general, everything cost "little blood" - a little more than 700 rubles.
Connecting equipment for a local network
WITH INTERNET ACCESS
- Installed a new network card in PCI-slot computer with direct Internet access. This computer will be our Server. The system immediately detected it and installed the necessary driver itself (if your system could not install the driver, then install it yourself from the disk that is sold with the network card).
- We connected a modem to this network card and.
- We will connect a cable to the second network card of the same computer, which will be connected to the switch at the second end.
- Connected network cables to the network cards of each computer.

- The second ends of the cables were connected to the switch and connected to the mains. The LEDs flashed on the monitor screens, messages appeared that network cable connected.

LAN setup
WITH INTERNET ACCESS
Then we started setting up the local network.
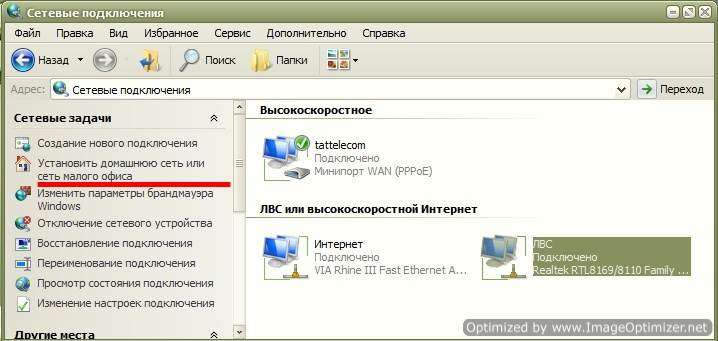
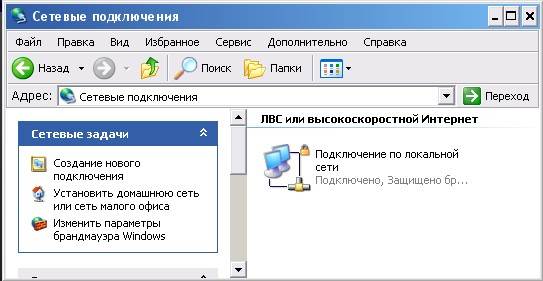
- Started from Server settings with direct Internet access. To do this, choose - Start — Setting — Control Panel — Network connections .
- First, we renamed the network card to connect the network, so as not to get confused in the future. They named her solidly - " LAN" (local computing network).
- We now have an icon called " LAN” is the network card to which we have the LAN cable connected. Let's look at the settings of our network card for the local network. To do this, click right click mouse icon " LANProperties ».

- The window " LAN - properties ". If you named your network card differently, then you will have a different name, only the word Properties will not change. Roles, this does not play any, so you can not get hung up on this.
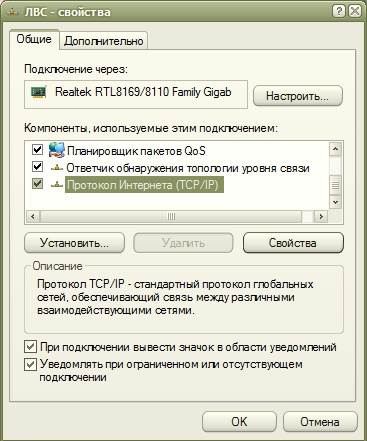
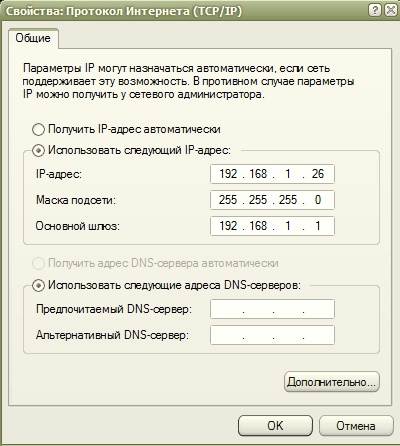
- In this window, on the tab " General» double-click on the entry « Internet protocol (TCP/ IP) "or select this entry and click the button below" Properties ».
- The following window will open TCP/ IP) ».

- In it, we make it active (set a point) opposite the entry “ Use the followingIP-the address: ».
- Assign to our computer, which will connect to the Internet directly via modem IP-address: 192.168.0.1 (if you have never set up a network, then it’s better to write the same as ours). The last digit must be 1 . The server must be the first on the network.
- Subnet mask: 255.255.255.0 (dots are not required anywhere). Nothing else needs to be written anywhere. Save everything (click the button " OK «).
- Put the checkmarks at the bottom on « When connected, display the icon in the notification area ” and “Notify me when there is limited or no connection ”, so that you can immediately see if the cable has come off or for some other reason there is no network. And once again we save everything.
- We have configured the entire network card of the first computer named "Server". Now let's move on to setting up the network itself.
- Select the icon " LAN ».
- And click on the left in Network tasks on the icon of the house " Set up a home or small office network ».

- The window " Network Setup Wizard ". Click on the button " Further ».

- In the next window, press the button again Further ».

- In the next window, put a dot on the entry " Other"and press the button" Further ».
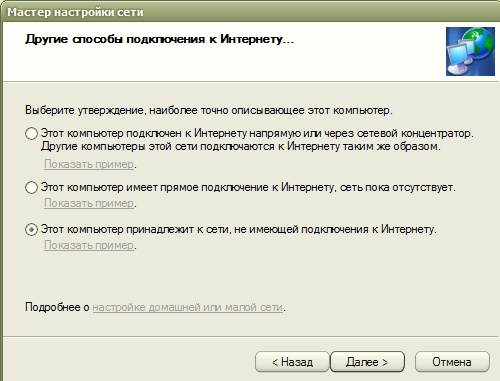
- In this window, set the point to " This computer belongs to a network that does not have an Internet connection ” (this makes it easier to set up the network).
- And again press the button Further". The next network settings window will open, where we will be asked to give a name and description.

You don't have to write a description, but the name should be clear to you. Better change it at this step. For everything to work without problems, all names must be written in English letters, and it does not matter in large or small.
At first we called the computer STELLA so it writes the current name STELLA, and now we will rename it to SERVER. And again press the button Further". In the next window, you must specify working group.

You can leave the name of the working group as it is, or you can change it to the one you like. It also doesn't affect anything. We press the button " Further «.

This page is best left as is.
On the next page, you will see all the data that you entered to set up your network. If something does not suit you, you can return by clicking the button " Back and change what you need. If everything suits, then press the button " Further ».

In this window, it is better to set the point to " Just complete the wizard… ».

Next, press the button " Ready” and the system will prompt you to reboot. Follow this advice. In the same way, we configured the network cards on the other two computers. The only difference is only in a different name, and the name of the group must be the same for everyone (i.e. the same).
On another computer, as you can see, the name of the icon has not been changed, since there are no other icons, and you can’t confuse it with anything. There is only one network card.
AT " Internet protocol (TCP/ IP) »For the second computer, write:
IP -address: 192.168.0.2
Default Gateway: 198.162.0.1
PreferredDNS -server: 192.168.0.1
AlternativeDNS -server: we don't write anything

AT " Internet protocol (TCP/ IP) "For the third computer, we write:
IP -address: 198.162.0.3
Subnet mask: 255.255.255.0
Default Gateway: 198.162.0.1
PreferredDNS -server: 192.168.0.1
AlternativeDNS -server: do not write anything

Everything is the same as on the second, only IP-addresses last digit 3 .
Our network is set up. Now we configure the network card to which the modem is connected (if you already have a modem connected and the Internet is configured, then you can skip this part of the article).
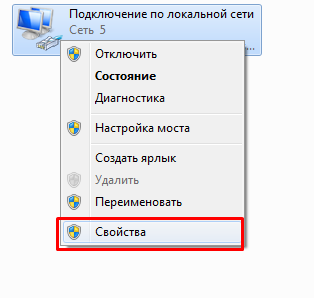
We go again to the first computer, which was called " Server". We go to - Start – Control Panel – Network connections . Right click on the network card icon Internet and select " Properties ».

The window " Internet properties ". In it, on the tab " General» select in the small window « Components used by this connection: » entry « Internet protocol (TCP/ IP) " and open it either by double-clicking or by pressing the " Properties ».

In the new window that opens Properties: Internet Protocol (TCP/ IP) » set a point on the record « Use the followingIP-the address: " and write:
IP-the address: 192.168.1.26
Subnet mask: 255.255.255.0
Default gateway: 192.168.1.1
(These figures may be different for you. You can find them by calling the technical support phone from your Internet provider).
And press the button " OK ».
We fall again into the window " Internet properties ". Go to the tab " Additionally ».

Put a check mark in it Allow other network users to use the Internet connection this computer". And uncheck "Allow other network users to manage Internet connection sharing"". We press the button " OK and restart all computers. That's all. We now have a network with all computers connected to the Internet.
- Main condition: The “server” must be turned on and connected to the Internet, even if no one is working on it yet, otherwise other computers will not be able to access the Internet.
On other computers (Clients) you only need to launch your browser (Opera or whatever you have installed).
Here is the connection diagram of our computers:

It is imperative to install an antivirus program on all computers, especially since it can be updated regularly for you. Enjoy the advantage of a local network.
Connecting two computers to the Internet
The settings are no different from the connection that we reviewed above. The only difference is the absence of a switch, because we simply connect one computer to another with a single network cable.
By the way, from my experience I can say that you can take the same cable as for the local network, and not twisted pair. For two computers it doesn't matter. But when you connect a twisted pair to the switch, your network will not work.
Here are the questions we looked at:
- XP LAN Setup,
- connecting two computers to the Internet,
- Internet Connection Sharing,
- local area network with public Internet access.
Soon I will tell you , And How .
Video: Set up a local network in Windows 7
Video How to remove the password for access to the network, folders and printers
Today, there is an Internet connection in almost every home. Some people are limited to one computer. Others buy routers and create a home local area network for several devices (including smartphones). In any case, in order to do everything right, you need to know how correct setting local area network in Windows 7. It is this topic that is discussed in this article.
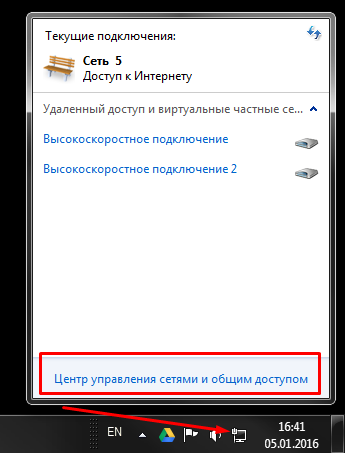
Network and Sharing Center
This menu is the heart of all network connection settings in Windows. Set up a local network, change the IP address, find out the MAC address of your network card, create a new PPPoE connection - all this can be done here. Of course, all actions can be performed through command line Windows, but for most users, this method will be very inconvenient.
To bring up the "Control Center" in Windows 7, you can go several ways:
Connecting to new network equipment
Let's say you've connected to an ISP and bought yourself a new router. The configuration of the router itself is not considered in this article - there is too much variety. When the device is fully configured and ready to work, you need to connect your personal computer to it.
You connect the router and PC using a patch cord, and the network connection icon in the Windows tray changes its appearance. This means that everything is fine with the network card and cable. If your router is in DHCP mode, i.e. independently assigns IP addresses to new devices - most likely, you will not need any additional settings.
The operating system will ask you to select the connection type: "Public", "Home" or "Work" networks. For Private Windows user this step is irrelevant. Select, for example, home and click "Ok". Try to go online - if everything worked, you don't need to do anything else. 
If not, you need to configure the adapter, which is discussed below.
Note! If you don't have a router and you connect a cable from your ISP to your computer, it probably won't work for you. Modern providers rarely use DHCP technology, preferring PPPoE or Static IP. In this case, follow the further instructions.
Configuring Adapter Options
This section of the manual is intended for those users who need to configure the properties of the adapter (network card). If, according to the agreement with the provider, you need to assign a specific IP or mask, specify a specific gateway, follow the instructions. If the contract specifies a login and password for connection, skip this step and go to the section on PPPoE.
New home connection
If you are connecting directly to the ISP with a cable, bypassing the router, you will most likely need to do the following.
Despite the growing popularity of mobile optimized Windows devices 8 and Windows 10, the good old “xspice” still enjoys the trust of users. Accordingly, the question “how to create a local network connection on Windows XP” is still relevant for lovers of simple and understandable “classics”. Therefore, here we will look at how to set up a local network between windows xp and windows xp when connecting computers via cable.
To set up a local network on windows xp, you first need to connect the computers using a network cable.

connecting a network cable to a PC network card
A direct connection over a Windows XP local area network is created in the settings of each networked computer.
The cornerstone of most do-it-yourself local area networks is the incorrect connection of computers over twisted pair. Check that the cable is not “crushed” by the sofa or broken by the interior door, otherwise, or may occur.
How to set up a network connection in windows xp?
To create a LAN connection:
1. Go to your Windows XP section "Network Neighborhood";
2. In the left part of the menu, from the list of possible tasks, select the "Show network connections" sub-item.
 This will allow you to determine the networks that are currently in use or simply disabled.
3. Select the local area connection shortcut here, right-click on it and select the "Properties" menu item.

4. In the "General" tab at the end of the list is the column "Internet Protocol TCP / IP" - double-click on this line to enter the menu for adjusting the IP address parameters.
Enter the following parameters here: 
If the LAN connection shortcut is inactive, then right-click on it and enable the network connection.
This completes the windows xp windows xp local network setup on the first computer.
5. On the second and subsequent computers (when creating a network connection through a switch), the network card is configured in the same way.
 This parameter is adjusted through the "Control Panel" in the "System" tab. Next, go to the "Computer Name" column and set the desired value. Each computer must have a serial name: for example, comp 1, comp 2, comp 3, etc. Do not forget to title the name of the entire functioning working group - this will be required for the smooth exchange of information between the functional nodes.
If you have several personal computers, or a computer and a laptop, and you want each of them to be connected to the Internet, then you will need to organize a local area network through which all devices will have access to the global network.
Local network for exit and the global web
To connect to a local network, it is absolutely not necessary to use a desktop computer. It is also possible to connect a laptop to it. The following steps are for Windows program XP, but they can be made the same for any other system.
For creating home network First of all, you need special equipment, and in particular, a switch and network wires. Below you can see a photo of the necessary equipment.
Also, network cards must be built into the board in all devices. She is also pictured below.
And of course, not one local network can do without the modem itself. It is shown below. ![]()
Please note that the network card must be installed in the computer that has direct access to the global network. This computer will continue to serve as a server. The system automatically detects new equipment - network card and install the necessary drivers.
After that, we connect the modem in the installed network card and set up Internet access.
We connect one end of the network cable to the second network card of the server, and connect the other to the switch. Next, we connect the network cables to the network cards of desktop computers or laptops. The picture below shows what it should look like.
Now we connect the free ends of the network cables to the switch and connect to the electricity network. You may notice that on all connected screens there are signals that indicate the readiness to connect cables. The photo shows an example of messages.
We proceed to the establishment of the network itself. First of all, we set up the server. We go to Start, select Settings, then Control Panel, then Network Connections .. Rename the old network card to avoid confusion in the future. Next, you can see the icon of the renamed network card to which the network cable is connected. We look through the network settings. To do this, click on the map icon and select the "properties" menu item. Below you can see what it looks like.
After that, a new window will open on the screen. the name of the window is “LAN - Properties”, since for example we named our LAN network card. The photo below shows what this window looks like.
We are looking for the "General" tab and click the inscription "Internet Protocol". Or you can just select this line and click "Properties". You will see a window called "Properties: Internet Protocol (TCP / IP)", it is shown in the photo below.
Make the entry Use the following IP address:” active and assign an IP address to the server using a modem. It is better to write the following numbers: 192.168.0.1. Save all changes made by clicking OK. Check that everything is the same as in the picture below.
After that, check the boxes on the last two items. This will allow you to immediately detect the departure of the wire for various reasons. Save everything again by clicking OK. The server setup is now complete. Let's start setting up the rest of the equipment of the local home network.
To do this, first select the "LAN" icon, as shown below.
After that, click on the next house icon, which is shown below.
A setup wizard will open in front of you. It will help you quickly and correctly carry out the setup. We press "Next". Below you see an example of a wizard.
Then a new window will appear, where you also need to click "Next".
In the window that appears, check the box next to "Other" and click "Next" again.
Check the box next to "This PC is part of a network that does not have Internet access" and click "Next". A new half-empty window will appear, as shown in the figure below.
Write the name in capital or small English letters and click "Next". In the new window, specify the working group, as shown below, and click "Next" again.
On the newly appeared page, we do not change anything, we leave it unchanged.
And here you will already need to enter all the data that you previously used to set up the local network. If you think that you made a mistake on one of the points, you can always go back and eliminate the mistakes. If you think that everything is in order, go "Next".
We put a dot in front of the item "End the wizard."
In the new window, click "Finish" and restart your computer.
Similarly, we configure the network cards of the remaining computers on your local network that are not servers. The only difference that you will encounter when working is the name of each equipment. NIC names must be different from each other.
As the figure below shows, we have different data installed on the new hardware. We write everything in the same way as shown below.
After that, fill in the "Internet Protocol" for the following equipment. We also fill it in accordance with the illustration below.
As you can see, the data entered is the same. After that, our local network is configured. We configure a network card that has a connection directly to the modem.
We go to the Start server, open the Control Panel and the item Network Connections. Click on the Internet icon and click on Properties.
In the window that opens, click "General" and click the line "Internet Protocol".
We do everything in the same way as in the figure below in a new window and click OK.
In the window that opens, go to the "Advanced" tab.
We put a tick in front of the penultimate item and put a tick in front of the last one. Click OK, reboot all connected equipment.
Creating a local network at home is not a whim, but a necessity if you use two or more computers. The main task of such a network is to connect PCs and create an opportunity for the user to conveniently use the resources of each of them, and not switch between computers. In this article, we will look at how to set up a LAN connection between computers.
For example, two devices will be used: a desktop computer based on Windows 7 and a laptop based on Windows 10. The list of instructions that will be in the article can also be used on other Windows operating systems (8, 8.1).
Methods for connecting computers over a local network
Today, you can connect via a local network through a router or directly. The first method is gaining popularity, and the second is already a relic of the past, although the time period has not passed so much. Consider schematically how the connection takes place.
To begin with, consider the first scheme "directly". It only works when computers are connected to each other. Data transfer occurs only in one direction, i.e. either from the first PC to the second, or vice versa. At the same time, if the Internet is supplied to one computer, then it can be configured to be served to the second one, but this is already inconvenient, because. routers appeared.
Desktop computers are connected to the router, and mobile devices can receive data from the router or transmit them to it using wireless network. Thus, you can use the router (usually they immediately wifi hotspot access), connect all devices in the house to one network and use the Internet from one access point, while not interfering with each other at all.
We will now configure the local network according to the principle “through a router”, because it is more convenient, more practical and more modern, and also not very difficult even for a novice user. How to set up your router? Use the instructions from the manufacturer's website, now they are written very clearly and accessible. When you have configured the router, proceed to configure the local network.
Please note that if you have been using the Internet via a modem for a long time, your desktop computer is connected to it, and the router is connected to the modem, you do not need to make additional settings. It is only important that a laptop or other PC is connected to the router using a wireless WiFi networks. Let's start setting up the network.
Setting up a local network on a desktop computer (#1)
To start using the local network, you must follow the instructions below:
Setting up a local network on a laptop (#2)
First of all, you need to do the same steps as on computer No. 1, namely points 1-4. Since we have Windows 10, in order to enter the "Control Panel", you must enter the "Search" and enter this request. After that, everything is done in the same way as with the first PC.
Now let's move on to creating home group»and further network configuration:
Now, in order to make sure that everything works as it should, it is necessary to check the performance of the local network we created, which we will now do in the next part of the article.
Network health check
The main task of the local network, as we have already said, is the sharing of resources. Most often, such resources are faxes, scanners, printers, etc., as well as the files themselves on different PCs. We will not test the operation of the printer from different PCs, but this function should definitely become available after the above conditions are met.
Let's check the health of the network using file transfer. To do this, let's create a shared folder on the laptop. Go to "Conductor" and then in "Network":
The computer named "Jenya" is our laptop, and the second computer "Evgeniy1" is a stationary one. With this we checked that the computers are really on the same network. Now go to the Local Disk D and select a folder for public access, let it be, for example, "Synopsis". Select it, press RMB, and then "Properties":
Therefore, you need to press "Access", and then « General access»
. In the list of users, select the one who logs in to the system on computer No. 1 under such and such a login. After that, you will receive a message that the folder is shared: 
Now we press again "Ready". On computer number 1, enter "My Computer" - "Network", and then select our computer "Jenya". Now in the list of folders our "Abstract" folder has become available. It is important not to immediately go into this folder and check if everything has been transferred - you need to wait about a minute after you closed the "Properties" window for the changes to take effect. 