In the operating room Windows system, which is multi-user, it is possible to restrict access of individual users to folders of other users located on a public partition hard drive. This is convenient because users will only have access to those resources that the administrator allows. For example, you want to restrict your child's access to folders that contain negative information.
Just click a folder right click click, select Properties, then the Share tab, and then click the Sharing button. The shared folder will be displayed in the details panel, the bottom one will be a small icon showing two small colored characters.
Sharing is enabled by clicking on the Start menu on Devices and Printers. Find the printer you want to share and right-click it by clicking the Printer Properties tab. In the window that appears, check the "Printer Sharing" box in the "Sharing" tab, and optionally enter a more meaningful name in the text box.
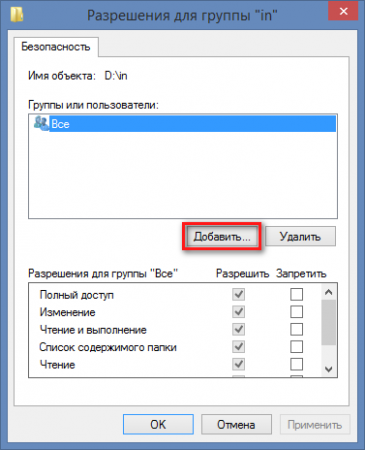
To configure access to a folder, go to the properties of this object. To do this, right-click on the folder and select the item in the drop-down menu ( Properties). Or click on the menu item ( File) Windows Explorer and select ( Properties). Then go to the tab ( Security). Here you will see that access to a particular folder is set by default to all users. To change access for a particular user, you must first add it to the list of users. Click the button (Change) and in the new window click on the button (Add). Here you should enter the username, as it is registered when logging in. If the user is located in another domain, then you should also select his location. For this, the corresponding button is used. After the name is entered, confirm all changes and press the button (OK).
Clicking the Apply button saves the settings and shares the printer. Shared Printer can only be used when the computer it is connected to is turned on. If you need a printer that can print more than network computers, you must buy it with built-in network adapter or use a small accessory called "Print Server". This is a great opportunity, although perhaps the insufficient space available for it seems to be a problem, but these are the details.
You will also be able to access certain folders from another computer or smartphone, or anywhere you can access a web browser. Even nicer is that you can use the app to share files with other people. Folders that you share can be marked as public, i.e. will be visible and accessible to everyone, or you will only be sharing folders with certain users. You will also see the files you selected as favorites. In addition to seeing the new app, you can now reorder your favorite folders with a touch and drag to "go up" to your most used files that you conveniently use at the top of the app.
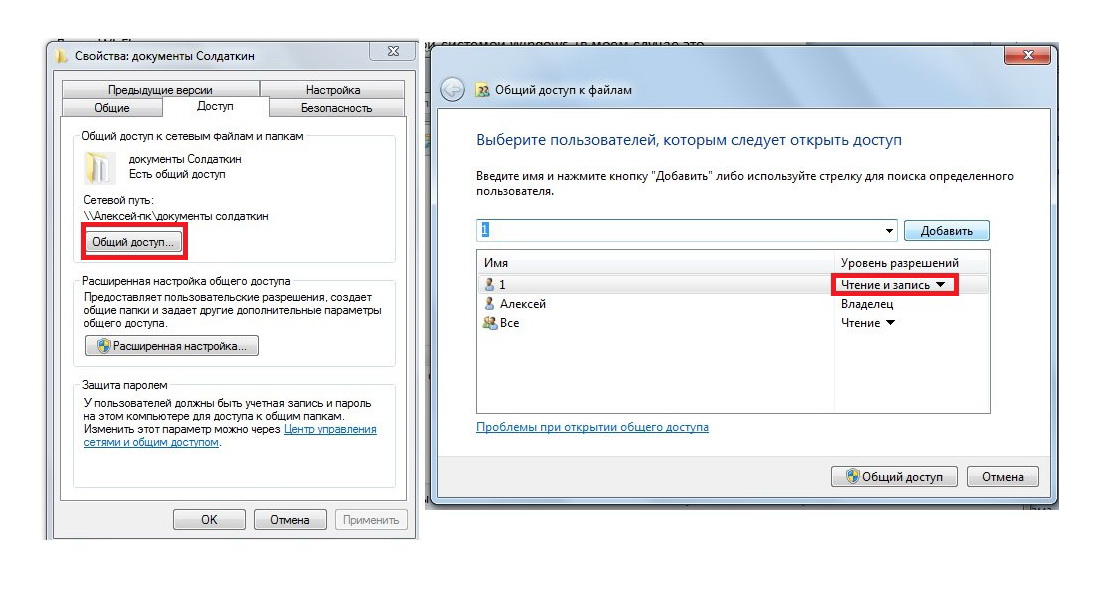
The username should now appear in the list ( Groups or Users). Select a user and in the permissions area, check the appropriate checkboxes opposite the rights that the user should have for a particular folder. If you need to prohibit access to the folder, then put all the checkboxes in the column ( Deny). Confirm the changes and click (OK), the system will warn you that the rights ban has more than high priority before resolution. That is, it turns out that all other users will have full access to the folder, and the selected user will have a ban on access to the folder, which is higher than any permission.
Yes, it's probably not a big change, but it makes it even easier for you. The difference is that in this case this component will be at the bottom instead of above the display. This design decision guarantees that the next flagship will offer a dual rear camera. The preferred method of using this technology is to position the front sensor. Finally, we note that new flagship may hit the market in February. An illustration showing how the fingerprint sensor will work.
In recent years, virtual reality has developed extremely rapidly, but there are still problems with the most effective ways to interact in a virtual space that is looking for solutions. If traffic management is complemented by eye-tracking technology, it will increase the ability to understand the user's intent, and it will make the system more natural and intuitive, and this will open the door to more possibilities. We are still just beginning to exploit the full potential of virtual tracking technology, but revenues are expected to hit unheard of heights in the near future.

The operating system has rights inheritance from root directories and drives to all other folders in this location. This means that the permissions for folders and all subfolders will be the same as for the root drive. This is handy because changing each subfolder for an individual user is too time consuming. However, such inheritance is not always convenient. After all, it will be impossible to change access rights for user groups. However, inheritance can be disabled for a particular folder. To do this, on the tab ( Security) folder properties click on the button ( Advanced). In the window that opens, on the tab (Permissions), click on the button (Change permissions) and uncheck ( Add permissions inherited from parent objects). You will now be able to change the current permissions regardless of the settings in the parent directory or hard disk partition.
This is a beautiful yet important distinction that leaves a layer of complexity and depth to virtual interactions. If the helmets use eye-compatible displays, two of these steps will be removed, meaning the user will only have to look where they want to go, press a button, and be there. Accurate tracking of the user's eye movements allows players' avatars to reflect their movement in the game. Check out the best helmets for virtual reality on the market. You no longer need to leave your home to scan an important document.
You don't need to spend a lot of money on a scanner. They are ideal for both business and personal use. Scan documents, receipts, business cards, notes, and even whiteboards or whiteboards. With it, you can scan recipes, notes, business cards, and other documents, including whiteboards. The app also has smart cropping features and automatic text readability. With it, you can scan photos, documents, notes, receipts, business cards, and whiteboards, and then the app automatically cuts them down for greater clarity.
With the release of Windows 8 and Windows 8.1, it became necessary to write an article on how to share files and folders in these operating systems. The sharing process in them is almost identical and, by the way, is not critically different from the Windows 7 sharing process in local network. So, how to share Windows 8?
1. Configure advanced settings for "Network and Sharing Center"
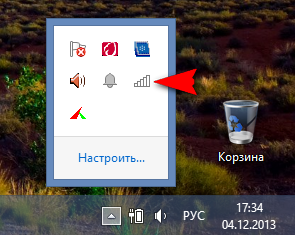
In previous articles about sharing, in order to open the Network and Sharing Center, we suggested that you do the following: Right-click on the network icon in the tray and select Network and Sharing Center: Network File Sharing in Windows 8
It allows you to combine files, edit documents, fill out and sign forms. The app uses intelligent page detection to adjust perspective and enhance images. When you need to scan long multi-page documents, you can use the Bulk Scan feature. Other great features are photo import, general access to e-mail, password protection, document organization and useful search. As with other applications, you can scan almost all documents and notes down to whiteboards and business cards.
For some users, the network icon may be hidden in the pop-up: Network File Sharing in Windows 8
Perhaps for someone, opening the Network and Sharing Center through the Run line will seem easier. To open the Run prompt, press the Win and R keys in sequence, and paste the following command into the prompt:
control.exe /name Microsoft.NetworkandSharingCenter
The app offers many in-app purchases to meet your additional needs. This is definitely unpleasant information as many users use this method of locking their smartphones. As reliable as it may seem at first glance, this functionality actually cracking the display unlock combination is not such a difficult task. Scientists from the University of Michigan have conducted a new study that shows that virtually no one is trying to hide their unlock pattern while we present it.
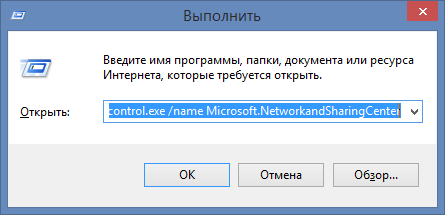
The Network and Sharing Center window opens.
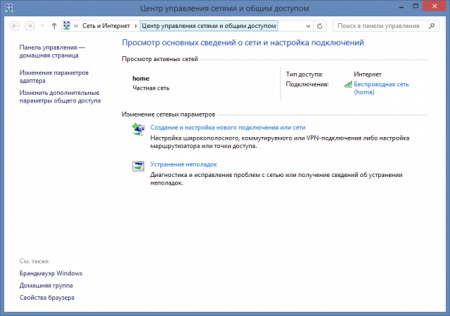
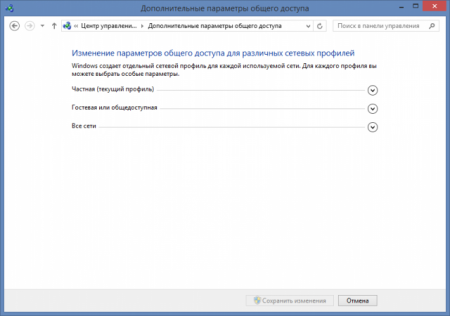
When viewing active networks, you can see a list available networks and an internet connection. also here you can create new network or try troubleshooting (never worked for me :)). Here we are interested in the linkChange advanced sharing settings. Click on it. In the window that opens, some sharing options are presented, separately for each of the network profiles: private. guest (public) and all networks.
This poses a serious threat to our security because it is very easy for our human being to see our unique combination. Just a quick glance at the exact moment can reveal your particular combination, which then jeopardizes all the information you keep on your smartphone. Research scientists show that over 64% of participants can successfully guess the unlock pattern once they see the combination. This value increases to 80% if they can see the combination a second time.
Even in two looks, only 27% of recovery attempts were successful. Scientists believe that this trend is related to how different people remember combinations of symbols and numbers. It is already supported in the default installation. Settings → Sharing → Sharing personal files. There you can activate a shared folder in your home directory with one click for that network. You can also password protect your password.
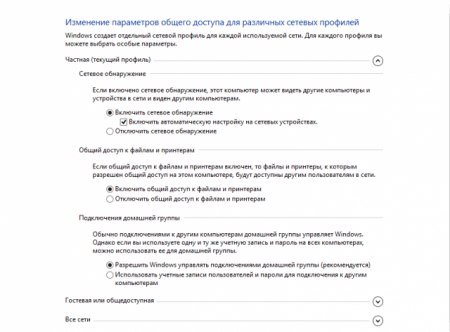
Network profiles appeared in Windows Vista, and Windows users continue to suffer from this, to put it mildly, not the best innovation. In Windows XP, these profiles did not exist, and sharing took place in just a few clicks. The intentions of Microsoft are also clear: to ensure greater security of the computer when interacting on the network. However, is it really necessary for a home user? Especially for those who do not store confidential data on the computer. Expanding each of the profiles (near the profile name there is a button with a down arrow), change the settings as shown in the screenshots (screenshots are clickable):
![]()
![]()
Don't forget to save your changes after setting.
Lyrics. While. like other developers operating systems and programs have almost abandoned the confirmation of actions for a long time, in Windows it is still necessary to press Confirm, Save, OK, Yes, of course, And what do you think, of course, I want to save the settings, no, I'm just poking around here
Also be aware that sharing is not available for remote computer until shared folder will not be empty. Either through the browsing network, where sharing should appear automatically, or through "Connect to Server", where you have to enter the sharing address you specified in the settings. This protocol allows you to exchange files, directories, printers.
GUI Configuration
See "Adding, editing and deleting users and groups". This allows you to set up a shared directory and assign it to users who can access it.
Command line configuration
Click Start → Control Panel → Network and Sharing Center. In the Change Adapter Settings window, double-click the icon showing the network connection.2. Folder sharing
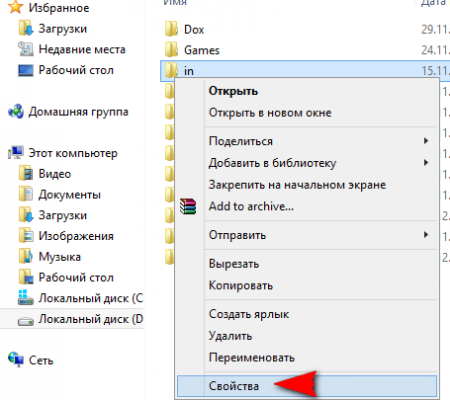
Select any folder on your computer that you want to make visible to computers on the local network. I have a folder with the magic name "in". Right click on it and go to properties
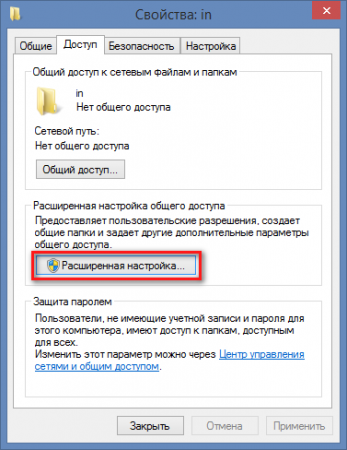
Go to the Access tab and click the button Advanced setup
If this "test" succeeds, you can continue. This binding is defined in the file. A specific user's password can be set or removed. using. You can then remove users. In the "User Accounts" window, click on the "Create a new account” and follow the instructions of the wizard.
Enter the server address in the form as shown in the figure below. You can use. Let's assume that directory sharing has been set up according to the instructions above. Use a text editor to create the file. To which you insert rows.
Check the box next to Share this folder, and then click the Permissions button
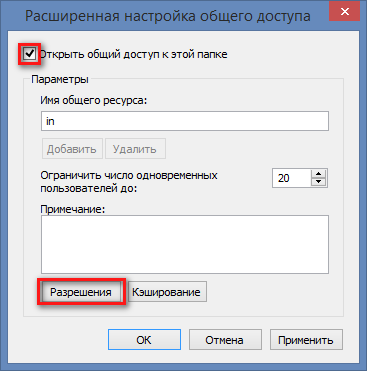
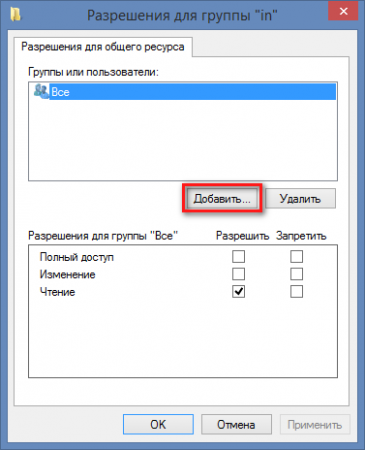
Here you can also change the name of the folder, which will be visible to other network users, while the name on your computer will not change. You can also limit the simultaneous number of users who can view the content of the resource. We recommend that you set this value to 1 or 2 if there are many computers on your local network. If you share a folder in home network, which has only 2 - 3 computers, you can leave this value unchanged. In the next window, click the button Add
Then set the permissions for this file. And open this file in text editor. Insert the line at the end of this file. The correctness of its syntax and storage location can be determined with a command. The result of this command looks something like this.
Before changing it, do backup original configuration file. Then open the configuration file in a text editor. In the configuration, you need to further configure. In the global value section of the workgroup parameter, the workgroup name that belongs to both computers in the data section, set the path to the shared directory in the path parameter. Double-click My Computer to open a menu where you have selected Properties. In the System Properties window, click the Computer Name tab and enter the name that appears next to working group.
Next, click the Advanced button
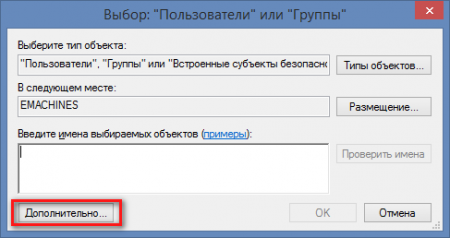
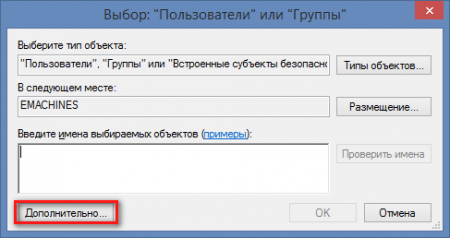
In the window that opens, click the Search button, scroll down the list and find the Network item. Select it and click OK

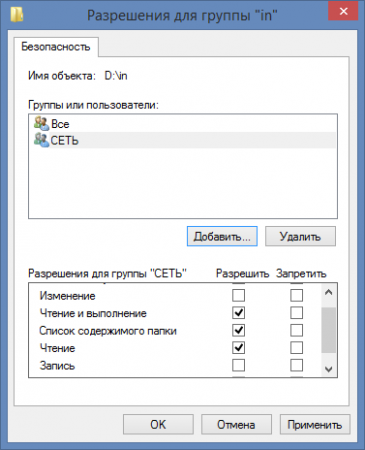
In the next window, also confirm your actions. In this window
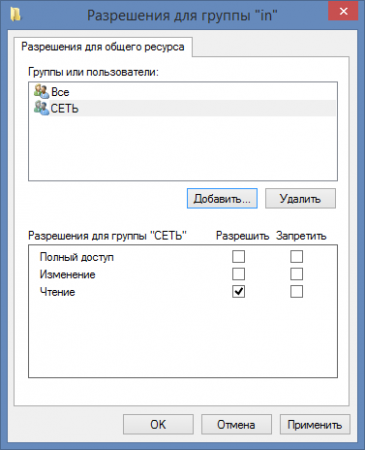
you can set permissions for network users: whether they can only read the content of the resource or write to it.
After starting the daemon, enter the command line to mount the shared directory. Click "Network Places" and in the "Network" section, click the "Add network connections". Click the "Next" button and then the "Other Network Addresses" icon. After a while, a window with the general contents of the directories will open.
Basic homegroup sharing settings
It's absolutely basic setup. However, this is outside the scope of this guide. To benefit from the advantages and benefits home group, you must, of course, create it. Select the data you want to use in your homegroup using the Checkbox Activation Wizard. These are the eloquently named objects "Pictures", "Documents", "Music", "Videos" and "Printers". On the control panel, left click the mouse. . You can add another computer to the homegroup you previously created, such as when you connect a new computer or laptop that you want to share with.
3. Changes to security settings for a shared folder
In order to do this, go to the security tab in the folder properties, click the Change button and repeat the steps described in paragraph 2.

Screenshots for clarity
Please write it down or follow the link. Print out your password and instructions. To add new computer, click "Select a homegroup" and sharing options, and then click the "Connect" button of course again in the control panel. You can't remember the auto-generated homegroup password trying to meet the highest security requirements. This is a combination of symbols and numbers, if you want to create your own, you can do it again in the Home group in the Control Panel.

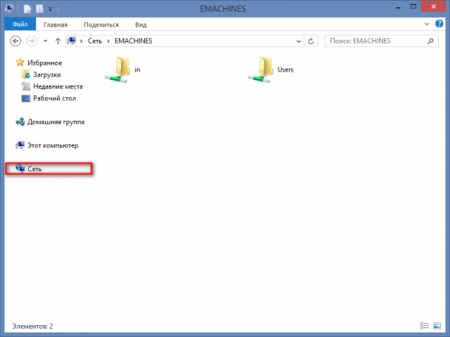
AT last window you can choose permissions for network users: whether they can change the contents of the folder, i.e. delete and write files, or only be able to read and copy data from it. Now, if you go on another computer to the Network in Explorer or any other file manager, you will see your computer with a shared folder.
4. Possible problems
This sharing method was tested on Windows 8, Windows 8.1. The computers from which the subject was accessed were under Windows control XP, Windows 7, Mac OS 10.6.8. If the computers still do not see each other, then it is worth trying to configure your antivirus. Often access problems are possible for users of Kaspersky Internet Security, Nod, Avast and other antiviruses. You need to dig in the direction of the firewall built into these products. If you do not see a shared computer in the network environment, then this method of access sometimes helps here: Find out the IP address of your computer. This is done as follows: Open a command prompt by typing Run command in the line
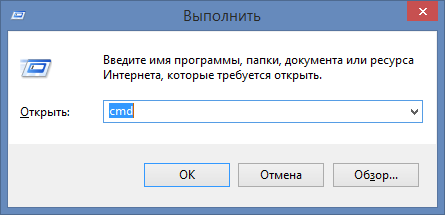
AT command line run the command:
ipconfig
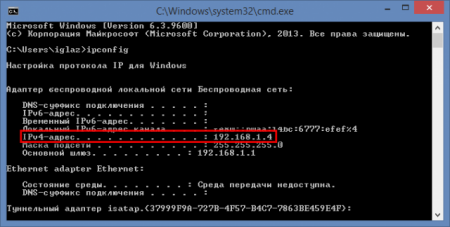
The numbers next to the IPv4 address are the IP address of your computer. I have it
192.168.1.4
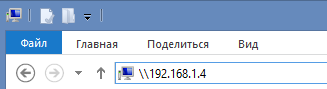
Enter these numbers in the address bar of the explorer on the computer from which you are connecting to the shared machine and press Enter. Add two backslashes before the numbers:
Here is such a complex sharing. Let's hope in the next Windows versions 10 Microsoft will make this process easier and more user-friendly.