Computer local networks, unlike global ones, provide communication between computers within the same room, regardless of its size. This could be one apartment or a large shopping center. There are also heterogeneous (mixed) networks, when computers or other devices with different operating systems or with different data transfer protocols. Within the same local network you can connect not only computers and laptops, but also other multimedia devices (TVs, gaming consoles, stereo systems, etc.) By correctly creating such a system, you will be able to watch movies or listen to music that is on computer media, on a TV screen or using an audio system, quickly exchange files, etc.
In this article we will look at an example of setting up a local network for home use. Even an ordinary user can cope with this matter. We are considering the option where all computers have Windows 7, which is familiar to Russian users, installed (the procedure is almost no different for setting up a home network under Windows 8 or Vista).
The first stage is the selection of equipment
Setup begins with selecting the appropriate network component. There are several options - a switch, a router or a wireless access point. Moreover, they can be combined if you plan to create not only a local network, but also connect to a global one. What is the difference between these devices?
- A simple switch for a home network provides exclusively communication between computers using a wired connection. It does not carry any other functions (we will not consider special “smart” devices that providers use). Computers and multimedia devices are connected to this network switch using wires. In stores, UTP5 cables with crimped ends are called patch cords and are sold in different lengths. The length of each patch cord for a home local network does not matter, since from device to device the signal travels through the cable without deterioration up to 150 meters.
- Router, or router. This network component not only connects local network points, but can also provide access to the Internet. At the same time, many modern models support both wired and wireless communication devices internal system(via WiFi).
- A wireless access point for home use will ensure that your gadgets communicate with each other exclusively via WiFi. Please note that computers with a wireless network card can connect to it, but modern phones and tablets, almost without exception, have access to WiFi.
For the simplest connection of home computers into one system, a relatively cheap switch is suitable. Routers and wireless points will cost more. Choose the appropriate components based on your needs and financial capabilities. They are presented in large quantities on the market.
The second stage is setting up a local network (via a switch)
If you choose a simple switch and connect computers to it using a cable, we immediately move on to the stage of setting parameters for each computer or device.
IN Windows system 7 we need to go to the Start menu, select Control Panel and open the Network and Sharing Center tab.

By clicking on the name of the network (Home network, Enterprise network, etc.), you can proceed to creating working group(but it is better not to complicate the process and cancel the system offer). On the left you will see the option Change advanced settings public access. Make sure that Network Discovery, File and Printer Sharing, Folder Sharing, and other settings you need are enabled. These steps must be carried out on every computer/laptop!
Now we configure the network cards. In the Network and Sharing Center, click Local Area Connection.

In the window that appears, click Properties and select the line Internet Protocol version 4 (TCP/IPv4) and click Properties again. In the window that appears, select Use the following IP address and enter the IP for the first (main) computer - 192.168.0.1, and the subnet mask - 255.255.255.0.

The line with the gateway number is not specified if the local network does not have access to the Internet. We carry out the same actions on all other devices, only we change the last digit after the dot in the IP address to 2, 3, 4, etc.
The number of connected computers is usually determined by the number of outputs on the hub, which varies from 8-16 or even more. This connection method, with certain settings, which we will talk about a little later, allows you to unite all computers with a single local network. In addition, this connection allows computers to be on the network independently of each other. Even if one of the computers disconnects from the network, the rest will continue to work. In order to implement the network through a hub, we will need a special network cable which will connect each computer to the network. This cable is also known as “twisted pair”.
Step three - check network settings
Now you can check whether the local network was created correctly. To do this, in the Start menu, in the search, type cmd and press Enter, in the window that appears, type the word ping and, separated by a space, the address of the required computer, for example, ping 192.168.0.3. if everything was done correctly, a message indicating the successful exchange of packets and the response time will appear. If the settings were not made correctly, you will see messages indicating that the timeout interval for the request has been exceeded.
The second stage is setting up a local mesh (for a router)
If you use a router in your system, then setting up a regular LAN is no different from the steps described above for a switch. But if you want to connect local network computers to the Internet, then the procedure changes radically. We configure only the router, and for all devices connected to the home network we set the option in the network card settings - Obtain IP addresses automatically.
To configure the router, you need to open any browser window and type its network address in the line (it is usually indicated on the box itself or in its documentation). Depending on the brand and manufacturer, these IP addresses may be different. The browser will open a window with the router parameters, where you need to specify the information that your provider gave you. If everything was done correctly, all your devices will automatically be connected via a local network and connected to the Internet. Now you can move on to step 3 - checking that the settings are correct and “ping” all your devices, as described above.
A situation often arises when, when the router or modem is correctly connected to the PC, there is no “wireless” icon in the lower corner of the computer monitor network connection windows 7". And no matter how much the user switches the wires, stubborn " network connections" never appear. In this case, you need to put off “cable work” for a while and check (possibly reinstall) the connection parameters over the local network.
Setting up a network connection in Windows 7
- 1. Click with the left mouse button (hereinafter left all the time, unless otherwise indicated) on the “Start” menu button.
- 2. Select the “Control Panel” icon.
- 3. In the “Control Panel”, click “Network and Internet” - “View network status and tasks” (if you don’t see it, switch the viewing mode to “Category” view).
4. Go to the “Change adapter settings” menu.

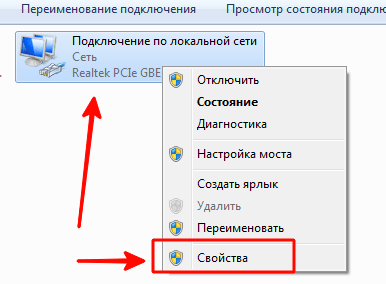
5. Click right click mouse on the “Local Network Connection” icon, from context menu select “Properties”.

6. Double-click to open the properties “Internet Protocol Version 4 (TCP/IPv4)”.
7. Switch the first checkbox to the position: “Obtain an IP address automatically”, the second to “Obtain the DNS address of the north automatically”.

8. If the checkboxes were already in the specified position, then change the first one to the position: “Use the following IP address.”
Set the following values: “IP address”: 192.168.1.2, “Subnet mask” 255.255.255.0, “Default gateway”: 192.168.1.1; "Preferred DNS server": 192.168.1.1.

Do not forget to click the “OK” button in all open windows after completing the settings to save the settings.
Setting up a network connection in Windows 8:
In general, setting connection parameters here is carried out similarly to the previous version of the OS. The only caveat: many users do not know how to open network connections in Windows 8. Therefore, at this stage we will dwell in more detail:
1. Right-click on the “Start” menu and in the menu that appears, select “All applications”

2. In the “Applications” menu, click the “Control Panel” icon.

3. Click on the “Network and Internet” icon.
5. Find and click “Change adapter settings” (top left).
Further setup is carried out similarly to the “seven”: follow steps 5 to 8 and check the network connection - the corresponding icon should appear in the lower corner of the monitor.
IN Microsoft Word You can add and modify pictures, illustrations, shapes, and other graphic elements. All of them can be edited using a large set of built-in tools, and for more precise work, the program provides the ability to add a special mesh.
This grid is an auxiliary tool; it is not printed and helps to perform a series of manipulations on the added elements in more detail. It is how to add and configure this grid in Word that will be discussed below.
1. Open the document in which you want to add a grid.

2. Go to the tab "View" and in the group "Show" check the box next to the item "Net".

3. A grid of standard sizes will be added to the page.

Note: The added grid does not extend beyond the margins, as does the text on the page. To change the size of the grid, or more precisely, the area it occupies on the page, you need to change the size of the margins.
Changing default grid sizes
You can change the standard dimensions of the grid, or more precisely, the cells in it, only if there is already some element on the page, for example, a picture or figure.
1. Double-click on the added object to open the tab "Format".

2. In a group “Arrange” click the button “Align”.

3. In the button drop-down menu, select the last item “Grid Options”.

4. Make the necessary changes in the dialog box that opens, setting the vertical and horizontal grid dimensions in the section “Grid step”.
So, you have finally concluded an agreement with a new provider, and a cable with a plug has been installed in your apartment - a real window to the world. All you have to do is connect it to your computer - and the Internet is at your service. However, if it was enough to insert the plug into the socket, you would not need to read this article.
Let's look at how to connect the Internet to a computer via cable, in the simplest case. Let's say you have only one computer, and you will use it as a router (if you suddenly need it or a tablet). Or (alternatively) you are planning to do so later, so you turn off the router to make remote access easier.
Let's say you have a network card on your computer (it doesn't matter whether it's separate or built into the motherboard), and you've just connected an Ethernet cable to its input. We assume that you are using the most current Windows 10. Although for correct settings Windows 8/8.1 or even 7, these instructions are also suitable: the principle is the same.
Of course, you can always call a professional to do all the necessary work for you. But specialists are not always free. In addition, you will not only save money on calls on your own, but also learn how to set up the Internet on your computer via cable. In our world, such knowledge can come in handy at any time.
Dynamics vs. Statics
Now check with your provider what kind of connection they offer on your tariff plan: dynamic or static.
With dynamic connection your IP address may change depending on your ISP settings (and if you intend to subsequently connect to your workplace remotely, this may interfere with you). But manipulations with entering parameters are reduced to a minimum: the provider sets the IP address, subnet mask and default gateway independently. In this case, just plug the cable into the computer and that’s it, Internet access will appear.
Static connection provides a static IP address assigned to your computer (or router, if you choose to connect through one). In this case, you will have to manually enter the IP address, subnet mask and default gateway in the connection settings. Usually all these incomprehensible numbers and letters are included in the access agreement or in an appendix to it. If necessary, you can clarify them with the technical support service by providing your details.
In some cases, access also requires a login and password (do not confuse Internet access as such with access to your personal account on the provider’s website - for personal account data is required).
How is the connection made?
Let's look at the procedure step by step.
- Insert the plug of the Ethernet cable brought into the apartment into the corresponding port of the computer. Even if you have never done this before, you will not be able to confuse this type of connector and plug with something else.

- Right-click on the “Start” button and find the “Control Panel - Network and Internet - Network and Sharing Center” section. In the left column, select the “change adapter settings” tab. A list of your adapters will appear in the main window (more precisely, in our case, one “Local Area Connection” adapter). Again, use the signature “right-click” technique and select “Properties”.
- A small pop-up window contains a whole column of different strings with properties. Select the line “IP version 4 (TCP/IPv4)”. While it's selected, click the Properties button below the list box.

Now our instructions branch out. Have you checked with your provider what IP is provided to you? If not, check now.
- If dynamic, then trust the automatic selection in the IP address and DNS server settings.
- If it is static, you will have to enter the values manually. As a rule, you need to specify “IP address”, “Subnet mask”, “Default gateway” and “DNS server”. When you have completed entering your data, click OK to save your selection.
Important points:
- If the connection requires a modem, enter its default address as the IP address; this is usually 192.168.1.1. If the modem has a different IP (which is rare), it is indicated on the bottom of the modem itself or in its instructions.
- Usually the ISP provides the DNS server details, but sometimes this is omitted. Then you can use the universal ones:
1) Public DNS from Google: 8.8.8.8 or 8.8.4.4 - a universal solution, usually suitable for all computers
2) OpenDNS – 208.67.220.220 and 208.67.222.222
3) Yandex DNS with its own anti-virus filter - 77.88.88.88 or 77.88.8.2 - if you trust the Yandex anti-virus policy (although sometimes it may consider a completely decent site unreliable)
4) Yandex DNS with a filter for pornography and other obscene content - 77.88.8.7 or 77.88.8.3 - although it depends on what you actually need from the Internet, hehe.
- Let us repeat: if remote access is important to you, make sure that your provider’s support ensures that your IP will not change.
If your ISP offers L2TP access, this may require some additional steps on your part. Usually the provider provides instructions for setting up this specific type of connection, but it wouldn’t hurt to duplicate it on our part either.

So, to configure L2TP, you need:
- Go to the already known section “Network and Sharing Center” and select creating a new connection
- Unlike previous options, here you should go to “Connect to your workplace”
- When the system prompts you to create a new connection, select this item
- Select "Use my connection"
- Enter the server address provided by your provider. You should not select the immediate connection option. You assign a name that you like.
- In the next window, enter the username and password provided to you. Don't forget to check the box next to "Remember password"
- Connect now when the system prompts you to do so
- Return to “Adapter Properties” (as discussed above) and select the “Security” section
- In the "VPN Type" drop-down options, select "L2TP" IPsec VPN" Below is the line “Data Encryption”, here you need to select “Optional”
- Under the "VPN Type" line, click the "Advanced Options" button
- Enter this same key in the “Key” field. You must have it from your provider.
- That’s it, you can click “OK” with peace of mind and use the connection.
This instruction works for Windows 7 and newer versions.
Why all this complexity? - you ask. This solution has advantages: for you - increased connection security (compared to a regular LAN), for the provider - simplification of the billing system.
Setting up PPPoE
Before setting up the Internet on your computer, check with your provider about the type of access it offers. Access via PPPoE requires not only correct settings, but also authorization using a login and password. You will need this connection method if you do not use a modem or router, but insert the cable from the provider directly into the connector on the computer, without intermediaries.
To do this, you again go to the “Network Control Center” and select there, create a new connection with its help.
In the wizard that launches, you select the first item - “Connect to the Internet” - and click “Next”. Then in the window that appears, you must select “High Speed (with PPPoE)”.
The final step remains. In the final window, you need to come up with a name for the connection and enter the login and password issued by the provider. If your computer is used by several people (for example, family members), each under their own account, and you want to give them all access, then check the box “Allow others to use this connection” accounts».
Now make sure your Internet connection is working. And if so, then hello world!
Setting up a local home network can be divided into several steps:
1 We register network settings on all computers/laptops/TVs of the home network (this step is used if there is no router on your local network).
2 Checking the name of computers and workgroup specified in the properties of computers.
3 Power on Windows Firewall.
4 Checking the network operation.
We manually set up network settings on all devices in the home network (for networks that do not have a router/router)
Go to the Control Panel (“ Start Panel management") and select " Network and Sharing Center».
After that, click “ Change adapter settings». 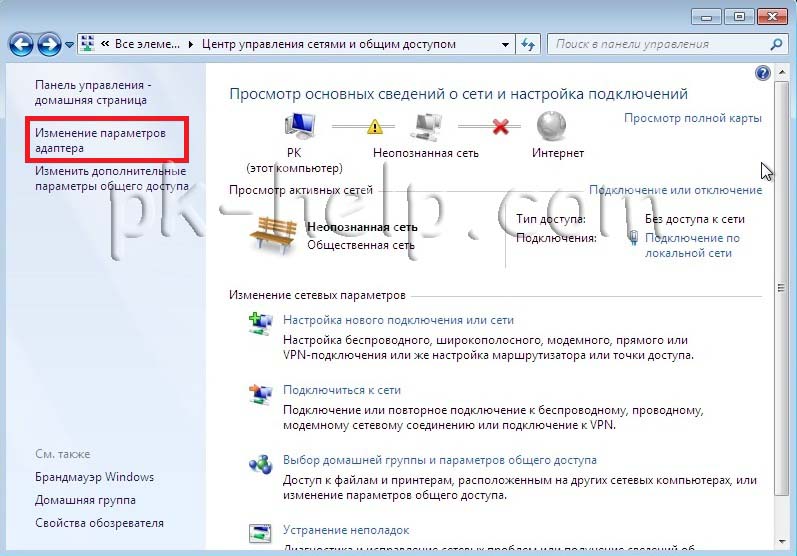
In the network connections window, select the connection we are interested in and right-click on it, select “ Properties", in the connection properties window select " Internet Protocol Version 4 (TCP/IPv4)" and press the now active button " Properties" In the Internet Protocol Version 4 (TCP/IPv4) Properties window, enter the IP address 192.168.1.1
(on other machines we write 192.168.1.2
, 192.168.1.3
etc.) The subnet mask for all computers must be 255.255.255.0
. The gateway should not match the IP address of the computer; in the gateway, enter the IP of another computer on the network (if you do not specify a gateway, you will not be able to specify the network; by default you will have it - Public, this will be discussed below). 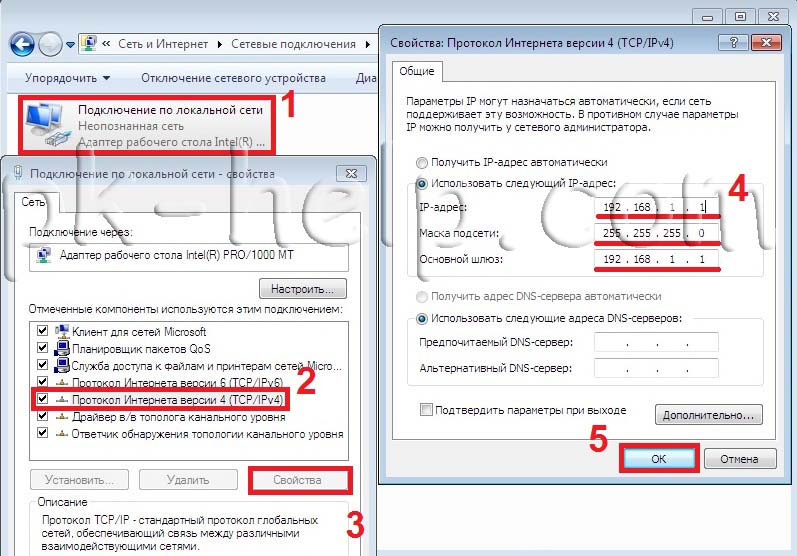
The first time you connect to a network, you must select a network location. This choice affects the firewall settings and security settings for the type of network you are connecting to. If your computer connects to multiple networks (for example, a home network, a network at a local coffee shop, or a network at work), choosing a network location will ensure that your computer has the right level of security. 
There are four types of network placement.
home network for work in home networks or in networks whose users and devices are known and can be trusted. Computers on your home network can belong to a homegroup. For home networks, network discovery is enabled, allowing other computers and devices connected to the network to be used and allowing other users to access the computer from the network.
Work network for networking in a small office or other workplace. Network discovery, which lets you use other computers and devices connected to your network and allows other users to access your computer from the network, is turned on by default, but you can't create or join a homegroup.
Public network for networks in public places (such as cafes and airports). This network location is configured in such a way as to make the computer “invisible” to other users and increase its protection from malicious software from the Internet. Home group is not available on public networks and network discovery is disabled. This option should also be selected if you are using a direct Internet connection without a router or a mobile broadband connection.
Domain is used for domain networks, such as those used in workplaces in organizations. This type of network location is controlled by the network administrator and cannot be selected or changed.
In practice, I would recommend choosing for your home network Working network
, because unlike Home Network, there is no need to enter a password to share resources. Of course, you shouldn’t choose a public network for a local network at home; I’m generally silent about the domain, since in this case you need to install and configure a domain controller; for a home network, it’s not worth it.
Checking computer and workgroup names.
It is necessary to check that all devices on the home network are part of the same workgroup and have different names. To do this, go to " Start-Control Panel-System" A similar procedure must be performed on all computers/laptops on the network.  In the Computer name, domain name and workgroup settings field, look at the entered computer name and workgroup name.

Checking the operation of the Windows Firewall service.
The next step is to check whether the Windows Firewall service is enabled. To do this, go to " Start - Control Panel - Administration» 
In the window that opens, click " Computer management». 
Next go to " Services and applications - Services", find a service there Windows Firewall and make sure that it is enabled; if it is disabled, you need to launch it and check that the Startup type is set to " Automatically", to do this, double-click on this service and in the window that opens, look and, if necessary, correct the Startup Type. 
Checking the network operation.
The last step is to check the operation of the home network; to do this, launch the command line on one of the computers. Click " Start» in the search bar write cmd and press the " Enter». 
Will open command line, you need to enter the command ping and the IP address of another computer on your home network, press the " Enter». 
If everything is done successfully, you should have no packet loss.
At this point, setting up your home network can be considered complete; the next step is to configure network printer or do shared folders (network folders) , this will be discussed in the following articles.