On the desktop, you can configure the display of captions under shortcuts and icons on transparent background with shadows.
Such signatures look much better against a nice wallpaper (background image) than against colored rectangles with a background background (the color is set by default or customized by the user).
Basically, most computer users have icon names on a transparent background. However, it happens that out of nowhere, colored frames appear around the names and even if you crack them, you can’t get rid of them.
What is recommended to do in such cases?
1. Check whether the “Casting shadows by desktop icons” function is enabled:
If everything is ok, the background of the shortcuts is transparent, just close the window. If not, click in the empty square next to the line “Casting shadows by icons on the desktop” (a check mark will appear) and click OK, in the next window OK again.
2. Make sure that the background desktop you have a jpeg image installed. Since problems arise when using transparent or animated images, respectively with the png or gif extensions. If this is your situation, change them to a regular bitmap.
3. Let's see, it is possible that web content is placed and pinned on the Desktop. Right click on free space Desktop - Properties, in the "Properties: Screen" dialog box, select the "Desktop" tab.
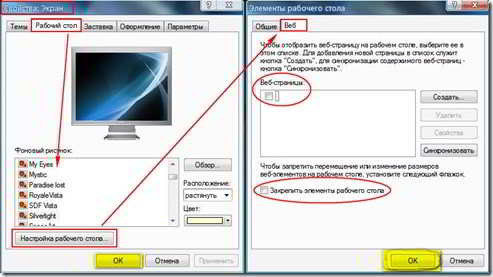
First, change the background image to any of the set suggested by the operating system and click the “Apply” button. Then click the “Desktop Settings” button, in the “Desktop Elements” dialog box that opens, select the Web tab. If there are checkboxes in the "Web Pages" area, uncheck them and the "Lock Desktop Items" checkbox too (if checked). Confirm your actions by clicking the OK button successively in two closed windows.
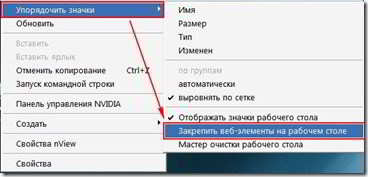
4. Let’s also try right-clicking on the free space of the desktop, in the menu that appears, select the top line “Arrange icons”, then in the submenu uncheck the “Pin web elements to desktop” command.
5. Let's also consider a situation where the reason may be the system's use of a high-contrast mode. This setting operating system can be canceled via the panel Windows management. Click Start - Control Panel - Accessibility - Adjust text contrast and screen color - uncheck the "High contrast" box - click OK.
Instructions
Left click on background image on the desktop - this action is quite enough to deselect one, as well as all the icons located on the desktop. In this case, the background of the labels should become transparent. If the selection is removed, but the color fill under the labels remains, then the reason lies in the corresponding settings for displaying desktop elements.
Activate the context menu on the Windows XP desktop by clicking on the background image right click mice. Select the “Properties” item in it and in the window that opens, click the “Desktop” tab. Click the “Desktop Settings” button, and in the next window that opens with the heading “Desktop Elements”, select the “Web” tab. Here you need to uncheck the box next to “Lock desktop items”, as well as all the checkboxes in the “Web pages” list lines. After that, close the settings windows by clicking the “OK” buttons in them. In this way, you will eliminate one of the possible reasons in Windows XP for the seeming selection of shortcuts on the desktop.
Open the context menu of the “My Computer” icon by right-clicking on it, and then select the “Properties” line. You can also do this through the main OS menu on the “Start” button - opening it, right-clicking the “Computer” button and selecting the same “Properties” line. Or you can use the hotkeys Win + Pause Break. Any of these actions opens the System Properties component. Click the Advanced tab, and then click the Options button in the Performance section. In the “Special effects” field, check the box, and in the list of effects, find the line “Casting shadows by icons on the desktop” and check its checkbox. Then click the "OK" button - this will eliminate the other possible reason imaginary selection of desktop icons.
Open the main menu of the system, select the “Control Panel” link in it and click the “Accessibility” inscription. Then click on “Adjust text and screen color contrast” and uncheck the “High contrast” box if it is checked there. Click the “OK” button to eliminate another reason for the illusion of highlighting desktop shortcuts.
Video on the topic
note
These very small files - less than 1Kb - are just pointers to the location of the program on the disk, so you can do whatever you want with them (copy, move, delete, etc.). without the slightest harm to your information. You can place shortcuts on the desktop, or, for example, in Start menu folders. Toolbar Icons: These represent tasks on the application's toolbar.
The icons that are placed in this section are in PNG format. To place an icon on any file or folder, you need to download the Aveiconifier program. At the same link you will find instructions for using this program. How to install an icon on a shortcut: Right-click on it => property => “shortcut” tab => change icon and select your icon in .ico format How to install an icon on a folder: right-click...
Sources:
- how to take a picture of a desktop
- Desktop shortcuts and objects are not highlighted
If the user wants to customize the view " worker table” according to his own taste, he needs to know how to work with the various elements on him. Badges, located on the “Desktop”, you can hide, move, delete. Many of these activities occur in several stages or steps.
You will need
- -mouse;
- -keyboard;
- -component “Folder Options”;
- -Screen component.
Instructions
There can be different icons on the “Desktop”: files, folders, shortcuts. After installing the operating system, all the icons that the user sees on the “Desktop” are shortcuts for launching programs installed on the local drives of the computer. Even folders such as “My Computer”, “My Documents”, “Trash” are also just shortcuts. “Real” folders and files appear later, when the user creates them himself.
If you need to delete some shortcuts (folders, files) from " worker table", select them with the mouse and press the Delete key on the keyboard. Another option: select the icons and right-click on any of them, select the “Delete” command from the drop-down menu. When asked to confirm deletion, respond in the affirmative. Badges will be placed in the "Basket".
To remove items such as “My Computer”, “Network Neighborhood”, “Trash”, “My Documents”, click in any free space “ worker table" Select "Properties" from the drop-down menu. The Properties: Display window will open. Go to the “Desktop” tab and click on the “Desktop Settings” button table" In the window that opens, go to the “General” tab and remove the marker from the fields of those elements that you want to remove from the “ worker table" Apply the new settings and close the window.
To remove from " worker table» files and folders you created and move them to another directory, select necessary files and folders and place them on the clipboard. To do this, right-click on any selected icon and select the “Cut” command from the drop-down menu.
Go to the new directory to place the files, click in any free space open folder right-click and select Paste. The “Paste” command can also be called from the “Edit” item on the top menu bar of the folder. It makes no sense to move program shortcuts in this way.
To make file and folder icons hidden, move the cursor to each desired icon and right-click on it. Select "Properties" from the drop-down menu. In the dialog box that opens, go to the “General” tab and place a marker in the field opposite the inscription “Hidden”. Click on the “Apply” button and close the window.
Call the “Folder Options” component. To do this, through the “Start” menu, call up “Control Panel” and in the “Appearance and Themes” category, click on the “Folder Options” icon. Another way: open any folder and select “Tools” in the top menu bar, then select “Folder Options” from the drop-down menu. A new dialog box will open.
In the window that opens, go to the “View” tab. In the “Advanced Settings” section, use the scroll bar to find the “Hidden files and folders” item and check the “Do not show hidden files and folders” field. Click on the "Apply" button and close the window. All files and folders that you have made hidden will remain on the Desktop, but will be invisible.
In order to remove shadows icons on worker table, you need to know what type of settings this function refers to. Presence or absence of shadows icons refers accordingly to the desktop settings. Which means to remove shadows, you need to go into desktop settings.

Instructions
Right click on worker at the table. In the menu that opens, select the “Properties” line. Click on it with the left mouse button. The "Display Properties" window will open. Using the left mouse button, select the “Desktop” tab. In this window you will find a button “Desktop Settings”. Click on it also with the left mouse button. A relatively small window will open. Thus, you have entered the desktop settings.
In this window, go to the “Web” tab, find the line “My current home page". Most likely, this line will be the only one in the window. You will see a check mark in the box next to it. Uncheck the box by left-clicking on it. In the same window, click on the “Ok” button with the left mouse button. Close the “Display Properties” window by clicking on the cross in the upper right corner of the window and pressing the same left mouse button.
After the operations performed shadows icons on worker the table should disappear. This method of removing shadows icons on worker The table is valid for any version of Windows. However, if for some reason the result is not achieved, you can try an alternative option for removing shadows.
To use it, right-click on the “ My Computer” shortcut. In the menu that opens, use the left mouse button to select the “Properties” line. In the window that opens, use the same left mouse button to select the “Advanced” tab. Find the "Performance" group. In it, click the “Options” button. You will see the inscription “Casting shadows with icons on worker table." Use the left mouse button to uncheck the box. Now click once on the “Apply” button and then twice on the “Ok” button. All that remains is to close the control panel. Thus the task is completed, shadows icons on worker the table has been cleared.
Sources:
- how to remove shadows on desktop
Tip 4: How to make desktop icons transparent
Almost all desktop visual effects are configured in the display properties. If, for example, how to change the image to worker table everyone knows, some other visualization parameters are not familiar to everyone. For example, how to make icons on worker table transparent, not everyone knows.

Instructions
Turn on the computer and make sure that the monitor does not display any active processes, in other words, all that the user should see on the monitor screen is the desktop icons and background image. If the screen displays the work of active programs, for example, activity indicators or processor temperature, then it is better to minimize them for a while. You should also remove active gadgets that are displayed on worker table. All this will help avoid visualization defects that may occur when changing desktop settings.
After the preparation process is completed, you can proceed directly to the process of changing the properties of desktop icons. Press the "Windows" + "E" key combination. If anyone doesn’t know, the “Windows” key is located on the very bottom row of the keyboard, penultimate on the left. There is also a Microsoft Corporation icon on it.
Appears service menu. Find the line "Folder Options", then go to the "View" option, find the "Hidden files" option and opposite this option, check the "Show hidden files" checkbox. Then go to the properties of the icons on the screen. You can do this simply by clicking on the desired icon right mouse button, thereby opening the context menu of the icon.
IN context menu select the Properties option. This is the lowest option in the context menu. That's it, you have entered the "Properties" command for desktop icons. Now all you need to do is click on the “Hidden” option. Then select the "Save" command and click "OK". That's all, the icon we need has a transparent appearance. This way you can make everything transparent icons desktop, or only those that we need.
Video on the topic
Helpful advice
In order to make desktop icons transparent, you do not need any special knowledge or programs. All you need is a couple of minutes of time.
Quite often, users of the Windows XP operating system complain about the appearance of permanent highlighting of desktop icons, mostly blue. This happens because changes have been made to the settings for displaying graphic elements or the mode for displaying web elements has been turned on. worker table. Getting rid of the problem is quite easy.

You will need
- operating room Windows system XP.
Instructions
To change the effect of the unpleasant phenomenon in the form of displaying the selection of desktop icons, you need to go to the system settings. Right click on worker table, select "Properties". In the window that opens, go to the “Advanced” tab, in the “Performance” block, click the “Options” button.
In the new window, go to the “Visual Effects” tab, check highlighting option “Casting shadows with icons on worker table" You can also select the “Restore defaults” option, but all settings that have been made up to this point will be automatically reset. Click the Apply button and refresh your desktop by pressing F5. If everything remains the same as it was, we move on.
Right click on worker table, select "Properties". In the window that opens, go to the “Desktop” tab and click the “Desktop Settings” button. In the new window, go to the "Web" tab. In the “Web pages” section, uncheck all the checkmarks that are there. You can try removing all web pages except the My Current Home Page element.
You can also use the system recovery service, which is included in the standard set of utilities for the Windows XP operating system. Thus, you can roll back any actions that made changes to the operating system registry. You can find the recovery service in the “Utilities” section. Click the Start menu, select All Programs. In the list that opens, select “Standard”, then “System”, then “System Restore”.
In the main program window, select “Restore your computer to an earlier state” and click the “Next” button. Then select any day on the calendar and click Next. A window will appear on the screen asking you to confirm that the checkpoint has been restored. After clicking the “Next” button, the computer will restart and data will be restored.
Components on " worker table" may look different. In the operating system Microsoft Windows the user can organize everything according to his own taste. Customize or remove allocation color of icons and inscriptions on " worker table» can be done in a few clicks if you know what and where to look.

Instructions
The main “Desktop” settings are located in the “Properties: Screen” window. To open it, open Control Panel through the Start menu. In the “Design and Themes” category, select the “Screen” icon by left-clicking on it, or select any of the available tasks. Another way: right-click on any place on the “Desktop” that is free from files and folders. Select “Properties” from the drop-down menu and a new dialog box will open.
If on your " worker table"The inscriptions of all folders and files are highlighted in color, go to the "Desktop" tab in the window that opens and click on the "Desktop Settings" button. In the additional Desktop Elements dialog box that opens, go to the Web tab. Uncheck the "Lock desktop items" box and click OK. In the properties window, click on the “Apply” button.
Additional visual effects and colors of inscriptions or other elements of various components of the “Desktop” are configured on the “Appearance” tab. Click on the “Advanced” button and use the drop-down list to customize the display of elements to your liking. Click the OK button in the additional appearance window, the Apply button in the properties window and close the window.
Through the Start menu, open Control Panel, in the Performance and Maintenance category, select the System icon, and the System Properties dialog box will open. Go to the "Advanced" tab and in the "Performance" group, click on the "Options" button. In the "Performance Options" window that opens, go to the "Visual Effects" tab. Place (remove) the marker in the required fields, customizing the design to your own taste. Click OK in the options window, apply the new settings in the properties window, and close the System Properties window.
. Most often, this incident occurs after the system freezes. It is not the desktop shortcuts themselves that turn blue, but the inscriptions underneath them that are not on a transparent background, but on a dark blue one. Some people simply don't pay attention to it. Well, blue ones, and God bless them! But for others, such a transformation simply infuriates. What can you do, we are all different. Some people have socks under their noses and “smell”, but they only get a buzz from it, while others are enraged by any thing that lies crookedly or is out of place. It also pisses me off if there is something on my table that is not the way I put it. It’s good that I’m alone in my office at work, otherwise I’d be exhausted and torture others. And it’s good that everyone in the family is the same. It’s true that our cats are constantly putting things in order, but we try not to leave or scatter anything anywhere. In general, animals discipline us well. Try leaving something out of place! I used to often forget the flash drive on the table. But after just chewing it up a couple of times, my memory improved dramatically. We've talked about characters, now let's get back to our labels. How can I return them to their original form?
For Windows XP
Let's go " Start - Settings - Control Panel"

Open the folder " System"

In the window that opens " Properties of the system"go to the tab " Additionally ».

Blue desktop shortcuts in Windows 7. In order to get to the “ Properties of the system", go to the menu " Start", go to the entry " Computer", and right-click on it. In the drop-down list, select “ Properties" In the window that opens, on the right, select the item “ Advanced System Settings ».


In chapter " Performance"Press the button " Options ».
In the window " Performance Options"go to the tab " Visual effects", set the switch to " ". After that, look for the entry “” below. If there is no checkmark next to this entry, then check it and press the button at the bottom “ Apply ».
If the checkbox next to the entry “ Casting shadows on desktop icons" stands, and the labels on the table are still blue, then we put the switch to the item " Special Effects", and then back to recording " Restore Defaults", and press the button " Apply ».

Now blue labels on the desktop should appear on a transparent background.
If this procedure did not help in Windows XP, then right-click on an empty space on the Desktop and select “ Arrange icons" - and uncheck the box next to the entry " Pin web elements to desktop ».

Source
Not every user will like the standard design of the desktop and the entire environment of the Windows 7 operating system. If you want something unusual in the design, or your eyes are tired of the white font color, you can change the standard settings and create your own, unique graphic design.
You will need
Computer;
- Internet;
- administrator rights.
Sponsored by P&G Articles on the topic "How to change the font color on the desktop" How to remove the background of a shortcut How to deselect icons on the desktop How to reduce the size of the desktop
Instructions
Click on the "Start" button and select "Control Panel". Find the “Design” section and click on it. You will be taken to the graphical design settings area of Windows 7. You can also click on the “My Computer” shortcut, which is located on the desktop personal computer. Next, on the left side, find a tab called “Control Panel”. Find the item “Change color scheme” in the list on the left and click on it. The Color and appearance windows”, in which you can choose different color schemes with ready-made combinations of colors for panels, windows and fonts. Operating systems typically have a huge range of different colors that can be used both in application software and in the operating system itself. If you are not satisfied with the choice of operating system, click on the “Other” button located at the bottom of the window. You will be taken to an area fine tuning graphic design. Here you can set the color for each element of the Windows graphical environment. Click on the “Element” item to bring up the entire list of elements whose color can be changed. Find the item you need and set the color you like. You can also select the element presented in the window at the top by simply clicking on it with the mouse. If font settings are available for this element, the settings buttons are activated. There are various graphical mini-applications that change the desktop settings in the most bizarre ways. You can find similar applications on the Internet using search engines. However, you should clearly understand the fact that some programs may contain malicious codes, so for data reliability, use licensed software. How simple
Other news on the topic:
On a Microsoft operating system Windows user can customize the design of various components of the “Desktop” in accordance with his preferences. You can change not only the appearance of icons and the size of labels, but also the color of the “Taskbar” and the “Start” menu. To set up a color that is pleasing to the eye
In the Microsoft Windows operating system, the user can customize the “Desktop” to their own taste. You can work with almost every element separately, setting new parameters for its display. If you need to change the appearance, size, color of labels or inscriptions on the "Working
In the Microsoft Windows operating system, the user can customize the display of various components to their own taste. Even small elements such as window control buttons or a scroll bar can have a non-standard appearance. Not only the color scheme of the design is available for editing
Components on the Desktop may look different. In the Microsoft Windows operating system, the user can organize everything according to his own taste. You can customize or remove the color highlighting of icons and inscriptions on the “Desktop” in a few clicks, if you know what and where to look. Sponsor
The standard fonts used by the system to display the names of folders and programs located on the desktop are, by default, designed for users with normal vision. If you find it difficult to read the standard font, you can easily change it by following a number of simple steps. Sponsor
operating system Windows versions XP gives the user the ability to customize the desktop. You can change the font and size of individual elements, which include icons and title bars. The option to change the menu has also been implemented. It is recommended to start by choosing a desktop style,
Some users of the Windows XP line of operating systems are faced with a problem that often comes their way - desktop icons turn blue when inactive. If you have such a problem, you can get rid of it quite simply by changing the settings
Modern video cards and monitors create very high-quality graphic image, allowing you to place hundreds of different shortcuts on your desktop. The quality of the image, of course, is a good thing, but what to do if the picture is of such high quality that it is not always possible to make out the font of the labels yourself?
The Windows operating system provides the user with an impressive set of settings that allow you to change the look of your desktop beyond recognition and optimize it to suit your needs and tastes. You can change the background, splash screen, control layout, and much more. And of course,
Changing the color of the toolbar, taskbar, or general desktop style of the Microsoft Windows operating system is a standard personalization operation, but may require additional assistance. software. Sponsor of P&G placement Articles on the topic "How