A disk drive is a special piece of computer hardware that main function which is to read disks and write them.
Although optical drives are gradually losing their former popularity, you still cannot do without them, first of all, this concerns the operation of a stationary PC.
The cost of the service is 290 R.
How to connect a disk drive to a computer- a task worth entrusting to professionals! We will fulfill it with a guarantee and in the shortest possible time!
Action algorithm
- For a start it's worth prepare PC to such a connection. Therefore, before proceeding with the process itself, you need to complete a whole list of preliminary procedures. The first thing to do is to completely turn off the power to the PC. You need to not just turn it off, but pull out the power supply cable from the power supply network. Compliance with safety rules is a mandatory moment in the repair of equipment. Therefore, you should work very carefully and carefully. If you do not have sufficient experience or do not know how and in what sequence to act, it is recommended to entrust this task to professional craftsmen.
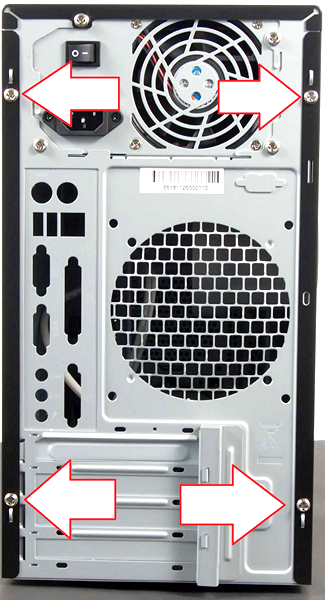
Further, when the computer is de-energized, you need to remove the side covers from its system unit. This is required to gain two-way access to the device. Usually, the side covers are fixed from the back side of the unit with four screws. They must be unscrewed and slightly shifted back, and then completely removed.
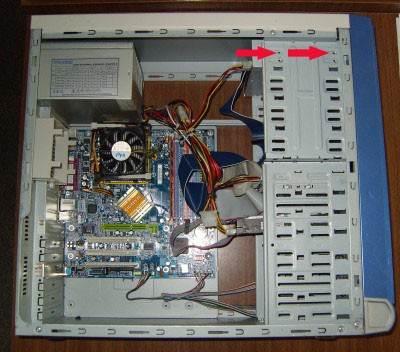
- Followed by disable old drive from personal computer and take it off. This is done by unscrewing the screws that fix it. As a rule, there are only 4 of them - on one and the other side, two each.
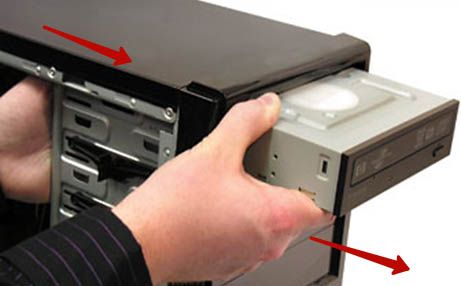 After that optical drive carefully pulled out of system block. To do this, it is recommended to slightly push the device from the inside of the device and then pull it out.
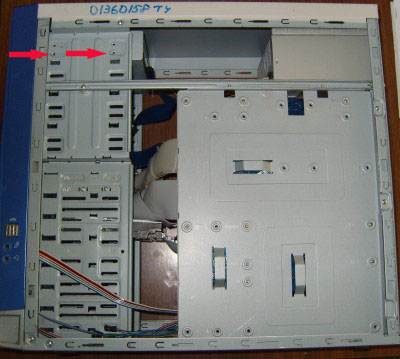
It is important to know that the installation and removal of the drive is carried out exclusively from the outside of the system unit.
This suggests that attempts to push the device inside the computer case will be futile.
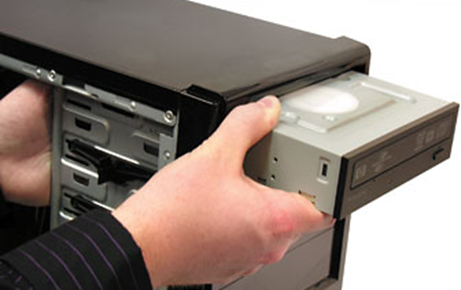
- Connecting a drive to a PC. This point is the most important in the whole process. First, the drive is inserted from the front of the case into a free hole and pushed inward as much as possible. When the device finally gets into its proper place, it must be fixed there with screws. It is necessary to focus on the fact that you do not need to save on screws, and it is best to tighten two things on both sides. Otherwise, with poor fixation, the drive will vibrate and make a lot of noise during operation.
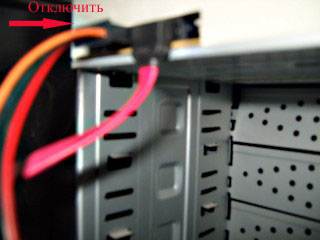
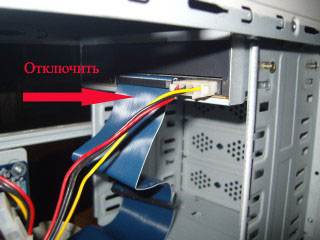
- After directly installing the drive into the computer, you must connect it. The latest models are connected in the same way as hard drives– via SATA cables. All that needs to be done is to plug such a narrow cable into any free port located on motherboard, and in the drive too. Plus, you need to connect a SATA-powered cable that comes directly from the power supply. This cable is much wider and includes four conductors.
Be careful!
This advice can harm your computer if used ineptly, if you are not a specialist, we advise you to contact our masters, leave a request below or call
We are ready to help you
However, if you are not confident in your own abilities and doubt that you can cope with connecting the drive yourself, then it is better not to risk it, but immediately call a qualified wizard.
Our specialists are ready to provide you with repair work of any complexity at a professional level and in the shortest possible time.
Entrust the problems with your PC to knowledgeable people so as not to start the situation and prevent the breakdown from worsening. The cost of our services is quite affordable and will please you with excellent quality.
A disk drive or optical disc drive is a device designed to write and read information from optical discs. Due to its design, the drive has many rotating and moving parts. These parts wear out quickly, so sooner or later any drive fails. In this article we will talk about how to install a drive in case of a breakdown.
Step #1: Power off your computer completely.
Before you do anything, you must completely de-energize the computer. This will save your life and protect your computer's internal components from damage.
Step number 2. Remove the side covers of the system unit.
In order to dismantle or install a drive, we need access to the system unit from both sides. Therefore, both side covers must be removed. Typically, these covers are fixed with four screws.
Step #3: Remove the old drive.
Drives are installed in 5.25 inch bays of the system unit (upper large bays). There are several such compartments in the system unit. Therefore, you can install several drives at once. But, most often, one drive is installed in the computer. We will consider this option in our article.
If the computer already has a drive that you want to replace, then you need to disconnect the cables from it and unscrew the screws that fix it. As a rule, the drive is fixed with four screws (two screws on each side of the system unit). If there is no disk drive in the system unit, then this step can be skipped.

After you have disconnected the cables and unscrewed the screws, you can proceed to remove the old drive. The drive needs to be pushed a little out of the system unit, and then gently pull it out, holding its front part with your hand.
No need to try to push the drive inside the system unit, you will not succeed. The drive only comes out.
Step #4 Install the drive.
So, now we come to the most important question: how to install a drive. Once you have freed up space in the 5.25 inch bay, carefully insert the new drive into the system unit. As well as in the case of removing the drive, this is done from the outside of the system unit (from the front).
After you have inserted the drive into your computer, you need to secure it with four screws (two screws on each side of the drive).
Step #5. Plug in the drive.
All modern drives are connected using cables. This must be taken into account if you are buying a drive for an old computer. In this case, you need to make sure that the computer supports the SATA interface.

For modern computers, connecting using SATA does not create any problems. All you have to do is plug a narrow SATA cable into the drive and motherboard, and connect power from the power supply using a wide SATA cables. After that, the connection of the drive to the computer can be considered complete.
Step #6: Close the side covers and turn on the computer.
Close the side covers of the computer and secure them with screws at the back of the system unit. After that, you can connect the power and turn on the computer.
Updated - 2017-02-13
Drive Replacement . If you frequently use your CD or DVD drive, you will need to replace it more than once. Even if you are a very careful user, you still can't avoid it. I do not advise you to carry the processor to a repair shop because of such nonsense.
In the best case, you will have to wait in line or pay for urgency, and in the worst case, you will be slipped some kind of drive after the repair. And it’s good if something else is not replaced by the worst, or the same after repair.
I don’t know about you, but in our workshops they do just that. And there is nothing to complain about. You came with one malfunction, and after a while you will return with another. And their customer flow does not decrease, and your money smoothly moves into another pocket.
So my advice to you is to learn how to repair your computer. Save money and nerves!
How to replace a drive
Today we will consider the easiest repair - replacing the drive. This process works for both CD and DVD drives. Unlike substitution or addition, or this operation is really simple.
Since it's time to replace the drive, it's better to immediately change it to a combo DVD that can read and write files, music and movies. You don't have to take a very expensive one. If you often use a disk drive, then an expensive disk drive will fail with the same success.
The only thing you need to know when buying is the type of connection that your motherboard supports. Because there are SATA drives, and there are IDE. In order to decide what kind of drive you need, it is best to open the system unit and see what cable it is connected to the motherboard with.

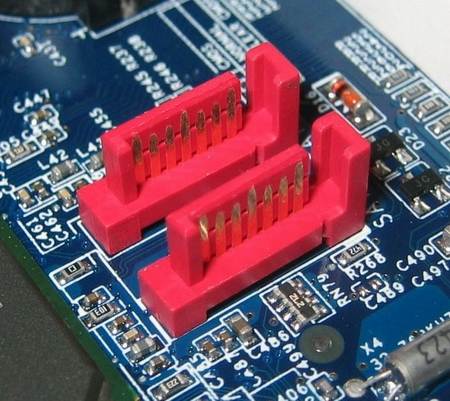
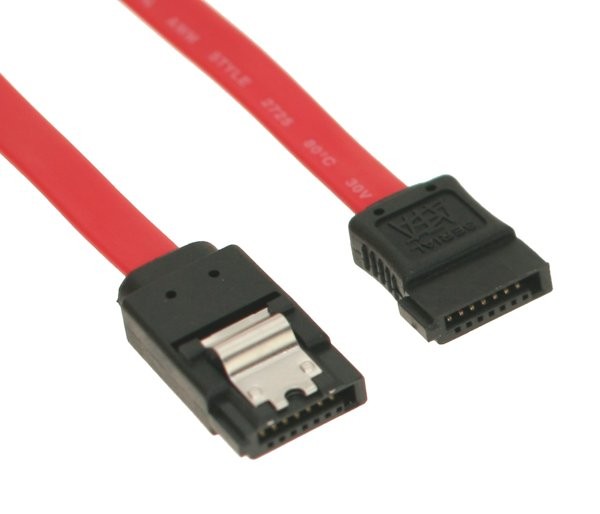
SATA cable 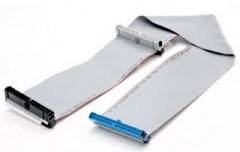
If your drive is connected with a SATA cable, then you need a SATA drive, and if the cable is IDE, then an IDE drive, respectively. On some motherboards, you can connect both a SATA and an IDE drive. But such boards are becoming less and less common, because. SATA is already used everywhere.
Installing a drive
- First we need to dismantle (pull out) the old drive.
- Disconnect the computer from the electrical network.
- Disconnect all cables connected to the connectors on the back of the system unit (mouse, keyboard, monitor, etc.).
- Remove the side covers of the system unit.
- Find the drive (usually at the very top).
- Disconnect the cables from it.
SATA drive
IDE drive
- Unscrew the screws (two on the right and on the left) that secure it to the chassis of the system unit.
Left-hand side
Right side
In the photo, the screw locations are shown with red arrows. I already have them unscrewed. Some drives are secured with latches, which are usually located at the level of the screw holes, closer to the front panel. They must be pressed simultaneously on both sides and push the drive forward.
By the way, the drive is inserted and removed from the front, from the front panel. So do not try to bend or break anything if it does not go back to you.
The drive must be removed from the front, not from the inside!

Get a new drive. For an IDE drive (if you connect it to the same cable as the HDD) you need to set the jumper to the SLAVE position.
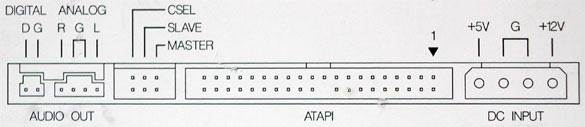
Your drive may be different. Look at how it is drawn on its body and set the jumper in the same way as shown there.
On the hard disk, the jumper must be set to MASTER (if your old disk drive was connected along with hard drive one loop, then nothing needs to be changed on the hard disk).
The best solution is to connect the drive to a separate cable. Then no jumpers need to be installed.

Carefully insert the drive into the slot from the front, secure with screws, and connect the necessary cables to it.
Close the covers of the system unit.
Connect Everything necessary equipment to the system unit (mouse, keyboard, monitor, etc.).
Turn on the computer, wait for the download to complete, and check for installed drive in system. To do this, open the folder " My computer ". There should be an icon for the drive.
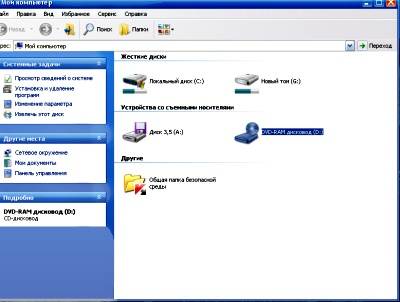
Insert some disk (preferably with autoload) and check the operation of your new drive.
SATA drive replacement
Do the same with the SATA drive, but you don't need to install any jumpers. Connect a thin flat cable to it, and connect the other end to the SATA connector on the motherboard.
This is how the drive is replaced.
Instruction
The way you connect a drive to a laptop depends on the interface of your drive. If you have a USB drive, plug it into any USB port and turn on your laptop. Wait for the system to detect new connected hardware and install the drivers. After the “Device is connected and ready to use” window appears, go to “My Computer”. The icon for the connected drive will be there. Now they can be used.
If you have a SATA drive, you will need to purchase a special USB-IDE/SATA adapter to connect it to your laptop. In addition, through this adapter, you can connect not only optical drives, but also hard drives and other equipment that supports these interfaces.
Turn on your laptop. Wait for it to start operating system. The wizard for connecting and configuring new hardware should work, as in the case of a USB drive. Then the procedure is the same.
If the device was not automatically detected by the system, click on the "My Computer" icon right click mouse and select "Properties". Then select the "Device Manager" tab. A list of equipment will appear. On the very top line, right-click and select "Update hardware configuration.
If an "Unidentified device" appears in the list, right-click on it and select "Update Driver Software". In the next window, select "Automatically search for drivers". If you have an Internet connection, you can check the box next to the "Use the Internet" line.
The disk drive is used to read information from hard drives. If everything is in order with it, it opens quite easily, but it happens that it just jams. You can remove the disk from the drive in the usual or forced way.
Instruction
Then turn it off with the button located on the back of the system unit, wait a few seconds. Click on the button and start the computer.
Try to open the drive in the usual way. Select the "My Computer" folder, then "DVD-RW drive(D)" and right-click, find the "eject" line and press the left mouse button.
This method does not help in all cases, but only in those when the computer freezes.
If the drive still does not open, then only a specialist can help you.
Sources:
- disk drive won't open
The most common way to upgrade a personal computer is to install and connect a drive to it. This operation does not require contact service center, since connecting a drive is not difficult, and all you need is a small screwdriver that fits the small screws of the system unit case.
![]()
Instruction
Secure the drive with the fixing screws. Insert and close the side cover of the system unit case. Turn on your computer. If the installation was done correctly, the drive will automatically be detected in the BIOS and will become available for use in the operating system.
Modern laptops and netbooks are aimed primarily at comfortable work and mobility: they can be carried with you in a regular bag, they will work without additional devices. However, for many users, controlling a laptop with a touchpad and keyboard becomes a real torture. In this case, a mouse is needed.

Instruction
Modern optical mice are wired and wireless. To connect a wired mouse to your computer, select a mouse with a USB input from the store. Plug your device into your computer's USB port and get started. Wired mice do not require the installation of special programs.
Wireless mice much more mobile than wired ones: you can use them at a distance of several meters from the computer, without getting tangled in wires. However, these devices also have some minor drawbacks. Wireless mice run on a battery or rechargeable battery inserted into the mouse. Due to the lower power consumption, the sensitivity of the mouse is reduced. In addition, you should constantly monitor the battery level in the mouse: power can disappear at the most inopportune moment.
Before you start working with a wireless mouse, you need to install special drivers in the laptop system. Paste installation disk into the computer's disk drive. The driver disc is sold with the mouse.
After the system recognizes the disk, it will offer to install programs. Agree with all system requirements and install drivers without changing anything in the settings. Click "Install" and "OK" when prompted by the system.
If you have Bluetooth installed on your computer, you can use Bluetooth wireless mouse. It will also work from its own battery, but the connection with the laptop will be via Bluetooth.
Adjust the operation and sensitivity of the mouse as you wish. To do this, go to the "Start" menu, select the "Control Panel" tab. In the window that opens, click on the "mouse" shortcut. Set your personal mouse preferences.
To connect a laptop to internet At home, there are two main methods that can be used: direct cable connection and connection via wireless channel WiFi. The second option is usually chosen because it allows you to keep the laptop mobile.
You will need
- - WiFi router.
Instruction
If you already have a desktop computer at home connected to internet, then it is most reasonable to use a Wi-Fi router. This network hardware allows you to synchronously use Internet access for both computers. Get a Wi-Fi router and connect this equipment to the network alternating current. Install it near your desktop computer. This will avoid the need to purchase an additional network cable.
Disconnect the Internet connection cable from the desktop computer and connect it to the WAN port of the router. Now connect with network cable supplied with wireless equipment, the LAN port of the router and the network card of the computer. Open an Internet browser and follow the procedure for logging into the web interface WiFi router.
Open WAN menu. Set up a connection to internet. To do this, specify the same settings that you used when setting up a direct connection of a desktop computer. If possible, enable the NAT and DHCP functions. To increase the security of your computers, enable the Firewall feature. Please note that it may interfere with access to some resources on the Internet.
Now open the Wireless Settings menu. Customize your work settings wireless network WiFi. Be sure to select the strongest encryption type (WPA2-PSK) if possible. Set a fairly complex password. Now reboot the Wi-Fi router programmatically or mechanically (power off).
Wait for the router to fully boot up and connect to the server. Check for access to internet on a stationary PC. Connect your laptop to WiFi networks and make sure that mobile computer got internet access.
Sata interface is currently the most convenient way connecting storage media to a computer, providing a high data transfer rate. Also, the connectors occupy a smaller area, which significantly extends the life of the device. Connecting a drive via Sata takes much less time than installing media according to the usual scenario.
You will need
- - screwdriver or screwdriver.
Instruction
Turn off your computer and unplug it from the power source. Using a screwdriver or screwdriver, unscrew the fasteners of the side walls of the system unit. If you open the computer cover for the first time, pay attention to the presence of warranty stickers: if the warranty period has not yet expired, this may void the warranty of the seller or device manufacturer.
Choose the optimal location of the drive so that it is in the ventilation zone, since the drive tends to heat up, which affects the overall temperature. Make sure that the cables do not interfere with the operation of the computer, in contact with motherboard and other devices; also, in no case should they touch the cooler. If you have a lot of storage devices installed in your computer, it is best to install an additional cooling system.
Install the optical drive in the selected position, while securely fastening it with special screws, they can be bundled with the drive or sold in a computer store, many of them even differ in the type of device. It is best not to use conventional bolts when installing computer hardware.
Connect the Sata cable to the appropriately named connector on the motherboard. When connecting devices through this interface, it does not matter at all what type of storage medium is connected to it. Connect the other end of the cable to the connector on the drive. Locate an unused wire coming from the power supply, connect it to the drive and arrange all the wires in the correct order.