Disable Asus laptop touch mouse in BIOS
Asus laptops have long established themselves as one of the best on the market. They are equipped with good webcams, a powerful operating Windows system and not only, they have an attractive appearance, provide the ability to work with both a touchpad and a standard mouse.
In an attempt to meet the needs of consumers, the company tried not only to make available all the additional features, but also to provide the ability to turn them off. To understand in more detail, and if necessary, to carry out diagnostics and, the engineers of our service center can.
Perhaps this is why disable the touchpad on Asus laptop even a child can. This small Touchpad- touchpad - allows you to control the cursor without the participation of a standard mouse. Some will say that this is very convenient, especially if you work not at the table, but for many users the touchpad causes some problems. For example, when printing, you can touch the panel with your palm, moving the cursor in the wrong direction, or even completely knocking down important settings. Therefore, it becomes necessary to disable the touch panel at least for a while.
Using hotkeys
Before proceeding with the operation, carefully examine your keyboard. You need to find the Fn key - this button, in combination with other keys, can help you configure a lot of your laptop's functions. With it, you can adjust the sound volume, screen brightness, configure Wi-Fi and the like. In many laptop models, it is also responsible for disabling the touchpad. It is enough just to simultaneously hold down "Fn + F9" on the keyboard and the problem is solved.
To be sure, you can try to move the cursor using the touchpad. If the arrow remains motionless, then you have succeeded. When connecting on laptops, you need to do the same.
Disable in settings
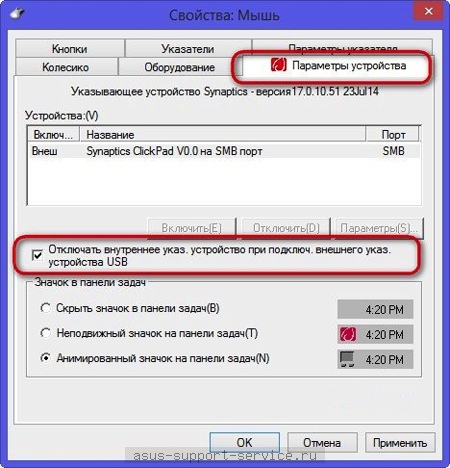
In the event that the keyboard shortcuts could not help you, you can try to change the settings in another way. To do this, just click the "Start" menu and go to the "Control Panel". After that, go to "Devices and Printers", where go to the "Mouse" tab. Now find in the window that opens the line "Turn off when connecting an external USB mouse" and check the box next to it.
Thus, as you can already guess from the inscription, the problem can be considered solved.
If you are a fairly experienced user, confident in your abilities, then you can disable the built-in mouse using the BIOS subsystem. You just need to go to this subsystem and in the Internal Pointing Device section and select the required value.
If you have your computer set to automatically go to sleep after a certain period of time, you will also need a way to wake it back up. On a laptop, this is simply done with a lid; Open the lid and the computer comes back to life. Desktop computer needs other methods and those are usually the keyboard or mouse.
If your mouse is particularly sensitive, then just bumping the table can wake up your computer. Sometimes, even walking next to a table can set this up - mice can be sensitive little creatures.
Disabling the Wake-Up Mouse
As with everyone Windows versions there are a number of ways to achieve the same goal. In this case, the easiest way is to use hotkey combinations, WinKey+X bring to the so-called Power menu in Windows 10.
From the Power menu, select Device Manager. Which should bring you to a window that looks like this:
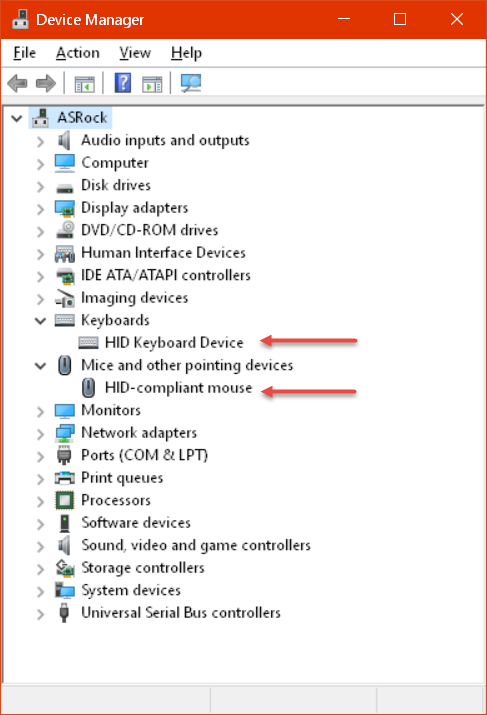
Depending on the device you are connected to your system, your list may differ from the above.
I'll show you how to enable/disable wakeups with the mouse, but the wakeup keyboard options are identical in nature. Double click on the entry in Device Manager to bring up Mouse properties window:
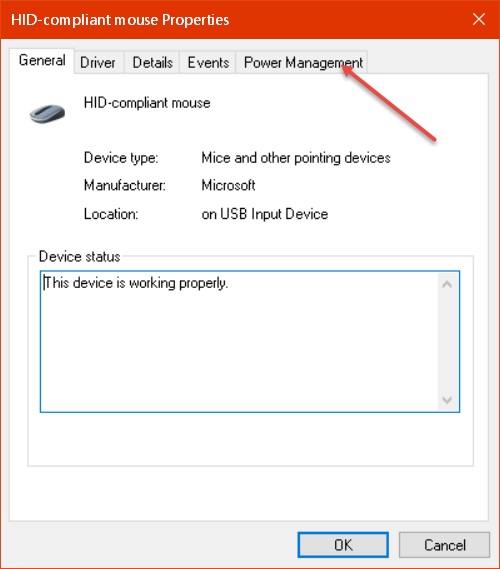
Click the button Power management:
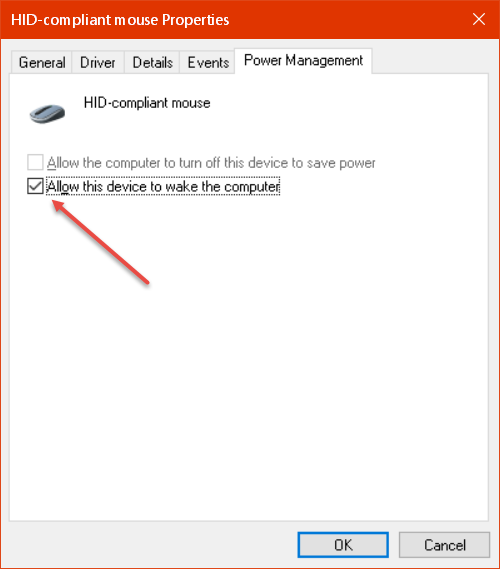
Now, either check or uncheck this to enable or disable wakeups with the mouse.
Note: If you have your keyboard and mouse disabled, you will not be able to wake your computer from sleep in the traditional manner. It can be an uncomfortable situation - just sayin."
Bonus Hint - Disable WoL
Sometimes the keyboard or mouse are not the only culprits. Your computer's insomnia may be caused by the network adapter. The setting known as Wake on LAN (WoL) could be the villain. As before, open Properties window network adapter in and select Power Management tab:

To change this setting, the Windows checkbox allows Turn off this device to save power needs to be checked. Uncheck " Allow this device to wake up the computer“.
Disabling the touchpad is resorted to in different situations: some users do an excellent job without any kind of manipulators, using only the keyboard buttons. It often happens that the touchpad is damaged and the mouse pointer in this case randomly moves around the screen, trembles, moves in jumps, and so on. the touchpad is simply necessary for normal operation. There is also a third option, when the user, due to the prevailing habit, is simply inconvenient to use touch mouse and he prefers a regular mouse by connecting it via a USB port.
You can disable the touch mouse on a laptop either physically by pressing the appropriate button on the laptop itself, or by disabling the feature in the pointing device management program. The first option is possible only on those laptops that have a special disable button on the touchpad itself, or one of the function keys (F1. . . F12) is configured. In this case, it will show a logo in the form of a crossed finger or something similar. To use this button, just press it together with the Fn button, which activates the function keys. Anyone can figure it out here. And how to disable the touch mouse on a laptop that has neither a disable button nor a configured function key? Then you can disable the touchpad programmatically.
Despite the visual differences of modern operating systems, you can disable the touch mouse on a laptop in the properties of this device, and there is such a menu in any operating system. Most fast way calling this menu is double-clicking on the icon responsible for controlling the pointing device. It can be seen in the system tray area (lower right, where the clock is). The icon may look like a schematic image of a touchpad or a manufacturer's logo. If the user does not know what the corresponding icon might look like, then you can find it by moving the mouse cursor over the icons (without clicking). The system will display the names running applications. For a touchpad, this might be, for example, the following phrase: "Touchpad Pointing Device from Synaptics." Double-clicking this icon opens the Mouse Properties window.
Also, the properties window can be opened in Windows XP by successively pressing the "Start - Control Panel - Mouse" buttons (it happens as an independent icon or in the Printers and other equipment section). And in Windows7, just type the word "Mouse" in the search bar and click on it. Although you can use the traditional method: "Start - Control Panel - Hardware and Sound - Mouse". So, having opened the mouse properties window in any of the ways, you need to go to the tab "Device Settings" (Device Settings). Next, you need to select the desired device (in this case, the Touch Pad) and click the "Disable" button. After pressing the "OK" button, the touchpad will be disabled. If necessary, it can be enabled in the same menu.