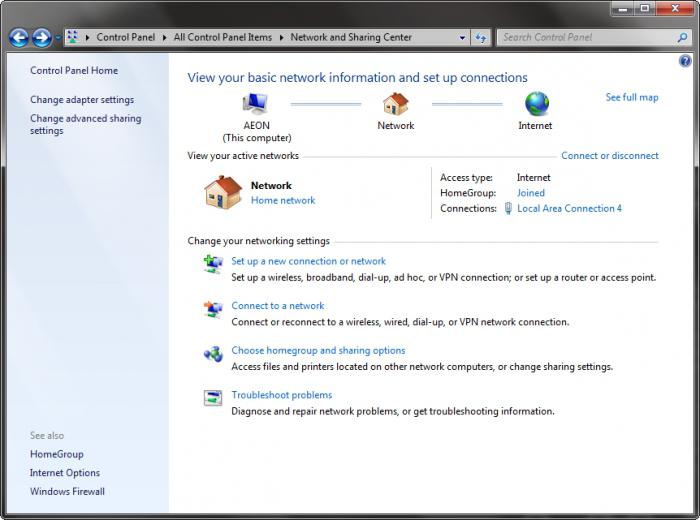
It is possible to configure the Windows 7 network through the control panel of the operating system. There, a connection to the network is made - worldwide or local, as well as the configuration of existing network connections. All network settings are located in the appropriate section of the control panel, so the configuration steps local network and the Internet in Windows 7 are much faster and easier. Basically, setting up a network in Windows 7 differs little from setting up a network in Windows XP: the control panel interface and its items have been slightly modified to access the required network settings. On the contrary, such nuances as setting IP addresses, subnet masks or MAC addresses of the network card have remained the same, familiar to the user. In the Windows 7 operating system, in addition to the IPv4 protocol, the IPv6 protocol was added, which significantly expands the range of IP addresses used. But when there will be a need for it and whether it will be used by providers, it is not yet clear. To access the network settings, go to the control panel and click on the "View network status and tasks" button in the "Network and Internet" section. Thus, you will find yourself in the "Network and Control Center and public access». ![]() Here you will see information about which network connections you have. You can also create a new network connection here. At the top of the window, you can see a map of the existing connection. The image below shows that the computer named "HOME-PC" is connected to the Internet through multiple networks. This is how Windows 7 perceives the connection through the "LAN". By clicking on any of the map icons, you will open the corresponding browser for this network segment. For example, clicking on the computer icon will open the "Computer" window, which clearly shows file system PC. By opening "Multiple Networks", you can see the available network resources. Finally, the Internet icon leads to the default Internet browser and MSN page. Below is the "Network and Sharing Center" window, which clearly displays active networks. The image shows that in this particular case, the second network is the network between the computer and virtual machine. In addition to the name of the network, its type is indicated (here - “Public network”). The network type is subject to change - just click on it with the mouse.
Here you will see information about which network connections you have. You can also create a new network connection here. At the top of the window, you can see a map of the existing connection. The image below shows that the computer named "HOME-PC" is connected to the Internet through multiple networks. This is how Windows 7 perceives the connection through the "LAN". By clicking on any of the map icons, you will open the corresponding browser for this network segment. For example, clicking on the computer icon will open the "Computer" window, which clearly shows file system PC. By opening "Multiple Networks", you can see the available network resources. Finally, the Internet icon leads to the default Internet browser and MSN page. Below is the "Network and Sharing Center" window, which clearly displays active networks. The image shows that in this particular case, the second network is the network between the computer and virtual machine. In addition to the name of the network, its type is indicated (here - “Public network”). The network type is subject to change - just click on it with the mouse.  The "Public network" type allows you to secure your computer as much as possible. When connected to the Internet with home computer this type is the most suitable. If you setting up a local network in windows 7, the "Home network" setting option is suitable for you, which will allow you to exchange data between computers connected to a local network and provide high-quality access. In the same window of the Network and Sharing Center, to the right of the network name, the connection type is displayed. By clicking there, you get access to the settings for the selected network connection.
 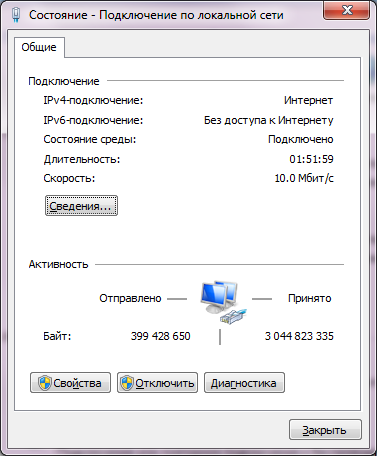 This window is similar to the network settings window in Windows XP. The "Details" option gives you an idea of the network connection and all detailed information about him. To set up a network connection in Windows 7, click on "Properties", wait for the window to open and select "Internet Protocol version 4" in it.
 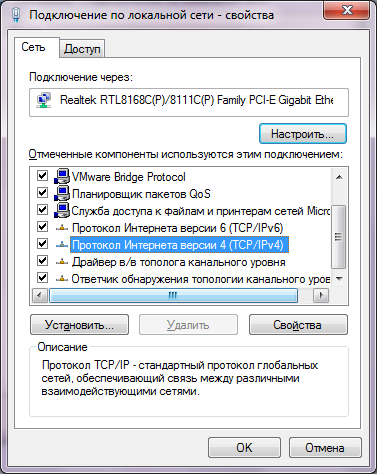 Then click on "Properties" again and in the new dialog box configure the IP address and other parameters - subnet mask, gateway, DNS servers, etc. Information about this is usually given by the provider.
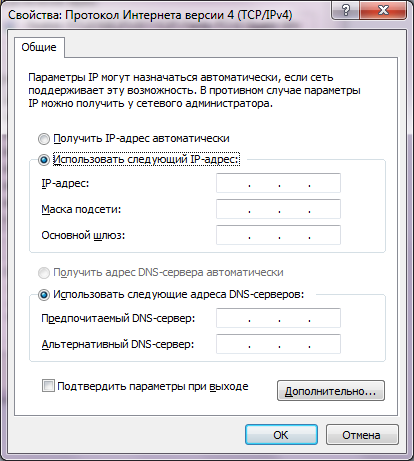
In the connection properties window, you will see through which device the network is accessed (Realtec RTL8168...). Next to the name of the device there is a "Configure" button, by clicking on which you can configure the network card. There are providers that open Internet access by the MAC address (physical address) of the network card. Therefore, if you change the network card or the entire computer at once (in this case, the MAC address of the built-in network card will change accordingly), access to the network will stop until you set the necessary physical address on the new equipment. To do this, click on the “Configure” option next to the name of the network card and find in the window that opens (Advanced tab) the “Network Address” parameter. 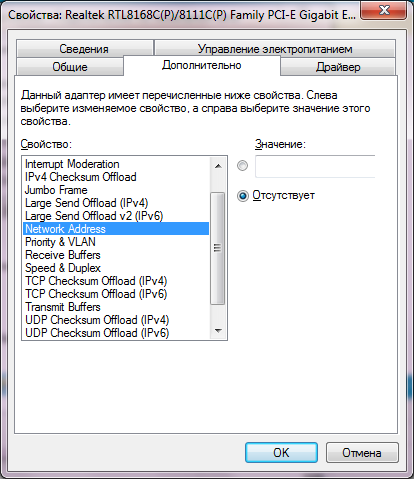 By default, the value switch for the specified parameter is set to "None". That is, the factory MAC address of the network card is set. To change it, switch to the "Value" option and enter the address you need. Creating a new network connection in Windows 7 is simple: at the bottom of the "Network and Sharing Center" window there is a link "Set up a new connection or network". Click on it and a connection settings window will appear in front of you.
 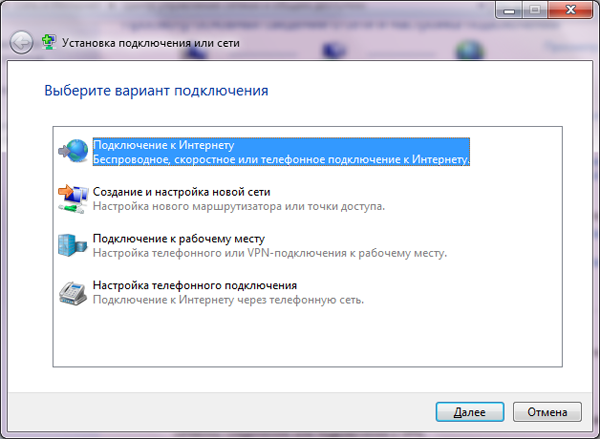 To connect to the Internet, check the first item and click "Next". Specify the connection method.
 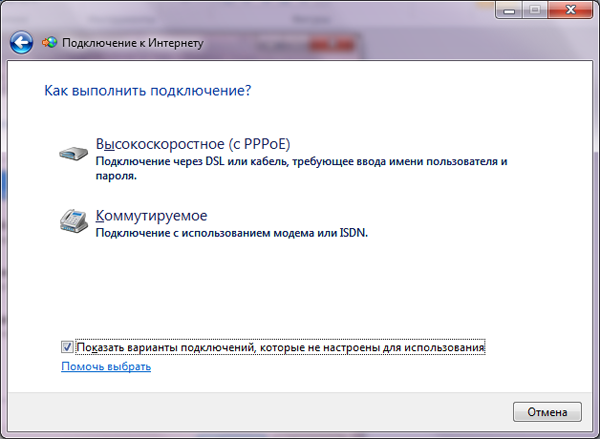 If you are connecting to the Internet from your home computer, select the "High Speed" option. Finally, enter the login and access password received from the provider.
  Here you can also assign a name to the newly created connection and allow, if necessary, other users of the system to use the connection to access the network. These are the basic settings you will need when setting up a network in Windows 7.
Today, more than ever, network connections play one of the most significant roles in the computing world. This is explained quite simply: in this way, you can not only combine several computer terminals into a single local network, but also gain access to the World Wide Web.
Windows 7 Network Connections: Basic Types
First of all, you need to clearly understand the essence of connections of this kind. Their creation and configuration in the “OS” of Windows 7, although it has much in common with previous versions of the OS of the entire family, nevertheless contains some specific points related to the protocols used.
It is worth noting right away that Windows 7 network connections are presented in an expanded form. So, for example, it can be the usual creation of a home or corporate network, wireless or telephone connection, workplace connection, use of computer-to-computer connections, etc.
But in this case, we will proceed from the fact that we have a high-speed connection to VPN networks or to a leased line, because telephone connections are practically not used today.
Create a new connection
The process of creating connections of any type is standard for all systems. Network connections Windows can be found in the standard "Control Panel". For example, for Windows 7, they are located in the Network and Sharing Center.
At the initial stage, you need to use the "Setting up a new connection or network" menu, and then select the most suitable option from the list that appears. After going through a few simple steps, the user will receive the creation of a new connection. However, the matter does not end there. Now you need to configure the basic parameters, without which the existing connection will not work.
Setting up a network connection
In general, the setting is made using the data that the provider sets. We will proceed from the fact that we already have some kind of network. Network connections are configured using special TCP / IP protocols (in Windows 7 - IPv4 and IPv6). It doesn't matter if you use a LAN or wireless network connection, or choose a homegroup, keep in mind that IPv6 is not currently in use. Network connections are based on the IPv4 protocol. Why is IPv6 needed? Apparently, the developers, having included it in the list of settings, so to speak, played ahead of the curve.
As for the basic settings, they are called by right-clicking from the "Local Area Connection" section (or from the list of networks in the "Change adapter settings" menu), where the "Properties" item is selected. Now you need to select the IPv4 protocol and go to its properties.

Ideally, the user does not need to configure anything. In the case of network connections via LAN, all parameters are assigned automatically. That is, the parameters for automatically obtaining an IP address and a DNS server address are involved here.
Otherwise, all values will need to be entered manually, using the data provided by the provider. The main parameters here are the IP address, subnet mask, default gateway, preferred and alternative DNS server address, etc. Sometimes network connections require additional parameters such as WINS server values. Having set all the values, it remains only to save the configuration changes.
Wireless connection
With wireless networks the matter is much simpler. Network connections of this type require at the initial stage to correctly configure the router (say, a router or an ADSL modem), after which the Wi-Fi (or sometimes Bluetooth) module installed in the system will automatically detect virtual private VPN networks that can be accessed.
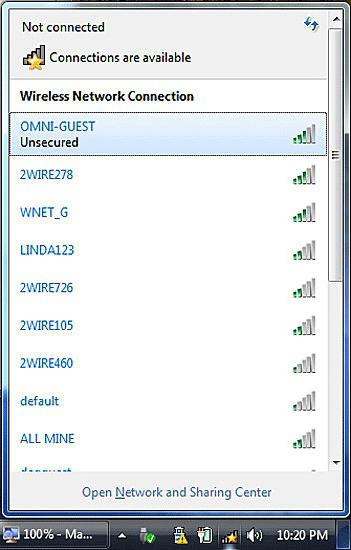
As a rule, almost all networks are secure, as evidenced by the padlock icon on the network icon. Now you just need to enter a password - and access will be done automatically.
Troubleshooting
Sometimes network connections can fail or just not show up in the list. There can be many reasons for this.
First of all, for example, for Wi-Fi networks, you just need to update the list, for "locals", after setting the basic parameters, you may need to restart the computer terminal.
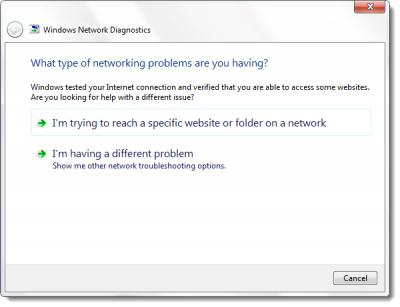
If this does not help, you can use the troubleshooting tools. In the Network and Sharing Center, this, as is already clear, is the Troubleshooting section. Sometimes the problem may remain. In this case, it may very well be that it is associated with the provider. So you just need to contact the appropriate support service.
Conclusion
In principle, as it is already clear, there is nothing particularly difficult in creating or configuring network connections. The main thing here is to decide on two key points: correctly select the type of network to which you intend to connect, and correctly register all the necessary settings. All the rest computer system will do it herself.
Of course, sometimes you may need tools to test the network connection, but here you can trust the Windows diagnostic tools or use third party programs to determine a fix for a problem. For example, today there are a lot of software packages for identifying the reasons for the inoperability of Wi-Fi networks and even for guessing passwords for them. On the other hand, you can find quite a few applications for diagnosing local networks and terminals connected to them. In general, the choice is so wide that a way out can almost always be found.
Setting up a Windows 7 network is becoming an increasingly popular issue every year, as the number of users of both the Internet and this operating system is growing. Therefore, sooner or later, everyone faces a dilemma, how the setting is performed windows network 7. As a rule, such a question becomes especially acute when another computer (laptop) appears at home. To properly configure the network, you will have to become a system administrator.
Everything in windows 7 network settings can be set and changed in the "Network and Sharing Center" (hereinafter referred to as NUSiOD). Setting up a windows 7 local network is done here. Even at the stage of installing the operating system, the computer was given a name. This important parameter, because the local network should not contain computers with the same name. Let's see where the network settings are in windows 7.
Network and its types
TsUSiOD can be opened in several ways.
- Click at the bottom of the screen right click mouse on the icon in the form of a computer, open the context menu, in which we find TsUSiOD;
- We press "Start", go to the "Control Panel" (View: "Small Icons") and again we find TsUSiOD.
The first thing you see is a map of your network, the number of active network connections and their type: "Home Network", "Company Network" and "Public Network".
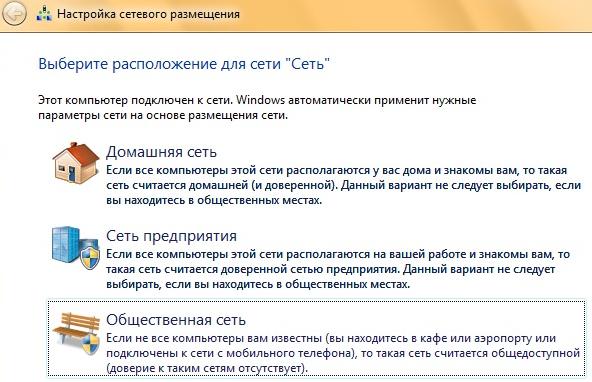
Setting up home, office and domain networks
If you network computers and other devices at home, you can very conveniently use shared folders. A home network can only be created on one computer, and others can join it. Setting up a home network in windows 7 is done like this: click "Start", go to "Control Panel", look for the "Homegroup" parameter, click "Create home group", choose which resources will be shared, set a password for access to the home network. Similarly, you can connect to your home network and change the necessary settings.
Let's see how to set up a network in windows 7 office. To do this, select the type of network environment "Work Network". You can do this in TsUSiOD. Under the name of the active network, click on the type of network and select Enterprise Network. This type allows computers on the network to see each other and allows file and folder sharing, but create a group like " home network"It is impossible, since a higher level of security is provided here. To secure data, the following network setting in the windows 7 office will come in handy. In the CUSiOD on the left, click on the link" Change advanced sharing settings ". In the window that opens, you can enable or disable network discovery and access to shared folders and printers.
Windows 7 domain network is used in enterprises. It is configured by the administrator. You cannot make any changes to the network settings on your computer.
Knowing the type and location of the network in windows 7, as well as how to install and configure it, you can easily combine all home devices into one.
Organization and setup working network windows 7 should still be done by professionals. Gaps in network security can lead to the theft of confidential information and cause irreparable damage to a firm.
How to view the MAC address
Windows XP
1. Click Start, open Control Panel, click Network Connections > right-click Local Area Connection and select Status.
2. Go to the Support menu item and press the Details button. 
3. In the line Physical address in the value section, the mac-address of the network interface is indicated. 
Windows Vista / 7
1. Open Control Panel, click Network and Internet > Network and Sharing Center, in the left column, click Change adapter settings.
2. Right click on the network connection you want to know MAC address(usually, it's Local Area Connection), and then click Status. 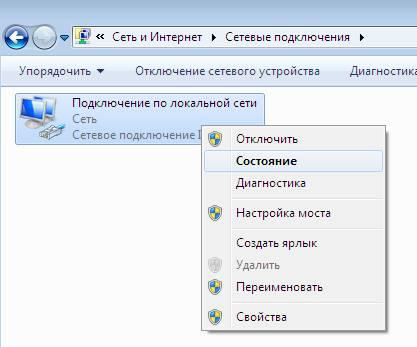
3. Click the Details button. 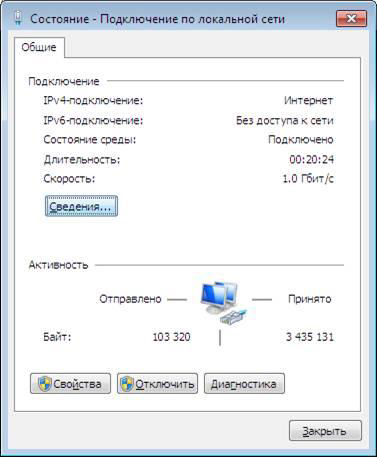
4. In the window that appears, you will see a line called Physical address, which indicates the mac-address of your equipment. 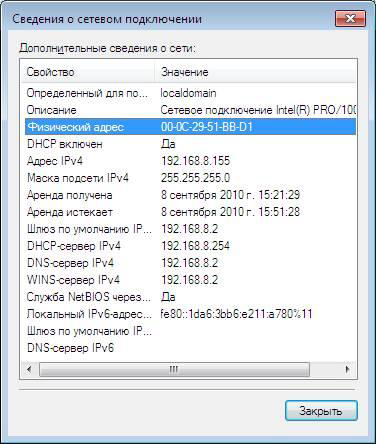
MacOS
1. Select on the desktop System Preferences > Network 
2. Next, select Local Area Network (Ethernet) Connection > Advanced. 
3. In the Ethernet tab, in the Ethernet ID field, your mac-address of the equipment will be indicated. 
linux
1. On the desktop, select Menu > Accessories > Terminal Emulator. 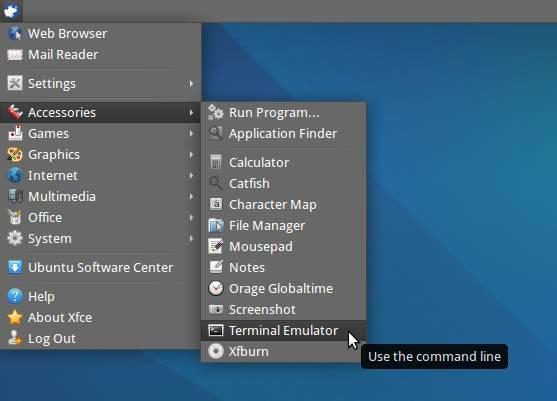
2. Enter the ifconfig command. In the eth0 category, in the Ethernet HWaddr line, the mac-address of your equipment will be indicated. 
Setting up a network connection
Windows XP
2. If the "Control Panel" is displayed by category ("Select a Category" heading), click the "Switch to Classic View" link. 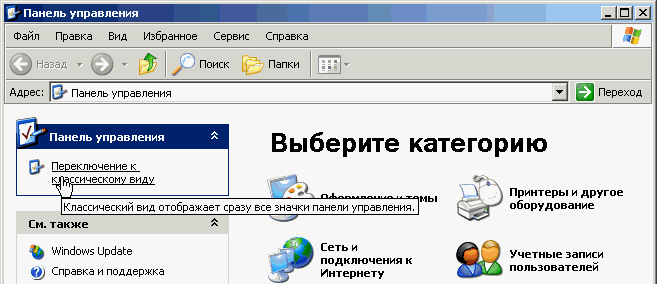
3. Double click the Network Connections icon. 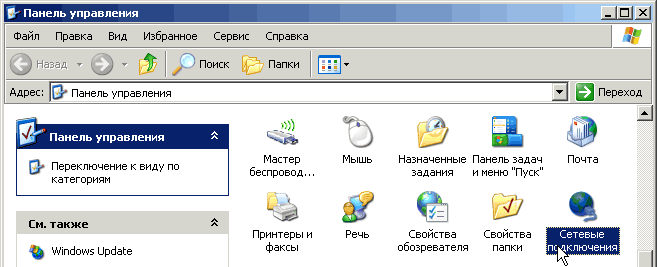
4. Right-click on the network connection, in the appeared context menu select "Properties". 
5. In the window that appears, select the TCP / IP protocol and click "Properties". 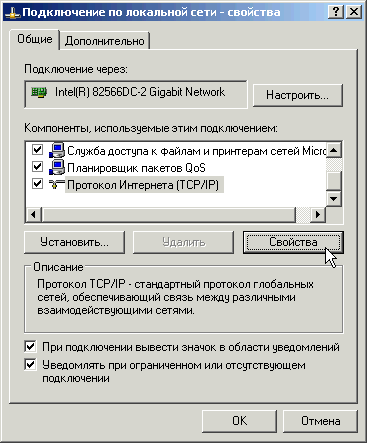
6. In the window that appears, select "Obtain an IP address automatically" and "Obtain DNS server address automatically". 
If you don't see a network connection label in Network Connections (commonly called Local Area Connection), check:
1. Whether a network card is installed in your computer.
2. Are the drivers for the network card installed or motherboard if the network card is built into it.
Windows Vista
To connect to the Internet, you need to configure the system to automatically issue network details. Typically, the default network card is configured to automatically obtain network credentials. To your operating system automatically received the settings, you need to do the following:
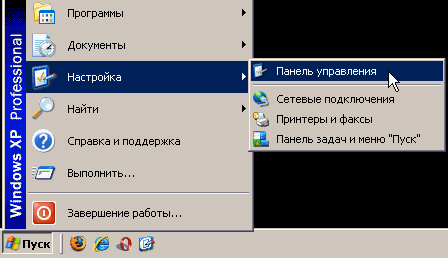
1. Go to the "Start" menu and select "Control Panel". 
2. In the "Network and Internet" subsection, select the "View network status and tasks" item. 
3. In the "Network and Sharing Center" that opens, click "Manage Network Connections". 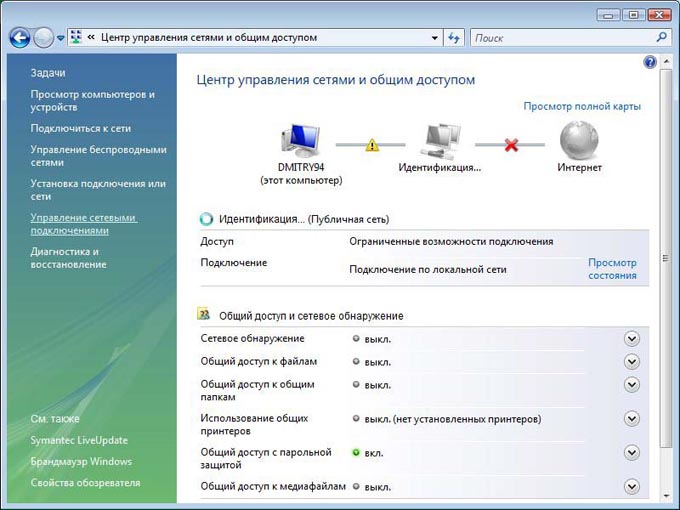
4. Double-click the left mouse button on Local Area Connection.
If you see a LAN icon with a red cross through it, or if it has a Exclamation point, or it is missing, it means that the network connection is not available or is not properly installed network adapter. Contact technical support. 
5. A window will appear showing the status of this connection. Click the Properties button. 
6. Check the boxes as shown below, select the TCP/IPv4 protocol, and click the Properties button. 
7. In the "Properties: Internet Protocol Version 4 (TCP/IP)" window, check one box next to "Obtain an IP address automatically", the other - next to the inscription "Obtain DNS server address automatically". Click the "OK" button. 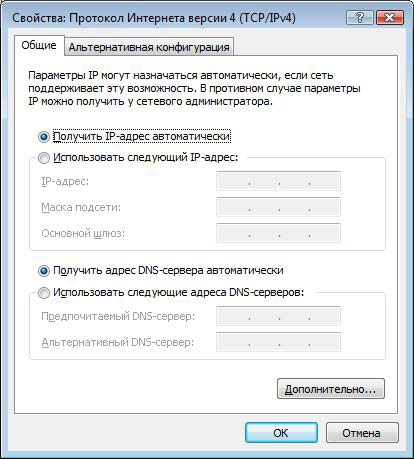
Windows 7
Paste network cable into the appropriate slot on the computer.
Click the Start button with the left mouse button to open the menu and select Control Panel.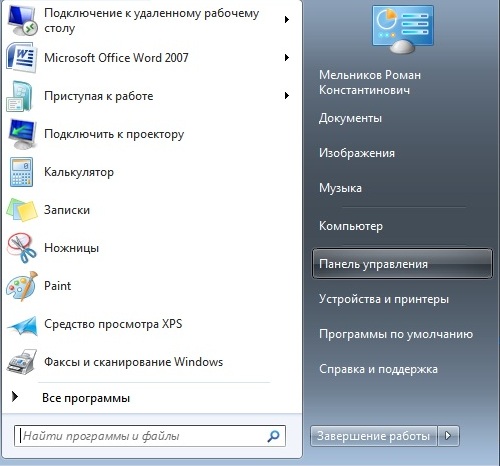
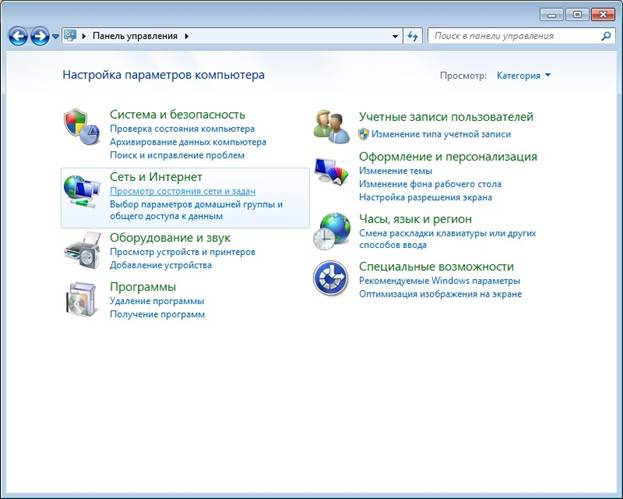
Opening the "Control Panel" menu, select "Network and Internet" - "View network status and tasks."
In viewing network details, select the current active connection. It's under the "View Active Networks" heading. Open the "Local Area Connection" link.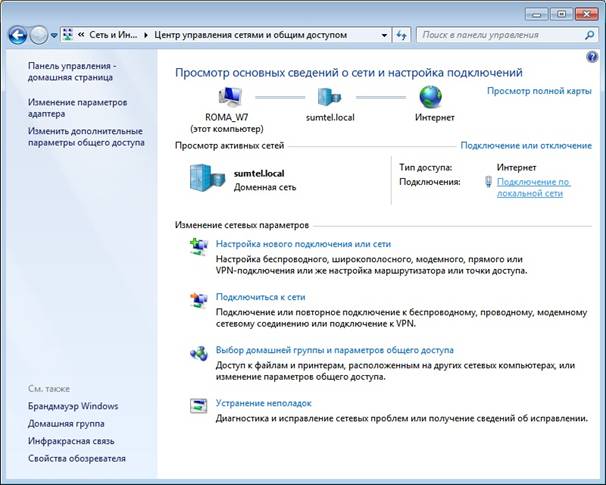
Next, the network connection status window will open, in which you need to click the "Properties" button.

In the window that opens, select "Internet Protocol Version 4 (TCP/IPv4)" and click the "Properties" button.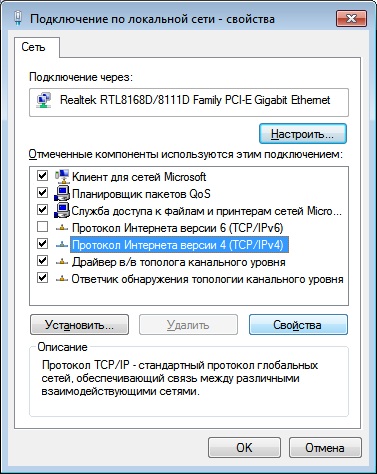
In the properties you need to set:
- Obtain an IP address automatically
- Obtain DNS Server Address Automatically
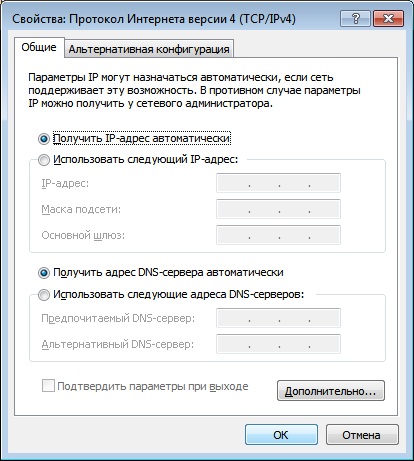
Save the settings by clicking the "OK" button.
Restart your computer.
After reboot please wait 5 minutes.
linux ubuntu
The process of setting up network connections in linux ubuntu extremely simple (provided that your network card is defined).
1. Open network settings: 
2. Enter the password. The system will display all network connection which have been defined. 
3. Select Automatic Configuration (DHCP) and click OK. 
Mac OS 10.x
1.Go to " System settings». 
2.Select "Network". 
3. On the left select Ethernet - Configure, in the drop-down list select using DHCP. 
4. Click Apply. 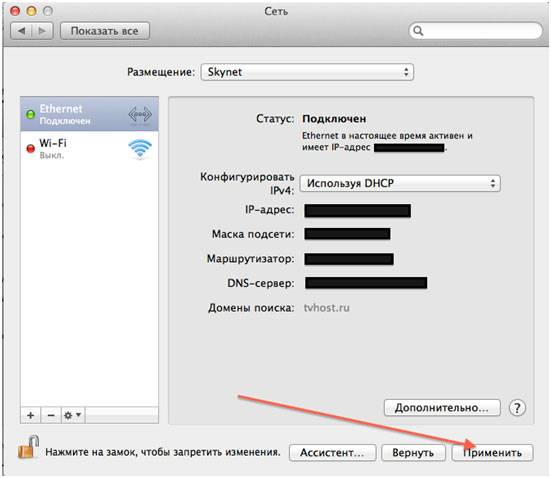
How to change the MAC address