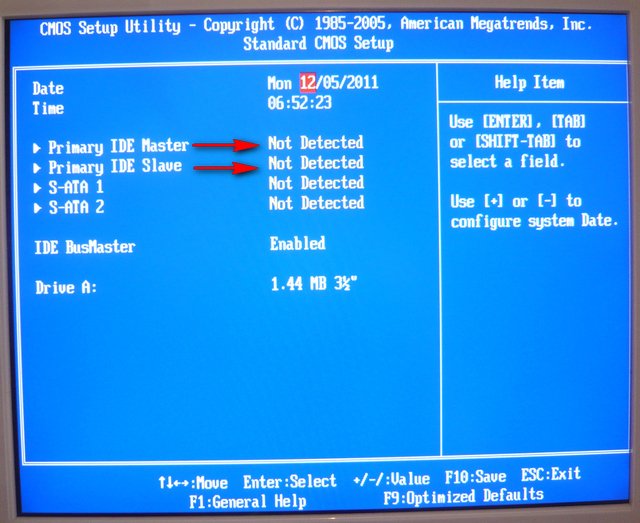
Hello, I came to you with a problem. We decided to update the computer, but not the whole, but the main components: the motherboard, RAM, video card and power supply, all this was safely installed in our old case. And now the problem is, our BIOS is not in hard drive running and a drive, both IDE interface devices remained from the previous computer and we did not change them, the master in service center I connected both data drives to our new motherboard with one IDE cable, since there is only one IDE controller connector on the motherboard. We brought the system unit home and when you turn on the computer there is only a black screen, we go into the BIOS, there is an inscription: Primary IDE Master No detected and Primary IDE Slave No detected . We would go back to the service, but we do not live in the city. What can you think of?
BIOS does not see the hard drive
I come across a similar situation quite often, probably before your hard drive and floppy drive were connected to the old motherboard, using separate cables, to two different IDE connectors and both worked in the position of Chief, i.e. Master. In the service, you simply connected two of your devices to one cable, but they forgot about the jumpers, now both of your devices are working in Master mode, because of this there is a conflict and as a result BIOS does not see the hard drive and the drive too.
- In our article, we will work with a hard disk and an IDE interface drive, if you have little experience, about how to connect and disconnect and what errors you may have, read in more detail. If this article does not help you, try another one, in it described .
Where the computer was assembled for you, we hurried a little and now we will try to fix everything. IDE interface devices need to be configured with a jumper, it will then tell your computer how to properly access the drives (and the drive). When working with IDE devices, it is very important for a computer to know who is the Master device on the same loop and who is the slave Slave , this is decided by a small one. The contacts on which the jumper is mounted are located directly on the drive. Instructions for the location of the jumper are usually located on the drive case. We turn on the computer and go to, first of all, you need to make sure that the IDE controller is enabled in the Integrated Peripherals tab.
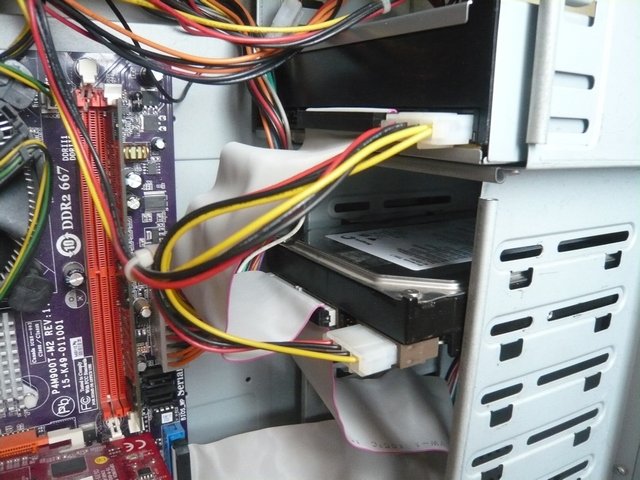
Make sure the power cables are connected.
In our article, we will set up jumpers first of all Seagate hard drive, then to gain experience Western Digital and Maxtor hard drive, Sony NEC Optiarc will act as a drive. Pay attention to screenshots. I also have a similar problem, the BIOS is not in hard drive running and drive, both devices are not detected Primary IDE Master No detected and Primary IDE Slave No detected.
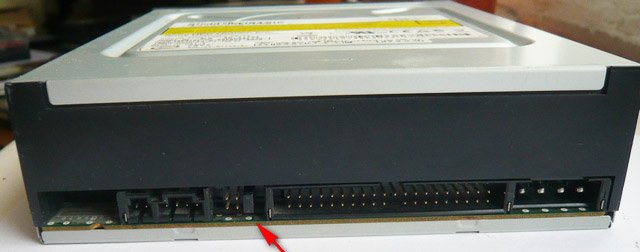
From the very beginning, we look at how the jumper is mounted on the Sony NEC Optiarc drive. According to the instructions located on the case of the drive, the extreme right position is Master, which means that the drive is already connected with us by a jumper as the main one. It is best to connect the Master to the end of the loop.


Now let's move on to the hard drive, the Seagate hard drive is also connected as a Master, two main devices on the same cable is an inevitable conflict.
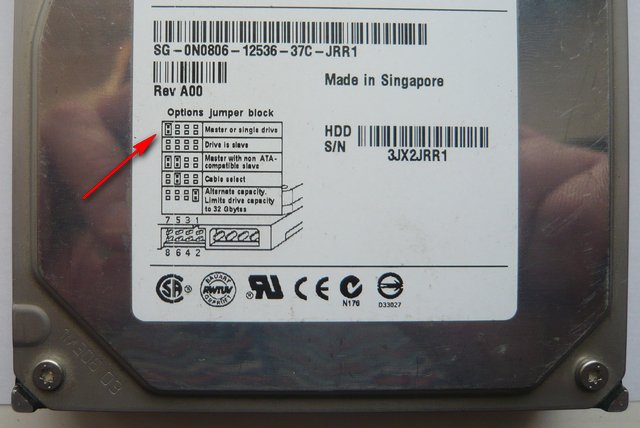

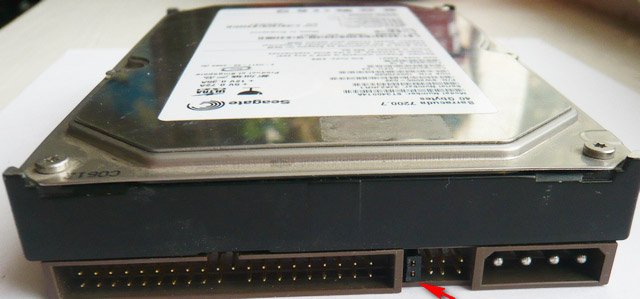
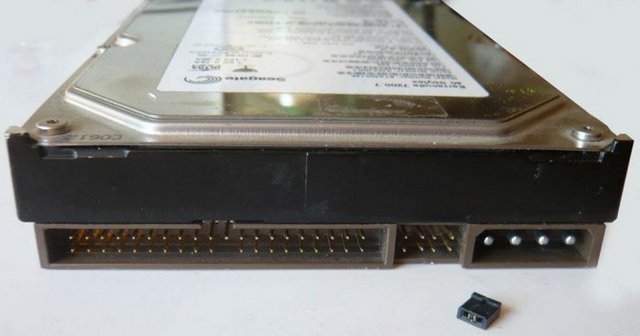
The result for both devices in the BIOS is No detected. Let's avoid device conflicts and leave our drive as Master and connect the Seagate hard drive as Slave. We look at the instructions and see that the Seagate hard drive works in slave mode without a jumper at all, remove the jumper altogether.

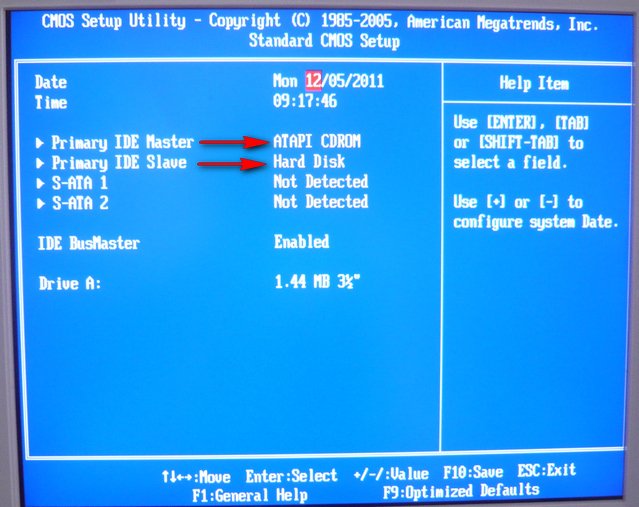
We look if everything is connected correctly and turn on the computer. The result is obvious, both devices were found and determined. Now we also connect the Western Digital hard drive, everything is perfectly defined in the BIOS. Behind it is a Maxtor hard drive, everything is fine too.

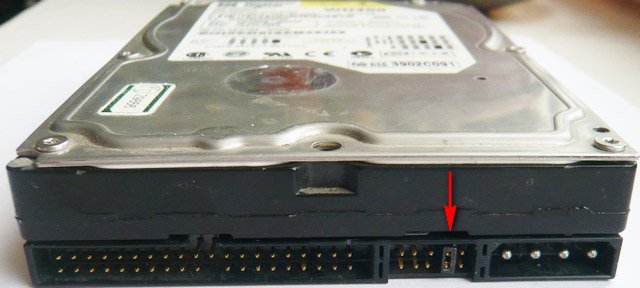

Many may notice, and if you connect the hard drive to the end of the cable and make it Master-Master, and the drive in the middle and slave-Slave, it’s always more important device connected to the connector at the end of the cable, if you want to do this, after all, the work of the hard drive is a priority for us. Then the main thing is not to bend the train itself too much, don’t be too smart, it will look like it’s on the screenshot.
brakes HDD) as you do not connect them. What about in our case? We look in the BIOS, the speed of our Sony NEC Optiarc -UDMA-4 DVD-rom, most likely the Seagate UDMA-5 hard drive, will work in UDMA-4.

Why am I doing this? But why, if you have absolutely old disk drive, it’s better not to connect it with one cable at all, since the speed of both devices will be very low, most likely PIO, so save up for a new one in this case.
When you connect a hard drive to your computer, it may happen that it does not appear in "My Computer" and even does not appear in the "Device Manager". Then the first thing to do is to see if the computer's BIOS sees the hard drive. If the hard drive is still detected in the BIOS, then the system recognized it. In such cases, the hard drive will simply need to be manually connected already in the system itself.
You will need
Computer with Windows OS.
P&G Placement Sponsor Related articles "How to find a hard drive in BIOS" How to remove a large space between words in Word How to fix a runtime error How to remove a virus from RAM
Instruction
Turn on the computer and immediately after that press the Del button on the keyboard. This will take you to the BIOS menu, in which select the Main menu. It contains information about all the main devices connected to the motherboard.
You need to search for a hard drive in the BIOS, depending on the connection interface that it is equipped with. If your hard drive is equipped with an IDE interface, then you need to look for it in the Primary IDE Master and Secondary IDE Master sections. If the system sees the hard drive, then information about the model is displayed opposite the line hard drive, manufacturer and capacity of the hard drive. By selecting this section and pressing Enter, you will see more detailed information about the hard drive. If the system does not see the connected hard drive, then opposite will be the inscription Not detected.
If you have a hard drive with a SATA connection interface, then you need to search, respectively, opposite the SATA items. For example, you connected a hard drive to the second SATA connector on system board. Therefore, information about it should be opposite the SATA 2 item. To view additional information, you must also select this section and press Enter. As in the previous case, if the system does not recognize the connected device, you will see Not detected.
The system must recognize hard drives immediately after they are connected. If you have connected a hard drive, but the BIOS system does not see it, there may be several reasons. It is possible that the connection cable is loose. Then you need to check everything and reconnect. It may also be that the connection cable is out of order, so you need to try another one. It may also happen that you forgot to connect the power to the hard drive. Do not exclude the breakdown of the connection interface on the motherboard itself. It is worth trying to connect the hard drive to another interface. Most the right way check the hard drive for serviceability - connect to another computer.
How simpleOther related news:
If you have purchased new hard disk or you need to connect a third-party hard drive to your computer, it's easy to do. Depending on the type of hard drive connection, you may need power cables and a cable to connect to the motherboard. You will need - a computer; -
DVD players are gradually becoming a thing of the past, giving way to media players and TVs with a USB interface. Indeed, why save up piles of discs at a time when you can keep all the films on a hard drive connected to a TV. P&G Placement Sponsor Related Articles "How to connect a hard
Not everyone goes to visit each other, taking with them a hard drive (unless, of course, it is external). However, an ordinary user may also need to transfer data from one hard drive to another. This is easy to do - you just need to connect the second hard drive to the computer and
Modern hard drives are very reliable and can last a very long time. But no one is immune from the breakdown of any equipment. If a hard drive fails, there is little chance that it can be repaired. Then you will have to purchase and install a new hard drive. This process
When replacing a hard drive with a new one, it happens that the system cannot detect it. The hard drive is connected to the computer, but it is not in the list of available hardware. Sometimes, in order to correctly display the connected devices, you need to change some settings in the BIOS. With correct BIOS configuration
Incorrect connection of the hard drive may be the reason that the system simply does not see it, if a second hard drive is connected, then all available hard drives may become invisible. Meanwhile, in connecting a hard drive to the motherboard is no big deal. P&G placement sponsor
To increase the functionality of the system, it is sometimes necessary to install an additional hard drive on the computer. AT modern computer The BIOS detects the hard drive automatically, and if problems arise, it is mainly due to incorrectly connected contacts or simply non-contact. But hard
Probably radio amateurs and novice electronics repairmen who do this for their own pleasure, far from all have a specialized education in electronics - a radio mechanic, a traffic controller, or an electronic engineer. But most of them still somehow have something to do with electrical engineering.
In my environment there are even electric welders who are engaged in minor electronics repairs, most often consisting in replacing banal swollen capacitors on motherboards and power supplies, and without having the necessary tools or theoretical training. Anything more serious than this can confuse them. Seeing this and remembering yourself at this stage, years after the moment when you made the decision to purposefully study electronics, you see that this decision was correct and knowledge in this area - theory, closely linked to practice, will always be in demand by society. And here's a prime example of that.
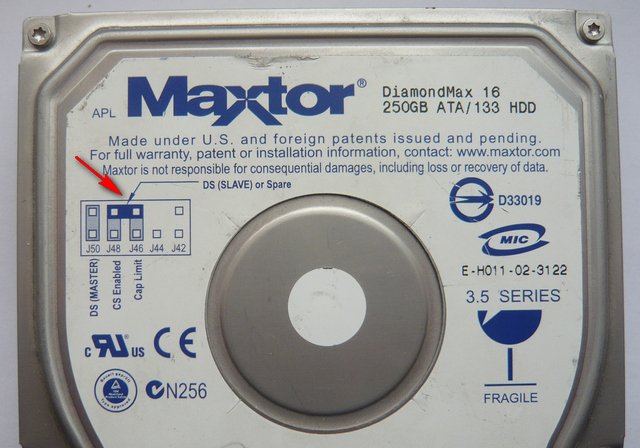
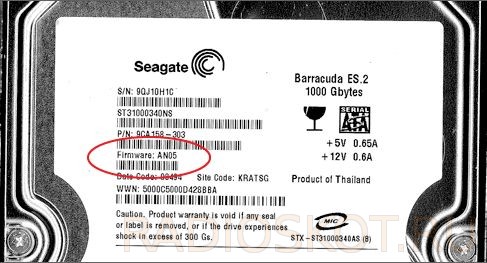
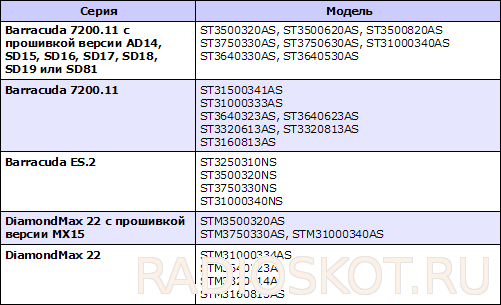
Some time ago, a familiar electronics engineer gave me a hard drive that was not detected in the BIOS and the computer hung for a minute, at the stage of determining hard drives when starting the computer. Googling on the Internet, and the hard drive was Maxtor 500 Gb SATA 2, I found that this problem was relevant for Maxtor and Seagate hard drives released a few years ago.
HDD Maxtor-Seagate
It was connected with a glitch in the BIOS firmware of the hard drive and most of the disks of this problematic series, there were several lines, they required mandatory flashing, otherwise at one fine moment they refused to be detected in the BIOS motherboard, when starting the computer. The problem was that you can only flash a hard drive when it is visible in the BIOS. Like any person who has a programmer, first he climbed to look for a firmware dump, deciding to remove the hard drive board and clinging to a special clip for flashing connected to the programmer, just roll the firmware.
![]()
Clip for flashing the programmer
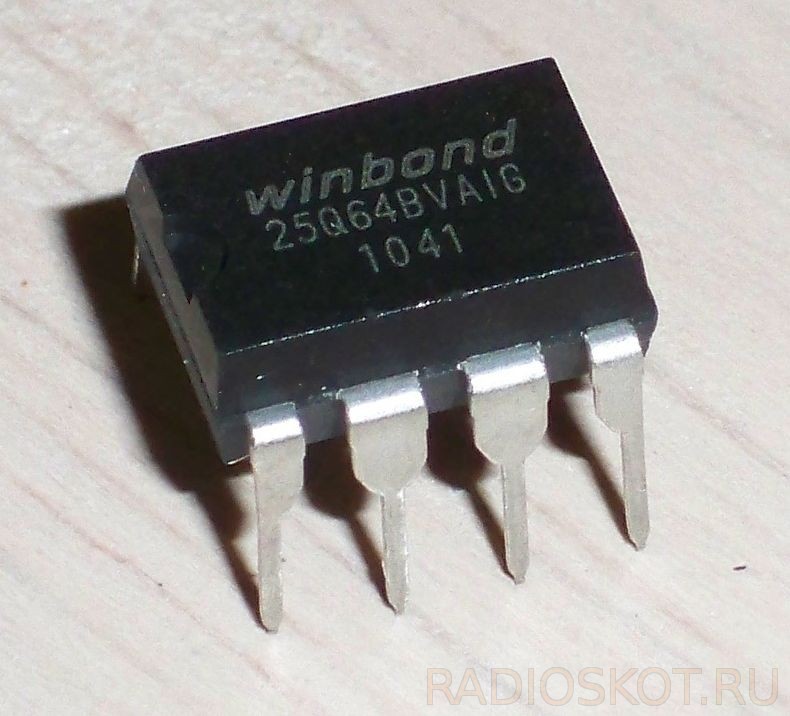
But here everything was much more complicated: it was impossible to take a firmware dump merged by another user from some other hard drive, even a similar model, and stupidly overwrite the binary firmware file. This method works with any other equipment, such as motherboards, routers (conditionally, I won’t say anything about the same MAC address), monitors, video cards, but is not suitable for flashing hard drives. The fact is that the firmware stores, let's call them conditionally, calibration data - this is data on the surface of the hard disk, Smart, BAD blocks, mechanics, etc.

PC3000 Hard Drive Recovery Complex
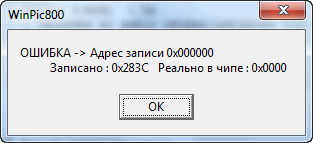
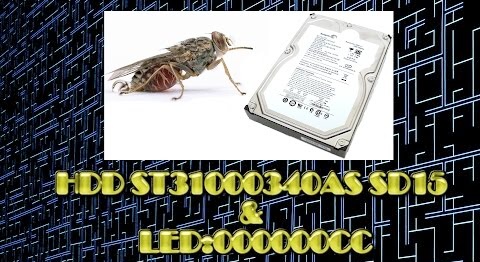
Therefore, it was unrealistic to reflash a hard drive that was not detected in the BIOS without very expensive special equipment for diagnosing and reanimating hard drives. So at the initial stage, we need our hard drive to at least become visible in the BIOS. To do this, we need to remove the problem that has the name “Fly CC” (SS) among specialists and just IT people. Where did such a name come from?
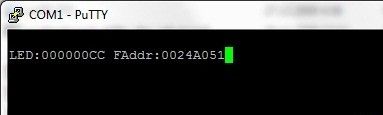
Error message Fly CC
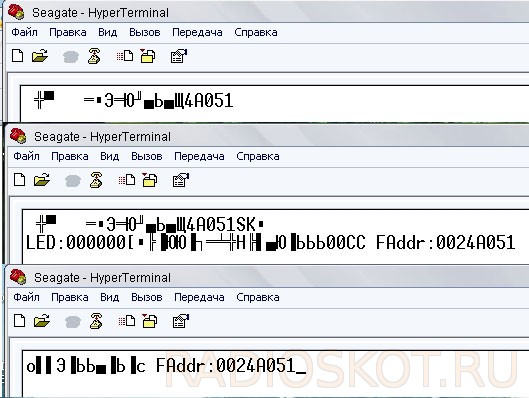
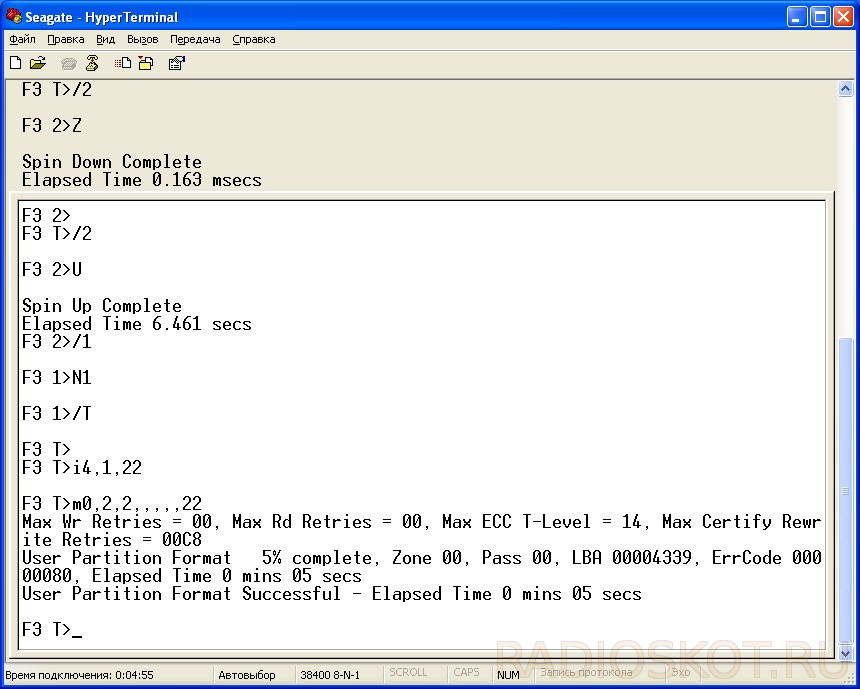
The fact is that when connecting to the hard drive terminal using a USB-UART adapter, with which we, using the Putty or HyperTerminal program preinstalled in Windows XP but not included in the Windows 7 distribution, we see a boot interruption and a diagnostic message in which there are the letters "SS". The text of the message itself is the same as in the screenshot above.

Putty Interface
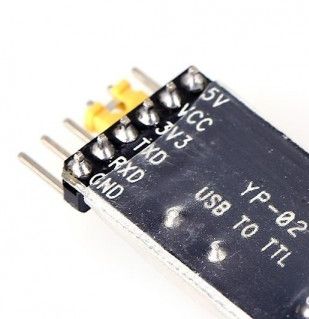
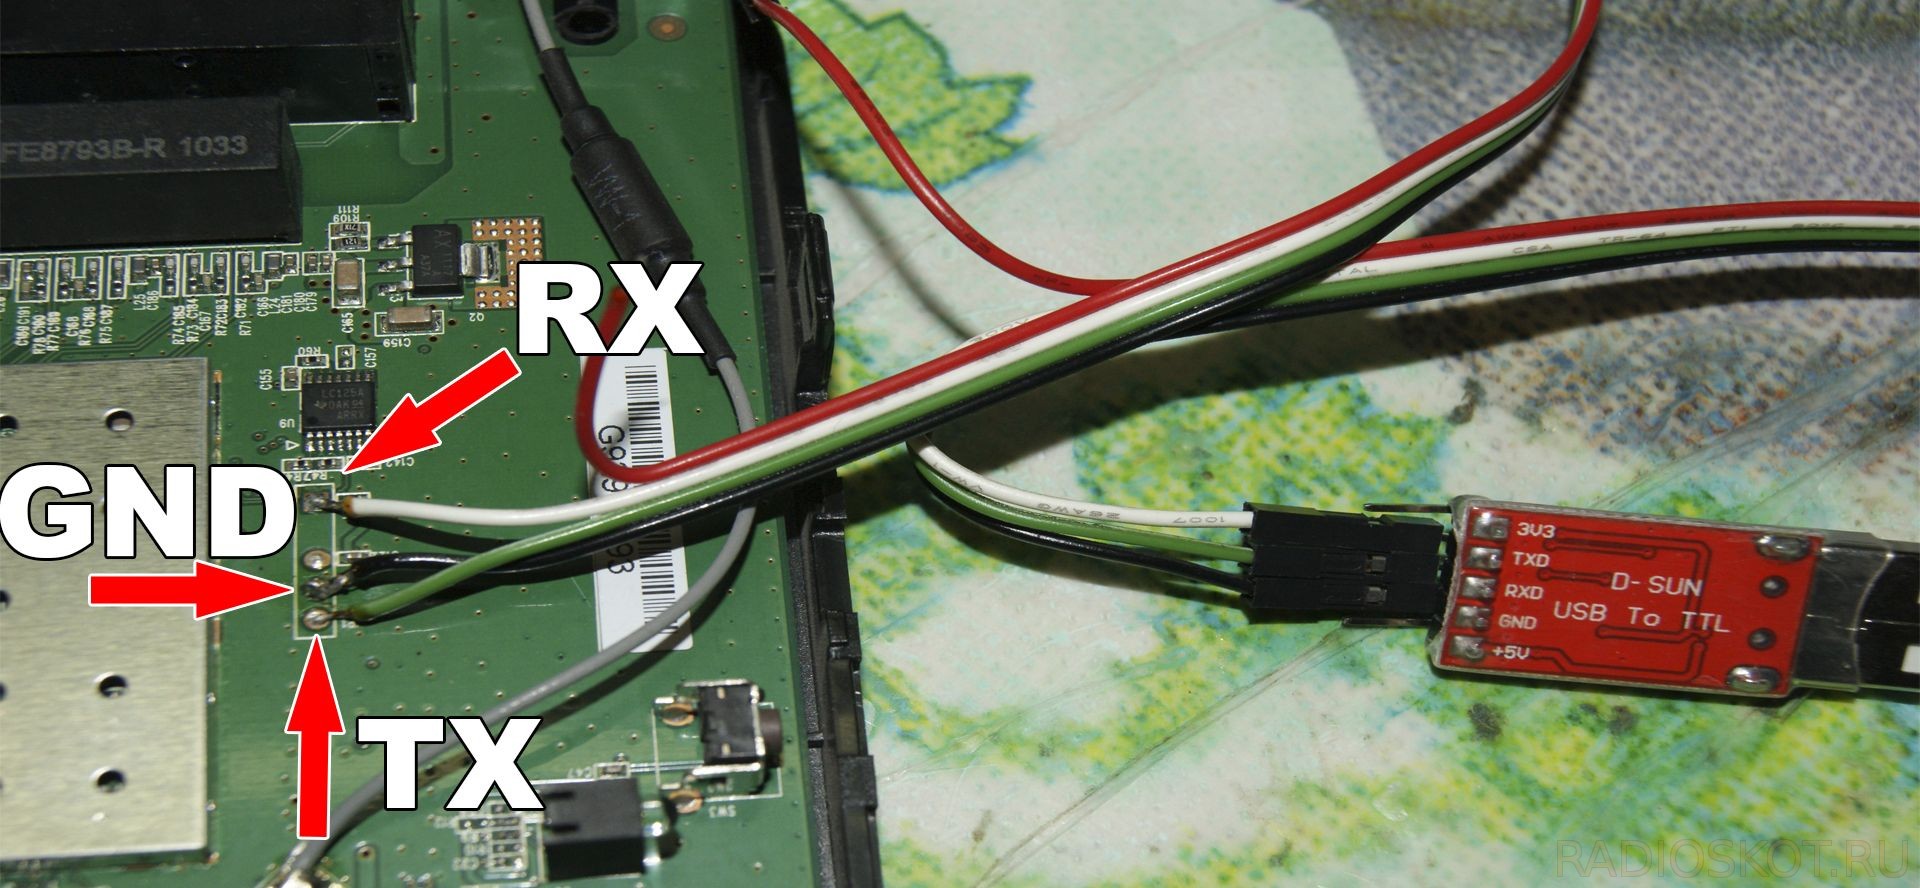
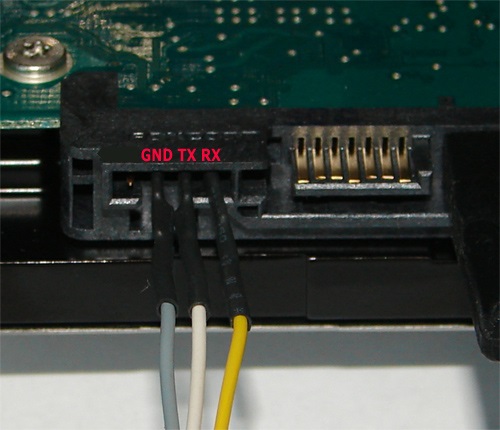
This means that you are the lucky owner of a hard drive from this problematic series. I will briefly describe (the process was described in detail in a previous article) how to connect a similar USB-UART converter, which is also called USB-TTL. We must necessarily connect the common ground coming from the USB-UART adapter and “cross” the RX and TX pins, connecting RX to TX, and TX to RX. These pins are located on the back of the hard drive case next to the SATA and power connectors.
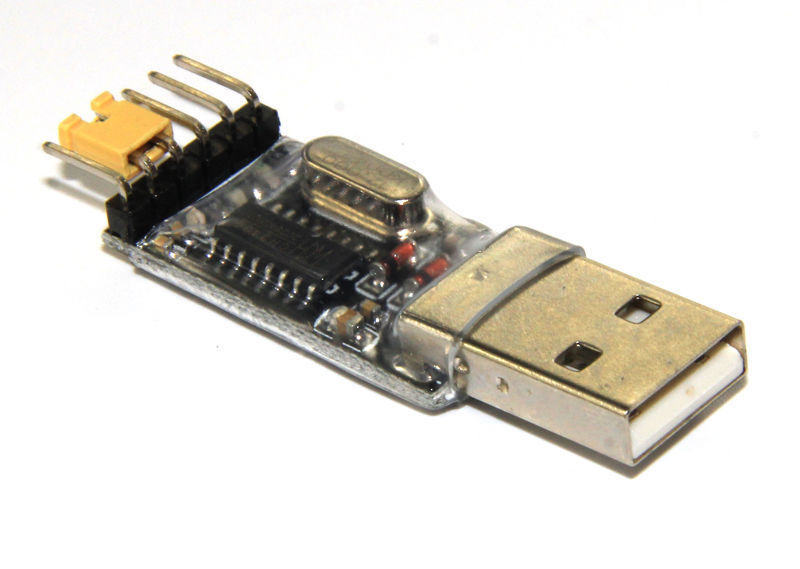
USB-TTL adapter CH340G
As I already wrote in the last article on the use of this USB-UART adapter, for flashing, or rather controlling the process of flashing the router, we will need to correctly experimentally select the speed of the COM port, usually these are speeds of 33600, 57600, and 115200 Baud (I have not seen other speeds) in console. Otherwise, if the speed is chosen incorrectly, we will see, as in the case of flashing the router, krakozyabry, instead of the usual English text.
Errors in the console
So, we have correctly configured the console. Correctly selected the desired COM port in the terminal.
Let me remind you that this USB-UART adapter costs only about 40 rubles on Aliexpress and can include various microcircuits, all of which are listed in the previous article. For those who do not have the opportunity to purchase this adapter, there are options for connecting in the console using a Data cable for flashing ancient phones.
Theoretically (after all, we are electronics engineers, not IT specialists, at least most of us) we can reflash a hard drive without any adapter at all, by matching the RX and TX logic levels coming from the COM port with resistors (power from the COM port I do not recommend taking because of the risk of overloading the port), which are on every ancient system block. But there is one caveat here, why I do not recommend this method to beginners.
USB-TTL 3.3 Volts
- The fact is that we need strictly 3.3 volts from the adapter - no more and no less, and although for safety reasons it is not recommended to take power from the adapter at all, but to use native power from the PC power supply, a deviation in the rating upwards is fraught with failure of our hard drive.
- The second important point is that the logical levels on the COM port of system units and laptops of different years of manufacture have different voltages - from 7 to 12 volts, if I'm not mistaken, and we will have to select the value of the current-limiting resistor that provides the desired voltage drop using measurements with a multimeter, received levels of RX and TX, so this method is only suitable for people who can confidently hold a soldering iron in their hands, for everyone else it turns out to be rather advice from the category of harmful.

Gromov programmer
This is the reason why everyone's favorite (including me) Gromov programmer for MK AVR, assembled a few years ago, refuses to work with some relatively modern motherboards and laptops, because by applying standard-value resistors for this circuit, we get logic levels that are too low in voltage, no longer corresponding to a logical unit in voltage, when programming AVR microcontrollers, and accordingly, our programmer issues either a logical zero instead of a unit, or garbage in general, which is not always correctly identified when flashing the microcontroller.

Firmware code programmer shell
The same garbage when writing firmware to the microcontroller memory, we can get using long unshielded cables or wires, such as COM or LPT for homemade programmers, or already from the programmer to the microcontroller being flashed. For the same reason, when I see on a video, for example, on Youtube, wires 30-40 cm long and longer, from a similar USB-UART adapter or a self-made MK AVR or Flash or EEPROM memory programmer, I am surprised at the technical illiteracy of people who do not understand the consequences of their actions.
Flash memory BIOS DIP-8 package
It’s good if we need to flash a home-made AVR microcontroller one-time, and if we need to flash the motherboard with a home-made programmer, the BIOS for which is very difficult to find on the Internet, even on specialized sites - we may lose the chance to restore our motherboard with native firmware if the found dump for some reason will not work.
Error during MK verification
In this case, it is necessary to verify the saved dump with the firmware in the memory of the microcircuit, although if garbage is written / read, then most likely there may be errors during verification, even with a correctly saved dump. In general, this is best avoided. In the case of , if incomprehensible characters pop up in our terminal, this is just a reason to think about making the connecting wires shorter.
Long wires from USB-TTL adapter
Someone who has previously dealt with microcontrollers or reflashed the BIOS before on any technique with any Chinese programmer will say: 30 cm is approximately the standard length of the cable going from the programmer to the microcontroller. The fact is that in such factory cables, if you noticed, there are always more wires than Pins on the programmer block. This is due to the fact that each signal core has a “ground” wire running in parallel with it.
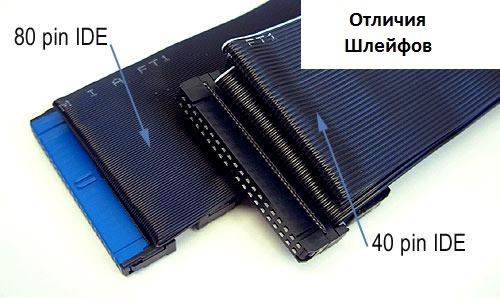
Differences between IDE cables
This is a professional solution for computer technology(remember at least IDE cables, 40 and 80 cores, ATA 33, and ATA 66-100 and having the same number of 40 contacts) and any other where interference is unacceptable, and allows you to use longer cables and wires that do not have shielding. So, now that we have deviated from the topic of the article and analyzed all these nuances, let's return to our topic again - the process of removing the Fly CC.

USB to UART connection
Just seeing how schoolchildren and even older people teach the masses in YouTube videos and in articles it is wrong to work with flashing digital circuits - I allowed myself this digression. So, you have a hard drive with a BIOS detection problem: Maxtor or Seagate, hard drives from other manufacturers do not seem to have such problems.
Hard disk - work in the console
You first need to type in the search a list of models of problematic hard drives, and there are not so many of them, but if your hard drive is one of them, you need to go to the official website of the manufacturer and serial number hard drive to finally make sure that this is exactly your case, and the problem is not related to any other software and hardware failure. The second step should be confirmation in the terminal after connecting the USB-UART adapter and supplying power to the hard drive, the appearance of an inscription containing the letters “CC”.
Connecting the adapter when flashing
Then you will need to google, depending on your hard drive model and manufacturer, what manipulations need to be done with hard drive, in order to be able to type in the console. As far as I remember, there are only three or four options. To do this, we will first need to stop the hard drive motor. How can I do that?

We close the points on the hard drive board
Each subspecies of problematic hard drives has its own methods, in my case it was necessary to close two small nickels, contact pads on the board, in another case it may be necessary to slip a piece of office paper under the contacts going from the control board to the engine (not glossy (!), To avoid closures).
Hard drive model prone to CC fly
After that, it was required to type certain text in the console. Having tried to close these nickels, in my case with platypuses, I realized that this is a dead number and I still have to solder to the nickels with a thin MGTF wire. I tied this wire in a knot and glued it to the hard drive board to a place free from contacts with a drop of hot glue. Because restoring these little nickels is another problem, and it was very easy to tear them off, having made one awkward movement in a hurry. To the MGTF wires soldered to the nickels, I connected jumpers - jumpers “father” and “mother”, used in the construction on Arduino. Then it only remained to wait for the right moment after switching on and closing our jumpers to stop the engine.
Arduino jumpers for adapter
Everything, typing in the console has become possible, half the work is done. Then I found a certain sequence of commands on a specialized site, which one after another had to be entered in the terminal. It was nothing complicated - the only thing is that for each subspecies of boards of problematic hard drives, this sequence was slightly different. At the end of the article, I will give in the archive the full text from the article, according to which the commands were typed, limiting here to a brief description of the recovery process, in general terms.
List of hard drives prone to ts fly
So, we typed a certain sequence of commands and finally received a message that the hard drive has returned to normal, then turn off the power, open our jumper, which can be replaced in principle with anything - any switch, toggle switch or locking button, or at worst, just quickly twisting ends of MGTF wires. That's it, now we have removed the Fly CC.
Fly tss on the screw
Now our hard drive should already be visible in motherboard BIOS fees. What we are convinced of, with bated breath) - were our labors not in vain? We turn on the PC, the hard drive is detected in the BIOS, in my case, the boot did not go beyond the BOOTa request, this is understandable - the differences in the PC hardware should have been so. For the sake of interest, I booted from my hard drive, there didn’t even seem to be a password for Windows and all the files were visible, although when there is a desire, even this does not become a problem by connecting a reanimated hard second and climbed through other people's files, however, did not find anything of value to myself.

Firmware hard drive from a disk image
But that's half the battle, the hard drive is still on the verge of risk, as it has an old firmware, problematic, and at any moment everything can happen again. But now it is visible in the BIOS and it will not be difficult to change it, we are looking for a disk image with firmware on which there will no longer be such problems, released specially by the manufacturer. You can take it on the official website or specialized forums.
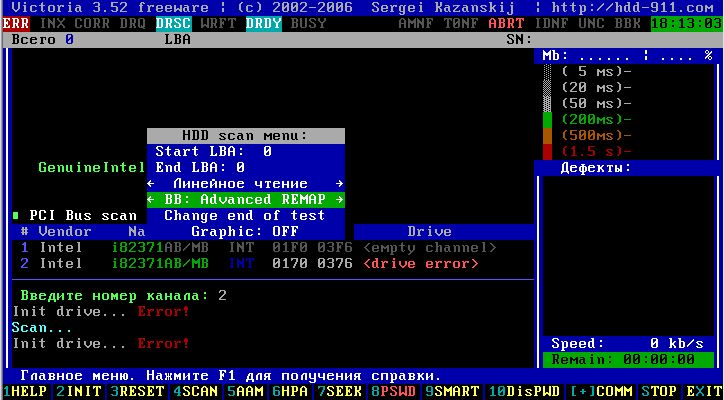
Victoria - choose a remap
We enable booting from CD-ROM in the BIOS and select the desired model from the list, and in order to avoid errors, it is better to disable all other hard drives altogether by disconnecting the cable, press: flash our hard drive. And here we are waiting for another possible problem- after flashing the SMART hard drive will be clean, which means that we do not record when work hard disk, files to unmarked sectors with possible BAD blocks, bad sectors, we need to boot from a disk image with Victoria or a similar program, and select scanning and advanced Remap in it.

Bad blocks when scanning a disk with Victoria
Thus, we will get an idea of the surface and the state of the mechanics of our hard drive, in my case we were very lucky, there was not only a single bad sector, there was not even a single very slow sector - the surface was almost ideal. Here, as they wrote on the forums in topics dedicated to the restoration of hard drives, sometimes a very unpleasant surprise awaits us, after flashing in a small percentage of cases there are a lot of BAD blocks, bad sectors, but in my case I was lucky.
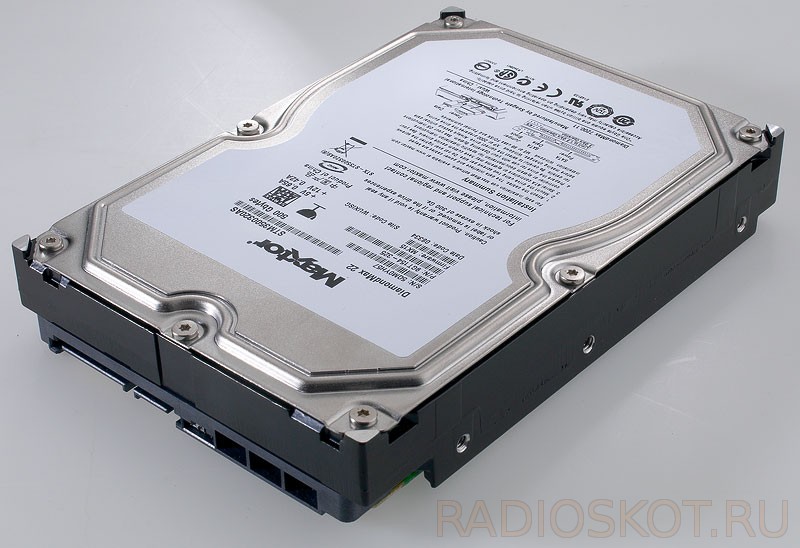
Refurbished Maxtor 500 GB
Now I have a second 500 GB hard drive, on which I took a chance and installed the system, quite a long time has passed and no problems have been noticed in operation. This hard drive in terms of write / read speed is much superior to that bought new in 2011 at the same time as computer hard a 250 GB drive, also Seagate, but fortunately not from a problematic line. Price given hard a refurbished used disk on the forum of our city is about 1000-1200 rubles, depending on the condition of the surface and the brand, and there were even those who wanted to buy it from me, but remembering the classics, I want to say: you need such a cow yourself :)
Let's sum up the work done
This case proves that electronics repairs are by no means boring and difficult, or accessible only to specialists - professionals in the field of repair or recovery of information, but on the contrary, it is possible to independently make each novice neat radio amateur or home repairman who knows how to combine business with pleasure. You can download the archive with the source of the article on which you restored your hard drive here. Good luck with your repairs! Especially for the portal - AKV.
Discuss the article REFLASHING THE BIOS OF THE WINCHESTER HDD