Buy domestic HDD SATA. Do this if you don't already have such a disk.
- It is better to buy a hard drive made by the same company as the computer (eg HP).
- Some hard disks not compatible with some computers. Before the purchase hard drive Find your computer model and hard drive model (for example, search "HP Pavilion L3M56AA SATA Compatible") to see if they will work together.
Turn off your computer and unplug it from the electrical outlet. Do not work inside the computer while it is turned on, as you could damage components or cause injury.
- Some desktop computers turn off within a couple of minutes. In this case, wait until the computer fans stop working.
Open the computer case. This process depends on the computer model, so read the instructions for your computer or search the Internet for relevant information.
- In most cases, you will need a Phillips screwdriver.
ground yourself . This will prevent accidental damage to sensitive internal computer components (such as the motherboard).
Find an empty hard drive bay. The main hard drive is installed in a special compartment of the computer case; next to this compartment there should be a similar empty compartment in which you will install second hard disk.
Insert a second hard drive into the bay. The compartment is located under or above the main compartment. hard drive. You need to insert the drive so that its side with connectors for connecting cables is directed into the computer case.
- In some cases, the disk must be fixed with screws.
Locate the hard drive connector. Run through the main hard drive cable to find out where the hard drive connectors are located on the motherboard. (The motherboard is a large board that other boards and devices connect to.)
- If the main hard drive cable looks like a wide, thin ribbon, it is an IDE hard drive. In this case, you will need an adapter to connect a second hard drive to the motherboard.
Connect a second hard drive. Connect one end of the cable to the second hard drive, and the other end to the connector on the motherboard (this connector is next to the connector that the main hard drive is connected to).
- If your computer motherboard only has IDE connectors (connectors a few centimeters long), buy a SATA to IDE adapter. In this case, connect the adapter to the motherboard, and the cable of the second hard drive to the adapter.
Connect the second hard drive to the power supply. Connect one end of the power cable to the power supply and the other end to the second hard drive.
- Typically, the power supply is located at the top of the computer case.
- The power cable plug looks like a wider SATA cable plug.
Make sure all cables are connected securely and correctly. Otherwise, the computer's operating system will not recognize the second drive.
Connect your computer to an electrical outlet and turn it on. Now you need to make Windows recognize the second hard drive.
Open the Disk Management window. Click right click mouse on start menu
In the lower left corner of the screen, and then from the menu, select "Disk Management".
- You can also click ⊞ Win+X to open the menu.
The time has come when one hard drive in a computer is no longer enough. More and more users decide to connect a second HDD to their PC, but not everyone knows how to do it right on their own in order to avoid mistakes. In fact, the procedure for adding a second disk is simple and does not require special skills. It is not even necessary to mount the hard drive - it can be connected as external device if there is a free USB port.
Connecting a second HDD to a PC or laptop
The options for connecting a second hard drive are as simple as possible:
- Connecting the HDD to the computer system unit.
Suitable for owners of conventional stationary PCs who do not want to have external connected devices.
- Connecting a hard drive as an external drive.
The easiest way to connect an HDD, and the only one possible for a laptop owner.
Option 1. Installation in the system unit
Determining the type of HDD
Before connecting, you need to determine the type of interface with which the hard drive works - SATA or IDE. Almost all modern computers equipped SATA interface, respectively, it is best if the hard disk is of the same type. The IDE bus is considered obsolete, and may simply not be on the motherboard. Therefore, with the connection of such a disk, some difficulties may arise.
The easiest way to recognize the standard is by contacts. This is what they look like on SATA drives:
And like this in the IDE:
Connecting a second SATA drive in the system unit
The process of connecting a disk is very easy and takes place in several stages:
SATA boot priority
The motherboard usually has 4 connectors for connecting SATA drives. They are designated as SATA0 - the first, SATA1 - the second, etc. The priority of the hard drive is directly related to the slot numbering. If you need to manually set the priority, you will need to go into the BIOS. Depending on the type of BIOS, the interface and management will be different.
In older versions, go to the section Advanced BIOS Features and work with parameters First boot device and Second boot device. In new BIOS versions, look for the section Boot or Boot Sequence and parameter 1st/2nd Boot Priority.
Connecting a second IDE drive
In rare cases, there is a need to install a disk with an outdated IDE interface. In this case, the connection process will be slightly different.
Connecting a second IDE drive to the first SATA drive
When you need to connect an IDE drive to an already working SATA HDD, use a special IDE-SATA adapter.
The connection diagram is as follows:
- The jumper on the adapter is set to Master mode.
- The IDE plug is connected to the hard drive itself.
- Red SATA cable one side is connected to the adapter, the other - to the motherboard.
- The power cable is connected on one side to the adapter, and the other side to the power supply.
You may need to purchase a 4-pin (4 pin) power to SATA adapter.
OS disk initialization
In both cases, after connecting, the system may not see the connected drive. This does not mean that you did something wrong, on the contrary, it is normal when the new HDD is not visible in the system. To be able to use it, initialization of the hard disk is required. Read about how to do this in our other article.
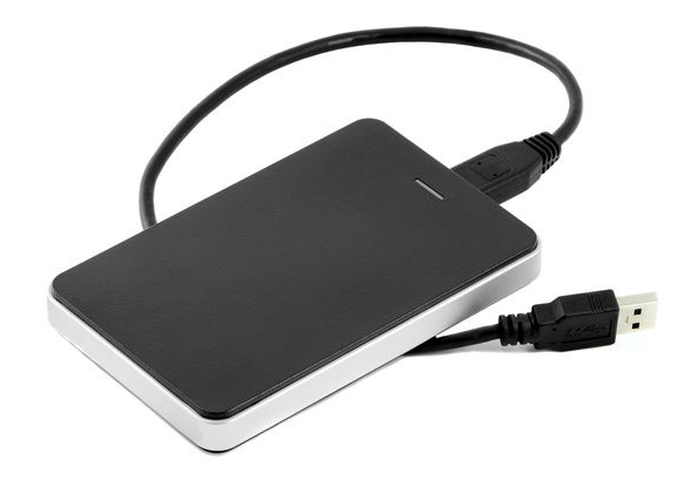
Option 2: Connecting an external hard drive
Often users choose to connect external HDD. It is much easier and more convenient if some of the files stored on the disk are sometimes needed outside the home. And in the situation with laptops, this method will be especially relevant, since there is no separate slot for a second HDD.
An external hard drive is connected via USB in exactly the same way as another device with the same interface (flash drive, mouse, keyboard).
hard drive for installation in system unit can also be connected via USB. To do this, you need to use either an adapter / adapter, or a special external case for the hard drive. The essence of the operation of such devices is similar - the required voltage is supplied to the HDD through the adapter, and the connection to the PC is via USB. Hard drives of different form factors have their own cables, so when buying, you should always pay attention to the standard that sets the overall dimensions of your HDD.
If you decide to connect the drive using the second method, then literally follow 2 rules: do not neglect the safe removal of the device and do not disconnect the drive while working with the PC in order to avoid errors.
We talked about ways to connect a second hard drive to a computer or laptop. As you can see, there is nothing complicated in this procedure and it is absolutely optional to use the services of computer masters.


On your own and without the involvement of a specialist, if necessary, you can connect an additional hard drive to your computer. Next, we will analyze installation diagram and subsequent connection of a new hard drive in the system unit. It should be noted that the actions are performed smoothly, clearly, without the use of force and abrupt actions.
First step need to de-energize the entire system unit, for this we turn off the power, and then disconnect absolutely all the wires. Next, the side covers are unscrewed and removed, as well as in the image.
For the hard drive, of course, there are their own compartments, which, depending on the model of the system unit, can be located in different positions and have a different position. 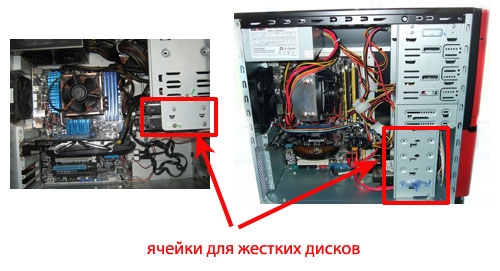
According to the method of connecting the hard drive directly to the motherboard, they are divided into two types, and exactlySATAandIDE. The second option, which has very wide cables and ports for connection, is considered obsolete and is now rarely used. Due to its irrelevance IDE variation will not be considered here.
If the SATA hard drive is already connected to the computer, then adding a second one can be quick and easy. Additional drive is inserted into the appropriate free cell and attached to the body. It is desirable that they are located at a sufficient distance from each other to avoid overheating. 
In order to connect a new hard drive to the motherboard itself, you need a cableSATA. Plug one end into the corresponding slot on the board, and the other to the hard drive. 
It is worth noting that in each modern model system unit, a minimum twoSATA- connector.
The next step will require connect new hard drive directly to the power supply. For this, it is applied special cable, the plug of which is slightly wider than that of the SATA cable. In the case when a single plug comes out of the power supply, you will need a splitter. It happens that a narrow plug in the power supply was not provided, then you should purchase an adapter. Examples are shown in the images: 
Having obtained all the above cables, you should connect the hard drive to the power cable.
The secondary media is now fully connected. You can then start the computer by attaching the covers, connecting the cables, and applying power. After that, will follow, if necessary, the stage system setting new hard disk.

The time has come when one hard drive in a computer is no longer enough. More and more users decide to connect a second HDD to their PC, but not everyone knows how to do it right on their own in order to avoid mistakes. In fact, the procedure for adding a second disk is simple and does not require special skills. It is not even necessary to mount the hard drive - it can be connected as an external device if there is a free USB port.
The options for connecting a second hard drive are as simple as possible:
- Connecting the HDD to the computer system unit.
Suitable for owners of conventional stationary PCs who do not want to have external connected devices. - Connecting a hard drive as an external drive.
The easiest way to connect an HDD, and the only one possible for a laptop owner.
Option 1. Installation in the system unit
Determining the type of HDD
Before connecting, you need to determine the type of interface with which the hard drive works - SATA or IDE. Almost all modern computers are equipped with a SATA interface, respectively, it is best if the hard drive is of the same type. The IDE bus is considered obsolete, and may simply not be on the motherboard. Therefore, with the connection of such a disk, some difficulties may arise.
The easiest way to recognize the standard is by contacts. This is what they look like on SATA drives:

And like this in the IDE:

Connecting a second SATA drive in the system unit
The process of connecting a disk is very easy and takes place in several stages:

SATA boot priority
The motherboard usually has 4 connectors for connecting SATA drives. They are designated as SATA0 - the first, SATA1 - the second, etc. The priority of the hard drive is directly related to the slot numbering. If you need to manually set the priority, you will need to go into the BIOS. Depending on the type of BIOS, the interface and management will be different.
In older versions, go to the section Advanced BIOS Features and work with parameters First boot device and Second boot device. In new BIOS versions, look for the section Boot or Boot Sequence and parameter 1st/2nd Boot Priority.
Connecting a second IDE drive
In rare cases, there is a need to install a disk with an outdated IDE interface. In this case, the connection process will be slightly different.

Connecting a second IDE drive to the first SATA drive
When you need to connect an IDE drive to an already working SATA HDD, use a special IDE-SATA adapter.

The connection diagram is as follows:
- The jumper on the adapter is set to Master mode.
- The IDE plug is connected to the hard drive itself.
- The red SATA cable is connected on one side to the adapter, the other side to the motherboard.
- The power cable is connected on one side to the adapter, and the other side to the power supply.
You may need to purchase a 4-pin (4 pin) power to SATA adapter.
OS disk initialization
In both cases, after connecting, the system may not see the connected drive. This does not mean that you did something wrong, on the contrary, it is normal when the new HDD is not visible in the system. To be able to use it, initialization of the hard disk is required. Read about how to do this in our other article.
Option 2: Connecting an external hard drive
Often, users choose to connect an external HDD. It is much easier and more convenient if some of the files stored on the disk are sometimes needed outside the home. And in the situation with laptops, this method will be especially relevant, since there is no separate slot for a second HDD.
An external hard drive is connected via USB in exactly the same way as another device with the same interface (flash drive, mouse, keyboard).

A hard drive designed for installation in a system unit can also be connected via USB. To do this, you need to use either an adapter / adapter, or a special external case for the hard drive. The essence of the operation of such devices is similar - the required voltage is supplied to the HDD through the adapter, and the connection to the PC is via USB. Hard drives of different form factors have their own cables, so when buying, you should always pay attention to the standard that sets the overall dimensions of your HDD.


If you decide to connect the drive using the second method, then literally follow 2 rules: do not neglect the safe removal of the device and do not disconnect the drive while working with the PC in order to avoid errors.
We talked about ways to connect a second hard drive to a computer or laptop. As you can see, there is nothing complicated in this procedure and it is absolutely optional to use the services of computer masters.
To increase the amount of permanent memory of the computer, it is recommended to connect an additional hard drive. Choice of hard drive depends on the characteristics of the PC motherboard.
You will need
- - IDE-SATA controller;
- - USB-SATA connector.
Instruction
You will need
- SATA disk kit, computer.
Instruction
The SATA cable has the same connectors. One connector leads to the motherboard, the second - directly to the hard drive. Wrong connection of SATA drives - impossible operation;
SATA drives do not have jumpers - the connection is very simple.
Find the corresponding connector on the motherboard;
Connect the connecting cable;
Connect to hard drive
Connect the power cable to the hard drive (you will need the special cable that came with the hard drive). Sometimes an adapter is included.