AD HOC MODE
In Ad Hoc mode, clients communicate directly with each other. A peer-to-peer communication is established on a point-to-point basis, and computers communicate directly without the use of routers. This creates only one service area that does not have an interface for connecting to a wired LAN.
In Ad Hoc mode, the connection speed is no more than 11 Mbps, regardless of the equipment used. The actual data exchange rate will be lower and will not exceed 11/N Mbit/s, where N is the number of devices in the network. The communication range is no more than one hundred meters, and the data transfer rate drops rapidly with increasing distance.
INFRASTRUCTURAL MODE
In this mode, routers provide communication between client computers. The router can be thought of as a wireless switch. Client stations do not communicate directly. The router has Ethernet ports through which the basic service area is connected to a wired network - to the network infrastructure.
MODES AND
The term WDS (Wireless Distribution System) stands for "distributed wireless system". In this mode, access points are connected only to each other, forming a bridge connection. In addition, each point can be connected to several other points. All points in this mode must use the same channel, so the number of points participating in the bridge should not be excessively large. Clients are connected only via a wired network through the uplink ports of the points.
A wireless bridge can be used where cabling between buildings is undesirable or not possible. This solution allows you to achieve significant cost savings and provides ease of setup and configuration flexibility when moving offices. Wireless clients cannot connect to an access point in bridge mode. Wireless connection is carried out only between a pair of points that implement the bridge.
The term WDS with AP (WDS with Access Point) stands for "distributed wireless system, including access point", i.e. using this mode, you can organize not only bridging between access points, but also simultaneously connect client computers. This allows you to achieve significant savings in equipment and simplify the network topology. This technology supported by most modern access points.
REPEATER MODE
There may be a situation where it is not possible, or inconvenient, to connect the router to the wired infrastructure, or some obstacle makes it difficult for the router to communicate directly with the location of the wireless client stations. In such a situation, you can use the dot in repeater mode.
Similar to a wired repeater, a wireless repeater simply retransmits all packets received on its wireless interface. This retransmission is carried out through the same channel through which they were received. When using a repeater access point, be aware that the overlap of broadcast domains can result in a halving of the link throughput, because the original access point also "hears" the relayed signal.
The repeater mode is not included in the 802.11 standard, so for its implementation it is recommended to use the same type of equipment (up to the firmware version) and from the same manufacturer. With the advent of WDS, this mode has lost its relevance, because the WDS functionality replaces it.
CLIENT MODE
When migrating from a wired architecture to a wireless architecture, you may sometimes find that existing network devices support wired Ethernet, but do not have wireless interface connectors. network adapters. To connect these devices to wireless network you can use the access point - the client. Only one device connects to the wireless network using a client access point. This mode is not included in the 802.11 standard, and is not supported by all manufacturers.
801.11
- the IEEE standard, which defines the order of access to the transmission medium and provides physical layer specifications for wireless local area networks with speeds up to 2 Mbps. The 802.11 standard applies to DSSS and FHSS high-frequency radio channels, as well as to infrared channels.
802.11a- an edition of the IEEE 802.11 standard, which considers networks operating at speeds up to 54 Mbps using DSSS technology.
802.11b- an edition of the 802.11 IEEE standard, which considers networks operating at speeds up to 11 Mbps using DSSS technology.
802.1lg- a revision of the 802.11 IEEE standard, which considers networks operating at speeds up to 54 Mbps using DSSS technology, backward compatible with the 802.11b standard.
802.1li- IEEE standard related to the security of wireless networks. It combines 802.1x and TKIP/CCMP protocols to provide user authentication, confidentiality and data integrity in wireless LANs.
802.1x- IEEE standard for authentication and access control on link layer. Access point (access point) - the type of base station that the wireless the local network is used to allow wireless users to interact with the wired network and roam within the building.
AD HOC MODE
(peer-to-peer network mode) - a wireless network configuration in which users can directly establish connections between their devices without the services of a base station. Wireless personal and local area networks can work in this mode.
The main advantage of this mode is the ease of organization: it does not require additional equipment (access points). The mode can be used to create temporary networks for data transmission. However, it must be borne in mind that ad hoc mode allows you to establish a connection at a speed of no more than 11 Mbps, regardless of the equipment used. The actual data exchange rate will be lower and will not exceed 11/N Mbit/s, where N is the number of devices in the network. The communication range is no more than one hundred meters, and the data transfer rate drops rapidly with increasing distance. To organize long-term wireless networks, infrastructure mode should be used.
Example:
On the client side, we will use a wireless USB adapter. All settings for other types of adapters (PCI, PCMCI, ExpressCard, etc.) are carried out in the same way.
When connecting the adapter, you need to install the driver that comes with all wireless equipment. The Wireless icon should appear in the Network Connections window. network connection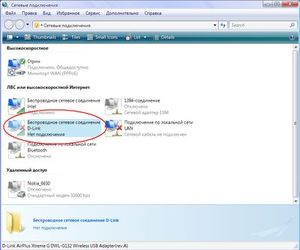
Wireless network in ad hoc mode first we will build from computer1 and laptop1, and then it will be possible to connect other computers. This can be done in two ways: using the built-in Windows XP service, or Windows Vista and the D-Link AirPlus XtremeG Wireless Utility that comes with D-Link equipment.
1) Setting up a connection using the built-in Windows service. When installing the interface, using the built-in Windows utilities, additional programs not required. But for this you need to check the box Use Windows to configure the network on the Wireless networks tab in the properties of the wireless connection 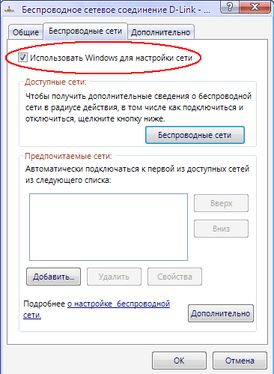
Before establishing a connection, you must configure static IP addresses. They are configured in the properties of the wireless connection, on the General tab, in the Internet Protocol (TCP/IP) properties. 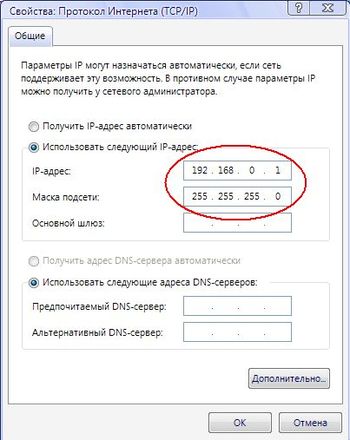
Let the first computer (Computer1) have an IP address: 192.168.0.1, and the second (Laptop1): 192.168.0.2, and a subnet mask: 255.255.255.0. Now for networking in ad hoc mode, double-click the left mouse button on the wireless interface to launch Windows Service. Here, on one of the computers, run Set up a wireless network. In the wizard that appears, you must enter the SSID (for example, AdHocNet) and enter the access key. This completes the configuration of one computer. 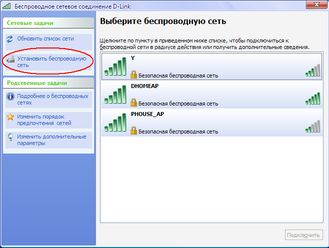
On another computer, we also start the Windows service, and in the main window select the network that appears (AdHocNet). If the access keys match, this computer connects to the first one and thus, an Ad Hoc wireless network is created.
If you need to connect more computers, then all the same steps are carried out as with the second one. In this case, the network will already consist of several computers.
2) Setting up a connection using D-Link software AirPlus XtremeG Wireless Utility.
In this case, you need to install this program and uncheck Use Windows to configure the network.
To organize wireless ad hoc Run this program on the first computer and go to the Setup tab. 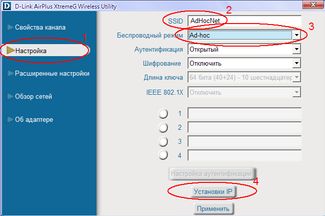
Then enter the SSID created network(for example, AdHocNet), select Ad Hoc mode and set the IP address with the wireless interface mask.
Let's leave authentication and encryption open for now. If you need to make additional settings, they can be made on the Advanced settings tab.
On other computers, we also run this program and open the Browse Networks tab: 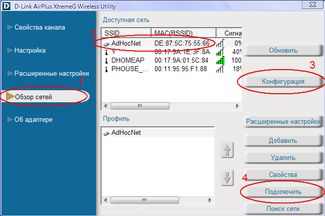
In the window that appears, select a network, and to configure the IP address of the second computer, click the Configuration button. Then click the Connect button, and if the access keys match, the wireless adapter will connect to the first computer. Other computers are connected in the same way. Update available networks done with the Refresh button.
infrastructure mode
In this mode, access points provide communication between client computers. The access point can be thought of as a wireless switch. Client stations do not communicate directly with each other, but communicate with the access point, and it already sends packets to the recipients. 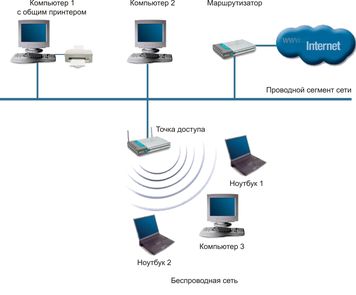
The access point has an Ethernet port through which the basic service area is connected to a wired or mixed network - to the network infrastructure. Example:
Set up a wireless access point in infrastructure mode. Configuration is carried out via a wired interface, i.e. using an Ethernet connection. Although it is possible to do this through the wireless interface, but we do not recommend it, because. at enough in large numbers access points, there may be confusion in the settings.
1. In the Network Connections window, disable network and wireless adapters. AT context menu select "Disable" for each adapter. As a result, all computers are isolated from each other, network connections no.
2. Set up network adapters to communicate with the access point. Local Area Connections->Properties->TCP/IP Protocol->Properties -Use the following IP address
-Enter the address 192.168.0.xxx, where xxx is your computer number (1, 2, 3, etc.).
-Specify mask 255.255.255.0
-Include cable connection
3. Connect to an access point.
Connecting an access point network cable with a network adapter, supply power.
Reset point settings. To do this, press and hold the reset button for five seconds. Do not turn off the power while pressing reset! Point loading time is about 20 seconds.
When the download is complete, the Power and LAN indicators light up on the point. In browser Internet Explorer type http://192.168.0.50 , You will be prompted to enter a name and password. 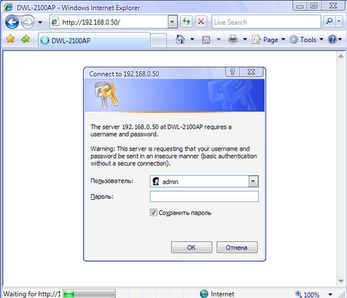
4. Let's start the setup. Enter "admin" as the username with a blank password. Let's configure the point's IP address first. This is only necessary if you have many access points. On the Home tab, click the Lan button (on the left).
-Set the address 192.168.0.xxx, where xxx is a unique point number.
-mask 255.255.255.0
-Default Gateway 192.168.0.50
5. Enable hotspot mode.
Wait for the point to load, and enter the new address in the browser http://192.168.0.xxx
On the Home tab, click the Wireless button (on the left)
Install:
Mode: Access Point
SSID: Network
SSID Broadcast: Enable
Channel: 6
Authentication: Open System
Encryption: Disable 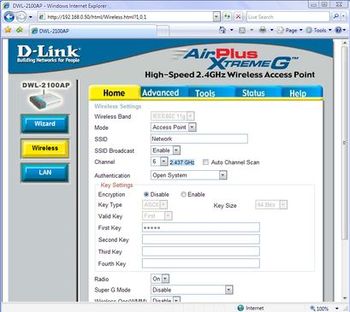
Please note that the settings we have chosen do not ensure the security of the wireless connection, and are used for educational purposes only. If you need to do more fine tuning, click the Advanced tab. We strongly recommend that you read the configuration documentation before setting up your access point, a brief description of all parameters is on the Help tab.
After completing the settings, click "Apply" to reload the point with the new settings.
Disconnect the point from the network interface. Your point is now configured to connect wireless clients. In the simplest case, to provide customers with the Internet, you need to connect a broadband channel or an ADSL modem to the point. Client computers are connected in the same way as described in the previous example.
wds and wds with ap modes
WDS term(Wireless Distribution System) stands for "Distributed Wireless System". In this mode, access points are connected only to each other, forming a bridge connection. In addition, each point can be connected to several other points. All points in this mode must use the same channel, so the number of points participating in the bridge should not be excessively large. Clients are connected only via a wired network through the uplink ports of the points. 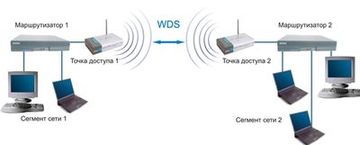
Wireless bridge mode, similar to wired bridges, is used to combine subnets into common network. With the help of wireless bridges, it is possible to combine wired LANs located both at a short distance in neighboring buildings, and at distances up to several kilometers. This allows you to network branches and the central office, as well as connect customers to the Internet provider's network. 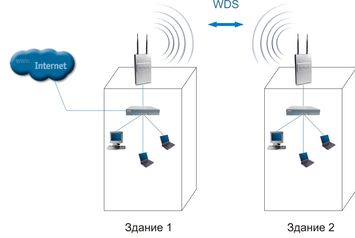
A wireless bridge can be used where cabling between buildings is undesirable or not possible. This solution allows you to achieve significant cost savings and provides ease of setup and configuration flexibility when moving offices.
Wireless clients cannot connect to an access point in bridge mode. Wireless communication is carried out only between a pair of points that implement the bridge.
The term WDS with AP(WDS with Access Point) stands for "distributed wireless system, including access point", i.e. Using this mode, you can organize not only bridging between access points, but also connect client computers at the same time. This allows you to achieve significant savings in equipment and simplify the network topology. This technology is supported by most modern access points. 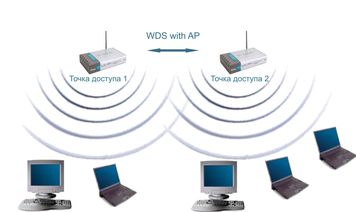
However, it must be remembered that all devices in the same WDS with AP operate on the same frequency and create mutual interference, which limits the number of clients to 15-20 nodes. To increase the number of connected clients, you can use several WDS networks configured for different non-overlapping channels and connected by wires through uplink ports.
Topology of organization of wireless networks in WDS mode similar to conventional wired topologies. Bus topology
The topology of the "bus" type, by its very structure, assumes the identity network equipment computers, as well as the equality of all subscribers.
There is no central subscriber through which all information is transmitted, which increases its reliability (after all, if any center fails, the entire system controlled by this center ceases to function). Adding new subscribers to the bus is quite simple. It is necessary to enter the parameters of the new access point into the last one, which will only lead to a short reboot of the last point. The bus is not afraid of failures of individual points, since all other computers on the network can normally continue to communicate with each other, but the rest of the computers will not be able to access the Internet. Ring Topology
A "ring" is a topology in which each access point is connected to only two others. There is no clearly defined center in this case, all points can be the same.
Connecting new subscribers to the "ring" is usually completely painless, although it requires the mandatory shutdown of the two extreme points from the new access point.
At the same time, the main advantage of the ring is that the relaying of signals by each subscriber can significantly increase the size of the entire network as a whole (sometimes up to several tens of kilometers). The ring in this respect is significantly superior to any other topology.
The topology of connections between points in this mode is an acyclic graph of the tree type, that is, data from the Internet from point 4 to point 2 can pass in two directions - through points 1 and 3. To eliminate unnecessary connections that can lead to cycles in the graph, the spanning tree algorithm is implemented. His work leads to the identification and blocking of unnecessary connections. When the network topology changes, for example, due to the disconnection of some points or the inability of the channels to work, the Spanning tree algorithm is restarted, and previously blocked extra connections can be used instead of failed ones. Star Topology"Star" is a topology with a clearly defined center, to which all other subscribers are connected. All information exchange takes place exclusively through a central access point, which thus bears a very huge pressure.
If we talk about the stability of the star to point failures, then the failure of a conventional access point does not affect the functioning of the rest of the network, but any failure of the central point makes the network completely inoperable. A serious drawback of the star topology is the strict limitation on the number of subscribers. Since all points operate on the same channel, usually the central subscriber can serve no more than 10 peripheral subscribers due to a large drop in speed.
In most cases, for example, to combine several districts in a city, combined topologies are used.
Repeater mode
There may be a situation where it is impossible, or inconvenient, to connect the access point to the wired infrastructure, or some obstacle makes it difficult for the access point to communicate directly with the location of the wireless client stations. In such a situation, you can use the dot in repeater mode. 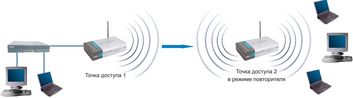
Similar to a wired repeater, a wireless repeater simply retransmits all packets received on its wireless interface. This retransmission is carried out through the same channel through which they were received. When using a repeater access point, be aware that the overlap of broadcast domains can result in a halving of the link throughput, because the original access point also "hears" the relayed signal.
The repeater mode is not included in the 802.11 standard, so for its implementation it is recommended to use the same type of equipment (up to the firmware version) and from the same manufacturer. With the advent of WDS, this mode has lost its relevance, because the WDS functionality replaces it. However, it can be found in older firmware versions and in outdated equipment.
Client mode
When migrating from a wired to a wireless architecture, you may sometimes find that existing network devices support wired Ethernet, but do not have interface connectors for wireless network adapters. To connect such devices to a wireless network, you can use an access point - a client 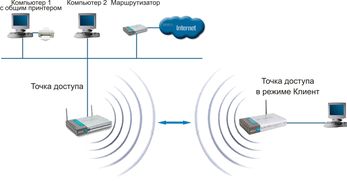
Only one device connects to the wireless network using a client access point. This mode is not included in the 802.11 standard, and is not supported by all manufacturers.
One of the main advantages of modern routers is their multitasking. It is now difficult to find separately such devices as a connection point, modem or repeater. Any Wi-Fi router supports bridge mode and router mode, can become a connection point or perform the function of a signal repeater.
Router operating modes
According to the method of use, it is customary to distinguish all wireless Wi-Fi devices into the following categories:
1. Bridge (bridge);
2. Router (router);
3. Access point;
4. Client;
5. Repeater (repeater).
Bridge
This method is used to combine two networks into one. The connection uses two devices that have this bridge mode. This method is suitable, for example, for connecting two adjacent buildings. Therefore, there is no need to combine them with wires.
Type of work - bridge
router
Most routers operate in this mode. It can turn an ISP's IP address into internal addresses and distribute them to devices within the network's range. The router can forward ports, open general access to network printers and file storage.
It can auto-authenticate so that the user does not need to authenticate every time they try to access the Internet. In the end, the router in this mode can be used as a normal switch.
Access point, client, repeater
This method is confused with the previous one. Unlike Router mode, this method of application is simpler and consists only in the fact that the device receives wired signal and convert it to wireless.

Operation type - access point
The client is the reverse way of functioning. Thus, the wireless signal is received by the device and sent over the wired channel.
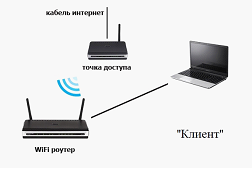
Type of work - "client"
Repeater - this method of application allows you to amplify the signal from the main Wi-Fi device.

Work type - repeater
Installing a wireless network in the Asus RT-N10U model
The RT-N10U supports three use cases: router, repeater and connection point. First you need to turn on the device and wait until the Wi-Fi indicator lights up and connect to the appeared wireless connection. After that, you need to go to the admin panel. To do this, you need to type and in the address bar of the browser and go to the address 192.168.1.1, and then enter login and password (admin, admin by default).
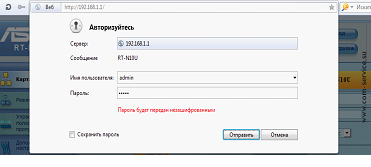
Admin panel login
In order to protect the router from external interference, you need to change the password for the admin panel. You can do this by going to the tab. Settings\Administration\System. Then enter the new password twice and click on the "Apply" button.
Setting up a wireless network
First you need to set up Wi-Fi. To do this, you need to go to the page add. settings\wireless network. Next, be sure to specify the connection parameters:
- SSID - network name;
- Authentication method - select WPA-Auto-Personal;
- WPA encryption - select Tkip;
- Preshared key - you need to specify a key (password) that allows you to get permission to connect.
WiFi setup
After the values are set, click the Apply button.
Setting up an internet connection
Now you can start setting up an internet connection. Depending on the Internet connection protocol, there are: PPPoE, L2TP, PPTP. Each protocol has its own differences, therefore, the configuration of the router, depending on the authorization method, is different.
PPPoE
This protocol is mainly used in xDSL technology. Authorization is carried out using the login and password provided by the provider.
This connection is configured as follows. You need to go to the WAN / Internet connection tab and set the following settings:
- Connection type: PPPoE;
- Get IP automatically;
- Username: provided by the provider when concluding the contract;
- Password: provided by the provider;
- After entering the data, press the "Apply" button.
L2TP
The protocol is used to support VPN. Settings are made in the same tab as for PPPoE:
- WAN connection type: L2TP
- IP and DNS automatic
- Login and password from the contract
- PPTP\L2TP server - here you need to specify the IP address or the name of the vpn server specified in the contract.
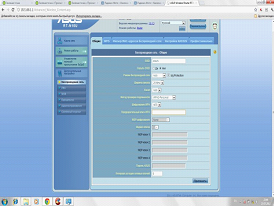
PPTP
This protocol provides a secure tunneled connection on a point-to-point basis. Depending on the operator, both static and dynamic IP addresses can be used here. The settings look like this:
- WAN type: PPTP;
- IP address, subnet mask, default gateway - the values from the contract are entered. If the provider does not allocate a static address, then select "Yes" in the column "Obtain an IP address automatically;
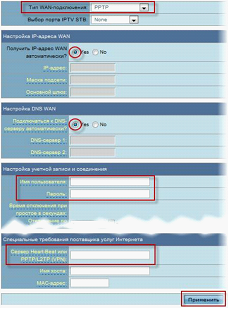
WAN setup page
- DNS - the addresses of the required provider are entered, if not known, then it is better to leave the automatic selection;
- Login and password - from the contract.
After filling in the parameters, you must click the "Apply" button.
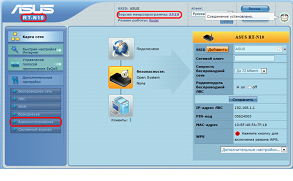
Connectivity Check
After filling in the required parameters, select the "network map" tab. If the configuration is correct, then the Internet icon should have the "connected" status.
Repeater and access point modes
To change the way the router works to a repeater or a point, go to the Advanced tab. settings\Administration\Operation mode. After selecting the desired option, you need to click on the "apply" button for the changes to take effect. Further settings are made depending on the tasks performed by the router.