BIOS - software package, which is used to configure individual components of the computer hardware, as well as devices connected to it. You can access it immediately after turning on the PC, before it is fully loaded operating system. Some computer models use UEFI instead of the traditional BIOS. This is the connecting shell between the operating system and the hardware. Therefore, before you go into the BIOS in Windows 10, you need to understand that this happens differently on all devices. In this article we will talk about how to enter BIOS on Windows 10.
Typically, Windows 10 ships in UEFI mode (with the exception of some builds). To get into its settings, the OS must be installed on the computer, and the user can, if not log into the system itself, then at least access the login screen and account selection.
How to open UEFI from a running OS (relevant for 32 Bit and 64 Bit versions):
- Click on “Start” and enter the request on the keyboard. Launch the found application from the top of the list from the “Best Match” category.
- Or click on the "Start" icon right click mouse and in the appeared context menu select the desired application.
- Next, find and click on the “Update and Security” option. If the search is complicated, then enter this combination in the empty “Find” column (at the top of the window).
- Scroll through the list and select Recovery. The settings available to the user will be displayed on the left side of the window. Find the “Special boot options” text and the “Restart now” button. It is with its help that you will enter the UEFI parameters.
- Start the reboot process strictly using this method so that once the system starts up, you will be taken to the screen you see in the screenshot below.
- Select the Diagnostics icon and go to Advanced Options.
- An option will appear here that is dedicated to UEFI settings. Click on it and confirm your choice. then reboot the device.
After this, UEFI will open, which many users are accustomed to calling BIOS. Make the necessary settings, and then save your changes.
Safe mode can be accessed through the Safe Mode menu. After this, the user will have access to all necessary programs.
If the operating system does not boot, but you can get to the user selection screen to log in, then you can get into UEFI from here. For this:
- Wait until the screen appears where you can select account, then click on the “Power” icon.
- A button for reboot will appear in the context menu that opens. Click on it while holding down the Shift key on your keyboard.
After this, the same “ blue screen"(as in the screenshots above), where through the "Advanced options" menu you can open UEFI, following the instructions described above.
How to get into the BIOS after turning on the computer
By default, you can enter the BIOS (or UEFI) during system startup. But keep in mind that on all computer models this happens by pressing different keys.
- on Asus laptops The BIOS is opened using the F2 button on the keyboard. Suitable for devices from other manufacturers, especially if you are using an older laptop;
- on desktop computers you need to press Del. Suitable for some laptop models (Lenovo, HP).
Press the key immediately after the loading screen appears. If nothing happens, then you are most likely using the wrong button.
UEFI does the same things as BIOS, but in a slightly different way. The main differences between UEFI and traditional BIOS are that it stores all system information about the computer in a special file, which is stored on the HDD (SSD) and has a graphical interface.
Immediately after turning on the computer, at the bottom of the screen there is an inscription: “Press the name of the key to get into the BIOS.” If it is not there, then read the instructions for the device or use the search on the manufacturer’s official website motherboard(for desktop PCs or laptops) to accurately recognize the correct button.
In other cases, the system simply does not have time to process the command. This happens due to the really fast (compared to other OS from Microsoft) loading of the “tens”. In this case, you can try to disable this function. To do this you need to get into the PU. If you don’t know where the Control Panel is in Windows 10, then follow the instructions:
- Press the Win + R key combination on your keyboard to launch the Run utility. Here, enter “cmd” in the empty box and click “OK.”
- Through command line Type control.exe and press Enter to execute the command.
- The “Control Panel” will appear.
What should I do if I can't do this? If the line is grayed out, first click on the blue “Change settings that are currently unavailable” (administrator rights may be required).
- After that deactivate quick start and save your changes using the appropriate button.
Now, when you turn on the computer, try pressing the keyboard again the desired button to bring up the BIOS (UFFI). After you configure the necessary parameters, you can turn the function back on for faster system startup.
Conclusion
Now you know how to get to the BIOS (UEFI) settings from Windows. You can do this immediately after starting your computer. You can change the necessary settings and start the operating system in safe mode. If for some reason the button does not work, then try disabling fast startup or rebooting the device through the settings menu.
Video
For clarity, we suggest you watch a video on this topic.
Friends, hello everyone! In this article I want to show you how cleanliness is carried out in practice. Windows installation 10 from a flash drive via BIOS. This whole thing will happen using a living example of a budget Lenovo laptop. After all, if you remember, a special boot drive has already been prepared.
Therefore, now the entire process will be shown from start to finish, so that even novice users will not have any questions. And we must immediately say that there is nothing abstruse in this matter, you just need to do it with your own hands once and all fears will go away on their own.
The first step is to go to the BIOS to install the initial boot from a pre-prepared flash drive. I described in great detail how to do this in . In our case, the correct parameters look like this:

Before exiting, do not forget to press the key combination to save the changes. The next step is to indicate your regional preferences. In general, no comments, just look at the picture below.


In the next window, “Windows Activation” awaits us. Therefore, if you have a license key, you can enter it. If it is not there, or some pirated activator will be used in the future, click the “I don’t have a product key” item.

Now you will need to specify the version and bitness of the operating system to be installed. Personally, I recommend the most complete one, that is, select the “Windows 10 Pro” item.

After this, you should accept several license agreements of the following type.

And now comes one of key points. Now you need to select the installation type. Since we want to carry out a clean installation, we accordingly select the second item, which is called “Custom: Windows installation only.”

It is important to understand that in this case all information will be deleted from the system drive C, since in the future we will be fully formatted. But only after this can you be sure that the system has truly become pristine chapter.
After this comes the second key episode. Here you should specify the logical one to which the installation will be performed. Of course, logically this will be the above-mentioned section C, but how to correctly define it in the installation program?

If you look at the screenshot above, it becomes clear that we have a computer hard drive that has never been used before, since it is not even properly marked. Therefore, using the "Delete - Create - Format" buttons we bring it to the desired form. Like this.

Please note that “Disk 0 Partition 4” will be the system drive C in our case, but “Disk 0 Partition 5” will be the logical drive, which is needed for storing music, videos and other nonsense.
Therefore, if your hard drive has already been used before, then there may be several such additional partitions. Therefore, do not even think about formatting them, otherwise you will lose all the data.
Let's once again reinforce this truism: you only need to format the partition on which a clean installation of Windows 10 will be performed. You can, of course, make additional “fixes”, but this is done if you fully understand the process, so that later you won’t be offended by the lost information .

Now let's take a closer look at the items "Disk 0 Partition 1 -2 -3". As you can see in the picture above, they take up from 16 to 450 MB. So, these are service hidden partitions that are automatically created by Windows 10. They are needed to store system files and backup copies. Naturally, we do not take them into account and, in general, do not touch them.
As a result, after all the above manipulations, the process of copying files should start.

I’ll say right away that you will need to be patient here, since you won’t be able to skip this stage quickly.

Once completed, the PC should reboot and the configuration of various services will begin. First you will be asked to select your country of residence, language and keyboard layout. Then all available. If you want, you can do it right away. In general, it’s very cool when the system immediately uses network adapters laptop. In the future, this will greatly facilitate the installation of drivers from the Internet.

If for some reason you want to postpone this operation until later, select the "Skip for now" option. In the next step, the installer will ask you to enter a custom account name and . By the way, you don’t even have to specify the last one, just leave the line empty.

Next, we will offer settings for some functions that Internet users have nicknamed “tracking a person.” What to leave here and what to turn off is up to you to decide.

After this, you will need to wait a little, then the system will reboot again. But this is the last time. And here it is, the much-desired desktop. This means that we succeeded!

Therefore, now we can safely say that a clean installation of Windows 10 from a flash drive via BIOS was successful. What's left to do now? Of course, it is necessary to update all device drivers, because some of them may be missing in the installation program. I strongly recommend it here.
Then all that remains is to install the necessary programs. Which ones and in what quantities will you think about yourself, and I’ll tell you about an interesting way to do this online in. So keep an eye on the blog for updates. And in conclusion, let's watch an interesting video.
Microsoft is currently actively working on its new operating system. This operating system will be called Windows 10. The final version of Windows 10 is expected to appear in the summer of 2015.
The most interesting thing is that Microsoft recently announced that Windows 10 will be free. Or rather, that everyone will be able to upgrade to Windows 10. Not only users of licensed Windows 7 and Windows 8, but also users of pirated versions. How true this statement is will become clear only after the release of Windows 10, but for now we present to your attention a guide on how to install Windows 10 using it as an example.
Create a boot disk to install Windows 10
If you don't have the installation Windows disk 10, then you need to create it. It can be done, . As an example, we will demonstrate how this is done using free program ImgBurn.
After launching the ImgBurn program, you need to click on the “Write image file to disk” button.
After this, a window for burning disk images will open in front of you. Here you need to click on the button with the image of the folder (Browse button) and select the ISO file with Windows 10.

After the file with ISO way selected, you just need to click on the record button, which is located at the bottom of the ImgBurn program window. After which the recording of the operating room will begin Windows systems 10 per disk.
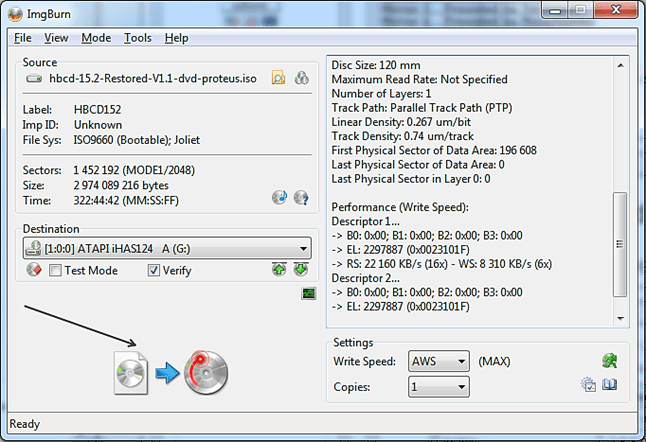
As we can see, write installation disk very simple. All you have to do is click a few buttons and select the ISO file to burn.
Setting up the BIOS to install Windows 10
Next you need to configure the BIOS so that the computer tries to boot first from DVD disc, and not from a flash drive or hard drive. The BIOS setup process can vary significantly depending on what version of BIOS your computer is running. But, in most cases this is done in the following way.
And go to the “BOOT” section.

Open the “Boot Device Priority” section.

After this, you will see a list of three items:
- 1st Boot Device;
- 2nd Boot Device;
- 3rd Boot Device;
To install Windows 10 from a boot disk, we need “CDROM” to be specified in the first paragraph. If this is the case, then simply exit the BIOS and proceed to install Windows 10.
If the “1st Boot Device” item indicates HDD, Floppy or something else, then we need to change this value to CDROM. To do this, select the “1st Boot Device” item using the arrows on the keyboard and press the Enter button.

After this, a window will open in front of you to select a device. Here you need to select CDROM.

After this, the CDROM value should be displayed next to the “1st Boot Device” item.

This completes the preparation of the BIOS for installing Windows 10. We save the changes (most often, this can be done using the F10 button) and exit the BIOS.
Let's start installing Windows 10
After saving BIOS settings insert boot disk with Windows 10 and reboot the computer. After rebooting, the computer should begin to boot from the disk and after a few seconds you will see Windows window Setup. In this window you need to select the interface language you want to use, the time format, and the keyboard language. Then click on the “Next” button.

After this, the “Install now” button will appear on the screen. Click it and start the process of installing Windows 10 on our computer.

After a few seconds, a window with a license will appear on the screen. Check the “I accept” box and click on the “Next” button.

Next, the Windows 10 installer offers you to choose one of two ways to install Windows 10: Upgrade Install () or Custom Install (manual installation from scratch). If you want to update your old version Windows to Windows 10, then you need to select Upgrade Install. If you install Windows 10 from scratch (deleting all data on system disk), then choose the second option – Custom Install.

The next stage of installation is partitioning the disk and selecting a partition. If you are installing Windows 10 on new computer or at virtual machine, then you will see only one unpartitioned disk here (see below). In order to partition this disk, click on the “New” button and specify the size of the disk that you want to create.

If you are installing Windows 10 on a computer that has already been installed, then you need to select the partition on which your previous operating system was installed. Then click on the “Format” button.
In this case, you need to be very careful not to confuse anything. Because formatting the partition will delete all data. If you format the wrong partition and install an operating system on it, then restore deleted files It won't work anymore. Because they will be overwritten Windows files 10.

After selecting the partition and formatting it, click on the “Next” button to continue installing Windows 10.

After this, the installation process of the Windows 10 operating system will begin. At this stage, you just need to wait a little.

Completing the Windows 10 installation
The final stage of installing Windows 10 is setting it up. On the first setup screen you will be presented with two options: “Use express settings” and “Customize”. If you want to manually configure all possible parameters, then select “Customize”; if you want standard settings, then the “Use express settings” option is suitable for you.

We will select “Use express settings” since this option suitable for most users. After clicking on the “Use express settings” button, the operating system requires you to enter data from your Microsoft account. Here we simply enter the email address Microsoft mail and the password for it. Then click “Next”. If you do not have a Microsoft account, then click on the “Create a new accaunt” link and go through a simple registration.

After you've signed in using your Microsoft account, you'll be prompted to protect your account. You can opt out of this by clicking on the “I can’t do this right now” link.


We wait a few more seconds and the Windows 10 installation is complete, a worker appears in front of us Windows table 10.

This completes the Windows 10 installation guide. If you have any questions, ask them in the comments.
BIOS used in all personal computers for user interaction with equipment, has long since outlived its usefulness, and in Windows 10 it was replaced by an updated UEFI interface, expandable through firmware additions.
What is UEFI
The next stage of evolution in the development of BIOS, like the BIOS itself, controls all low-level hardware routines, and also performs the main function of its predecessor - initializing the PC hardware components before turning it on and transferring control data to the bootloader found on the drive.
Benefits of the new BIOS with an improved graphical interface:
- Reduced boot time - thanks to the use of thread parallelization technologies during hardware initialization (in BIOS everything is done in sequential mode), the time for checking the status of hardware components is significantly reduced.
Interestingly, UEFI contains its own drivers for most components, so Windows 10 can use them without forcing the user to download and install the drivers themselves.
- Support Windows boot 10 from media whose volume exceeds 2 TB.
To boot the computer into the BIOS, a partition system called MBR was used - master boot record. Having a strictly limited recording length of 32 bits, its capabilities were enough to address disk space that did not exceed 2 TB on one medium. With the advent of UEFI, developers implemented a new information storage format called GPT. It supports orders of magnitude larger amounts of address space.
- Unlike BIOS, the new graphical system has an improved graphical interface to implement user control of the hardware before sending the bootloader the command to start Windows 10. Also, after booting into UEFI, you can use the mouse as an information input device, which was not available in any BIOS version.
- UEFI has a set of the most popular applications (their list will gradually expand), for example, an Internet browser for navigating websites without using the capabilities of Windows 10.
- Motherboards and laptops that use UEFI support all low-level applications thanks to the presence of compatibility mode.
Launching UEFI
Having considered the main advantages of the new BIOS, it remains to figure out how to go to its menu to boot from a flash drive (if you need reinstalling Windows 10), change any settings in the functioning of the hardware or simply evaluate its graphic capabilities.
You can enter UEFI not only using the classic method of pressing a special key when turning on the computer, as was the case with the BIOS, but also in several other ways.
- We go to “Start”, where we click on the “Settings” icon.
- We go to the tab where the settings are collected that are responsible for updating the “dozens” and its security.
- Click on the icon that says “Recovery”, then click on the “Restart now” button.

- Go to the “Diagnostics” section.

- In the additional menu options, click on the button displayed below.

Next restart Windows 10 will take us straight to the colorful menu of the new BIOS.
If this option seems too complicated, take the opportunity to get into the BIOS using the classic method. The only thing is that to do this you will have to deactivate the “tens” instant download function.
- Go to the control panel applet called “Power Options”.
- Click on the link that will take you to the power button configuration parameters.

- Uncheck the box that marks the “Enable fast startup.” option.

In order to understand how to install Windows 10 from a flash drive, you need to understand one important point: the installation process consists of three stages, namely, creating bootable media, setting up the BIOS and using the drive for its intended purpose.
We will analyze all these three stages step by step and in great detail so that no one has any questions and everyone can easily install Windows 10 on a laptop or PC. Go!
Step #1. Creating a bootable USB flash drive
Not only a removable storage device, that is, a flash drive, but also a regular DVD or even a CD can also be used as such a medium. But this type of information storage has long become a relic of the past and it is much more convenient to take a USB drive.
The easiest way to create a bootable drive is using the official utility from Microsoft, which can be downloaded from the official website. It's called Media Creation Tool, although that's not that important. When you do this, launch it and follow these simple steps:
- After launching, you will have to wait a little while the program prepares for further actions. When it completes, you will see the license agreement. You can read it if you wish, but in any case you need to click on the “Accept” button.

- In the next step, check the box next to “Create installation media for another computer” and click “Next”.

- Next, check the box “USB flash memory device” and click “Next” again.

- If you want to create an image of exactly the same operating system that is already used on your computer, in the next window you do not need to change anything, just click “Next”. If you want to write a different version of the OS to the flash drive, uncheck the “Use recommended settings for this computer” option and change the “Release” and “Architecture” parameters. After that, again, click “Next”.

- Next, all you have to do is check all the previously entered parameters and click on the “Record” button. Wait until the program finishes its work. Usually this process does not take very long.
It is worth saying that this utility freezes very rarely, so if it seems to you that everything has stopped and nothing is happening, it is better not to interrupt the recording process. Instead, just wait a little longer.
Of course, if all this has been going on for several hours, then something is wrong, but this is highly unlikely. In any case, you will receive a fully functional bootable storage device with installation files Windows 10
You can also create it using the very famous and simple UltraISO program. How to do this is described in our article on updating the OS on a laptop.
Now you need to make sure that the computer boots from it. This is done through the BIOS.
Step #2. BIOS setup
Before the installation itself begins, it is important to configure the computer to boot from a flash drive. This procedure will look different depending on the BIOS/UEFI version.
To initially get into the BIOS, you need to press a certain key during boot, most often Delete or F2. Usually on loading screen, in addition to other inscriptions, it is also written which button should be pressed.
How this might look is shown in Figure 5.

- AMI BIOS. In this case, you need to use the “Up”, “Down”, “Right”, “Left” and “Enter” keys to go to the “Boot” tab at the top. Next, go to the “Hard Disk Drives” section and click on “1st Drive”. There, put the flash drive in first place - you can recognize it by its name. Do the same in the “Boot device priority” section, only there the desired item will be called “1st boot device”. Press "Esc" to exit and restart your computer if it doesn't do so automatically.


- AWARD or Phoenix BIOS. Go to the “Advanced BIOS Features” section and find the “First Boot Device” item there. Press “Enter” on it and in the window that appears, select the option “USB-HDD” or “USB-Flash”. Press "Esc" to exit.

- H2O BIOS. Everything here is almost the same as in the AMI BIOS. First you need to go to the “Boot” tab, but then you should click on the “External Device Boot” item and select the “Enabled” option. Then in the “Boot Priority” section you should put “External Device” in first place. This is done using the “F5” and “F6” buttons. Again, exit this menu using the "Esc" button.

If you are already using UEFI rather than BIOS, then everything is much simpler.
In this case, the procedure is to go to the “Boot Sequense” or “BIOS Features” section and then “Boot Options”. After this, you can simply drag the flash drive with your mouse cursor to the first boot location. It also happens that the required menu item is called “Download Queue” or something like that.


Although Windows users 8 and younger with UEFI it is not at all necessary to even go to the system menu. Here it is enough to do the following:
- use the search to find the “Update and Recovery” window;
- go to the “Recovery” tab on the left;
- click on the “Restart now” button;

- then click on the “Use device” button;
- select your flash drive in the list that appears.

As you can see, everything is extremely simple. If something doesn’t work out for you, it’s better to refer to the instructions for your computer or the Microsoft Help page. But we have listed most of the currently available options above.
Step #3. Direct installation
Actually, now you need to use the created bootable drive to install Windows 10. If you did it in the same way as described in step No. 1, then The installation process will look like this:
- After the computer boots, a window will appear in which you need to select the language you will use, the time format and the input method, that is, the keyboard layout. If you previously used the Russian language, all these parameters will be set to Russia by default. All this can be changed by simply clicking on the appropriate item. Once the parameters are specified, click Next.

- On the next screen, simply click the “Install” button. She is the only one there and it is impossible to confuse her with something else.
- An input window will appear next. license key product. If you have it, enter it and click “Next”. If not, click on the words “I don’t have a product key.” You will still be redirected to the next Windows installation screen.
Important! If you created an image of your system, enter the key for it. This is also true for cases when you install the OS on another computer.

- If you entered the key, the operating system version will be detected automatically. And if you clicked on an option where you do not have a product key, you will have to select it yourself. It is advisable, of course, to choose the same version that is already used on the computer, but you can click on another one. Finally, click “Next”.

- Next you will have to agree to the license agreement. If you wish, you can even read it, although very few people around the world do this. In any case, check the box next to “I accept the license terms” at the bottom and click “Next”.

- If you just want to update already existing system and save all files and settings, in the next window click on the first option, that is, “Update: install Windows while saving...”. But if you want to remove everything and install a completely clean OS on your computer without files and settings (which, by the way, may have caused any breakdowns on the computer), choose the second option - “Custom: Windows installation only...”. If you wish, by the way, you can read in more detail about these options. To do this, click on the inscription “Help in making a decision” a little lower.

- One of the operations that is performed during a custom installation is partitioning the hard drive. You can read how this procedure works and what its principles are in our article on disk partitioning (method No. 3). Perform all operations required for custom installation and click “Next”.
- Then you can simply watch the installation progress step by step. Usually copied first necessary files, then they are prepared for installation, and finally components and updates are installed. Here you just have to wait.

- Actually, this completes the installation. But you will still need to perform the initial system setup. As part of this stage, you will again select your location, keyboard layout, create an account with Microsoft, or simply log in if you already have one. Also, if desired, you can set an entry code, connect cloud storage and configure privacy.
Advice: After installation, check all drivers. The easiest way to do this is to use the DriverPack Solution program. It allows you not only to check, but also to update drivers if necessary.
This completes the entire installation process and you can freely use Windows 10.