Pin upcoming appointments and meetings to a prominent place by opening the calendar overview to the right of the Mail view.
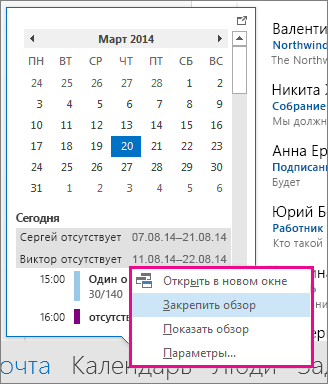
For more information, see Place your calendar, appointments, and meetings in visible places.
Select Monday as the first day of the week and display holidays in Month view
Use the Month view to quickly view all your tasks. Typically the calendar is set so that the week starts on Monday. In addition, you can add holidays to it.
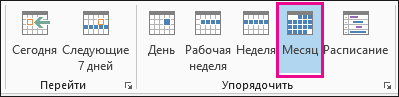
See more information about adding holidays to your calendar.
Setting up a non-standard work week
If you work on a non-standard schedule, you can customize the view Work week so that it displays specific days and hours. For example, if you're a nurse, you might only want to view your 12-hour shifts from Sunday to Tuesday.
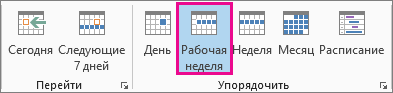
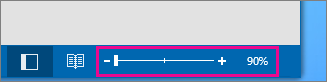
Advice: To view all your working hours in a view Work week, zoom out the calendar using the button Scale in the lower right corner.
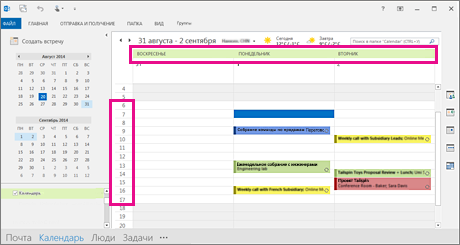
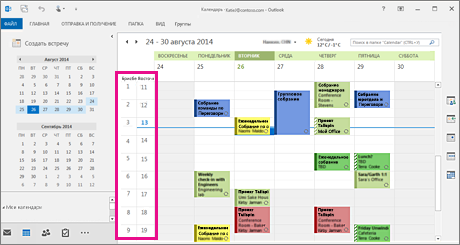
View two time zones in Week view
When working with partners in different time zones, it is useful to see all time zones in the view A week. For example, if you work in Moscow and want to schedule a meeting with a colleague from Australia (Brisbane time zone), it is advisable to review his schedule to avoid scheduling the meeting outside of work hours.
Looking for something different?
If you frequently filter calendar items or change fields, create a custom view to necessary information was always at hand.
Open the tab View.
In Group Current view click the button Change view and click Managing Views.
Click the button Create.
In field New view name enter a name for the view.
Disclaimer regarding machine translation. This article has been translated using computer system without human intervention. Microsoft offers these machine translations to help users who don't know in English, read materials about Microsoft products, services and technologies. Since the article was translated using machine translation, it may contain lexical, syntax and grammatical errors.
Please use the English version of this article, found at , as a reference. You and other Microsoft community members can improve this article by using the Community Translation Framework (CTF). Simply hover your mouse over a sentence in an article and select IMPROVE TRANSLATION from the CTF widget. For more information about CTF, click . By using CTF, you agree to our
MS Outlook is equipped with a powerful and convenient tool for organizing work time - a calendar. Let's look at the most interesting aspects of this application.
To manage your personal time in Outlook, use the Calendar section. In the calendar, users can save various events, also called appointments in Outlook terms. The standard toolbar contains buttons that can be used to control the calendar display mode. Possible viewing options are day, week, month.
To add a calendar element, simply double-click on the line corresponding to the time of the future event. In the window that appears, you must specify the topic, its start and end time. By checking the "Notification" switch, you can specify the appearance of a pop-up window after specified time before the event occurs.
Each event can belong to a category. In order to assign a category to an event, use the "Categories" button in the event creation window. A window for selecting a category will appear. Here you can mark the switches next to the names of the categories to which the event will be assigned.

The standard list of categories can be supplemented with your own. The "Main list of categories" button is intended for this purpose. In the window that opens, in the “New category” line, you can enter its name and after clicking the “Add” button, it will appear in the list of categories.
To set up a periodically recurring event, you can use the "Recurrence" button. In the "Repeat Appointment" window, you can change the previously set appointment time. And also in the “Repeat” section you can configure the repetition period. The event in Outlook will repeat daily at the specified time (you can set it to repeat every day or every business day), as well as weekly, monthly or yearly. In addition, it is possible to set repetition limits - for example, an event can be repeated a certain number of times, or executed until a certain date.

The "Planning" tab contains additional parameters for scheduling work time. Please note that busy hours on this tab are highlighted in blue. For example, here you can set up automatic selection of free time during the working day. The "Auto select" button is intended for this purpose. As a result, after clicking it, the system itself will determine the “window” in the work schedule and will schedule a new event at exactly this time.

The "Auto-select" tool will allow the system to determine free time itself.
MS Outlook allows you to schedule meetings. This element is similar to a regular event, but it generates emails, which talk about a future event.
To create a meeting, you must click the "Invite Participants" button when creating a new calendar item. The event window will appear at the top of the event window. new line, and next to it is the “To” button, clicking on which will open the “Select meeting participants” window. In this window, you first need to select the address source; you can use the “Contacts” section or the MS Outlook address book for this purpose. Next, you need to select the participant’s name and click the “Required” or “Optional” button. The name will appear in the appropriate line.

Using the "Advanced" button, you can search for an address or create new element contact list. After entering the addresses, you must click the "Send" button and the letter will be sent to all specified addresses. After successful sending, it can be found in the "Sent Items" folder of the "Mail" section Microsoft Outlook In addition, another entry will appear in the calendar - a meeting notification. The remaining parameters for creating a meeting are the same as when creating a regular event.
Another element of the MS Outlook calendar is an all-day event. You can create it using the “Actions” menu item of the same name.
Now almost every user has a Google account, since it gives a large number of benefits on the Internet, especially for users Chrome browser. The vast majority of computers have the Windows operating system installed and the majority of users use the built-in Windows utility for working with contacts, mail and reminders - Microsoft Outlook. A logical question arises: how can these two services be “friended” with each other? It is very convenient when it becomes possible to create events and activities in the calendars of other services via Outlook. In this article, we'll take a closer look at how to synchronize Outlook with other calendars. Let's figure it out. Go!
Outlook has a very convenient calendar. But sometimes you may need to synchronize it with others
First, it should be noted that synchronization will be one-way, that is, events from Outlook will not be synchronized with Google calendar.
Now you know how to synchronize Microsoft Outlook with Google Calendar and VKontakte. This is done very simply and quickly, and at the same time you significantly simplify your life. Write in the comments whether this article helped you and ask any questions you have about the topic discussed.
For users Microsoft Office Outlook who use multifunctional Outlook not just as an email editor, but also as an excellent planner of their tasks, projects, personal and work time, sometimes the question arises - how to organize calendars between Outlook and Google Calendar?
This can be done using online calendars.
Internet calendars- these are calendars that can be shared via the Internet. The format used for online calendars is iCalendar and file extension .ics.
Microsoft Office Outlook 2007 supports two types Internet calendars:
- Calendar snapshots - this is an online calendar that is sent in a message Email. It is not linked to the original calendar and is not automatically updated.
- Subscriptions to online calendars - These are online calendars created in Outlook or another email application, downloaded from a calendar publishing service or from a special website where you can post and subscribe to calendars. Unlike a snapshot calendar, online calendar subscriptions are periodically synchronized with a calendar stored on a web server. All online calendar updates are automatically downloaded to Outlook.
Using Microsoft Office Outlook 2007, you can import and export calendars from Google Calendar to as calendar snapshots in iCalendar format.
Import a calendar from Google Calendar to Outlook
- Login to Google Calendar under your login.
- In the left column in calendar group Click the arrow button next to the calendar you want to import into Outlook.
- Select a team Calendar settings.
- In point Calendar address click the button ICAL.
- In the dialog box Calendar address Click the calendar web address that appears.
- Click the button OK in the prompt window that appears to import your calendar into Outlook.

- The calendar will be opened in the Outlook calendar and added to the group Shared calendars.

note that the imported calendar will be static. It will not update despite changes made to it in Google Calendar. To sync your Outlook calendar with Google Calendar, you need to repeat the import procedure.
Export a calendar from Outlook to Google Calendar
- Open Outlook and go to the " Calendar«
- Select the calendar you want to export to Google Calendar
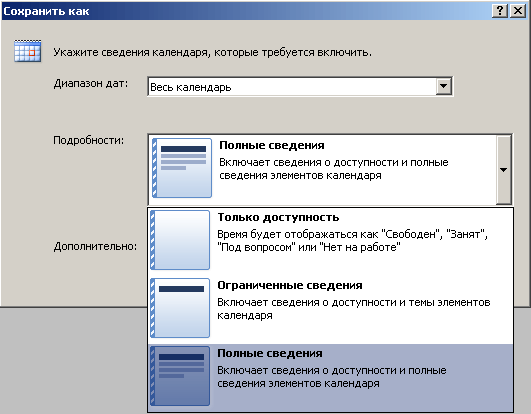
- On the menu File select team Save as

- Enter a name for the iCal file in the text box File name.
- A summary showing the calendar name, date range, and level of detail appears next to the button Additionally
Microsoft Outlook is a series of applications combined into one integrated information system. Each of these applications works with a specific type of document, in which, in fact, the relevant information is stored. In Outlook terminology, documents are called elements, and applications that work with elements - forms.
Elements can have the most arbitrary form (note, message, contact). A single format is used to store elements, but elements of each type have a specific set of fields (properties) in which information about the element is stored.
Menu(Menu) is a list of modes, commands or response options displayed on the display screen that are offered to the user for selection.
If there is a right arrow next to a menu command, it means it has an additional menu; if there is an ellipsis, then the command will open a dialog box.
Toolbar(Toolbar) is usually located below the menu bar and contains buttons that provide quick access to the most commonly used commands. To call a command, you need to move the mouse pointer to the button (the button will be highlighted in blue) and click on it with the left mouse button. If the button is grayed out, the command is not available at the moment.
![]() Outlook toolbars
Outlook toolbars
In addition to ordinary toolbar buttons, there are also some special ones.
Checkbox button. Shows what state the current object is in. If the button is framed, it means it is active; if not, it is passive.
List button. This button has a down arrow on the right. Clicking this arrow will expand a list with additional commands or properties.
Outlook stores items in folders, and one folder can only store one type of item.
Folder in Outlook, it is a logical store of information that is not directly related to the physical way of storing information on disk.
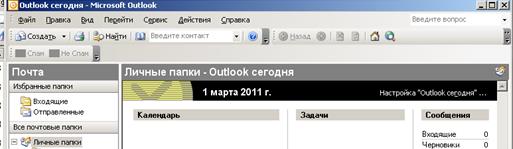
When you first start Outlook, the user has direct access to several types of information items. Outlook stores these items in subfolders that are contained in the folder Personal folders(Personal Folders).
| Folder name | Description of elements |
| Outlook Today | Contains general information about the status of all Outlook items |
| Inbox | Incoming emails and faxes |
| Calendar | Meetings, events and meetings. Personal schedule planning, calendar |
| Contacts | Information about personal and business contacts. The address book |
| Tasks | Planning, maintaining and recording tasks |
| Notes | Creating various notes |
| Delete Items | All deleted items |
| Drafts | Draft messages. Messages not ready to send |
| Outbox (Outlook) | Messages and faxes that are ready to be sent but have not yet been sent |
| Sent Items | Copies of sent emails |
| Diary (Journal) | Records of personal activities. Automatically track user activity with Outlook items and Office documents |
| My Documents | Provides quick access to the contents of the My Documents folder |
| Favorites | Provides quick access to the Favorites folder, which stores your favorite folders and Internet pages |
| My Computer | Displays the computer's file structure. Conductor |
Exercise 1.
Run Outlook.
1. In the area Personal folders click on the icon Calendar.
2. By default, the calendar is shown in the view Day. The current day is darkened in the area Calendar.

3. In the area Calendar Click on the arrows to go to January 2012. After that, select 8. The calendar will display the schedule for January 8, 2012.
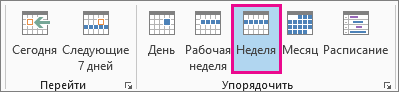
On the toolbar, click the button Work week. The calendar will display the schedule for the currently defined work week.
![]()
4. On the toolbar, click the button Month. The calendar will display the schedule for the current month.
5. Explore the views that are in the menu View - Sort by - Current view.
Task 2.
In this exercise, you will schedule an appointment, a recurring appointment, and an event that spans multiple days.
1. In the area Personal folders click on the icon Calendar.
2. Click the button on the toolbar Day.
3. Double-click the 13:00 time cell. will appear new form Meeting.
4. In the field Subject enter SBS New Product Presentation.
5. Press the key Tab and in the field Place enter Conference room 1.
6. Click the list button to the right of the second End field (the field that displays the time rather than the date) and select 2:00 pm from the drop-down list to set the meeting duration to one hour.
7. Check the option Alert to enable Outlook to remind you about this meeting. Click the list button to the right of the Alert field and select 30 minutes from the drop-down list to allocate time to prepare for the presentation.

On the window toolbar Meeting click the button Save and close.
8. In the area Calendar Click the right arrow to display the next month.
9. Click on the third Wednesday of the month.
10. Double-click the 10:00 time slot. A new meeting form will appear.
11. In the Subject field, enter SBS Status Report.
12. Press the Tab key and in the field Place enter Chief's office.
13. Press the button Repetition. The Meeting Recurrence dialog box appears.
14. In the area Repeat select option Monthly, then select the option Repeat on Wednesday of every 1 month.

15. Click OK. Recurrence options will be added to the form Meeting.
17. In the area Calendar Click on the right arrow. Region Calendar will display next month, and the third Wednesday of the month will be highlighted in bold to indicate that an appointment is scheduled for that day.
18. On the menu Go select Go to date.
19. In the field date enter 8/8/11, then press OK. The schedule for August 8, 2011 will be displayed.
20. Click right click mouse on the time cell 9:00 and in the menu that appears, select Create an event for the whole day. A new form will appear Event.
21. In the field Subject enter SBS on vacation.
22. Click the list button to the right of the End field and select August 14th from the drop-down calendar.
23. If option Alert enabled, disable it.
24. Click on the list button to the right of the field At that time and select from the drop-down list Not at work.
25. In the lower right corner of the form Event check the option Private.
26. Press the button Save and close. If Outlook warns you that the alert will not be displayed, click Yes. A new event has been added to the calendar. The key icon indicates that it is private.
27. On the toolbar, click the button Go to Today. The schedule for the current day will be displayed.
Task 3. Planning and organizing meetings
1. Click on the next day's date in the area Calendar. The next day's schedule will be displayed.
2. Drag your mouse across the time cells 9:30 And 10:00 to highlight them.
3. Enter and press the key Enter. The meeting will be added to the calendar.
4. With an appointment highlighted, press Enter again.
5. Click on the field Place and enter text Conference room 1.

6. Make sure the option is checked Alert, and select from the list Alert paragraph 1 hour.
7. Click on the comments area below the list Alert and enter a sample meeting agenda.
8. At the bottom of the meeting form, click the button Categories. A dialog box will appear.
9. Click on the field The item belongs to the following categories, enter Finance and press the button Add. The Finance category will be added to the list and highlighted.

10. On the list Available categories check the option Affairs and press OK. The selected categories will be added to the field Categories in the form of a meeting.
12. If Outlook displays a warning that the alert is not set, click Yes. The calendar will display the updated appointment.
13. Click on the time cell 12:00 and enter SBS Breakfast with Susan.
14.  Hover your mouse over the bottom border of the meeting, and when the pointer changes to a vertical two-way arrow, drag the bottom border to 13:00
and press Enter. The calendar will display the updated appointment. In area Calendar the selected date is displayed in bold, i.e. There are appointments scheduled for her.
Hover your mouse over the bottom border of the meeting, and when the pointer changes to a vertical two-way arrow, drag the bottom border to 13:00
and press Enter. The calendar will display the updated appointment. In area Calendar the selected date is displayed in bold, i.e. There are appointments scheduled for her.
15. On the toolbar, click the button Today. The schedule for the current day will be displayed. In area Calendar the next day's date is shown in bold, i.e. Meetings are scheduled for that day.
16. Drag an appointment to a temporary cell 11:30 . Meeting " SBS Breakfast with Susan» will be moved to 11:30 .
17. Hover your mouse over the left border of the meeting " SBS Finance Meeting" The pointer will change to a four-headed arrow.
18. Using the right mouse button, drag an appointment for the same day of the next week into the area Calendar. A pop-up menu will appear.
19. From the menu that appears, select Copy. The schedule for the same day of the next week will be displayed with new meeting « SBS Finance Meeting».
20.  Click in the area Calendar on the next day's date. Tomorrow's schedule will be displayed with the initial appointment " SBS Finance Meeting».
Task 4. Working with multiple calendars
1. Display your calendar.
2. Click on the list button to the right of the button Create and select from the drop-down list Folder. A dialog box will appear new folder.
3. In the field Name enter calendar test.
4. In the drop-down list Folder Contents select Elements of the Calendar type.
5. In the field Place folder in click on the folder Calendar.
6. Click OK. In the data file Calendar the new calendar will be displayed.
7. In the area Navigation area click on the icon Calendar.
8. Listed My calendars check the option Calendar And Calendar test. Outlook displays your main and school calendars next to each other.

9. In the area Calendar Click on the date in bold to display the day with the scheduled meeting or event.
10. Drag an event from one calendar to another to move it. Right-click on the event and drag it, then select from the menu that appears Copy.
Task 5.
Open your own calendar Calendar test.
1. On the toolbar, click the button Work week. The calendar will display the current work week.
2. Scroll the calendar page to view the start and end of your workday. Please note that business hours are shaded relative to the rest of the day.

3. In the menu Service select Options.
4. In the area Calendar on the tab Settings click the button Calendar options.
5. In the area Work week calendar check the options Bc And Sat and disable options W, Cp And Thu. The work week now runs from Friday to Monday.
6. Click on the list button to the right of the field Start time and select 15:00 . Then click on the list button to the right of the field End time and select 23:00 .
7. Click OK and in the dialog box Options click OK again.
The calendar will display the new default work week.
Task 6. Working with multiple time zones
To change the current time zone:
1. In the menu Service select Options.
2. On the tab Settings click the button Calendar options.
3. In the dialog box Calendar options click the button Timezone.
4. In the dialog box Timezone click the list button to the right of the field Timezone, select the desired time zone and press OK three times to close all dialog boxes.
Task 7. Designating meetings using color
To make important appointments stand out from other appointments on your calendar, you can color-code appointments and events by choosing from ten available labels, such as Important, Official, Personal, Vacation, Travel required And Phone call, or by adjusting parameters to meet your requirements.
1. On your calendar, go to the date June 24, 2012. Set up some kind of meeting.
2. Double-click on the meeting. A form will appear Meeting. In field Label select option Personal.
4. Set up another appointment.
5. Double-click on the meeting. A form will appear Meeting. In field Label select Mandatory visit.
If Outlook warns you that the alert is not set, click Yes. The updated appointment will be saved in your calendar and the color will change to orange to indicate that the appointment is very important.
7. On the toolbar, click the button Calendar colors and select Change labels.
8. Review the preset options, and then click Cancel to close the dialog box without making any changes.