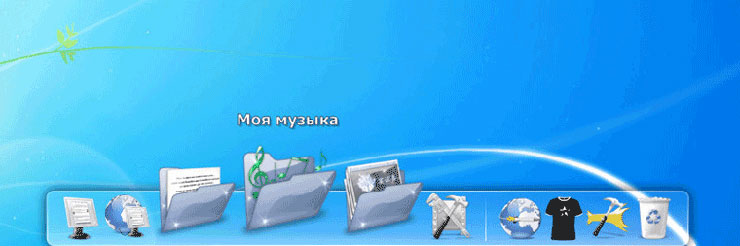
The RocketDock is a replacement for the taskbar in Windows, which is designed to quick start programs. The appearance of the RocketDock is similar to the Dock found on Mac computers.
This panel is used to quickly launch desired programs, or to quickly open frequently used folders. For some users, this quick launch implementation will be more convenient.
The free RocketDock program installs a kind of Dock for Windows on a computer with a Windows operating system. The RocketDock panel works in much the same way as it was implemented on Apple computers that are running operating system MacOS X.
In this image, you can see what the Dock looks like in Mac OS X Mountain Lion.
After installing the RocketDock program on your computer, a similar panel will appear on your computer. When you move the mouse cursor over any application that is located on the RocketDock panel, animation will be used, approximately the same as on Apple computers. When animated, app icons will increase in size.
The RocketDock program can be downloaded from the official website of the program. The RocketDock program supports plugins that increase the functionality of the panel. You can download plugins from the official page of the program by opening the “Get Addons!” tab.
download rocketdock
Install RocketDock on your computer. The application will be installed in Russian.
After the installation of the program is complete, you can launch the RocketDock program on your computer.
Change the position of the panel on the screen
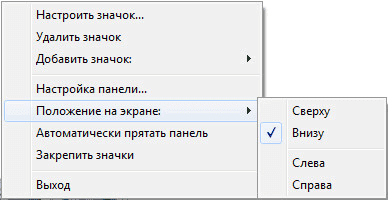
By default, after launch, the RocketDock panel will be located at the top of the Desktop. To change the position of the panel on the monitor screen, you will need to click in the panel area right click mice. AT context menu you will need to select the “Position on the screen:” item, and then select the desired location from the submenu: “Top”, “Bottom”, “Left” or “Right”.
You can swap Panel Windows tasks and the RocketDock panel, so that they do not interfere with each other.
Moving the Windows taskbar
To transfer the Taskbar, you will first need to right-click on the free space in the Taskbar, and then click on the "Properties" item in the context menu.
In the "Taskbar and Start Menu Properties" window, in the "Taskbar" tab, in the "Position of the taskbar on the screen" settings item, you will need to select a location for the new location of the taskbar.
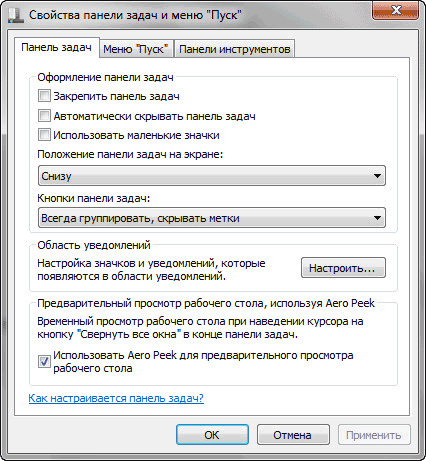
You can generally hide the Windows Taskbar from your computer's desktop. To do this, in the "Taskbar" tab, activate the "Auto-hide the taskbar" item, and then click on the "OK" button.
The taskbar will be reopened when you move your mouse cursor to the bottom edge of the screen (or to another part of the screen if you moved the panel to a different location) in the place where the taskbar was previously displayed.
To unhide the Taskbar, you will need to uncheck the box next to the "Automatically Hide the Taskbar" item.
RocketDock Settings
After opening the "RocketDock Panel Settings" window, in the "General" tab, you can do necessary settings of a general nature. If necessary, if you are not satisfied with the program settings you have made, you can return the default panel settings after clicking on the "Default" button.
In the general settings, you can select the desired language. If necessary, you can choose to launch the program at the start of the operating system, mark already running applications in the panel, activate running application instead of a new launch, pin icons, etc.
After making the settings, do not forget to click on the "OK" button. You can return the program settings to default by clicking on the "Default" button.
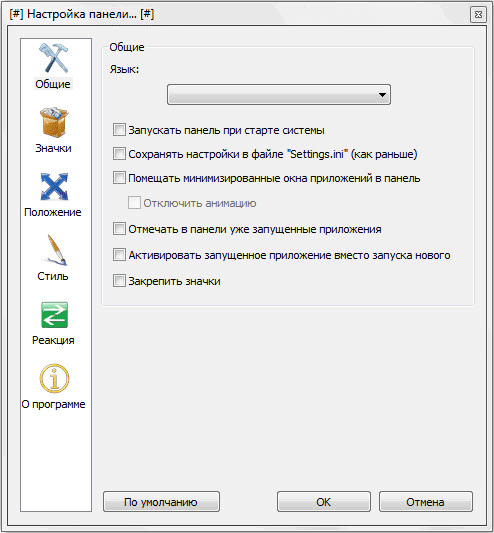
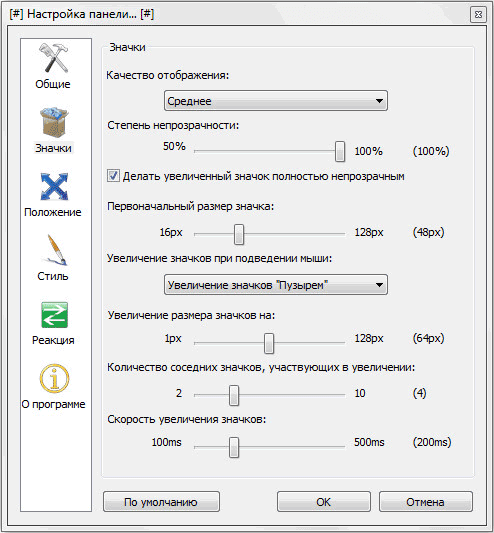
In the "Icons" tab, you will be able to select options for displaying application icons that will be placed on the RocketDock. Here you can change the display quality, the icon enlargement method, change the size of the icons, and also change the number of neighboring icons involved in the increase.
You can immediately observe all the changes made on the panel, customizing it to your needs.
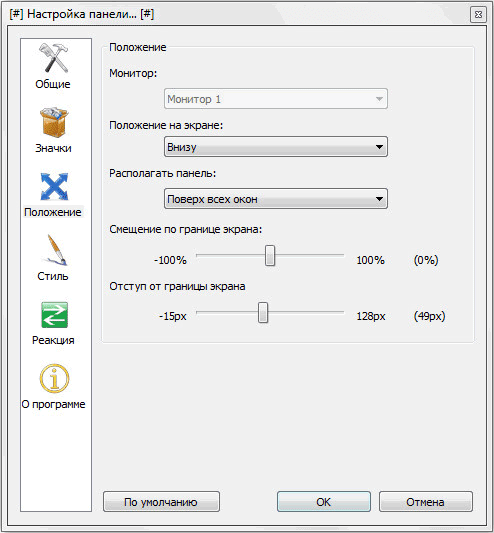
The position of the panel on the desktop of the computer can be adjusted from the "Position" tab. You can also adjust the indent from the screen border, or move the panel in any direction.
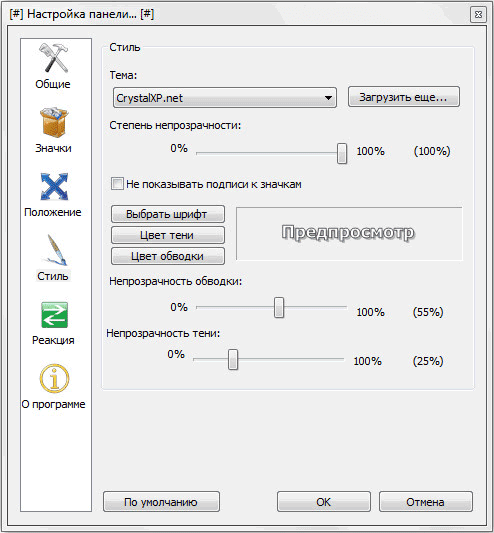
In the "Style" tab, you can select a theme for displaying the panel, select a font for icon labels, and adjust the level of transparency. You can also disable icon labels here.
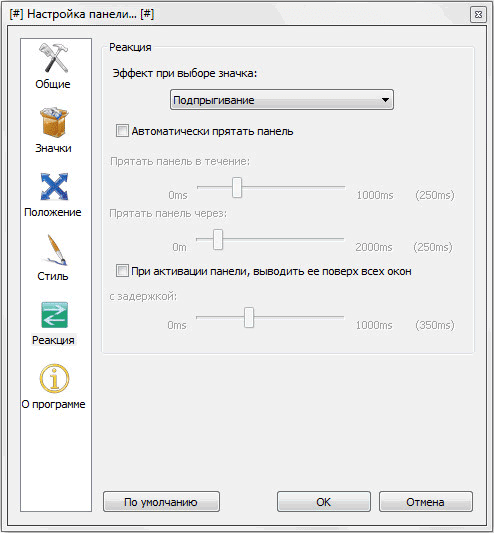
From the "Reaction" tab, it will be possible to adjust the effect and level of reaction to user actions. Here it will be possible to activate the item "Automatically hide the panel" so that the panel is displayed only when necessary.
After the mouse cursor is moved to the place where the panel is located, the RocketDock panel will again be displayed on the desktop of your computer.
After click right mouse on the panel, from the context menu, you can manage the program settings. In particular, it will be possible to pin icons to the RocketDock.
After completing all the settings, the RocketDock panel will look the way you need it.
How to add an icon to the RocketDock
In most cases, adding an icon to the RocketDock will suffice with drag and drop. In the context menu, the checkbox opposite the "Lock icons" item should be unchecked.
In the event that icons are not added to the panel using a simple drag and drop method, then to add an icon to the RocketDock panel, select the "Add icon:" item in the context menu. Next, in the submenu, select "File" or "Folder Path", and then in Explorer, find the application that you need to add to the panel.
After that, the program icon will be added to the RocketDock panel. Now you can quickly launch the desired program from the added icon.
After adding program shortcuts from the Desktop to the Quick Launch bar, these shortcuts can be removed so that they do not appear on the Desktop. It will be possible to hide such elements of the Desktop as "Recycle Bin" and "Computer" through the "Control Panel", from the "Personalization" section.
How to remove an icon from RocketDock
To remove an icon from the RocketDock panel, simply drag the icon out of the panel with the mouse.
Otherwise, the icon can be deleted using the context menu by selecting the "Delete icon" item in the context menu.
How to change icon in RocketDock
If you want to change standard icon program to another icon, for example, loaded into the program, then you will need to do the following.
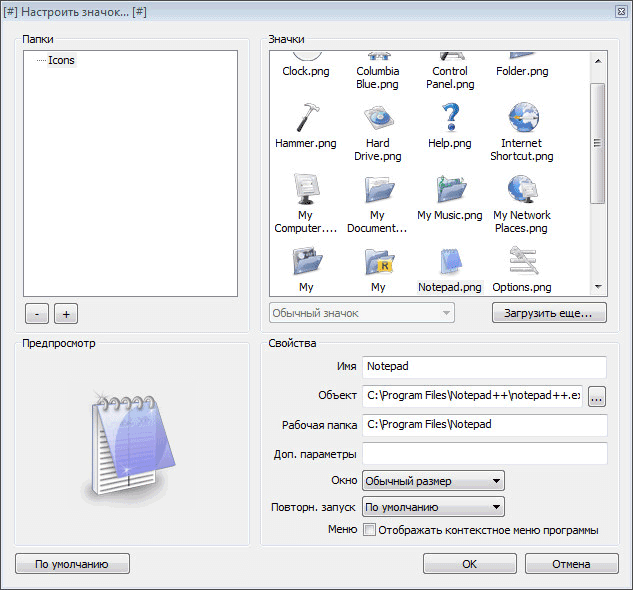
First, right-click on the panel on the icon that you want to change, and then select the "Customize icon ..." item in the context menu.
The "Customize Icon..." window will open, in which you will need to select a new icon to launch the program. Then look at the "Properties" settings of this icon.
Everything should already be set up here. In the field "Name" the name of this program is entered, in the field "Object" a link to the application is added, and in the field " Work folder» added a link to the corresponding program folder. Next, click on the "OK" button.
Everything, now after clicking on this new icon, exactly the program that you associated with this icon will be launched.
In this example, I chose one of the icons offered by the program, and then associated the Notepad++ program with this icon.
You can download icons from the Internet that were specially created for RocketDock or other similar programs (the icons match each other).
Conclusion
The freeware RocketDock creates a quick launch bar for Windows that resembles the Dock found on Mac computers.
The Windows 7 operating system allows you to customize the design and other subtleties for each user personally.
The main page, which most often catches the eye and performs the function of quick access to applications and files - the desktop, is also subject to detailed editing, and its main components - shortcuts - can be changed: reduced or enlarged, assigned other properties and an icon.
What is a "Label" what function does it perform
A shortcut is a direct link to the executable module of a program. That is, in the folder in which you installed something, there is a special application, by running which you can open the program itself. In order not to look for this application in numerous folders every time, create its shortcut to the desktop or to another convenient place.
For even faster access to applications, there is a taskbar that does not disappear when you open windows or programs, and all shortcuts on it are launched with one click.
 The taskbar contains the most important shortcuts
 To see which application the desktop shortcut belongs to, right-click on it, and then select the "File Location" section.
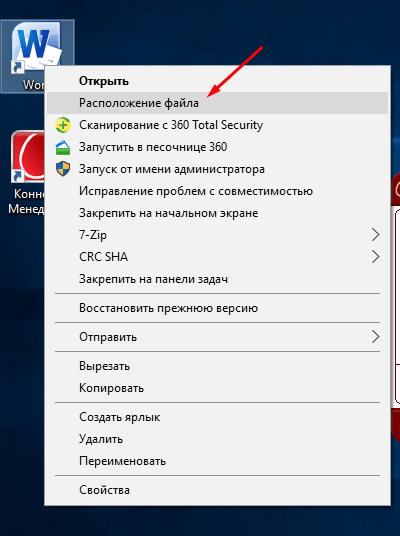 Click on the "File Location" button
 To find out the same information about a shortcut on the taskbar, right-click on it, then right-click on its name or icon and click on the "Properties" option.
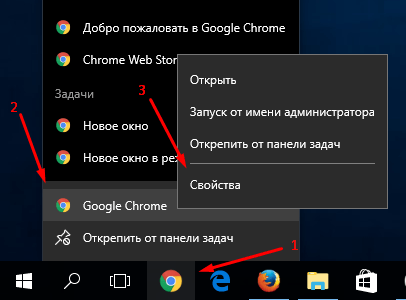 Go to the properties of the shortcut located on the taskbar
 In the window that appears, the path to the source application will be indicated in the "Object" section:
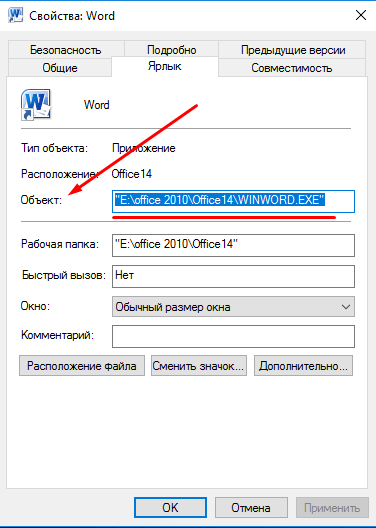 The file location is under "Object"
 Reduce or enlarge - adjust the scale
If there is no more space on the screen, and there is no way to remove extra shortcuts, then you can reduce their size. If for some reason you are not comfortable using the standard size labels, then you can increase each of them. But remember that after changing their sizes, the order may go astray, as the grid format will change, and you will have to arrange the labels again.
Through editing desktop properties
To change the size of shortcuts through the built-in desktop settings, do the following:
Using the mouse wheel
There is another way to edit label sizes that gives you many more than three scale options:
Video: big and small - how to change the size of icons on the Windows 7 desktop
How to remove arrow icons
To remove the arrow from the shortcut icon, do the following:
There is a second way to achieve the goal:
Video: how to remove shortcuts from the desktop
Removing the shield icon
The shield icon indicates that the application only works if you have administrator rights. To disable User Account Control, and with it the shield icon, follow these steps:
How to change properties and appearance
If for some reason you feel uncomfortable appearance shortcuts of the programs you installed, then use this instruction:
To change labels system programs, such as Recycle Bin or My Computer, do the following:
Video: change the icon
How to remove one label or hide all at once
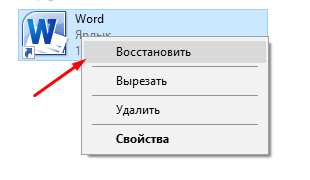 Restoring the shortcut
 What to do if shortcuts are removed by themselves
The reason for such incidents may be an error in the application to which the shortcut led. After each reboot, Windows checks all the shortcuts on the desktop, and if any of them leads to an application with an error, it automatically removes it. But if this function does not work correctly or interferes with you, then there are two ways out:
Reduce the number of shortcuts on the desktop to four, as a result of which the system's self-cleaning will stop working. You can do this by grouping all the shortcuts into folders, or by deleting the extra ones.
The second way is to disable the self-cleaning feature by following these steps:
To make it pleasant and convenient to work at the computer, try not to clog the desktop once again with shortcuts and files. If possible, group them into folders, this will help you not to worry about the amount of free space on the screen for as long as possible. If this is not possible, then reduce the scale of each label. But remember that the system can independently decide to remove the shortcut from the desktop if it is sure that it does not lead to a running program.
contemplativeRocketDock 1.3.5 is an animation panel with MacOS style shortcuts. Provides quick access to program shortcuts and built-in Windows features. The program will be a wonderful decoration for your computer desktop.
The desktop and the way you navigate the Windows operating system hasn't changed since the 2000s. Yes, bugs have been fixed, various minor updates have been added, but in general, it has remained the same. And because of this, many users criticize Microsoft and Windows. Apple products, on the contrary, received updates that stood out with a very stylish design.
Surely you have seen a floating panel with shortcuts on the desktop of the operating system from Apple. Thanks to the RocketDock program, this can also be done on Windows.
Features of the RocketDock App
After installation, the program is added to startup to start with the operating system. Thanks to RocketDock you can free your desktop from the same type and ugly shortcuts.
This program will please you with its smoothness and stylish design. In addition, the design can be changed to your taste or matched to the theme of the operating system. AT RocketDock preset a large number of standard themes that will satisfy even the most demanding users.
The ability to add shortcuts to the panel is well developed. It happens very easily and quickly with the help of the function Drag and Drop. This means that you only need to drag the shortcut and drop it to a specific location on the panel. Yes, labels here can be sorted randomly as you like.
Each running application is highlighted with an additional symbol at the top or bottom of the panel, depending on its position. The position of the panel can be changed. There are several default positions - these are bottom, top, left and right. But these positions can be adjusted manually. And you can automatically hide the panel. In this case, it will be displayed only when moving the mouse cursor over it.
Also in Windows versions above XP, there is an option to preview minimized windows.
There are several other similar RocketDock programs, but it is it that is perfectly optimized and consumes the minimum amount of resources of your computer. You can add this beauty without loading the system, even on the oldest PCs.
Specifications:
Version: RocketDock 1.3.5
Russian language
Status: Free
Author: PunkLabs
System: Windows All
Size: 6.2 Mb