We continue to introduce you, dear users, to Word capabilities. In its updated version of 2013 appeared additional functions, thanks to which you can create, for example, a beautiful brochure. A brochure is an effective way to talk about your activities or even about you, about what interests you. The brochure will be useful for public speaking as promotional material or for an unusual greeting. The main thing is imagination and creativity!
Let's follow the proven path...
There are several ways to create a brochure in Word 2013, but we are starting, so to speak, with the “standard” one. Every Word document has a ruler on the left side and top. Here we click on it with the left mouse button. This opens the “Page Options” functional window. We will need, first of all, the “Fields” tab. Here we are interested in the “page” workspace. Select “brochure” in the drop-down tab. The document orientation automatically changes to landscape. It is also possible to set the number of pages in the brochure. Select "all". In addition, you can select the margin and paper sizes if you are not satisfied with the automatic setting. Click “OK” and now you have a blank brochure in front of you to create on.
Since you can experiment with brochure options a lot and for a long time, which you can see in practice, we will look at the process of creating a brochure, presented as an example at the end of this article.
For the first page of the brochure I used title page, originally provided by Word 2013. Go to the Insert tab (top toolbar) => Cover Page. A tab with title options appears (in our example, Whisp is selected). Additional cover page designs can be downloaded from Office.com. To change the color of the page, use the Design tab Page Color. Select the desired color from the drop-down palette and see what happens.

We write the required text in the active fields of the page, experimenting with its position and fonts. you already know.
Now it's time to get creative on the other pages of the brochure. In our case, interesting text fields (Insert tab) were used as the area where the text would be located. If you click on the active “Text field” window, the options built into the document will open. We choose the Whisp sidebar, which has the same design as the cover page. Clicking on the inner area of the panel allows you to work in it - change the background color, fonts, margins, text location, add text, and so on. Let's try!
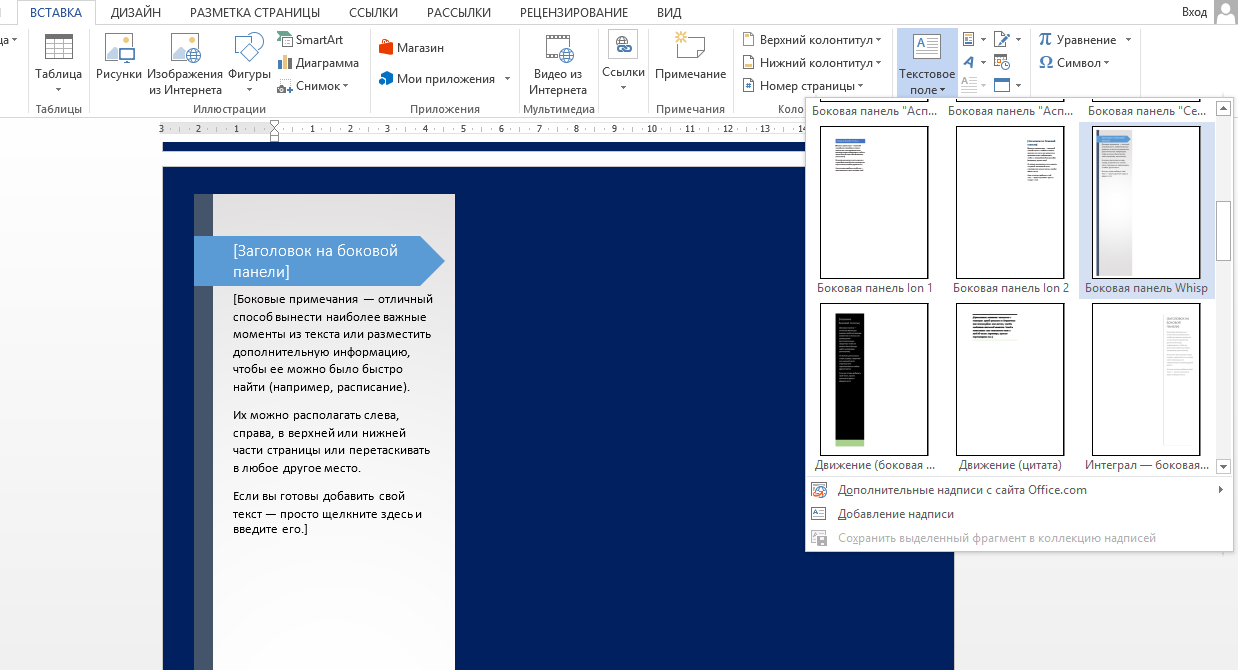
To decorate the page, add a photo: Insert Drawings. We select the desired picture from our device and, as soon as we click on it in the brochure after adding it, the Format tab appears, which allows you to work with the picture - experiment with its position, effects, borders, styles, select frames and much more. We decorate the following pages in the same way, filling them with the information you need.
Built-in booklets in Word 2013
Updated text editor invites us to also use the booklet templates already added to the document. We look and select them from the File tab - “Create Booklet”. There are not many options offered, but it is possible to choose the most suitable one and change it to suit your needs. After selecting the desired booklet, it will open and save as a separate document.
![]()
In conclusion, we note that no matter what problems you have to solve using Word, the brochure will undoubtedly become a creative alternative to a regular document, so be imaginative and create boldly, the process will captivate you completely!
Greetings, friends! Today I want to tell you about how to make a booklet on a computer, what it actually is (if you don’t know or have forgotten), and also give you a short list of programs in which you can create cool layouts. Moreover, create both independently and according to the proposed templates.
To create a really cool and bright booklet, you need professional programs and design skills, but a simple booklet can be made in ordinary utilities like Word or similar. To do this, you do not need any special skills or knowledge; the entire creation process is very simple. If Word is installed on your computer, then most likely Microsoft Publisher is also installed there. After all, it was precisely what was developed to create such publications.
Creating a booklet in Microsoft Publisher
Be that as it may, whatever software were not developed, the simplest, most popular and sought-after program for creating bouquets was and will remain a utility called Microsoft Publisher. The interface here is very similar to MS Word, which is familiar to us all, so you should not have any difficulties in mastering it. However, I have prepared step by step instructions, which will help you make a cool booklet quickly and easily.
Let me tell you right away that I have MS Office 2010 installed on my computer. If you have a different version, don’t worry. All buttons and controls are the same, the only difference is in the graphic design of the program interface. Therefore, rest assured that you will easily find all the functions that will be discussed below.
Let's launch the program. Regardless of the version used operating system, the location of the program shortcut can be found as follows. IN start menu or in the search on the taskbar (the strip at the bottom of the screen with buttons), start typing the word Publisher. The search results will display the name of the program we need if it is installed on the computer.
We will immediately be taken to the section for creating a new document with a proposal to select a publication template. In the window that opens, the program will offer you a huge number of options for creating a wide variety of types of documents. Select the Booklets section.
You will see a large number of already created and designed templates. Additionally, you can choose a color scheme for your brochure. Select the template you like and click the Create button.
If the template is not yet installed in your program, then click the download button so that it will be downloaded to your computer.
As you can see, our booklet consists of two pages. Each page is divided into three equal blocks. In the presented options, all the markup has already been done; all you have to do is replace the standard information with the necessary one. If desired, you can change the font display, its location, and so on. If you find it difficult to work with the objects of this program, then look at my article ““, it shows the basic techniques for working with images, shapes and text in the presentation editor. Here the actions are performed similarly.
Advice: Before creating a booklet, prepare information to fill out and pictures to insert. The main information will be contained on the second page of the booklet, that is, inside after folding.
I recommend paying special attention to the “Insert” tab. Thanks to this settings block, you can change any object in the booklet, insert pictures, tables, etc. 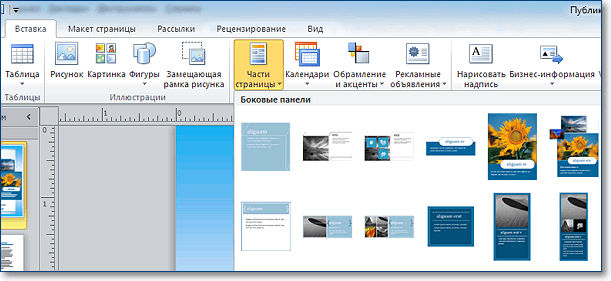 The “Advertising” menu may be of particular interest. It provides various templates for bright, creative and catchy logos, slogans or calls to action. This eliminates the need to draw some shapes yourself for later insertion into the booklet.
If everything is clear with text blocks and illustrations, then what about the background, which for some reason may not suit you? It's simple! To change it, you need to go to the “Page Layout” tab and select “Background”. Typically, the program shell has many different options built into it, among which any user can choose what he or she will definitely like.
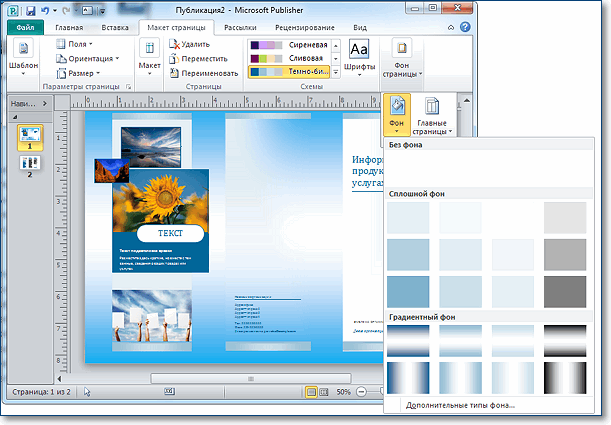
By the way, you can change not only the background itself and its type, but also the color. To do this, go to the “Additional background types” submenu and experiment with the settings. There you will change the gradient, number of colors and other elements.
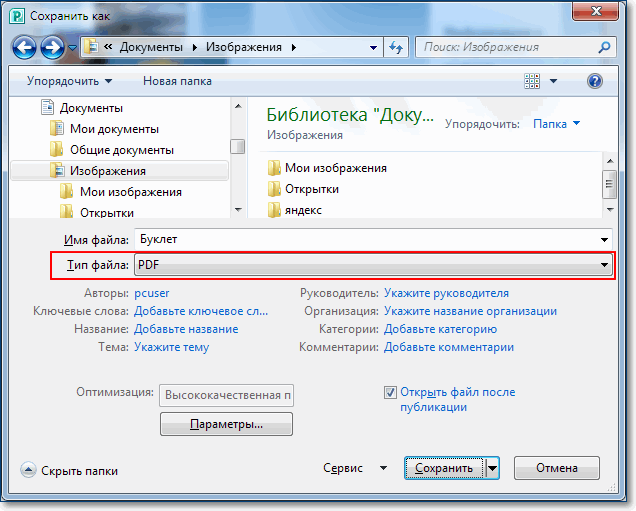
After you have entered all the necessary information into the created booklet, decorated it with colorful illustrations and found the optimal background, you need to print the document (if you plan to display its paper version). To do this, press the key combination CTRL+P, select the number of copies, specify the printer and send for printing. But if you are not going to print it yourself, it would be wiser to save the booklet in PDF format.
 can be posted on the Internet, viewed and printed on any computer where there is no Microsoft programs Publisher.
And now, in order to be able to correct our booklet in the future, let’s save it in the native format of the Microsoft Publisher program. File - Save.
Here, it seems to me, are simple and clear instructions that will help you understand how to make a high-quality and beautiful booklet yourself. Don't be afraid to experiment with different settings, friends. If you notice some interesting feature, try activating it. It is quite possible that this will give your booklet even more expressiveness and brightness. I've only covered the basic controls for creating a booklet in Microsoft Publisher, but you can go a step further and create a layout that suits your specific needs.
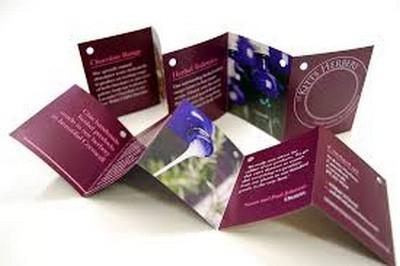
Many organizations and firms use promotional materials such as business cards, calendars, flyers and brochures to attract customers. But booklets occupy a special place in this list of printed products. Booklets contain just enough advertising material to tell a detailed story about the company’s services or products without boring the client, and they are also compact in size and easy to distribute. That’s how I’d like to talk about how to create it in this article.
As a rule, you can create a booklet from an A4 sheet by folding it across (along the short side) 2 times with an accordion. At the same time, it is divided into three columns of equal size, which can be filled with advertising material on both sides of the sheet. As a rule, one extreme column is reserved for the design of the booklet cover.
Of course, if you work in -e, you can use the standard templates offered by Microsoft. They are available when selecting a team Create – Brochures – Booklets. In the folder that opens there will be several blanks that can be taken as a basis. I also once tried to contact them, but then I realized that it was easier and faster for me to create my own version than to edit someone else’s.
By the way, the booklet is different from the booklet. They come in different varieties, and not just blue and red. 🙂 Depending on the amount of material to be placed and the illustrations, the booklet can be made with 2 or 3 folds. The first one, of course, will have wider pages and it will be more convenient to place text information on them. They differ only in the number of pages and have the same creation technology. Therefore, let's focus on three-page booklets with 2 page folds, and look at how to create a booklet using their example.
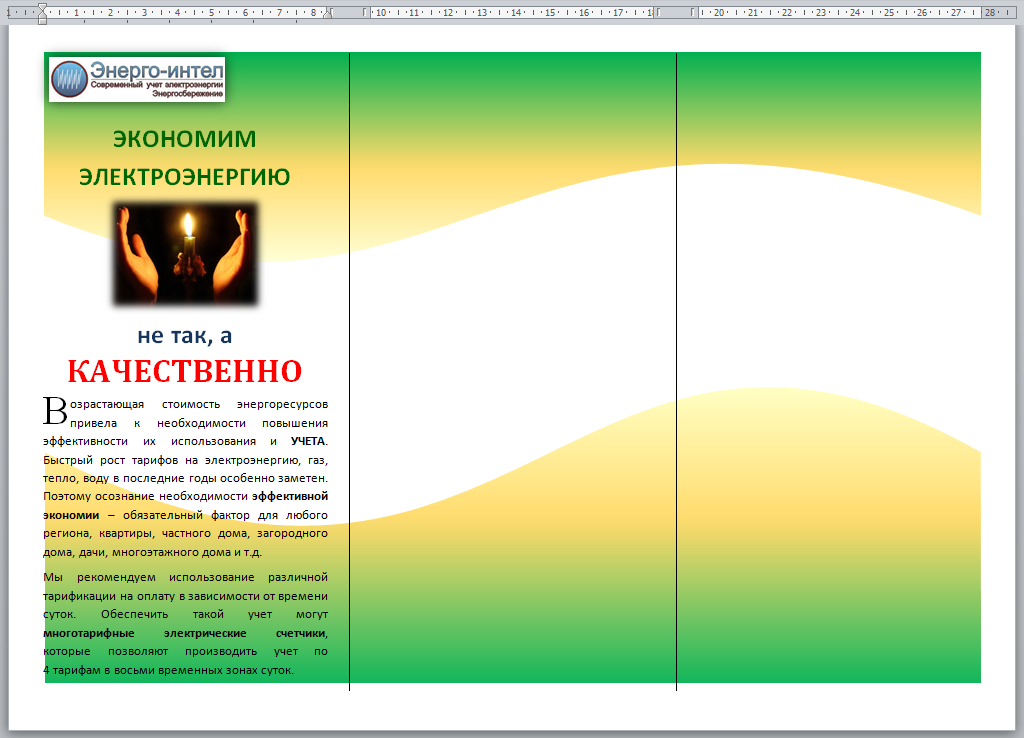
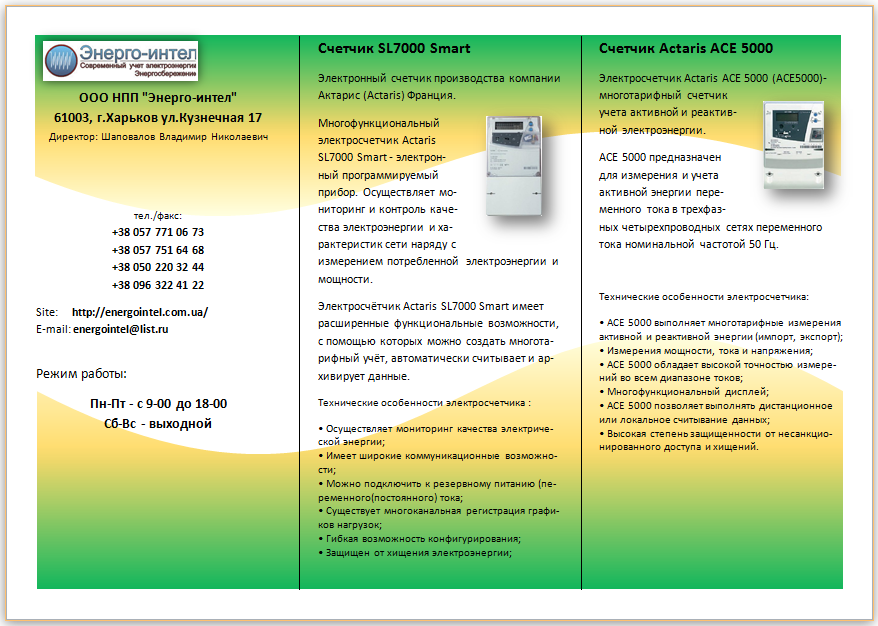
Let's create our own booklet, the way we want it, and at the same time we'll look at some of the nuances of working in the Word editor. As an example, I will choose a company that offers smart electricity meters to residents and organizations. Let's say she wants to advertise them by releasing a booklet and distributing it to potential clients.
I think it’s better to look at this process step by step:
To make it more attractive and easier to fold, you can display vertical dividers between the columns. Team Page Layout – Column ( from the region Page Setup) – Three Page Layout – Column ( from the region Page Options) – Other Columns and in the window that opens, check the box for the option Delimiter.
For further work, you need to understand one nuance: the text flows through the columns like water in communicating vessels. Therefore, it is convenient to fill the columns with both text and drawings (or photographs).
The next nuance is to decide where the title and last pages of the booklet are located. Well, the first one is more or less clear right away - this is the first column, but the last one is also located in the first column, but on the reverse side of the sheet. IN Word document– this is the first column of the second sheet.
4. We start creating a booklet with title page(this is the first column). On it we have the following information:
— at the top you can indicate the company logo
- below you can place a thematic drawing,
- title text in large letters in the center.
— introductory text revealing the topic of information. For added beauty, you can insert a “letter letter” into the text.
5. The booklet will be brighter if you immediately work out the background image (some abstract figure or lines), which will set the mood of your booklet. It is very convenient to place it behind the text.
It should be remembered that colors must be selected so that the text remains readable. Light colors with a certain percentage of transparency are best suited.
I ended up with this general design for the title side of the booklet:
How to insert and align pictures, I think, is not worth telling in this article, but here is the procedure for creating background picture can be described. I made it myself Word editor 2010 in this order:
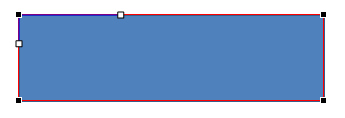
— First I turned to the menu Insert to the area Figures, where I selected a rectangle for insertion.
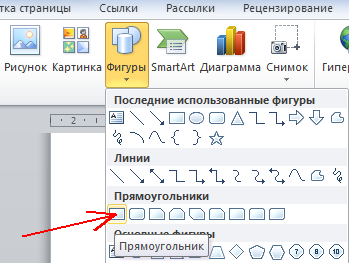
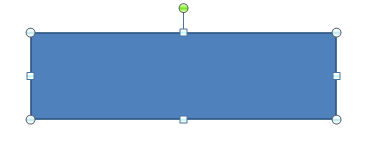
In this case, the cursor will take the form of a cross, with which you can “aim” and draw a rectangle from the left margin of the sheet to the right.
— After the blank figure is drawn, go to the point Format, where in the region Inserting shapes where through the button Change figure activate mode Start changing nodes.
— Click the mouse on the upper left vertex of the rectangle. This will display markers (white squares) of auxiliary lines, with which you can bend the sides.
— Since we will bend the upper horizontal line, we grab the marker placed on it and move it down, bending the line.

— Then click on the upper right vertex.
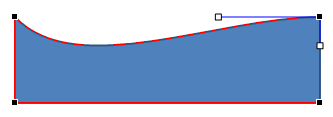
— Grab the marker and move it up. We get a wavy top line.
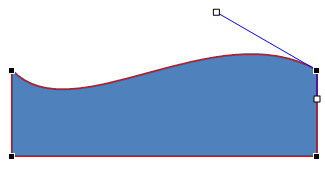
— To set two shimmer colors for a shape, I used the fill tool: by clicking on the shape, call up the tab Format on the menu ribbon, go to the area Shape styles. There we activate the command Shape Fill – Gradient – Other Gradient Fills. In the window that opens, you can configure the overflow fill by specifying Color For Gradient points on the color distribution strip and adjusting Transparency.

After the figure is prepared, place it on the sheet, indicating the position Behind the text. If you want two waves, as in my example, then you need to copy our figure and paste the copy at the top of the sheet, after turning it over. Perhaps the general design is complete.
Now all that remains is to enter information about the advertised products into the booklet and design the last page. We fill out pages 2 and 3 first. So one side is done.
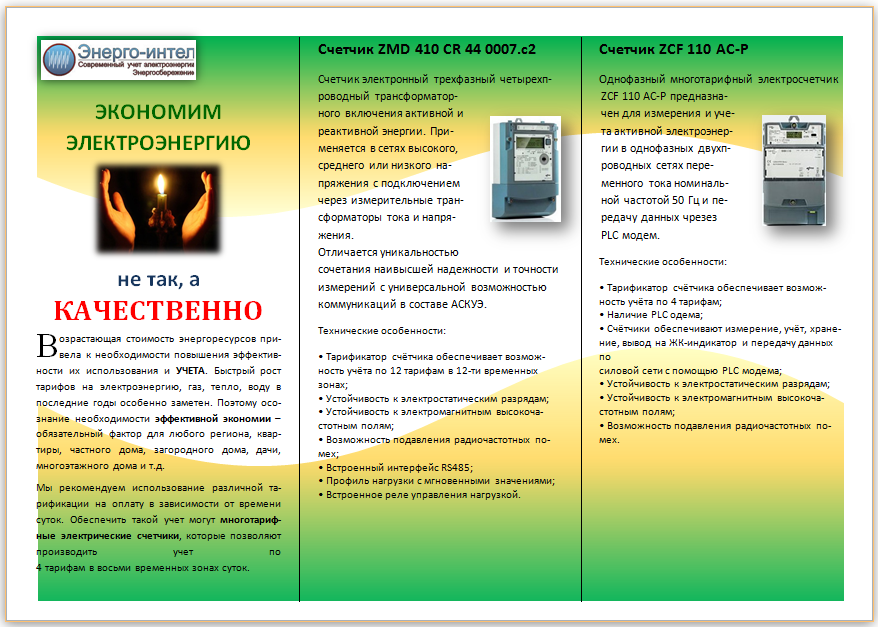
Now we create the last page, indicating on it the company address, contact numbers, website address and Mailbox. Then we fill pages 3 and 4 with content.
Here, in fact, the booklet was created. It can be saved as PDF file or images and put them into circulation. I think it turned out well.
Instructions for creating a brochure in MS Word 2007
1. Open a text editor MS Word 2007.
2. Configure page settings
Select a tabPage layout open Page settings,by clicking on the arrow
A dialog box will openPage settings. On the Fields tab (open by default) configure:
Fields
Top – 1.5 cm Bottom – 1.5 cm
Left – 1.5 cm Right – 1.5 cm
If you need to add extra space to your booklet to accommodate the binding, select Fields – Binding – 1.5 cm.
Orientation
landscape
Pages
several pages – Brochure
And commit the changes, all these changes by clicking on the button OK .
3. Insert the page number.
Select main menu itemInsert – Page numbers…
Select a location on the sheet by clicking on it with the mouse.
If you do not need page numbers on the first sheets, then on the tabInsert - Page Number, select Page number format...
We can change the Format numbers, changePage numbering, for example, start from page 3, if you have changed the page number format, then confirm it by clicking on the button OK .
4. Inserting a header and footer.
You can add text to your document, which can include text and pictures, located at the top or bottom of each section page. Typically, headers and footers contain book titles, author names, graphics and other elements.
Open the Insert tab, select Top or footer
A tab opens Constructor on working with headers and footers and input for header and footer text
When you enter text, the formatting toolbar is automatically turned on. Enter text, for example FOOTER, format it as normal text through the formatting panel, selecting Font, Font Size, Color
We can add a picture to the footer. On the tab Designer, select Drawing , a window opens Inserting a picture , where we can find the picture we want to insert. Once you've selected a picture, select it and click Insert
The picture you select will appear in the footer. The drawing appears in its real size.
You can make the picture smaller by grabbing the mouse at any corner (round) and holding it, move it to the right size. You can place a picture in the footer using the Tab or spacebar key on the keyboard. The picture can be processed using the Format tab, for example, cropped
Design a drawing using a drawing style
We can fill the header and footer with color through the tab Home by selecting Color
6. Brochure printing.
Open the main menu and select Seal
A dialog box opens Seal
If you are using a duplex printer (a printer that automatically prints text on both sides of the paper), click Properties. In the tab that opens Layout, choose Orientation – landscape and click on OK.
In the dialog box Seal , check the box againstduplex printing.
If you are not using a duplex printer, the dialog box Seal Select the duplex printing check box. All pages that should be on one side of the sheet will be printed, and then a message will appear telling you to turn the same sheets over and reinsert them into the printer.
You don’t have to set up printing, then print each sheet in order, turning each sheet over.
7. Bend the sheets along the boards and fold them according to page numbers.
Nadezhda Leonidovna Timofeeva, methodologist of the innovation and methodological department of the Education Department of the Nytvensky Municipal District Administration
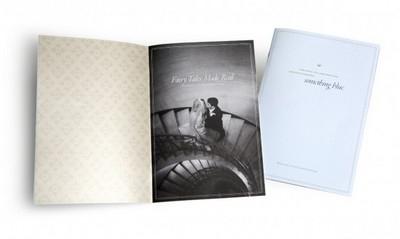
A text editor, in the understanding of many, is a tool for typing and formatting text. But in reality, Word is powerful. multifunctional tool, which can help reduce the time and financial costs of firms and organizations. In Microsoft's editor, it is easy to create not only text, but also a presentation and a leaflet. We will look at an example of making the latter in this article, using hotel business advertising as a basis.
The booklet is its purpose
Advertising goods and services through leaflets, calendars, and business cards is very effective. The booklets stand in a special place in this row. A sheet of format, folded in a certain way, contains maximum information about the company, organization, and its products. The compact size of the booklet is another advantage over leaflets and posters.

Form
Booklets are usually printed on a standard-sized sheet of paper, which is subsequently folded, giving it the appearance of an accordion. The result is a small elongated book with three pages. They are filled with advertising materials on both sides.
Of course, you can make a booklet out of two pages. An example of this is theatrical programs. But this format is more convenient for posting mostly text information. In the event that you need to place a maximum of images, it is best to resort to the classic view.

Booklet in Word
To create advertising products in the most popular one, you need to download a template from the official website. There is no need to search for it on the Internet. Just launch Word, go to the “File” tab, select the “Create” command. In each installed version The program already contains many templates for various types of documents. These include protocols, flyers, invitations and similar templates. As a rule, there are no booklets. But just type the word “brochure” in the search bar, and a smart editor will independently find what you’re looking for. Along with the booklet template, the program offers several types of other printing products, but for now it is enough to select the standard option you are looking for.
After clicking on the template, a standard Word window will open, but the booklet will already be displayed in it. This example can be easily changed by replacing the proposed information with your own
Creating a booklet
The downloaded template, as already mentioned, consists of two ordinary sheets of A 4 format. They are located in landscape orientation. You won’t be able to change it in Word, but that’s not required.
The first sheet has three columns. The one on the far left is the title page of the booklet. It usually reflects the name of the company and its logo. The remaining two columns can be filled with information about tours, registration conditions, prices, offered excursions, various services. To do this, just click on the area already occupied by template text and replace it with your own.
The second sheet is the reverse side of the booklet. It also contains information and illustrations. But you must remember that later you will have to fold the sheet like an accordion. And the reverse side will be just more pages. To see how to arrange the information correctly, you need to print the booklet. The example will show which column is the title page, which pages will be internal, and where to place contact information.
Editing a booklet
The size, color, and type of font in the template can be changed. The “Home” tab when working with a template is practically unlimited in functionality. All formatting options are available, which cannot be said about the other tabs. For example, there is no ability to split text into a large number of columns, change the orientation of the sheet, or set margins.
The functionality of working with drawings is also limited. There is no way to set boundaries, group images, or highlight objects. In our case, when creating a booklet for the hotel business, editing functions are sufficient. But what if you need a colorful brochure, for example, a children's booklet? It can be created without resorting to a template.
We create a custom booklet
It is better to consider this process step by step. So:
- Let's launch Word.
- Go to the “Page Layout” tab.
- Select the “Orientation” item.
- Set the landscape position of the sheet.
- In the same tab - “Page Layout” - select the “Columns” function and note their number. In our case it is three.
- Set the page division. To do this, from the “Columns” item, select the “Other Columns” line. In the drop-down window, check the “Split” checkbox.
At this stage, you can begin to fill out the first part of the booklet. Recall that the leftmost column is the title page. After filling it out, the editor will display a dividing line, this makes the work more convenient. We create the second part of the booklet in the same way as the first.
Conclusion
As you can see, it won’t be too difficult for anyone to make a booklet. The example we considered is quite universal for any type of business. But there are times when it is necessary to create a brochure with some special effects: an unusual complex shape, with a very big amount columns, and so on. Booklet software is what will help you non-standard situation. Typically, this type of software has various complex graphic functionality that allows you to edit photos in booklet mode. If a company or organization does not compete for a prize in the field of the most colorful booklets, then it is necessary to spend money on expensive software simply no.