The author of the article is Alexander Kuzin, Visio expert.
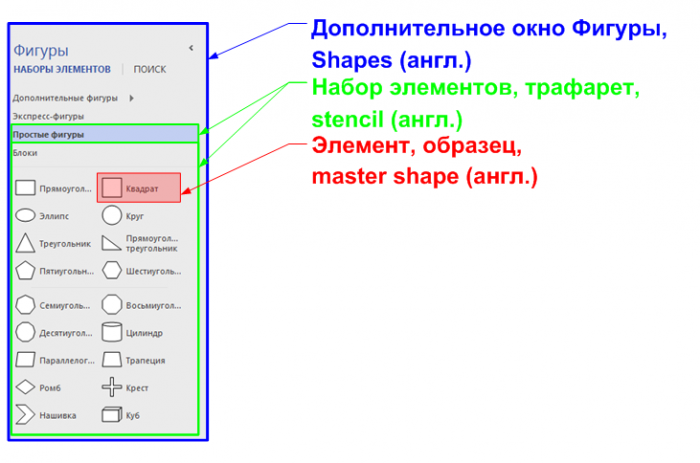
A set of elements or a Stencil (stencil) is a thematic set of specific elements or samples (master shape), which are easily transferred to the diagram by dragging the mouse.
These sets of elements are contained in special files. You can see files with sets of elements available on your computer in the additional Shapes window. It is usually located under the ribbon on the left side of the window. If you can't see the window Figures, you need to click on the tab on the ribbon View, select item Task panes, and then select the top line in the list that appears Figures.
To enable form search. 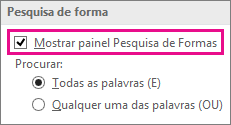
Click right click Click on the title bar of the search results stencil and select Save As. Save your custom shape to a Favorites template or another template. Right-click the shape, select Add to My Shapes, and click Favorites to add the shape to the Favorites template. You can also click Add to New Stencil to create a stencil containing just that shape, or Add to Existing Stencil to select a stencil from, for example, the My Shapes folder. In the Shapes window, click More Shapes, point to My Shapes, and click the stencil name. In the Options dialog box, click Advanced, then highlight the Form Search section. Then type table chair in the Search for Shapes field.
![]()
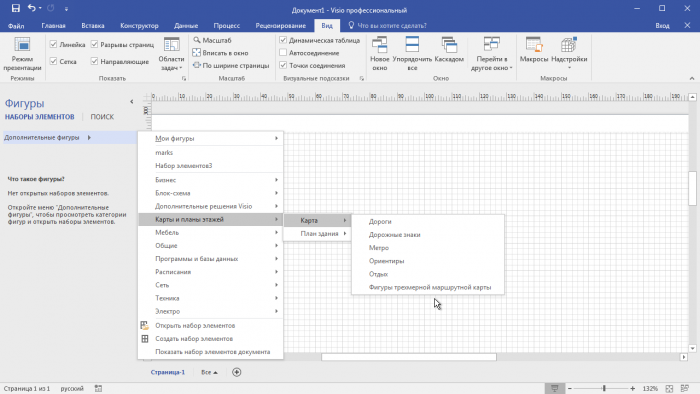
After the manipulations have been completed, you will see an additional window appear. Figures.
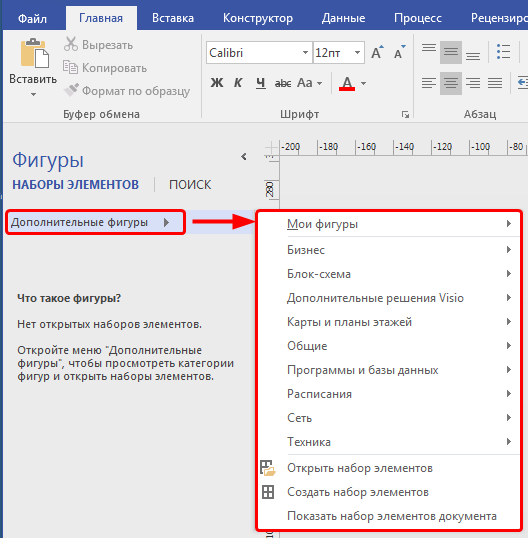
In this window you can see the stencils that are open along with your active document. You can upload additional stencils to your document by clicking on the item Additional Shapes.
If you have an Internet connection, you can search for forms online. Here are some of the download methods. Equipment Manufacturers If you are looking for forms that represent specific pieces of equipment, they can often be found on the equipment manufacturer's website. Once you download the shapes stencil, copy it to your My Shapes folder. . To quickly open a saved stencil, choose Shapes from the File menu, point to My Shapes, and then click the stencil name. These forms are copyrighted.
Find forms developed by third parties
You may copy, modify, or modify the figures for your own use and distribute designs that contain them. To open a stencil, select Shapes from the File menu, point to My Shapes, and click the stencil name. IMPORTANT: This article contains information about modifying the registry.
After this, an additional context menu will appear with a list of categories of stencils installed with MS Visio. The delivery set includes a fairly large number of sets of elements.
Third party stencils
Microsoft is currently expanding its templates and stencils ecosystem and integrating third-party content into Visio Pro for Office 365. (Office 365 subscription product). If you continue to use classic versions of MS Visio and have not found the elements you are interested in among those already installed, you can search for them on the Internet.
English version of this article. But you use the same three basic steps to create almost all of them. As an example, let's create a flowchart.
- Select the Flowcharts category.
- Click Basic Flowchart and click Create.
To create a diagram, drag shapes from the template onto a blank page and connect them to each other. If the shape you want to add is not in the Mini Toolbar, you can drag the shape you want from the Shapes window and drop it onto the blue arrow. New form linked to the first form, as if you had clicked on the mini toolbar.
For example, on the official Microsoft website in the Support section in the article Search for additional shapes and sets of elements, there are links to download various stencils.
Use the AutoConnect arrows to also connect two shapes that are already in your drawing. Drag the autoconnect arrow one way and drop it the other way. You get an arrow from the first form to the second. 
You can add text to almost any object-even connector by selecting it and typing.
When you drag a shape from the Shapes window onto the drawing page, the original shape remains in the template. This original is called the basic form. The shape you place in the drawing is a copy, also called an instance of that master. You can drag and drop as many instances as you like.
Third-party developers also develop stencils for Visio. A large number of stencils can be found at VisioCafe.com and.
Some Visio enthusiasts share their own figures on the Internet, on thematic forums and websites.
If you could not find the stencils you are interested in on the Internet, then you can create your own custom stencils. On the channel Microsoft Russia - official channel There is a video about creating your own custom sets of elements.
Rotating and resizing shapes
The most common things people do with shapes include functions created directly in the shapes. Visualizations help you quickly find and use these features. You can add data to each shape by entering it in the Shape Data window - View tab, Show group, Taskbars, and Shape Data.
Data is not displayed in the drawing by default. If you want to display data simultaneously different ways, you can use the Data Charts feature also available in the Data tab. The following figure shows data for two trees at a time.
Where to save additional stencils
Stencils can be saved in the My Shapes subfolder, which in turn is located in the folder My Documents. Personally, I prefer to store the stencils I create in this folder; for stencils from third-party developers, I use additional folders.
To specify folders with additional stencils, click on the tab File on the tape, in the section Options, select item Additionally, then point File locations and write the paths to additional folders containing stencils in the line Element sets.
People Flowers grow, indicating growth. If you're creating an organization chart, forms can automatically create a reporting structure. Drag each person's shape onto the chart and drop it into your manager's form. Forms are automatically connected to display hierarchy.
The shapes in each stencil have something in common. Forms can be a set of forms that you need to create for a specific chart type or several different versions in the same way. Stencils appear in the Forms window with titles grouped at the top of the window. To see the shapes of a specific stencil, click the stencil's title bar. If there are many templates in the model, the title area will have a scroll bar and some titles will be hidden; Scroll the panel to find them.
You can enter several different paths in this line, separating them with a semicolon.
In these lines you can specify paths to network drives and to application folders cloud storage for example OneDrive. This will allow you to synchronize sets of elements between your computers located in local network or between your computer at home and at work!
You can also expand the header area by dragging the bottom split bar down so that all bars are visible. Each template opens with the stencils needed to create a specific type of drawing, but you can open other stencils at any time.
In the Shapes window, click More Shapes, select the category you want, and then click the name of the stencil you want to use. When you want to create a chart, start with a model for that type of chart. Stencils filled with the shapes needed to create a specific type of design. For example, a model of a residential floor is opened using a stencil filled with shapes such as walls, furniture, appliances, cabinets, etc. Organization chart template includes various forms for executives, managers, assistants, positions, consultants, vacant positions, etc. appropriate grid size and ruler dimensions The plant layout opens with an engineering scale where 1 inch is equal to ten feet. Some models have unique features that can be found on special tabs on the ribbon. You can use the Planning tab to configure display options related to office layout diagrams. Models have preset settings appropriate for the drawing type. . To find out which models are available.
If you have a lot of stencils in your stencil folders, you will have to scroll through this large list for a long time. This is not very convenient, so it is worth distributing the stencils into various subfolders in categories.
Similar to how it is done with the stencils that come with Visio.
Selecting and opening a template
To view a brief description of the templates, click on the different template categories and select the template template thumbnails. In the Flowchart window, under Favorite Templates, double-click Main Flowchart. In the list of template categories, click Flowchart. . When you open a template, the shapes should open in sets of what are called stencils. Open stencils with a basic flowchart template are called arrows, backgrounds and basic flowchart shapes.
Step 2: Drag and Connect Shapes
To create a drawing, all you have to do is drag shapes from the template onto a blank drawing page and connect them together. There are several ways to connect shapes, but from now on we'll use faster drag-and-drop brackets that automatically connect them automatically using auto-connect.
In this case, you can drag the samples it contains from this stencil with the mouse.
Saving the Document Workspace
In Visio, you can save the document workspace - all windows open together with this document!
Click on the File tab, in the Information section, select the Properties menu item, and then Advanced Properties. You need to make sure that the Save workspace field is checked.
Step 3: Adding Text to Shapes
Although some designs make a point on its own, it is usually useful and sometimes necessary to add text to shapes. There are several ways to add text to shapes, but now let's use the easiest way.
Add text directly to the form
When you drag a shape from a stencil onto the drawing page, the original shape remains in the template.

In this case, when you subsequently open the document, all additional windows will open together with it. This will allow you to always have on hand the stencils you need to work with your document!
The opposite situation also happens, when you receive from other users a document with many stencils open. These stencils take up a lot of space in the additional Shapes window and often just annoy users. Simply close the stencils you are not using and save your Visio document.
The bright green dot located above the forms is called the rotating handles. Move the right or left rotation handle to rotate the shape. Blue connecting arrows for automatic connection. Light blue connecting arrows help you easily connect shapes to each other, as shown in the previous section.
Selection handles for resizing shapes. You can use the bright green handles to change the height and width of the shape. Click and drag a selection handle on the corner of a shape to make the shape larger without changing its proportions, or click and drag a selection handle on the side of the shape to make the shape wider or taller.
If more figures are required than are available in a particular Visio template, you can search for them on the device that has Visio installed or on the web.
Saving loaded stencils
Each form can be associated with data. There are several ways to add data to shapes. See Add data to shapes and add imported data to shapes. For now, let's look at how to display or display the data once it has been added. After data is added to a form, it does not appear in the drawing by default. The easiest way to see the data is to select the shape and then open the Shape Data window, as shown in the image below.
If you want to display data in multiple ways at the same time, you can use a feature called data graphics. The following figure shows data for two trees simultaneously. In Enhance your data with data graphs. NOTE.
Find Visio shapes and stencils
You can search for shapes and stencils on your local device, or search for stencils created by third parties or even Microsoft on the Internet.
Note: It is only available with an Office 365 subscription. If you subscribe to Office 365, make sure you have the latest version of Office. IT professionals managing the Office 365 update process can learn what updates are available in each channel on the update releases page.
Forms with special behavior
For example, you can lengthen the shape of people to show more people, or lengthen the shape of a growing flower to indicate growth. The following picture shows how you can measure the size of a figure on your page using a special size form designed for measuring other figures.
And below is the shape of the stencil template. You can right-click on the shape to set the number of slices and what each percentage represents for each slice. A great way to find out which way you can do this is to right-click on it to see if there are any special commands in your context menu. They can be a set of shapes that you need to create in the same way as a specific type of chart, or several different versions.
For more information, see Import downloaded stencils and Create, save, and share custom stencils.
Find shapes in Visio
To find shapes installed with Visio, you can use the search box. The search field is in the window Figures on a separate tab (not the one where the element sets are located).
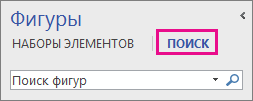
At the top of the tab Search search field is located. It also displays search results. To return to viewing stencils, go to the tab Element sets at the top of the window Figures.
Note: If element Search not displayed in the window Figures, it may need to be activated.
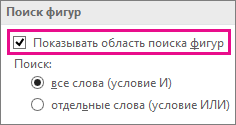
Activating shape search
Quick tasks
|
Task |
Actions |
|
Right-click the item set title in the search results list and select Save as. Enter a name for the stencil and save it to a folder My figures. |
|
|
In view Element sets in the window Figure right click the shape and select command Add to my shapes.  Then click Favorites Favorites. 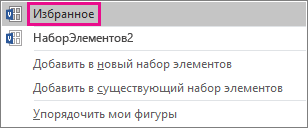 You can also select the command My figures). |
|
|
In the window Figures select team Additional Shapes, select item My figures 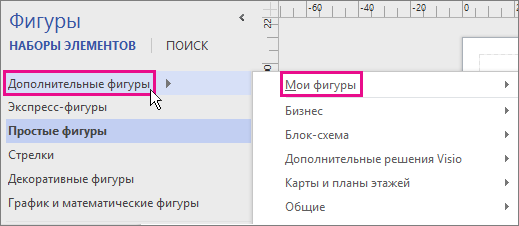 |
|
|
You can choose whether to use shapes when searching All entered words or any of them. For example, if you enter "office chair" to search in the window Figures, it is possible to search for figures associated with the word “office”, And with the word "chair", or figures associated with the word "office" or with the word "chair" (or both). Select the first search type (AND) if you want only results related to all the words you entered. Select the second search type (OR) if you need to view more search results and do not need to match all words. Setting up search options Open the tab File and select Options. In the window Visio Options Select a category Additionally, and then scroll the window contents down to the section. Advice: Find Shapes uses Windows Search to find shapes on your computer, so if you're not getting results, it's probably Windows service Search is disabled. In Control Panel, select Programs, click Turn Windows features on or off and then into the field Windows components check the box Windows Search. |
Search for shapes on the Internet
Not only Microsoft, but also other companies and individuals are developing shapes for Visio. If you need to find special or very unusual shapes, you can contact third-party suppliers. Some of them are listed below.
OEMs
Visio MVPs are Visio experts who are available to answer questions and provide solutions, advice, and guidance (usually in Visio discussion groups). On the independent Visio MVP site
Other external sites Some Internet sites run by independent Visio users and companies offer shapes and other downloads.
After downloading the stencil, copy it to the folder My figures. Default folder My figures located in the standard folder Documentation. Then open the stencil in Visio by navigating to the folder My figures.
Open a stencil saved in the My Shapes folder
Find shapes installed with Visio
The Shape Finder feature uses the Shape Finder feature to search for sets installed on your computer. Visio elements service Windows search. To perform a quick search, Windows Search must be running.
When you first launch Visio, the box is hidden to make more room for the shapes.

Quick tasks
|
Task |
Actions |
|
Right-click the title bar of the search results set and select Save as. Enter a name for the stencil and save it to a folder My figures. |
|
|
Right-click the shape, select command Add to my shapes, and then select Favorites to add a shape to the stencil Favorites. You can also select the command Add to new set elements to create a stencil containing only that shape, or command Add to existing stencil to select a set of items (for example, from a folder My figures). |
|
|
Open a saved stencil |
In the window Figures select team Additional Shapes, select item My figures and click the stencil name. |
|
Broaden or narrow your search |
Set Visio search options.
Open the tab File. For example, to find only office chairs and not any other types of chairs, select under Search parameter All words (AND condition) and press the button OK office chair. If you need to find tables and chairs, select in the section Search parameter Single words (OR condition) and press the button OK. Then enter the text in the "Search for Shapes" field chair table. |
Search for shapes on the Internet
If your computer is connected to the Internet, you can search for shapes on the Internet.
Saving loaded stencils
After downloading the shape set, copy it to the folder My figures. Default folder My figures is located in the folder [drive]:\Users\username\Documents\My Shapes.
Search for third party shapes
If your computer is connected to the Internet, you can also find Visio shapes using a web browser.
OEMs Figures representing specific equipment can often be found on the manufacturer's website.
Specialists with Most Valuable Professional (MVP) status Visio MVPs are Visio experts who are available to answer questions and provide solutions, advice, and guidance (usually in Visio discussion groups). The independent Visio MVP site, owned entirely by Visio MVPs, has shape sets.
Saving loaded stencils
After downloading the stencil, copy it to your My Shapes folder. By default, the My Shapes folder is located in the following path: C:\Users\username\Documents\My Shapes.
To open a set of elements, in the menu File select Figures > My figures, and then click the stencil name.