A good place to start would be to make sure the microphone is working at all. This can be done by connecting it, for example, to another computer. If you are sure that the microphone is working, then move on.
Before changing anything in the system settings, first try connecting the microphone to the rear panel and check its operation. If the microphone does not work, try connecting it to the front panel (if you have one) and check the microphone operation again. At the same time, make sure that you do not mix up the sockets. On the back panel of the computer there are usually 3 sockets marked in different colors: pink (microphone), green (speakers), blue (line-in):
There are usually 2 jacks on the front panel: microphone and headphones. Moreover, on the front panel the connectors may not be marked in different colors, then you should pay attention to the icons next to these sockets: icons in the form of a microphone and headphones at the corresponding sockets. If the microphone does not work, then compare your settings with the settings presented in the screenshots. If after installation correct settings microphone still doesn't work, try updating sound drivers, and then check all settings again and test the microphone.
Driver versions from which the screenshots below with working settings were taken:
SoundMax sound driver for Windows 7
~ 15.3Mb (v.610X6585)
Realtek Sound Driver for Windows 7
~ 54.5Mb (R2.47)
New driver versions:
Attention! In new driver versions, some settings and interface elements of sound panels may differ from those shown in the screenshots!
SoundMax sound driver for Windows 7 (new version)
~ 14.9Mb (v.6.10.01.6620)
Realtek sound driver for Windows 7 32bit (new version)
~ 48.7Mb (R2.67)
Realtek sound driver for Windows 7 64bit (new version)
~ 52.9Mb (R2.67)
Realtek sound driver for Windows 7 32/64bit (new version)
~ 96.7Mb (R2.67)
If the “Front Soundbar” does not work, then you need to do the following:
1. Check the “Control Panel (SoundMax or Realtek)” settings. Bring them in line with the “working” settings in the screenshots.
2. Check the BIOS settings. There is a “Front Panel” setting in the BIOS. Has 2 meanings: HD Audio and AC’97. Try changing these values and test the operation of the “Front Sound Panel”.
3. Well, the “Front sound panel” itself must be connected by wires to motherboard inside system unit.
Screenshots were taken from computers on which the microphone works. One computer with SoundMax sound, the other computer with Realtek sound.
Are common system settings microphone
Start button -> Control Panel -> Sound
Select the Recording tab. Select Microphone and click the Properties button

Check the settings on all tabs: “General”, “Listen”, “Special”, “Levels”, “ Additional functions microphone", "Advanced".


"Working" settings of the "SoundMax Control Panel"
Occasionally it is quite comfortable to use the connectors for microphone and headphones with front computer panels. It would be great if they showed you how to do this when you bought a computer in a store. But master the connection microphone at home data is also not so difficult. The main thing is to follow a few primitive rules.
You will need
- – microphone;
- – headphones or speakers for sound output.
Instructions
1. First, turn on your computer, wait for it to boot, and have a working microphone ready. If it works from the connectors on the back side of the system unit, then you can safely try to connect it to front panels. Usually there is a pink connector (with an icon microphone). The program that comes with the drivers is suitable for testing. sound card(say, Realtek HD manager) or “Sound Recorder”, which can be easily found by following the path “Start” -> “All Programs” -> “Typical” -> “Fun”.

2. If the microphone does not turn on (this may be indicated by static recording scales), then first check the software activation microphone. Find the speaker icon in the system tray and double-click on it. In the main sound settings window that appears, select “Properties” -> “Mixer” -> input device. For example, this could be Realtek HD Audio Input. The "Mic Volume" setting should be preferred. After closing the window, you will see the recording volume control with microphone. Icon microphone must be energetic and set to at least half scale. An alternative way to make these settings is: “Control Panel” -> “Sounds and Audio Devices” -> “Audio” -> “Sound Recording” -> “Volume”.
3. If recording still does not work, check the auto-socket detection mode front panels. This is the manager window of the program responsible for your audio devices. Set the top checkbox as shown in the photo and check the entry again with microphone. Often it is precisely because of energetic auto-detection that discord between audio devices appears.

4. If you haven't made a splash yet, then you should restart your computer and enter the BIOS. There, open the “Advanced Settings” menu. In the “Chipset Configuration” section there may be a “Front Panel Control” parameter. Forcefully set its value to “Enabled” (instead of “Auto”). After rebooting, try again to activate the microphone with front panels.
5. Another threat may await you if an audio cable was not connected to the motherboard when assembling the computer. front panels. You can check this if you open the side cover of the system unit and look at the connection point. If you have instructions for the motherboard, which indicate the connectors for connection, and you have correctly determined where you need to insert the audio cable, you can do this independently. Attention - if the computer is new and its case is sealed, you should contact the sellers for help so as not to lose the warranty.

Often, having connected a microphone to the input of a sound card, the user cannot force it to work and comes to the conclusion that the device is defective. The thing is that by default, in order to reduce interference, the microphone input in Windows is usually disabled. You can include it verbatim in a few movements.

Instructions
1. Double-click on the speaker icon in the tray (at the bottom right of the desktop).
2. In the volume control window that appears, click the “options” button at the top.
3. In the drop-down menu, select “properties”.
4. Check the box opposite the “recording” item, check the box opposite the “microphone” item (if it is not checked) and click “OK”.
5. A panel for adjusting the volume of input devices has appeared in front of you. On it, under the volume slider, there is a button to turn the microphone on and off. Turn it on.
By connecting headphones with microphone to the computer, you need to configure the hardware. Setting up equipment, in turn, is unthinkable without installed drivers for a sound card. Based on this, connecting the device to a computer can turn out to be a rather troublesome procedure for the user.

You will need
- Computer, headphones equipped with a microphone.
Instructions
1. Make sure you have it installed on your computer software for a sound card. If the drivers are not installed, install them by inserting them into the drive boot disk with the necessary software (the disk must be supplied with the computer/sound card). Install the drivers to the default folder and reboot the system. After restarting the computer, you will see the sound card agent icon, the one that will be located in the tray. Now you can start connecting the headphones and turning on the microphone on them.
2. If you look at the end of the device's wire, you will see its tail split in two, equipped with a pink and light green plug. The pink plug is the microphone output, and the light green plug is the headphone input.
3. Insert the light green plug into the corresponding colored socket located on the back of the computer. A sound card manager window will pop up on your desktop, where you need to designate the connected device as headphones. Apply the settings and check if audio is playing. Later you can move on to connecting a microphone.
4. Insert the pink plug into the socket that matches its color (this socket is also located on the back of your PC). The sound card manager will again bring up a dialog box on the desktop. In this window, you need to define the connected device as a microphone.
5. When connected wireless headphones With microphone It is not necessary to perform similar manipulations.
Modern computers make it possible to connect various audio devices to them for convenient and full-fledged use of current computing technology. Such devices can also include microphones different types.

You will need
- Computer, microphone.
Instructions
1. To connect a microphone and speakers to your computer, carefully look at the back panel of the system unit (more often than not). Here you need to find three holes sound cards that are configured as follows by default: scarlet (microphone input), blue (line input) and green (speaker output). The sound card can be built into the motherboard or installed separately.
2. After you connect the microphone (Fig. 1), you need to configure its parameters in operating system, because it is disabled by default. To do this, you need to turn on the volume control. Go to the "Start" menu - "All Programs" - "Typical" - "Fun" - "Volume". In the “Options” menu, you must select the “Properties” item (Fig. 2).
3. In the window that opens, you need to select the HD Audio rear input recording mixer or Realtek HD Audio Input, or another, depending on the equipment manufacturer. After this, in the “Volume Settings” field, the “Recording” item should mechanically become active. This is an indication that an external audio input device will be used. In the “Display volume controls” field, you must check the box opposite the inscription “Microphone” (Fig. 3).
4. Next, click “OK” to save the settings, then, with the help of moving the sliders, set the microphone sound (Fig. 4). Please note that in the “Tier” settings, the “Off” option is checked. everything” should not be! Otherwise, every sound of connected devices will be programmatically muted. The overall sound volume in the operating system is also adjusted here.
5. Different brands and models of sound cards use their own drivers and utilities supplied by the manufacturer, but the setup rules are basically the same between them. Examples of different microphone settings can be seen in Fig. 5.
Tip 5: How to activate the microphone in headphones with a microphone
Telephone microphone The headset (TMG) looks like ordinary headphones, but has a side movable element, at the end of which a microphone is located. It connects to the computer's sound card with two cables.

Instructions
1. Check whether the telephone and microphone headset is positively connected to the computer. On the sound card, the microphone jack is pink and the headphone jack is green. The headset's microphone plug can be pink or red, and the headphone plug can be black, green or white. Occasionally, they do not differ in color at all, but have stylized microphone and headphone symbols. Finally, if they do not have any designations at all, they can be distinguished implicitly: on a microphone plug, the middle and general contacts are made as a single unit or are electrically connected to each other (the latter can be determined using an ohmmeter - the resistance should be close to zero). Do not plug the microphone plug into any of the card's output jacks - this will short circuit the right channel and risk damaging the amplifier.
2. Having properly connected the headset, turn on the computer, wait for the operating system to load, put on the headphones and say something into the microphone. If you hear a personal voice, the connection can be considered complete.
3. If the headphones work but the microphone does not, run a program that allows you to change the ratio between the tiers of signals coming from different sources. In Windows, it is called, depending on the version, “Volume” or “Volume Control” and is located in the “Typical” - “Fun” menu section. In Linux it is called “KMix”, “Mixer”, “Sound Mixer” or similar, and is located in most distributions in the “Multimedia” menu section.
4. Find in the program an imaginary regulator that allows you to adjust the level of the signal coming from the microphone. If there is no such controller, enter the program setup mode (the method for entering this mode depends on the OS) and turn on the display of this controller. Next to it there is a checkbox, which in some versions of the program turns on the microphone, and in others turns it off. Turn on the microphone input, then use the slider to set the desired level of the signal from it. Don't make it too huge, otherwise distortions will occur. Later, check again if the microphone is working.
5. If your computer does not already have Audacity or a similar program that allows you to record sound files, install it. Record your personal voice, and then listen to the recording. The sound should be good, with approximately no distortion.
Video on the topic
Microphones They are used in everyday life together with computers, stereo systems and karaoke systems. They work great only if they are connected to the device correctly.

Instructions
1. Use only electret microphones with computers, and dynamic microphones with tape recorders and karaoke systems. The exception is some Toshiba laptops, which are designed to work with dynamic microphones.
2. The microphone plug can be a Jack type, with a diameter of 6.3 or 3.5 mm, or a DIN type - with three or five pins. If the socket on your device does not match the plug configuration, use an adapter. It can be ready-made or homemade. A Jack type plug has two contacts, one of which is located closer to the end of the cord and is general, and the other is located at a distance from the cord and is signal. For a DIN type plug, the middle contact is universal, and the signal contact can be the rightmost or the leftmost, depending on the year of manufacture of the device to which it is connected. Determine this experimentally when connecting.
3. The sound card has several connectors. You can only connect a microphone to the one that is prepared for this. The fact is that the headphone and speaker plugs have three contacts, and the microphone plug has two, one of which is wide. If you mistakenly connect a microphone to the headphone or speaker output, one of the amplifier channels will be short-circuited. The amplifier may fail.
4. To determine which of the sound card connectors is designed to connect a microphone, pay attention to their colors. The microphone jack is marked in red or pink. If the sockets do not have color identification, find what you need by a stylized image of the microphone or by the inscription MIC.
5. If the electret microphone does not work, pay attention to the polarity of the microphone capsule connection. Its downside, the one that is integrated with the metal case, must be combined with the general computer wire. If the sound does not appear even later, launch the software mixer (it is called differently in different operating systems), activate its microphone input and adjust its sensitivity so that acoustic feedback does not appear.
Video on the topic
Note!
Before any resoldering, disconnect the microphone from the device. Do not touch the microphone and grounded objects at the same time.
Mixing consoles, or mixers, are used to proportionally mix multiple audio signals. Using regulators located on the device body, you can change the relationship between the tiers of these signals.

Instructions
1. Turn off the power to the mixer and all equipment connected to its inputs and outputs, as well as that which you plan to connect or disconnect. To add a new signal source, connect it to the input jack provided for this purpose. If the source has a plug of a different design, use an adapter or replace the plug with another suitable one. At the same time, consider the pinout of the input jack of the mixing console.
2. Signal sources differ not only in plug designs, but also in signal tiers. If the mixer does not have an output jack designed for a signal of the appropriate amplitude, additional components will have to be used. For example, in order to reduce the amplitude, you will need an attenuator, and in order to increase it, a voltage amplifier (but not a power amplifier).
3. Some microphones require additional power. It can be supplied through the same wire, through the one that receives the output signal, or through a separate, third conductor. In this case, it is impossible to use attenuators or amplifiers without additional tricks. If you cannot do without them, decouple the amplifier output from the remote control input with a capacitor and organize the power supply to the microphone in positive polarity. Use only microphones that are designed to be powered by the voltage supplied by the mixer.
4. The frequency collation of the signal produced by the source may not correspond to that for which the input of the mixing console is designed. In this case, in order to reduce the tier low frequencies, pass the signal through a small capacitor, and to increase it through an RC filter. In some cases, more complex correction circuits with difficult amplitude-frequency collations (AFC) are required.
5. With power turned on for the mixer, signal sources, and amplifiers, adjust the controls to the desired levels of signals coming from all devices. A huge oversight is to connect the recorder parallel to the output of the power amplifier, incl. built into the remote control - even if the recorder does not burn out, the recording will be extremely illegible.
Note!
Do not make switches under voltage.
Many system units have additional sound card outputs and several USB ports located on the front panel. Unfortunately, these connectors do not always work reliably at a distance.

You will need
- - Internet access;
- - crosshead screwdriver.
Instructions
1. If the headphones are either acoustic system do not produce sound signals after connecting to the front channels, check the presence of the necessary drivers. Open the Device Manager menu.
2. To do this, go to the properties of the “Computer” item and select the appropriate link. Make sure no equipment is marked exclamation point. Otherwise, update the drivers for your sound card.
3. Use the website of the company that produces the board you are using to find the necessary drivers. It’s best to find out the exact model of the device in advance. If you are working with an integrated sound adapter, update your motherboard drivers.
4. Check the front soundbar settings in the BIOS menu. Restart your computer and hold down the Delete key (Sec, F2). Wait for the computer system board management menu to launch. Examine the contents of existing sections and find the “Front Panel Support Type” item.
5. Open it and set the HD Audio option instead of AC97. It is worth noting that occasionally it makes sense to switch the mode in the reverse order. Save the new settings and restart your computer again.
6. Open the sound card management program and make sure that the front panel not disabled. In Realtek utilities, as usual, a message appears when a new device is connected. Try changing the purpose of the ports, preferring the “Front speakers” or “Headphones” items.
7. If the described manipulations do not lead to a positive result, check that the panel is connected correctly to system board. To do this, read the instructions for this device. Remove the system unit cover.
8. Make sure that the specific audio port connectors are connected to the correct pins on the motherboard. Correct the connection if you notice an error.
Video on the topic
Helpful advice
To connect, use only a tested microphone.
A front panel with audio and USB ports is an integral part of any modern computer. This is a very convenient thing that allows you to connect removable media, headphones or microphone. However, it is often with the front panel that problems arise, as a result of which the sound stops working and you can no longer use the computer as usual. In this article we will try to understand possible reasons similar malfunctions.
Before you start troubleshooting problems with the front headphone and microphone jacks, you need to make sure that all drivers are installed correctly and the sound is working properly on the back panel of the computer. If there is no sound when you connect headphones to the back of the system unit, then the problem is more global and, therefore, requires a different approach to the solution and a separate conversation. We will devote this article entirely to the front panel.
Why doesn't the sound on the front panel work?
We begin diagnostics by remembering at what point the inputs stopped functioning. For example, if the computer was only recently assembled and you have never used headphones with a microphone, then perhaps during assembly the connectors were incorrectly connected (or not connected at all) to the motherboard, i.e. The front panel is simply not connected properly. If the panel worked properly before, then try to determine the action after which the problems probably began. Perhaps some settings were made in the Control Panel or BIOS. If nothing comes to mind, follow the recommendations below.
Checking the headphone and microphone input connections
This item will be relevant for those cases when the computer was disassembled/assembled and after that the sound on the front panel stopped working. You need to make sure that the panel is really connected - the connector is connected to the required contacts on the motherboard, and the integrity of the supply wires is not broken. To connect the front panel, either a solid block of two types – AC’97 and HD Audio, or separate connectors with markings can be used.
The AC'97 format is obsolete and is now rare. At the same time, the HD Audio (High Definition Audio) standard is now used everywhere. On the motherboard, the connector for connecting the front panel HD Audio plug usually has a letter designation, for example, F_Audio.

If you are still not sure where to connect the header, use your motherboard manual. Below we provide the AC’97 and HD Audio pinouts.

Connection diagram of individual connectors to AC’97:

Front Panel Configuration in BIOS
Sometimes it happens that the front panel works according to the old AC’97 standard, but the motherboard provides the new High Definition Audio specification. By the way, both connectors are similar, and the user may not notice this discrepancy. However, no problems should arise when connecting a panel with AC’97 to a motherboard with High Definition Audio. True, in some cases you will have to change the operating mode through the BIOS.
We go into the BIOS by pressing the F2 or DEL key when booting the computer. Next, go to the “Advanced” section and look for the “Onboard Devices Configuration” item. Just below is the “Front Panel Type” parameter (it can also be called High Definition Front Panel Audio or Legacy Front Panel Audio). Switch it from the HD Audio position to the AC97 position. If your front panel uses the HD Audio standard and the BIOS is set to AC97, then switch back.

Some motherboards do not provide the ability to change the operating mode of the front panel, but only allow you to disable or enable the sound controller. The Onboard Audio Function parameter (may have a different name) is responsible for this function, providing only the “Enabled” and “Disabled” values. In such a situation, you do not need to reconfigure anything in the BIOS, and the sound should work without additional manipulations.
Setting up sound devices in the Windows 7/10 Control Panel
If you are one hundred percent sure that the front inputs for headphones and microphone are connected correctly and everything is set correctly in the BIOS, it’s time to go to the sound settings in the most Windows environment 7/10. First of all, go to the Control Panel, and then to the “Sound” section. On the “Playback” and “Record” tabs, make sure that the default devices are installed.


To display all devices, click anywhere in the window right click mouse and check the “Show disconnected devices” and “Show disconnected devices” checkboxes.

On the “Playback” tab, click the same right button on the active device and select “Properties”. In the “General” section, look at the list of connectors - the item “Front panel 3.5 mm connector” should be present.

In the same way, we check the microphone properties on the “Recording” tab.

Front Panel Configuration Using Realtek HD Manager
If all the steps done did not produce results and the front panel for headphones and microphone still does not work, try playing with the Realtek HD settings. If the drivers are installed correctly, this sound configurator must be present on your computer. We launch it using the icon on the taskbar or, if there is none, by following the path Control Panel - Realtek HD Manager.
In the program window, select the “Speakers” section and click on the yellow folder in the upper right corner.

Make sure that the checkbox next to “Disable detection of front panel sockets” is checked; if it is not there, be sure to check it.

Save the settings and check if the sound on the front panel is now working. In most cases the problem should be resolved.
Here in the Realtek HD manager you can make additional device settings. Follow the corresponding link in the upper right corner of the window.

Using switches we achieve the required sound configuration.

We tried to talk as fully as possible about how to act in a situation when the microphone and headphones on the front panel do not work on the computer. If none of the above helps, try reinstalling or updating your sound drivers. As a last resort, seek help from specialists.
- Please explain why I have after Windows reinstallation 7, Realtek sound card, installed sound drivers from the motherboard CD, Realtek manager is installed and there is sound in the operating system. But I connect the headphones to the front panel and there is no sound, before reinstalling the operating system there was sound. Georgy.
- Letter No. 2 Answer this question, I recently reset my BIOS settings to default (default) and now I have Front soundbar not working, on the network they say you need to install the Realtek manager, but I’ve never had it, so it means something else, probably BIOS settings. Anton.
- Letter No. 3 Why do I have no sound in headphones in Windows 7 when connecting them to the front panel? Realtek sound card. On one of the forums on the Internet, I was advised to go to Playback devices and just turn on the headphones, but I can’t do it, because it says High Definition Audio device Not connected and if you right-click on them, this menu will appear and as you can see, they can be Disabled, not Enabled. I also read on one site that you need to go to Start->Control Panel->Sound - in the tabs Playback or Record, select the correct device and click Default, but that doesn’t help either. Christina.
Front soundbar not working
This article, friends, is suitable for both the Windows 7, Windows 8 and Windows XP operating systems, if there is a difference, I will definitely show you where.The answer to the first question. Let's deal with the front soundbar not working, firstly, in most cases, you must have Realtek Manager installed for it to work. If you have it installed, then there should be an icon for it on the taskbar,
if it is not there, go to Start - Control Panel- Realtek dispatcher. On Windows 7


if it is missing there too, try to find it in the folder
When you launch Realtek Manager in Windows 7, click the Speakers button, then click on the yellow folder in the upper right corner and a window will appear Connector parameters,

we see a warning If front panel jack detection does not work properly, check this box under Disable front panel jack detection, put a tick on this item and click OK.

After these steps, the front soundbar should work.
In the operating room Windows system XP Realtek Manager looks a little different, but the essence is the same. Left-click on the button with the wrench

and in the window that appears, check the box Disable front panel jack detection and OK,

The front soundbar should work.
We can also press the button Additional settings devices in this window and adjust everything as we need, for example, check the item - . This means that when you connect headphones to the front sound panel, the speakers connected to the motherboard at the back will immediately turn off.
On Windows 7


Now I am answering the second letter. It happens, friends, that the drivers for the sound card are installed and sound is present in the system, but the front sound panel does not work, there are usually two reasons for this.
Firstly: your front sound panel works according to the slightly outdated AC"97 standard and the cable coming from it is connected to the connector on the motherboard AAFP analog audio front panel ( designed specifically for connecting front panel audio connectors).
- Note: AC’97 is an already outdated standard audio codec, a veteran, one might say, it was developed by Intel in 1997, it is used in motherboards, as well as cases with a front-panel audio solution. But the sound subsystem built into your motherboard operates according to a newer standard - High Definition Audio or HD Audio. This may cause the front soundbar to not work. Intel High Definition Audio is a relatively new specification for audio codecs, developed by Intel in 2004, characterized by improved digital sound quality, an increased number of channels, and a higher bandwidth compared to AC"97.
Reboot and go into BIOS. Go to Advanced, then Onboard Devices Configuration

and finally the option responsible for the front soundbar Front Panel Type, it can also be called like this:
Front Panel Support Type High Definition Front Panel Audio, Legacy Front Panel Audio, it is in the HD Audio position by default,

move it to position, save the changed settings and exit the BIOS. After rebooting, the front soundbar should work.


Also, if your front panel works in HD Audio, then in the BIOS you need to switch it from position to HD Audio. In any case, experiment.
Friends, if you connect the AC"97 front soundbar to the AAFP connector on the High Definition Audio specification motherboard,

Then everything will work fine for you, only in some cases, when connecting headphones to the front sound panel, in sound speakers the sound will not be muted, even if you disable the item in the Realtek manager settings Mute rear output device when connecting front headphone output device.
All this is due to the fact that front sound panel manufacturers use a simplified wiring diagram for the AC97 front panel cables and outputs.
There are two ways out here, the first is to re-solder (not so easy), the second is to buy a new case, with support for the front HD Audio sound panel, and if you purchase a new computer, check with the seller, don’t be surprised if, when buying a new system unit in a non-specialized supermarket, You will be faced with complete ignorance of consultants on this issue.
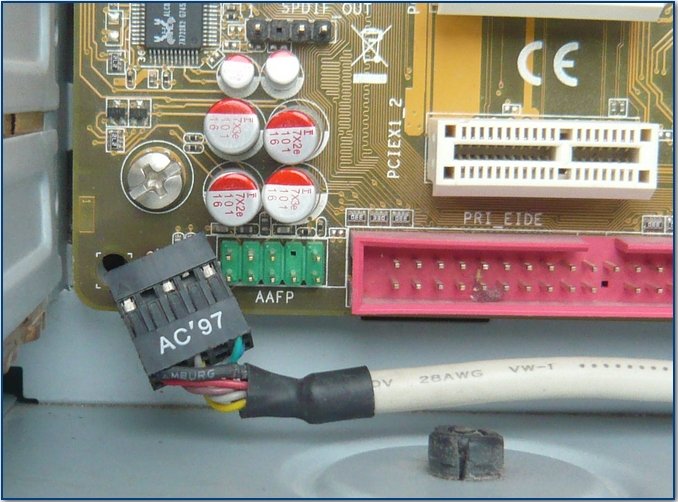
Well, the last thing you need to check if your front sound panel does not work is whether it is connected to the motherboard using a cable; sometimes they simply forget to connect it when assembling the computer, as in this screenshot.
They forgot to connect the AC"97 front sound panel cable to the AAFP analog audio front panel connector on the motherboard.
Well, from the third letter we established to Christina new version drivers from the official website and configured the front sound panel in the Realtek manager, everything is written in our article How to install a sound driver in detail.
Instructions
First, turn on your computer, wait for it to load, and prepare a working one. If it is from the connectors on the rear side of the system unit, then you can safely try to connect it on the front panel. Usually there is a pink connector (with a symbol). For testing, a program that comes with the sound card drivers (for example, Realtek HD Manager) or “Sound Recorder” is suitable, which can be easily found by following the path “Start” -> “All Programs” -> “Accessories” -> “ Entertainment".
If the microphone does not turn on (this can be indicated by fixed recording scales), then first check the software activation of the microphone. Find the speaker icon in the system tray and double-click on it. In the main sound settings window that appears, select “Properties” -> “Mixer” -> input device. For example, this could be Realtek HD Audio Input. You should select the “Mic Volume” settings. When you close the window, you will see a microphone recording volume control. The microphone icon must be active and set to at least half scale. An alternative way to make these settings is: “Control Panel” -> “Sounds and Audio Devices” -> “Audio” -> “Sound Recording” -> “Volume”.
If recording still does not occur, check the auto-detection mode of the front panel jacks. This is the manager window of the program responsible for your audio devices. Set the top checkbox as shown in the photo and check the recording from the microphone again. Often it is precisely because of active autodetection that a conflict between audio devices occurs.
If you are not yet successful, then you should restart your computer and enter the BIOS. There, open the "Advanced Settings" menu. In the "Chipset Configuration" section there may be a "Front Panel Control" parameter. Force its value to be "Enabled" (instead of "Auto"). After rebooting, try to activate the microphone from the front panel again.
Another danger may await you if the front panel audio cable was not connected to the computer when assembling it. You can check this by looking at the side cover of the system unit and inspecting the connection point. If you have instructions for the motherboard, which indicate the connectors for connection, and you have determined exactly where you need to insert the audio cable, you can do it yourself. Attention - if the computer is new and its case is sealed, you should contact the sellers for help so as not to lose the warranty.