One of the biggest problems when replacing hard drive, associated with the transfer of the system and all software, which previously functioned on the computer. Installation from scratch operating system and copying all programs to new media can take up to several hours, or even more.
operating room Windows system, unfortunately, does not include a full-fledged transfer of all content from one disk to another, which is simply referred to as "cloning" for its functionality. However, with the help of special programs, it will be possible to transfer all the contents of the disk in a simple and fast way.
The disk cloning process requires a little more special procedure. To get started, we will need to log in from a live session using the invoked tool. Its own developers define it as "free disaster recovery software".
We continue to select our language with the corresponding keyboard map. Since we want to clone a disk, we choose the second one. After selecting the source drive and the target drive, we will see a warning message that will ask us if we are sure to start the process.
For example, consider cloning a hard drive using the easy-to-use EASEUS Todo program Backup Free.
EASEUS Todo Backup Free is a backup tool, but in our case, we will demonstrate its "cloning" function. The program can be downloaded from the official website legally and free of charge exclusively for non-commercial purposes.
We say yes and wait for the process to complete, as always, without shutting down the computer or touching anything. It is important that you follow the letter without leaving anything, as a mistake can lead to loss of information on the disk. Otherwise, these are processes that do not have much difficulty, so be careful when you do them.
It is very likely that at some point in your life you will have to recover from a disaster on your computer. When that day comes, if you have a cloned image of your hard drive, the process will be much less traumatic and you will be able to get your system up and running as quickly as possible. For the task of creating a disk image or cloning, you can count on some of these free apps, which can do a great job of cloning a hard drive.
Installing the software is a simple standard process, followed by a step-by-step wizard that guides you through the various installation steps. However, it does not contain any tricks that try to install additional unwanted software.
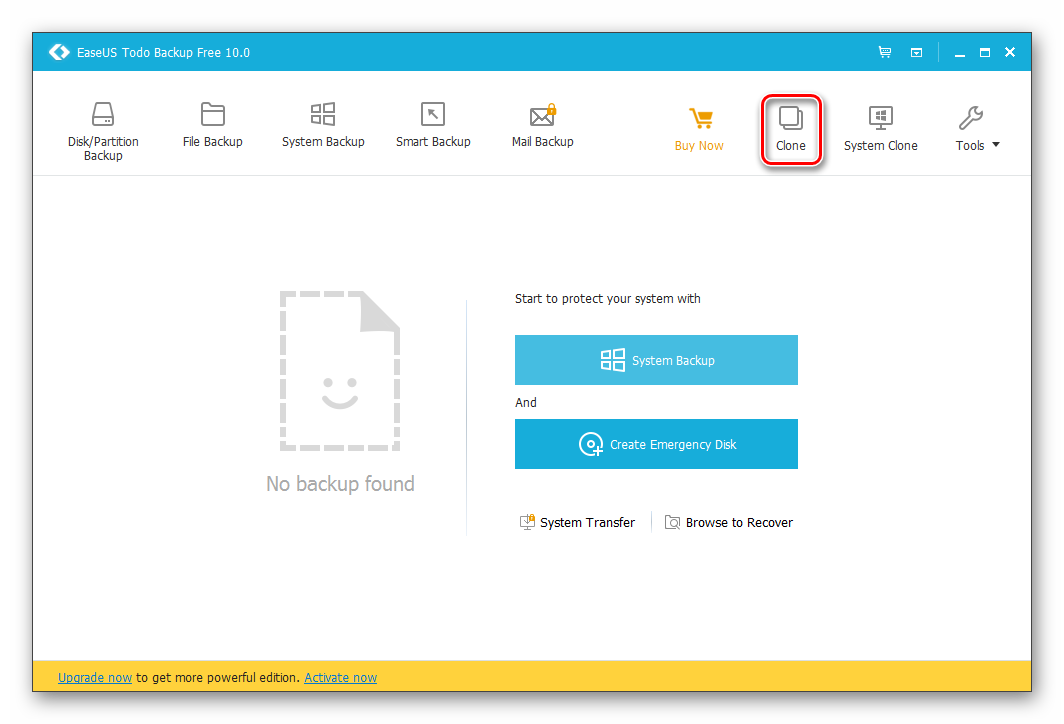
After installation, the program activation window appears. Here you select Current license: Free, thereby confirming the free non-commercial use. Then in the main window, click on the “Clone” icon. 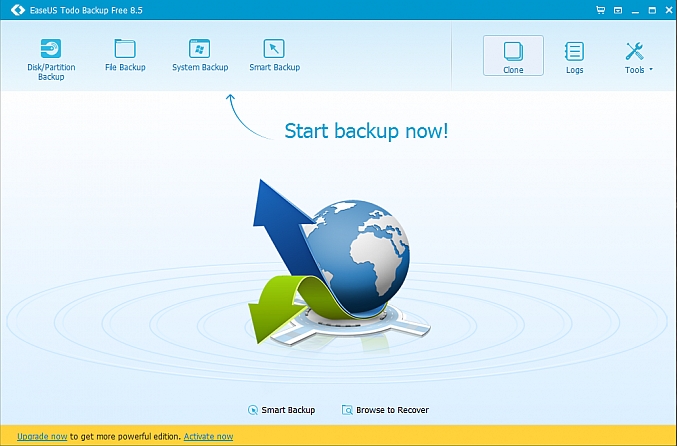
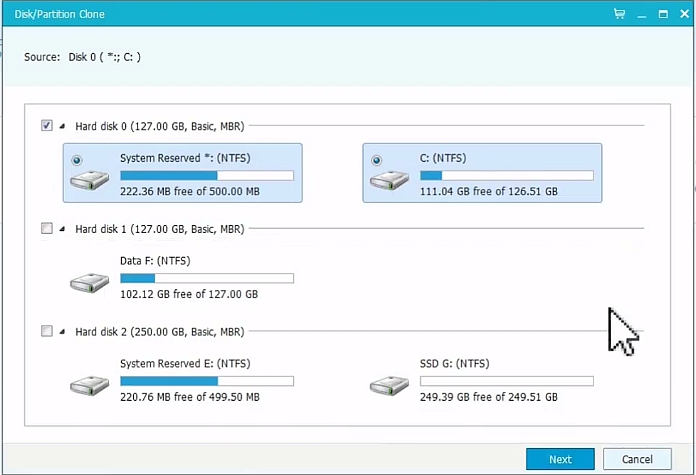
The first step is to choose a data source. In the window that appears on the screen, check the box next to Hard Disk 0, because it is labeled as system disk. In addition, the program will display the type of disk (basic, MBR or GPT), as well as its volume. If the destination disk does not contain any partition - as is the case with a new SSD - it will not be displayed in the data source selection window. After selection, click "Next".
Free hard drive cloning tools
You can perform bitwise copying and support a large number of file systems. It has auto mode and integrated multicast support. With this application you can create disk images or clone easily HDD. With this tool, you can create hot images, that is, you can clone the drive that is in use.
You don't have to do many things when using this tool, just decide what you want to clone and where you want to save or store the image. You can copy a single file or the entire system with one click. It does a great job of programmed manipulation of system images. Its free version is based on its powerful professional version, but it is only for personal use. It is advisable to use free version for testing software, and if it lives up to expectations, then purchase the professional version.
In the next step, we must specify the "recipient" for data cloning. It would seem that the window has not changed, because it will only show the old hard drive HDD, but at the bottom there is a field for connecting an SSD. Be sure to check the "Optimize for SSD" option.
Always good to have backup or a backup of our system if chaos takes over this situation. When creating a disk image, we make sure to restore the files and configurations of the computer, in case of situations such as disk failure, system crash, accidental or accidental file loss and long, etc. with the above tools you can provide some immunity when cloned hard drives and creating backups to get back to normal after the storm.
For now, we will have to be content with traditional disks on desktop computers and laptops. The migration process is quite simple and without additional complications. The first thing a user should do is to check the laptop disk size and the amount of space used.
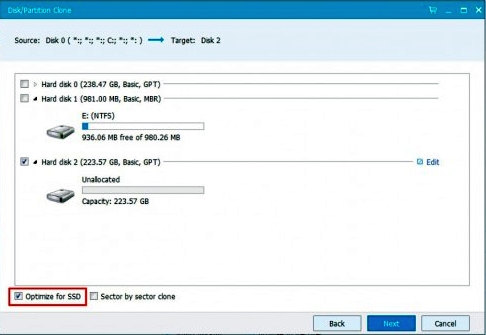
The EASEUS Todo Backup Free program will automatically recreate the markup on the recipient from the original media. In case of differences HDD volumes and SSD, the partition played on the SSD will be proportionately smaller (assuming the copied data can fit on the smaller SSD partition). The user will be able to customize the partition structure on the recipient's disk by selecting the "Edit" button in the program window.
Otherwise, before you start migrating your data and settings, you will need to transfer your media files and other non-essential files to external device storage. These connections are not compatible and you need to verify the type of connection before replacing drives.
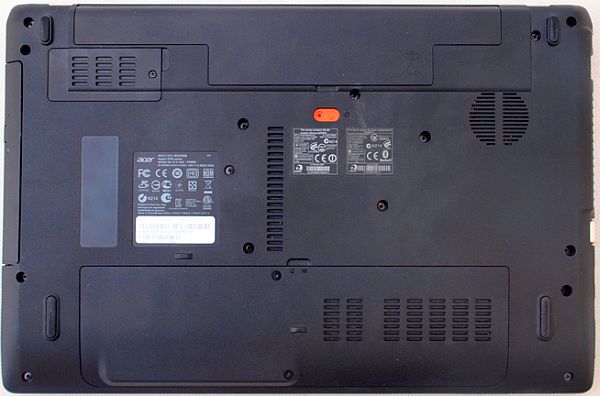
Turn off the laptop, remove the battery and use a Phillips screwdriver to remove the hard drive panel. To avoid damage to components, avoid discharging static electricity by using a wrist strap connected to a metal ground that serves as the negative pole.
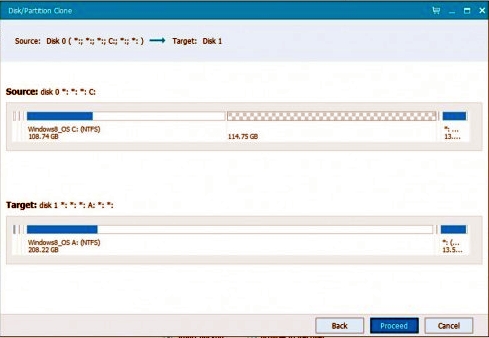
In the next step, the program will display the final window of the current settings. At the top is the structure of the original HDD, at the bottom - the structure of partitions and data placement on the SSD. At this stage, you can still make any changes, for this, click the "Back" button. Click "Continue" to start cloning your hard drive. The program will inform you that all data on the recipient's disk will be lost. Since there was no data on the recipient (the new SSD), feel free to proceed.
If you want to select "Yes", the software will simply copy all the files from one drive to another, creating a backup, but not boot disk. On the subsequent screens, select the options offered by the program by default, including automatic mode.
Copying information from HDD to SSD
The original disk partitions will be stored on the new disk in proportion to the new size. Connect only the battery, move the panels and start the system. No one can discuss the performance gain of a solid state drive over a traditional one.
The next step is hard drive cloning. The duration of the clone operation depends on the device connection method (IDE, SATA, via USB cable) and their performance. A copy will be made faster on a computer in which two drives (HDD and SSD) are connected via SATA. The speed of cloning in a laptop depends on the interface used. If the laptop and the SATA-USB adapter that is used to connect the SSD support USB 3.0, copying a couple of tens of gigabytes will take 30-40 minutes at best (depending on the performance of the devices). If USB 3.0 is not supported and only USB 2.0 is available, cloning can take up to several hours.
However, for now, they remain a costly option, especially since we're not in the best economic times. The economy may be in recession and slowdown, but data generation does not stop. If you've ever had to upgrade your computer with a new component, such as a larger hard drive, then what may be a simple task of removing two screws and putting them back in may be a lot more difficult than we think if we have we reinstall and reset all contents of the previous hard drive to the new one we want to mount.
After cloning SSD drive will contain the operating system, programs, and user data.
SSD setup after cloning
If you have cloned drives on personal computer, then most of the action is over - the SSD is already in system block. You can remove the old HDD or change the settings to boot from the SSD. This can be done in the BIOS/UEFI configuration program by changing the boot device order.
Why clone a hard drive and not use another technique?
Once we have a copy of our hard drive with this technique, we can dump it on any computer and work on it as if it were ours. At the moment you are probably wondering why you should clone your hard drive and not use any other method. The reason for creating this perfect copy of our current hard drive can have several reasons, on the one hand, we can get a perfect copy of our hard drive that we can store on an external hard drive, for example, so that we can use backup on if our main hard drive fails and we have to keep working with some urgency.
With a laptop it’s more difficult, you can’t do without a screwdriver here. To clone to an SSD, it is usually connected via an external SATA to USB adapter. After completion, you need to remove the old HDD and install solid state media in its place. It happens that with the replacement of the HDD and the installation of a new drive, some difficulties may arise.
How to replace a hard drive on a laptop
Notebook models vary, so slight installation differences may occur.
Transferring the system to a new drive
On the other hand, it's the perfect way to transfer our information from one computer to another without having to reinstall everything cleanly. Finally, something that has been very useful to me at any time, allows you, for example, to have exactly the same operating system on two perfectly different computers, in my case two different desktops.
Prerequisites for cloning a hard drive
Before we talk about what we should install or what we should configure in order to be able to move on to cloning our hard drive, we must consider two things: we need a cloning program and secondly, a completely clean hard drive that must be connected to the computer as it will be in this block, where we will copy all the information.
Typically, manufacturers place hard drives HDD under a cover fixed with screws at the bottom of the laptop. Therefore, a screwdriver is required, but before that, remove the battery.
The next step is to remove the HDD from the connector. Everything must be done very carefully. We move the drive along the horizons to free it from contacts. If it rests against the case, lift it slightly on the other side, then pull it out of the socket.
The latter also has its disadvantages, that is, we need a hard drive that must have the same capacity or even more than the original hard drive. Once we have cleared all these previous points, we will look at how to clone our hard drive depending on the operating system that we are using at any given moment.
With this action, we will launch the copy wizard, where you will need to check the option "Quick disk copy" to click "Next". Finally, we only need to select the drive or partition of the same location where the copy will be dumped. Note that this software allows you to customize the size of the partition where you want to drop the clone. To do this, you just have to select the Edit Sections option and resize the same using the sliders. With these steps, you will see that a new task has appeared in the Pending Operations section.
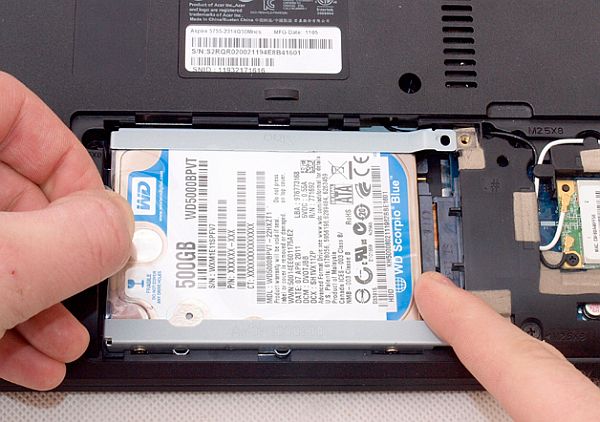
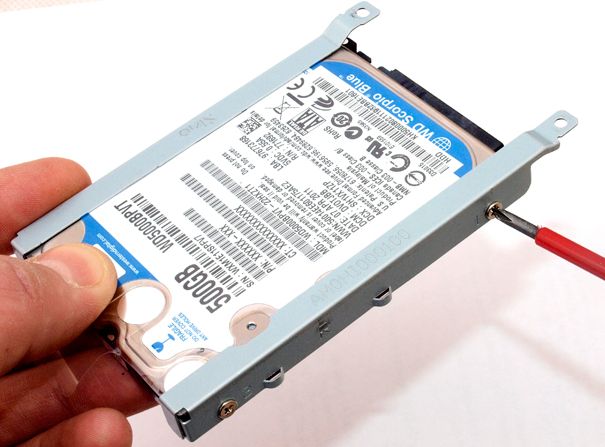
The hard drive in a laptop is mounted using a special adapter or mounting frame. After removing, unscrew the HDD from the frame and install the SSD in this place.
If the entire configuration is correct and matches the one you want, you need to click "Apply" to complete "Continue". The next step will be to restart the computer completely automatically, so at this stage you should not be afraid or worried. Once you start, you will notice that the machine will automatically launch the cloning software that will start working on it. While it lasts the whole process, do not touch anything and do not turn off the computer, just release the application.
If you want to keep it simple, since you want an exact copy of the hard drive you have installed in your computer, all you have to do is plug in new hard disk, remember that it must be the same capacity or higher than what we already have. and we want to copy.
Insert the SSD into the slot and connect to the SATA slot. Screw on the cover and connect the battery.
Replacing an old hard drive with a new one is a responsible procedure for every user who wants to keep all the information safe and sound. Reinstall operating system installed programs and copying user files manually is very time consuming and inefficient.
Once we have started the computer, we just need to open the terminal, and from command line executing a command is as easy as . To find out if we have installed it, we only have to complete the order. After this simple check will be done, we need to know exactly where you are, and especially what hard drives and partitions you have, for this we perform.
This command will give us information about hard drives that we have installed and their sections. After the names assigned to the original hard drive and the new one on which we want to reset the data are located. This command has a very simple explanation if it means input file i.e. source hard drive and it means output file.
There is an alternative option - to clone your disk. As a result, the new HDD or SSD will be an exact copy of the original. Thus, you can transfer not only your own, but also system files.
Disk cloning is a process in which all files stored on the old drive (operating system, drivers, components, programs and user files) can be transferred to the new HDD or SSD in exactly the same form.
Finally, if we run again. First, as in the previous ones, we must connect our new block to the machine. Once connected, you only need to open the disk cloning utility, which you can find in the Applications folder, specifically in Utilities. In this section, we will go to the "Partition Layout" field and select "1 section". Finally, just click "Check Disk".
Automation of procedures and operations
As soon as the system boots to the recovery disk. The entire reinstallation process will take about 30 minutes. Finally, when this process is completed, the system will ask us if we want to restore files from another drive, at this point we must select the old one, as this will copy all your personal files from the old hard drive to the new one. Is your hard drive often running out of space, making it difficult for you to update software, applications, and system, as well as save more data?
It is not necessary to have two disks of the same capacity - the new drive can be of any size, but sufficient to transfer the operating system and / or user data. If desired, the user can exclude sections and copy all the most necessary.
Windows does not have built-in tools to complete the task, so you will need to turn to utilities from third-party developers. There are both paid and free options that allow you to perform cloning.
Method 1: Acronis Disk Director
To clone with this program, do the following:
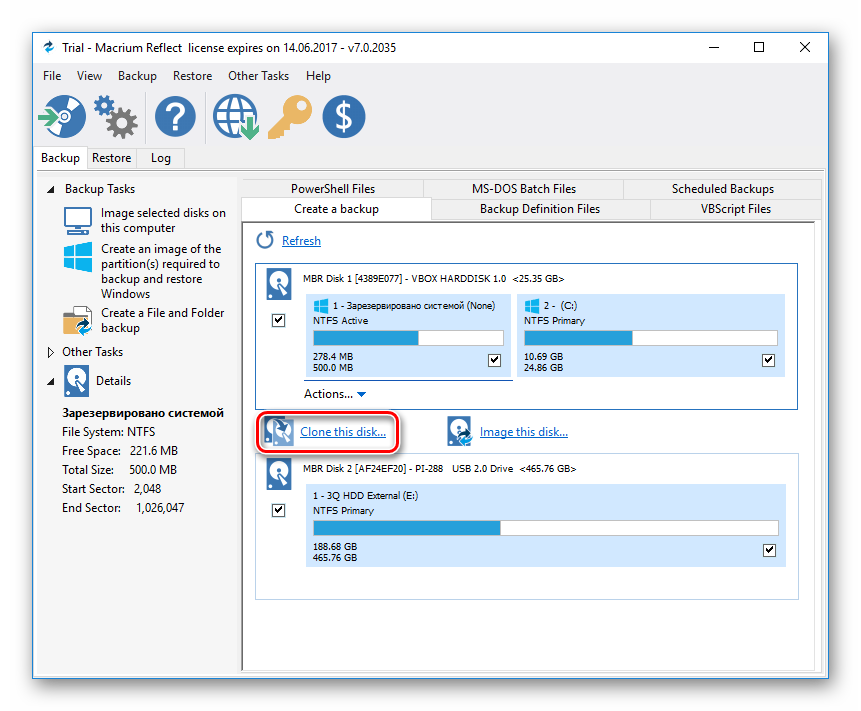
Method 3: Macrium Reflect
Another one free program who does a great job at her job. Able to clone disks completely or partially, works smartly, supports various drives and file systems.
Macrium Reflect also does not have a Russian language, and its installer contains ads, and these are perhaps the main drawbacks of the program.
As you can see, cloning a drive is not at all difficult. If in this way you decide to replace the disk with a new one, then after cloning there will be one more step. AT BIOS settings you need to specify that the system should boot from the new disk. In the old BIOS, this setting must be changed via Advanced BIOS Features > First boot device.
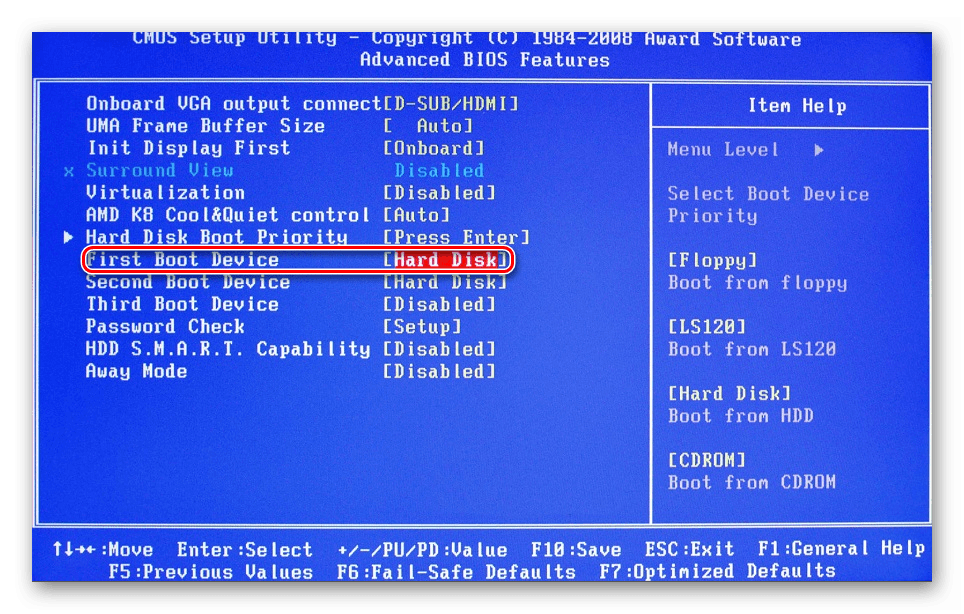
In the new BIOS - Boot > 1st Boot Priority.

Do not forget to look if there is a free unallocated area of the disk. If it is present, then it is necessary to distribute it between sections, or add it entirely to one of them.