Comment from blacklotusup
Fire orbs at the Green thing, done. Spam 1 if it doesn't register at first, it will count eventually.Comment from ragnarokio
note that you can"t mount the hippogryph while in shapeshift form, it"ll give you the error "you can"t do this right now"Comment from eismithiii
Firing at the base of the green orb worked for meComment from fefenc
This quest is broken. I spent 30 minutes firing balls at the center and all that happened was me getting kicked off the mount with no explanation at all.Comment from Puz00010
This quest is so bugged! It just takes a few thousand circles to finally complete it. good luck and be patient.Ok, with two alts I just had to target the center of the spire and 3 shots later complete, about 15 seconds...
Comment from Doloria
If you spend more than 3 or 4 minutes trying to destroy the conduit, you need to return to Prince Farondis and get another ride. Problem is there was no exit vehicle (red) arrow near the action bar. Also "/exit vehicle" didn't work. You may be stuck on the drake until it crashes. Wrote it up as a bug ticket.Once you "re off, you" ll find Prince Farondis where you left him. He "ll give you another ride, so you don" t have to abandon the quest.
Second time around I aimed at the base. nothing. Aimed at the top. That seemed to do it. It was hard to turn the camera to aim. The fel flame will go out when the conduit is destroyed.
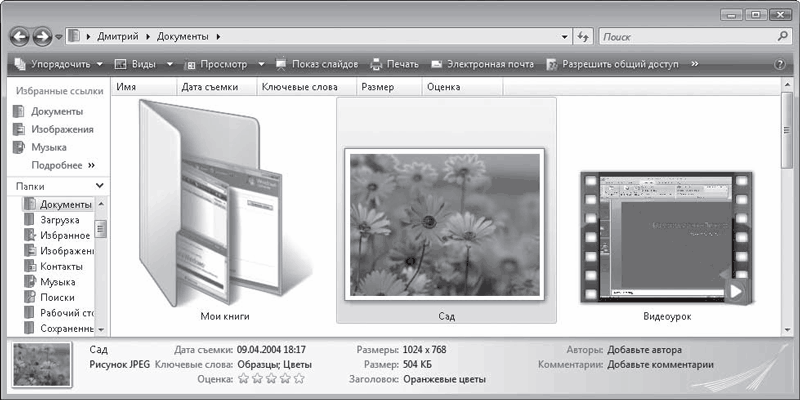
The easiest way to see File Explorer in action is to open a folder. For example, run Start > Documents. Your gaze will open the contents of the user's personal folder, in which his documents are stored (Fig. 3.1).
Rice. 3.1. Explorer window Windows Vista
Eyes widen, right? Nothing, now we will collect them in a heap.
Back button
It becomes available when you make at least one transition from one folder to another. It allows you to take a step back - return to where you were before you opened the current folder. Of course, we are talking about transitions in the same window.
Forward Button
on the contrary, it becomes available when you return to the previously viewed folder at least once using the Back button. The Forward button allows you to move from the current folder to the one that was opened after it.
Not confused? Do a simple experiment: open your personal folder, then (double-click) your documents folder. See the back button is active? Click it. You are back in your personal folder, but the Forward button is now active. If you press it, you will find yourself where? .. Try to guess. Or click if nothing comes to mind.
Address bar. It displays the path to the currently open folder. For example, in fig. 3.1 it says > Dmitry > Documents.
Search field. On fig. 3.1 this field says Search. But you can enter something else - the system will start searching without even waiting for you to type the name of the file or folder in full. However, this has already been discussed in Chap. 2.
Toolbar. It contains buttons for performing standard tasks with files or folders. What kind of actions? It depends on which folder item is selected.
Navigation bar. A handy thing for those who have systems thinking. This panel is located in the window on the left. Above - links to some important (according to Vista developers) places. Below is a folder tree, that is, a structure similar to a heraldic tree. Only the "root" - the Desktop - is not at the bottom, but at the top.
Folder content area. The main part of the folder window. Icons for files and subfolders are displayed here.
Detail panel located at the bottom of the window. It displays information about the selected object. For example, in fig. 3.1 the graphic file of Peter's Book is highlighted. In the details panel, you can see its thumbnail, name, type, and some other properties.
View panel in fig. 3.1 is not visible, but you can access it by clicking the Arrange button on the toolbar and choosing Layout > View Panel. The viewing panel is designed to view images, web pages, video files in a reduced format.
Folder Journey
It was already mentioned above that folders form a tree, like a family tree. Or, given that "branching" occurs from top to bottom, it is more correct to call this structure genealogical vines. At the very top, the root is the desktop. The main “trunks” depart from it - a personal folder, the General folder, Computer, Network, Control Panel, Recycle Bin. From the "trunks" depart "branches" - disks and folders. Each folder can contain other folders, and so on almost ad infinitum. We will have to learn how to climb these "vines" in order to be able to get to any folder and any file.
The hierarchical structure of folders is most clearly demonstrated in the folder tree at the bottom of the navigation panel (see Figure 3.1).
The icons in this tree are not strictly one under the other, but with different indents on the left. This is no accident. If the object below is slightly to the right of the top, it means that it is nested in it. Objects located on the same vertical belong to the same level (located inside the same folder).
Sounds difficult? Nothing, it's difficult at first, you'll get used to it soon.
To get to a file somewhere in the "deep" folder tree, you have to open them one by one - first the disk, then the folder on this disk, then the folder nested in this folder, etc. It's easy to get confused, so each file and folders have their own address, or path, which is written from left to right - from the drive name to the "end point". A sign is placed between the names \ .
For example, the file address of Peter's Book, which has already been mentioned, looks like this: C:\Users\Dmitry\Documents\Peter's Books.tif.
Theoretically, to open this file, you need to write the above address in the address bar in any Explorer window. But in practice, no one does this. It is much faster and easier to go from the "top" folder to the desired item using the good old mouse. In our example, by simply double-clicking the mouse button, you can open the Computer in sequence, in it - drive C:, in it - the Users folder (this is the same as Users), then - Dmitry, Documents (the same as Documents) - and here it is, our desired file of Peter's Book.
As you probably already figured out, to facilitate such “journeys”, there is a navigation bar in the Explorer window. You can quickly open one of your favorite folders, which are listed at the top of this panel. The lower part of the panel shows the section of the folder tree where you are now - this is also convenient if you need to move not very far through the folder structure.
Also, the Vista Explorer address bar is very clever. You have probably already noticed that there may be a > icon to the left of the folder name in this line. This is no accident. This means that this folder has subfolders. To see these subfolders, click on the icon > - a list will open (Fig. 3.2).

Rice. 3.2. Navigate to a child folder using the address bar
You can go to any of the subfolders by clicking on the corresponding item in the list. If you click on the name of the "parent" folder itself in the address bar, you will open it.
Advice
You can create a list of favorite folders yourself. For example, you want your Favorite Pictures folder to be always available. Navigate to it in the folder tree at the bottom of the navigation pane, select it with a mouse click and hold down left button, drag the icon to the Favorite Links list. To remove an unnecessary link from the list, click on it right click mouse and click Delete.
Sometimes you get so deep into the folder tree that the full address doesn't fit in the address bar, and you only see the names of the last few folders. A double arrow appears to the left of them. By clicking on it, you will expand the list of folders traversed at the beginning of the path. In addition, at the bottom of the list there will be links to system folders: Computer, Network, etc. (Fig. 3.3).

Rice. 3.3. Navigate to the top level folder using the address bar
Icons are different
As mentioned above, the contents area of a folder displays the icons of its subfolders and files. These icons may look different. How? It's up to you.
Let's figure out what ways to display icons in Vista Explorer. To do this, on the toolbar of the folder window, click the Views button. A list of possible options will open.
Huge icons. Really huge, taking up a lot of space, but clear icons. Images are presented as thumbnails, video files as thumbnails of the first frame, thumbnails of files can be seen on the icons of folders with attached files (Fig. 3.4).
Rice. 3.4. Huge Icon Mode
Large icons. A little more modest than in the previous version, but still quite large sketches.
Regular icons. Also sketches, but already small.
Small icons. No longer sketches, but simply icons. They are arranged alphabetically in rows.
List. The icons are as small as in the previous version, but arranged alphabetically in columns. Folders are listed alphabetically first, then files.
Table. Not only icons are displayed, but also information about each object: size, file type, date recent changes(Fig. 3.5).

Rice. 3.5. Display icons in table view
If the text in a column is not fully displayed, you can change the width of that column. To do this, drag one of the vertical borders of the column heading in the desired direction.
Tile. The icons of all objects have a medium size and detailed labels, in which the file type and size are indicated in gray font (for images, the size is displayed in pixels) (Fig. 3.6).
Rice. 3.6. Display icons as tiles
In Windows Vista Explorer, the choice of icon sizes is not limited to the options considered: you can choose an intermediate icon size by setting the slider in the list of the Views button to any position between the items Large icons and Small icons. Try to smoothly move the slider in this area, and you will immediately notice how the size of objects in the Explorer window changes.
The main thing is that there should be order in the Explorer
The icons in the folder window can be organized: sorted, grouped, and filtered. When there are a lot of icons, these operations are indispensable.
The easiest way is to sort. See, above the icons, the column headings: Name, Date taken, Keywords, etc.? These are signs by which you can sort. For example, if you want the icons to be sorted alphabetically, click on the Name heading. You want them to line up alphabetically, but in reverse order - again by heading. Same story with the rest of the columns.
The grouping and filtering processes are a little more complicated.
Hover your mouse pointer over the right border of any column heading and an Ў arrow will appear. By clicking on it, you will expand the panel containing the grouping and filtering options (Fig. 3.7).

Rice. 3.7. Grouping and filtering options panel
For example, you decide to group icons by modification date - then it will immediately be clear which files have not been edited for a long time, and which have recently changed. Expand the grouping and filtering panel for the Modified Date column. In fact, this situation is depicted in Fig. 3.7. Click the Grouping button on this panel. As a result, the icons will be divided into groups that have the corresponding dates as titles. By clicking on the heading of a group, you can select all the objects that belong to it (for example, all objects changed today). By double-clicking on the header, you can collapse and expand the contents of the group.
To cancel grouping, click on the column heading arrow on which it was carried out, and click the Sort button on the panel.
Sometimes you need to filter, that is, show only those files and folders that meet certain criteria. For example, you only want files that have changed today.
Call the already familiar panel for grouping and filtering the Date modified column. Check the Today box. Press Enter. Everything is filtered!
If you want to filter on multiple criteria (say, all files modified today and of type TIFF), you will need to check boxes in several sorting and filtering panels.
If Windows decides that too few objects were found, it will check with you whether the required selection result has been achieved and suggest that you search in subfolders.
To exit the filtering mode, open the grouping and filtering panel again and clear all the checkboxes on it. And then click the Back button.
There is another interesting possibility of working with icons - you can sort them into so-called stacks. This is a kind of synthesis of sorting and filtering.
What is a "stack"? Perhaps you will have an association with a vessel from which spirits are consumed. This is the wrong association. A stack in Explorer is like a folder. Let's say you want to sort all your documents by type, but you're too lazy to create a bunch of folders. Open the sorting and filtering panel of the Type column and select Stack.
As a result, the Explorer window will display stack icons with names that match the attribute values specified in the column - in our case, these are file types (Fig. 3.8).

Rice. 3.8. Decomposition of objects into stacks according to the attribute "Type"
You can work with stacks in the same way as with regular folders: open them with a double click of the mouse button, return to the list of stacks with the Back button, navigate to another stack using the address bar.
3.2. Search!
Sooner or later, so many files accumulate on the computer that finding something you need is a problem. We are not talking about any official and system files, which multiply in the depths of Windows. No, we are talking about documents that the user himself creates, copies, receives by mail, transfers from disks, digital cameras, mobile phones… Fortunately, Vista has a well thought out and implemented search process.
Some of it has already been mentioned in Chap. 2, it is now time to consider this crucial mechanism in more detail.
Entering a query in the search bar
We hope you have not forgotten where the search bar is? Yes, yes, in the upper right corner of the folder window. Therefore, if you want to find some file or folder, just open the window of the first folder that comes across (for example, personal) and enter the name of what you are looking for in the search bar. After entering the first characters of the name, the objects that satisfy the request will be displayed in the view area - the same “trick” as in the search bar of the Start menu (see Fig. 2.26).
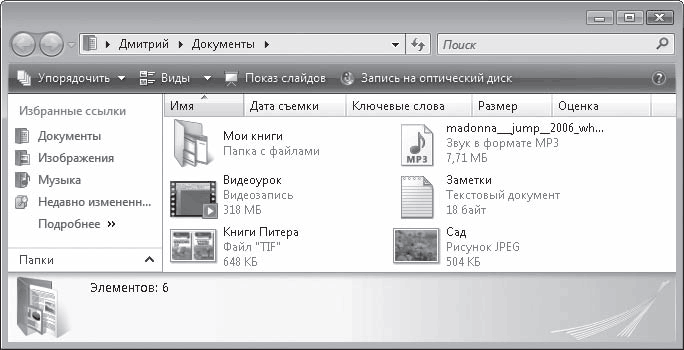
True, here you may encounter an inexplicable, at first glance, phenomenon. For example, if you entered the query in the search bar Article, then among the results there may be files containing the word Article not only in the title, but also in keywords, comments, list of authors and other properties, as well as in the text (Fig. 3.9).

Rice. 3.9. Finding files in the Documents folder
We will not go into details, but this can happen for those files and folders that are processed in a special way - indexed. They are located in special - indexed - folders. For example, a user's personal folders are always indexed, so searching through them is fast and complete.
If you do not remember the file name exactly, you can put signs instead of individual characters ? or * . The question mark is used to replace one unknown character, an asterisk - any number of characters.
Advanced Search
It may happen that the search result did not satisfy you. In this situation, you have two options - to curse Vista badly for poor performance, or pay attention to the Advanced Search link, which is located just below the results. The first option is simpler, but the second is more effective, so we will stop at it.

Rice. 3.10. Advanced search bar
See the Show only switch at the top? By default, it is set to All. “Show only all”… A strange grammatical construction, but the meaning is clear - the search will be performed regardless of the file type. If you want to limit the search to only one of some types, set the switch to one of the positions: Email. Mail, Document, Images, Music, Other.
In the Folder drop-down list, you can specify the search location - then the system will not search the entire computer, but in certain folders, which will significantly save time. You can order to search in indexed locations, on separate local drives, or in a specific folder.
Note
Indexing is a very interesting thing, but it is not possible to understand it without tension. If you are interested in what is indexed and how, read, for example, the book by Y. Zozuly "Windows Vista 100%" .
In the latter case, select the Select locations to search item in the list and in the window that opens, check the boxes next to the required folders.
In the drop-down lists below, as well as in the text fields on the right, you can set additional file properties if you know them. In the Name field, you can enter either the whole name or part of it using wildcards ? and * if you don't remember the exact name of the object.
To start searching, click the Find button. If the search is delayed, click the button with a red cross on the right side of the address bar.
3.3. Drag and drop!
So far, we have mastered only two actions with files and folders: we learned how to open them (double-click) and search. But this is only the beginning! You can do a lot of things with files and folders: copy and move them from place to place, create shortcuts, create and delete, burn to CD, flash memory and floppy disk. Any person who can move the mouse and press the buttons on it can do all these operations.
Create files, folders and shortcuts
When it comes to working in applications, you'll find that you can create new documents right there. Even more - this is the most correct way. However, you can also create a new document directly in Vista Explorer. Sometimes it's even more convenient than opening application program and perform the necessary actions in it.
To create a new document in Explorer, open the folder where this document should be located. Right-click somewhere in an empty space in the folder's content area - a context menu will open. Select the Create command in it. This will expand the submenu (Fig. 3.11). Have you seen the variety of file types? On your computer, the list may be different - it depends on what programs are installed.

Rice. 3.11. List of objects that can be created using the context menu
For example, you want to create a simple text document. You need to click on the item ... which one? That's right - at the point Text document. An icon will appear in the area of the workspace where you right-clicked the mouse. text file. His name will be highlighted so you can immediately write instead of faceless Text Document something bright and memorable. For example, Plan to take over the world. Press Enter to confirm the file name change. You can now open the created file by double-clicking the mouse button... and make sure it's empty. So you will have to think through the details of seizing world power yourself.
Any file is created in the same way if its type is in the list shown in Fig. 3.11.
By the way, there are two special commands at the top of the New submenu: Folder and Shortcut.
The first, as you might guess, is used to create a new folder. A few words need to be said about the second.
The word "label" has already been mentioned several times in the book. It is intuitively clear that this is some kind of tag "attached" to a file or folder. The way it is. A shortcut is a link to a file. The shortcut itself takes up little space, so it can be placed, for example, on the Desktop. But putting all working folders on the Desktop is undesirable - this is inconvenient and unsafe.

Rice. 3.12. Shortcut window
Press the Browse button and specify in the folder tree the object for which you want to create a shortcut (the path to the object will be displayed in the text field).
You can create a shortcut in another way. Go to the folder where the desired object is located, right-click on it and execute the Create Shortcut command. As a result, a shortcut to the selected object will appear in the same folder, which can be moved to the Desktop or to another folder.
Renaming objects
The name that you set when creating a file or folder is not a dogma. You can change it at any time.
To do this, select the desired object, click on it and select the Rename command in the menu that opens.
Advice
If you are too lazy to fiddle with the menu, select a folder or file, and then press the F2 key. The effect will be the same.
In this case, the name of the object will be switched to edit mode (selected and framed), and a cursor will appear to the right of the last character. After deleting the previous name, type a new one from the keyboard and press Enter to confirm.
If you, having entered the name editing mode, decide not to rename the object, press the Esc key.
Moving and copying objects
Files and folders often have to be moved from place to place, and sometimes copies have to be made. There are several ways to do this.
The first is the use of the clipboard. Highlight the file or folder you want to move or copy. Then click on it (her) with the right mouse button. The menu will open.
If you want to move the object, select the Cut command from the menu. If you need to copy an object, use the Copy command. Then go to the folder where you are going to move or copy. Click anywhere in an empty space on the workspace and select context menu the Paste command. After that, the file or folder will be transferred or copied.
The second way to transfer and copy is drag and drop. To do this, both the folder where the original object is stored and the folder where you want to transfer or copy it must be open. Click on the object with the mouse button and, without releasing it, drag it to new folder. As soon as it is within the new "place of residence", release the button - the object will move or be copied. In the process, you will see a large translucent sketch - an object with a caption that explains what is actually happening (Fig. 3.13).
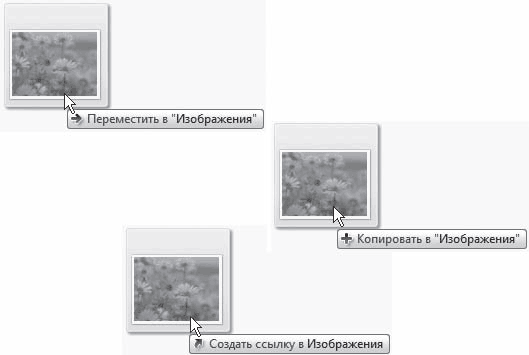
Rice. 3.13. Graphical display of various drag and drop operations
The question is - will it still move or be copied? It depends on the relative position of the source and destination folders. If they are on the same disk, they will be transferred; if they are on different disks, they will be copied.
But there are all sorts of situations. It happens that you do not need to copy a file to another disk, but transfer it. Conversely, sometimes you have to copy objects within the same disk. No problem! Let's not wait for mercy from the system, but turn to the keyboard.
Note
You have probably already noticed how often you have to right-click. This is almost a universal action. That is, if you do not know how to perform any operation on an object in Explorer, feel free to right-click on it (the object, not Explorer) and carefully read the menu that opens. As a rule, it has all the commands you need.
Advice
As practice shows, the mouse is used longer than the keyboard. Therefore, instead of right-clicking, you can use keyboard shortcuts: Ctrl+X instead of Cut, Ctrl+C instead of Copy, and Ctrl+V instead of Paste.
If you hold down the Shift key while dragging, the object is always moved. When the Ctrl key is pressed, it is always copied.
An inquisitive reader may ask: “What happens if you press both Ctrl and Shift while dragging? Who will fight whom?" Answer: “No one can beat anyone. As is often the case in conflicts, someone else wins.” Indeed, the keyboard shortcut Ctrl + Shift allows you to create a shortcut to a folder or file when dragging and dropping.
There is a third option for copying and moving files and folders. Although, to be honest, this is a variant of the second option. Right-click and hold an item and drag the icon to a new folder. Release the button and click on the desired command in the menu that opens.
Sometimes it happens that the name of the object being moved or copied is the same as the name of a file already in the folder. If these are files of the same type, the system will not know what to do - there cannot be two different objects in the same folder with exactly the same names! Therefore, it will bring up a window with a notification about the name match and a proposal to replace the existing file, cancel the operation, or give the object being moved a different name (Fig. 3.14). With a click of the mouse button, you can select any of these options.

Rice. 3.14. Notification about the match of the name of the copied file with the one in the folder
Deleting objects
Alas ... Everything that once appeared will inevitably disappear sometime.
Translated into computer language: any file or folder is as easy to delete as it is to create. Deleting unnecessary files is not a sign of hidden aggressiveness, but a cruel necessity. When there are too many files and folders, this, firstly, reduces the amount of available disk space, and secondly, “loads” the file system. For example, if the folder tree is too complex, then searching it takes a very long time.
There are several ways to delete an object.
Right-click on the icon and select Delete from the context menu.
Highlight with a mouse click junk icon and press the Delete key.
Drag the file or folder to the Recycle Bin icon on the Desktop.
The basket is a kind of buffer between existence and non-existence. The file in the Recycle Bin can no longer be opened and processed, but if necessary, you can restore it - then it will again become a full-fledged member of the file community.
Before moving an item to the Trash, the system will ask you if you really want to delete the file or folder. To confirm this, click the Yes button in the window that opens (Fig. 3.15).

Rice. 3.15. File deletion confirmation request
If there is a need to restore a deleted object to its original location, you need to open the Recycle Bin by double-clicking on its icon on the Desktop, find the icon of the deleted object, select it, and then click the Restore Object button on the toolbar.
Working with a group of objects
We hope you have already figured out how to create, copy, move, delete files and folders, as well as create shortcuts for them. Got it? That is great.
Sometimes there are situations when you need to do all these operations with several objects. You can, of course, drag files one at a time, but this is so unproductive! Fortunately, Windows has the ability to select many objects at once and process them in one fell swoop.
There are several ways to select a group of files or folders.
Selection by mouse capture. This is a convenient option if the objects are located next to each other in a folder. Click on a free section of the workspace next to the objects that you are going to select and, holding down the left mouse button, grab desired icons translucent rectangle by moving the mouse in their direction (Fig. 3.16).

Rice. 3.16. Selecting objects with the mouse
Attention!
If you work with removable media, remember that files deleted from them are not placed in the Recycle Bin.
If the icons of the objects that you want to select are, as in the previous example, one after the other, you can use the following trick. Select the first object in the group and, while holding down the Shift key, click on the last icon you want. As a result, both these objects and everything in between will be selected.
When the icons you want to select are scattered in a folder, select them by clicking the mouse button while holding down the Ctrl key.
If you need to select all the objects in a folder, it is most convenient to use the keyboard shortcut Ctrl+A (or use the folder window menu command Arrange > Select All).
Windows Vista introduced a new technique for selecting objects - using checkboxes. To enable their display, execute the menu command of the folder window Organize > Folder and Search Options, and in the window that opens, go to the View tab and check the Use checkboxes to select items box. After that, when you hover the mouse pointer over any icon, a checkbox will appear at the top of the icon. By clicking on this box, you can set the checkbox, thus highlighting the object, and by clicking again, deselect it. By sequentially setting checkboxes for different objects, you can select an unlimited number of them without resorting to the Shift and Ctrl keys (Fig. 3.17). It is very convenient for people who work in cold rooms and therefore have to sit on their left hand so that it does not freeze. To deselect all items at the same time, simply click on an empty area of the folder's content area.
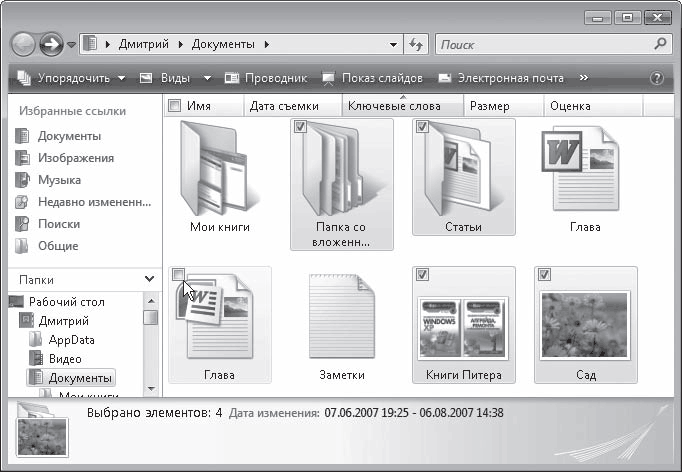
Rice. 3.17. Selecting objects using checkboxes
Let's say you have selected a group of files or folders. Now you can do with them all the same manipulations as with a separate object. You can even rename everything at once!
But be aware that when you try to rename a group of files or folders, Windows gives each object the name you entered and a number in parentheses.
If you need to stop selecting objects, just click on a free area of the workspace.
Working with ZIP folders
Windows system Vista, like its predecessor Windows XP, allows you to comfortably work with ZIP archives. It depicts them as folders, so you may not even realize that you are inside the archive.
To place files in a new ZIP folder (in other words, zip them), select them, right-click on any of the selected objects, and select the context menu command Send > Compressed ZIP Folder. As a result, a ZIP folder icon will appear next to the archived objects.
The name of the ZIP folder will be the same as the name of the item that was right-clicked.
With a ZIP folder, you can work like with a regular folder: move, copy, delete objects; when they get into the archive, they will be automatically compressed. Please note that when you drag a file into a ZIP folder, it will be copied. If you want to move a file to an archive, hold down the Shift key.
If you decide to unzip a ZIP folder (that is, extract objects from it), you can use two methods: either by simply dragging the archive somewhere to another folder with the mouse, or using a special wizard program. Drag and drop shouldn't be a problem. Let's deal with the master.
Right-click the ZIP folder and execute the Extract All command from the context menu. In the window that opens (Fig. 3.18) you will be offered the path to the folder where the files will be extracted.

Rice. 3.18. Compressed ZIP Folder Decompression Wizard
Attention!
Keep in mind that the ZIP folder icon is only visible if you don't have an archiving program (such as WinZIP or WinRAR) installed on your computer. If such a program is installed, its archive icon will be displayed.
If you wish, you can select a different folder by clicking the Browse button. After that, click the Extract button and wait for the process to finish. The unpacked files will be shown in the Explorer window.
3.4. If brought media
Nowadays, there are quite a few types of so-called external storage media - CDs, DVDs, "flash drives", etc. Some people still use the good old floppy disks. You also need to be able to work with these external media.
Reading CD and DVD
Viewing information recorded on a CD is no more difficult than viewing files stored on a hard drive. You will encounter discs all the time when working on a computer - any programs, films, games and music are sold on CD or DVD.
Press the drive tray open button, insert a disc and press the same button again to bring the disc inside the device. After that, the system starts to automatically read the contents of the disc.
Further options are possible. Sometimes a special program is already written on the CD, which automatically starts as soon as the disc is in a running computer. Such a program is called an autorun program. So don't be alarmed if, a few seconds after the CD or DVD has started reading, a window appears on the screen that says Welcome to the Mouse Pad Driver Installer!. Well, or something like that.
You can continue working with the autorun program, or you can close it. For example, just to see what is recorded on this disk. To do this, open the My Computer folder, right-click on the CD-drive icon and execute the Open command in the context menu. As a result, a window will open in which the icons of files and folders written to the disc will be displayed.
If there is no autorun program on the CD, then when you insert the CD into the drive, a window will open in which you need to select one of the actions depending on the type of files found on the disk (Fig. 3.19).

Rice. 3.19. Selecting an action on the contents of the CD
At the top of this window, there is a checkbox Always run for<тип_файлов>. If you select this check box, the next time it finds files of this type on the CD, the system will automatically perform the action you have chosen - even the window shown in Figure 2. 3.19 will not call! So use this flag with caution.
As soon as you click on one of the action options, the corresponding program will start and the contents of the disk will be at your service.
Burning Data to CD
If a writer is installed on your computer optical drive, then you can easily transfer data to a CD or DVD (depending on the type of drive), even without special burning programs.
The procedure is this.
1. Insert a blank CD or DVD into the drive. After the system determines the type of disk, click on the link Burn files to disk in the autorun window.
2. Enter a name for the disk (it can be arbitrary and will subsequently be displayed next to the drive icon when reading the disk) and click Next. The system will offer to perform formatting - special preparation of the disk for recording. Accept this offer by clicking Yes and wait for the procedure to finish (it may take a long time).
3. When formatting is completed, a disk window will open, into which you can drag files from other folders, they will be automatically written to the disk. Now you can extract it.
4. In the future, to add new files to this disk, insert it into the drive, in the autorun window, click the link Open folder to view files and drag the next files into the disk window.
5. You can delete files from the disk using standard windows way: Select them and press the Delete key.
Here it is necessary to remember one "pitfall". Windows Vista, by default, formats disks in what is known as a "living file system" (UDF). This is a convenient format, it allows you to periodically add new files to the disk and even erase them. But, alas, UDF disks cannot be read on computers that have a system older than Windows XP. On the players, you also, most likely, will not read it. Therefore, if the task is to fill the disc without further changing the content, and also use it in players, you should choose the Mastered (ISO) recording format. To do this, do the following.
6. Insert a blank disc into the drive and in the autorun window click the Burn files to disc link.
7. In the disk preparation window, enter its name, click the Show formatting options link and set the switch to Mastered (ISO) (Fig. 3.20). Click Next.
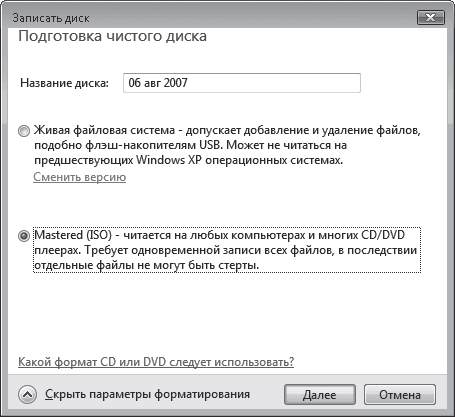
Rice. 3.20. Selecting a Recordable Disc Format
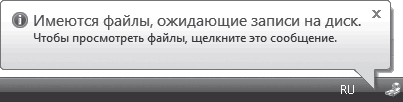
8. Copy everything to the disk window necessary files. After that, a message about the readiness of files for recording will appear in the notification area (Fig. 3.21). By clicking on it, you will open the CD-drive window, which displays the disk image - the icons of objects for recording, marked with an arrow.
Rice. 3.21. Message when files are ready to burn to CD
9. Click the Burn to CD button on the Disc window toolbar. This will open the recording window (Fig. 3.22). Type the name of the disc in it, set the burning speed (according to the capabilities of your drive and the label of the disc) and click Next to start burning.

Rice. 3.22. Entering a Disc Name and Selecting a Recording Speed
10. A special window will notify you about the end of the recording. As soon as you click the Finish button, all temporary files will be deleted, the drive tray will open and you can eject the burnt disc.
Prepared files do not need to be immediately written to disk. The created disk image will be stored on the hard drive until you burn the files or delete them from the temporary folder - this is done using the Delete temporary files button on the toolbar of the disk window.
Use of floppy disks and flash drives ("flash drives")
Floppy disks are becoming more and more a thing of the past, modern computers often they are not even equipped with drives for reading them. Flash drives (colloquially "flash drives"), on the contrary, have become the most fashionable and common way to transfer information today. However, there are many similarities in the use of floppy disks and flash drives.
Let's start with floppy disks (old age must be respected). To write files to a floppy disk, insert it into the disk drive. Select the files that you want to copy to a floppy disk, right-click on them and select Send > Disk 3.5 (A:) in the menu that opens (Fig. 3.23).

Rice. 3.23. Copying folders to a floppy disk via the context menu command
However, files on a floppy disk can be copied in the same way as on any other disk. Remember how? Reread sect. 3.3. To open the contents of the floppy disk, open Computer and double-click Disk 3.5 (A:).
Of course, you can copy and move objects from a floppy disk to HDD computer. You can delete and rename ... in a word, everything that was described above.
To eject a floppy disk from the computer, press the disk drive button on the front panel.
A "flash drive" in the sense of working with files is in many ways similar to a floppy disk. True, the flash drive is connected to the computer via a USB port - it does not matter if the computer is turned on or off. As soon as the computer realizes that a “flash drive” is connected to it, its icon will appear in the Computer window:
It is labeled as Removable Disk, although it should be called "Stuck Disk" or at least "Inserted Disk" to be honest. At the same time, a safe removal icon appears in the notification area:
If there are already files on the “flash drive”, then when it is connected to the computer, a window for selecting actions with contents will open, very similar to the one we saw in Fig. 3.19.
You can work with a "flash drive" in the same way as with any other storage medium - copy files to it in standard ways, view the contents, etc.
But you should be careful when disconnecting a flash drive from a computer. If you wrote data to a "flash drive", then if you remove the device too hastily, they may be lost. To prevent this from happening, it is better to first turn off the device, and only then remove it from the USB connector. To do this, right-click the Safely Remove Hardware icon in the notification area and select Safely Remove Hardware from the menu that opens. A window will open in which you need to select the name of the device and click the Stop button. In the next window, click OK. Now you can disconnect the "flash drive" from the computer without the risk of losing information and subsequent biting elbows.
As you can see, working with files and folders in Vista is not difficult at all. If anything - right-click on the object and carefully study the context menu.
Homework #3
1. Get yourself some file surfing. Don't know what it is? Naturally, this word does not exist. The essence of this process is that the user opens a folder, then the folder that is in this folder, then goes up and down the folder tree ... In a word, he walks. file system you will not remember in this way, but you will understand how complex and confusing it is.
2. After exercise 1, do not close the folder window. Get comfortable and press the back button. So you can calmly and without fuss figure out which snags of the folder tree shook you.
3. Try to find something about yourself on the computer. To do this, enter your last name in the search bar. I wonder what will happen?
4. Create a file (no matter what type), name it Guinea pig and make fun of it to your heart’s content: drag it across disks, copy it in every way, rename it ... But when you have enough fun, don’t forget to delete all copies of the poor guinea pig. There is nothing to clog up the computer. You may have to use the search bar again to search for copies ...
5. Try to burn files that are stored on your "flash drive" to a CD. If your drive cannot burn discs, on the contrary, copy the files from the CD or DVD to a "flash drive". Realize that in any of these operations, the hard drive of your computer participates only as an intermediary.
Having begun his journey, Siddhartha quickly mastered the teachings that he was taught, but did not rest on his laurels, but again set off on his journey - alone, without a guide. In his old age, he often recalled this decisive period of his life. He told how it happened: in the thicket of the forest at night, when darkness and silence reign everywhere and there is not a single living soul around for many yojanas, suddenly a branch will crackle or a leaf will fall, and you will be seized by terrible panic fear and horror. Those who have practiced meditation know that sometimes this happens - fear just rises in a wave. It would seem that there is no particular danger, and still it is not possible to get rid of this feeling. It was this kind of fear that Siddhartha often experienced at that time. He was seized with inexplicable horror. How to deal with such fear? What did Siddhartha do to get rid of him? He realized that there was nothing to be done. Here are his words: “If fear came while I was walking, I kept walking. If fear came while I was sitting, I continued to sit. If fear came while I was standing, I continued to stand. Well, if fear came when I was lying, I continued to lie. And the fear went away just as it came.” In other words, Siddhartha did not try to get rid of fear. He let the fear come, let it stay, and then let it go. He did not allow fear to enter his mind - the deep mind. Although Siddhartha overcame any difficulties and obstacles that came his way, they did not cause him much hardship. But the degree of heroism inherent in his nature is indicated by the fact that he then chose to choose the most difficult spiritual path that could be found. And that's not all: having decided to take up ascetic practices, he adhered to this path more strictly than any of his contemporaries. He experimented, searched for the truth by trial and error, and starting the test, brought it to the limit of human capabilities.
Therefore, he went naked even in the harsh winter, when deep snow lay in the foothills of the Himalayas. He stopped using the bowl and collected the meager food right into the palm of his hand. He heard that by cutting down his diet to a few grains of rice or barley and a few sips of water, one could reach the threshold of enlightenment, and followed this recipe. There is a horrifying description in the sutras of the state of exhaustion he brought himself to by following such a diet. The famous stone bas-relief in Gandhara depicting Siddhartha at this stage of the journey is devoted to the same theme: we see a seated ascetic, whose body has turned into a skin-covered skeleton.
Such a feat is unlikely to delight us - most likely, we will consider it just a perversion. But it must be remembered that Siddhartha was guided by a very specific goal and that in those days everyone approved of the practice of asceticism: it was considered a very effective means for those who had courage. In India, even today, ascetic practices impress many. A friend of mine who was a monk in Sarnath told how a famous ascetic visited them. His disciples inspired the monks that in the morning their mentor eats only one kind of grain, and the food should be ready at exactly seven in the morning. This seemed so important to a friend of mine, who was in Sarnath as assistant abbot, that he decided to personally see to it that their guest received everything he needed. Therefore, in the morning he brought grain to the cell of the great ascetic a few minutes before seven, so as not to be late, and as a result found that the ascetic had already left. A couple of his students hesitated, and my friend asked them for an explanation:
I brought what he wanted, right on time, and he didn't even wait!
Therein lies its greatness! - answered the students.
I'm afraid my friend told them - very politely - what exactly their teacher can do with his greatness, and, as you understand, this did not delight them. But in India, such oddities can attract a lot of attention. Even in the West, in some religious circles, oddities will get you some followers.
Therefore, to give up all this, not to live up to the expectations of the companions, to become nobody again - this required psychological and spiritual courage from Siddhartha, which can be classified as true heroism. After all, it is much easier to accomplish something even very difficult if there are spectators around who admire and applaud, exclaiming: “Look at him, this is a hero!” But if what you do is not liked by anyone and your fans leave you indignantly, it becomes a real test and very, very few can withstand it with honor. We can say that Jesus experienced something similar in the Garden of Gethsemane.
Finally, having independently realized that the true path passes through the stages of meditation, Siddhartha with unshakable determination focused all his will on the goal. According to some early sutras, it was then that he spoke the beautiful and dramatic words: "Let my blood dry, let my flesh dry, I will not move from this place until I achieve enlightenment." 10 He didn't say, "Well, I'll try this method for a few days, and if it doesn't work, I'll probably have to look for something else." Once Siddhartha saw a clear path in front of him, his determination was complete and unyielding. He set himself the goal of destroying conditioned existence and wanted no other. That is why the Buddha's enlightenment is often described simply as a heroic victory over the demon Mara, the Buddhist embodiment of evil. The name Mara literally means “death”, and this demon represents all the forces of evil that dwell in our mind, our bad feelings, our psychological lack of freedom, etc., and in short, our desire, our hatred and our ignorance - then that binds us to endless suffering. The victory over Mara brought the Buddha another title - Marajit: the conqueror of Mara.
Considering that the enlightenment achieved by the Buddha was such a vivid, lofty expression of the heroic ideal, we should not be surprised to find that his teaching so clearly emphasizes the need to rely only on oneself and not even rely on it. There is a famous saying of the Buddha, which is repeated many times in the Pali canon: “I have done for you everything that a teacher can do. Here are the roots of the trees - sit down and meditate. The rest is up to you.” 11 He never left the monks alone: he asked what they were going to do, how their practice was progressing, did not allow them to rest on their laurels, always inspired and encouraged them to make even more efforts. And most of them followed his instructions. True, some were a little tired of all this, and they complained that the Buddha completely drove them, but such people soon left to find a less demanding teacher.
The Buddha knew from his own experience that the spiritual life is not easy. More than once he compared it to a battle and told the monks, in order to raise their fighting spirit: “We are kshatriyas, warriors.” By this, he did not mean to say that they belonged to the Kshatriya class, because his students were from all castes, from Brahmins to untouchables (chandala), and caste distinctions were not encouraged in the Sangha. The Buddha said, “We are warriors because we fight. What are we fighting for? For shila - moral life, for samadhi - higher consciousness, for prajna - wisdom, for vimukti - the highest spiritual liberation. In such descriptions, he appears as the embodiment of fearlessness and self-confidence. There was no false modesty or bravado in him. His speech is called singha-nada: the lion's roar. There are people who bleat like sheep or even like little fluffy lambs, and there are those who bark or yelp like dogs. But Buddha's sermons are compared to the roar of a lion, because in Indian mythology all the animals in the jungle fall silent when the lion roars. When the Buddha explained the highest truth, no one could object.
You don't have to search far to find stories in the Buddhist sutras of how the heroic ideal was extolled or practiced. But to get a more direct and immediate impression of the apparently heroic nature of the Buddhist ideal, it is enough to look at the most vivid images of Buddhist art. Here I am not referring to the tradition of Gandharian sculpture, which is not purely Indian and, moreover, sometimes too sugary. I'm talking about the Mathura tradition, which takes its name from an area near present-day Delhi and is the earliest purely Indian art movement to emphasize energy rather than softness, confidence rather than tenderness, strength rather than good looks. It is characteristic of this tradition to portray the Buddha as a man in the prime of life, who stands firmly to his full height like a tall tower or a large tree, with his hands clasped in the abhaya mudra - a gesture of fearlessness.
Of course, not only the Buddha is depicted in the works of Buddhist art, and not only the personality of the Buddha is the embodiment of the heroic ideal. Developing the Buddhist tradition, Mahayana created the image of a bodhisattva - her main contribution to the Buddhist view. As the bodhisattva archetype has become a symbolic expression of a certain aspect of enlightenment, and one of the most important and revered archetypal bodhisattvas is Manjushri, the personification of supreme wisdom. In the Dhammapada, the Buddha tells how this Dharma seeker strikes the hordes of Mara with the sword of wisdom, so Manjushri in his incarnation, called Arapachana Manjushri, raises a flaming sword with his right hand - the sword of knowledge or wisdom. In the later historical period of the development of Buddhism, the wrathful Vajrapani became the central figure of the Tantric pantheon, whose bright, fearsome image personifies the heroic and fearless energy of the enlightened mind. With his right hand, he raises the vajra - an indestructible weapon with irresistible power.
It was interesting to "google" this topic. here to start:
Single wire power transmission
At the Moscow Research Electrotechnical Institute, S. V. Avramenko demonstrated the transmission alternating current one wire without grounding.
Rice. 5. Scheme of single-wire energy transfer according to the Avramenko scheme.
The basis of the device was the "Avramenko plug", which consists of two semiconductor diodes connected in series (Fig. 5). If the plug is connected to a wire under an alternating voltage of 10-10000 V, then a pulsating current circulates in the plug circuit, and after a while a series of sparks is observed in the arrester P. The time interval from connection to discharge depends on the value of the capacitance C, the ripple frequency and the size of the gap P. The inclusion of a 2-5 MΩ resistor in the transmission line does not cause significant changes in the operation of the circuit.
Investigating the transfer of energy along one wire, Avramenko, Zaev and Lisin come to the conclusion that the phenomenon is explained by the presence of a polarization current. In their opinion, the magnitude of the polarization current is directly proportional to the frequency, the diameter of the generator winding wire, the density of the wire material, the atomic number of the wire material, and is inversely proportional to the length of the winding wire, the mass number of the wire material. But the main dependence, according to the researchers, is the inverse proportionality of the difference in the squares of the oscillation frequencies - the resonant frequency of the atom of the winding material and the frequency of the generator.
The authors of the article consider it necessary to check the feasibility of manufacturing generator windings from copper, nickel, iron, lead wires, etc. The idea of a single-wire transmission of electricity interested many researchers. This is how Stefan Hartmann's experiment, based on Avramenko's invention, is described.
Rice. 6. Scheme by Stefan Hartmann.
The generator uses an automotive ignition coil. The electronic generator operates at a frequency of 10 kHz. A xenon flash lamp is used as a load, a copper wire is used as an antenna (Fig. 6). An alternating voltage generator through a conductor, the length of which is a multiple of the length of the standing wave of the electric field in it, is connected to the "Avramenko plug". In the case of resonance, the voltage amplitude at the point of connection of the "plug" is maximum. The author claims that the capacitor is charged with a voltage that does not affect the primary energy source. The generator, in his opinion, is only a source of information. The energy released in a xenon lamp is determined by the frequency and amplitude of the oscillations. The lamp is ignited by free electrons flowing through a copper antenna. If you remove the antenna, the xenon lamp does not light up.
Our experiments on single-wire power transmission.
The authors of this article conducted experiments on the transmission of electricity through a single wire. In our scheme, the "Avramenko plug" was not used. Instead of the "Avramenko plug", a conventional bridge circuit was used. In addition, we made a number of other changes to the Avramenko scheme, which increased its effectiveness. The scheme is shown in Figure 7.
The general view of the device is shown in Figure 8a. The device is powered by a B5-47 DC power supply. The load is an incandescent lamp 220V 25W. On wiring diagram shown in fig. 7, the numbers indicate: 1 - generator, 2 - spectrum expander, 3 - "antenna". The generator and transformer are placed in a dielectric case (Fig. 8b, 8c), diodes, a capacitor, a lamp, elements 2 and 3, which make up the energy receiver, are in a blue-white housing under the lamp (Fig. 8).

Rice. 7. circuit diagram devices for single-wire power transmission
Rice. 8. Photographs of experiments on single-wire power transmission.
Various incandescent lamps were used in the experiments, the best result was achieved when using 220V, 25W lamps (Fig. 8d, 8e). The key point in improving efficiency, in comparison with the Avramenko scheme, is the use of a standard bridge scheme, and not half of it, as well as the presence of a spectrum expander. The presence of a spectrum expander in the circuit leads to the fact that the load does not interfere with the full charge of the capacitor. As a result, all incoming energy is spent on charging a high-voltage capacitor with a low leakage current. In this case, the circuit is closed by bias currents to the free end of the secondary winding of the transformer through antenna 3 (Fig. 7).
Experiments with burnt out incandescent lamps.
In our experiments on single-wire power transmission described above, both serviceable lamps and burned-out lamps burn.
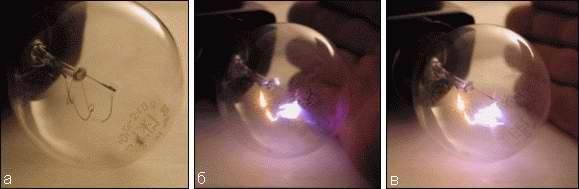
Rice. 9. Photos of experiments with burnt out incandescent lamps.
Figure 9a shows a break in the filament of an incandescent lamp. Figures 9b and 9c are photographs of the experiments. You can see the glow of the spiral and a bright spark at the place where the spiral breaks. Almost every one of us faces the glow of burnt out incandescent lamps, without suspecting it. To do this, it is enough to carefully look at the burnt out lamps. You may notice that the lamps often burn out in several places. The probability of a lamp burning out at the same time in several places is very small. This means that the lamp, having lost the integrity of the spiral, continued to shine until the circuit broke in one more place. This phenomenon occurs in most cases of burnout of incandescent lamps powered by 220V 50Hz.
We conducted such an experiment: we connected standard 60W incandescent lamps to the secondary winding of a step-up transformer. At idle, the transformer gave out a voltage of about 300V. In the experiment, 20 incandescent lamps were used. It turns out that most often incandescent lamps burn out in two or more places, and not only the spiral burns out, but also the current-carrying wires. In this case, after the first break in the circuit, the lamp continues to shine more brightly until another section burns out. One lamp in our experiment burned out in four places, namely, the spiral burned out in two places, and both electrodes burned out! The results of the experiment are presented in table 1.
Number of lamps used in the experiment
Number of lamps burned out in one place
Number of lamps burned out in two places
Number of lamps burned out in three places
Number of lamps burned out in four places
Number of lamps burned out in five places
Table 1.
Experiments on wireless transmission energy.
We provide information about our experiments on the implementation of wireless (without grounding) transmission of electricity.
Rice. 10. Video footage of experiments on wireless power transmission.
In our experiments, the energy source was a complex consisting of a B5-47 power supply, a generator and a transformer, it is clearly visible in frames 10a and 10c, the receiver was an IDR-6 DC electric motor. The electric motor is mounted on an electrically conductive platform, which, in turn, is mounted on a housing made of insulating material. Inside this case is an electronic assembly. The receiver scheme in this case differs somewhat from that used in the previous experiments described in Section 3.9. The inside of the receiver is shown in photographs 10d and 10e. On frame 10d, the circle highlights directly the electronic assembly of the receiver.
High frequency currents. Resonance transformer. Is electric current safe? Tesla's lecture on high frequency currents
According to Tesla, the year he spent in Pittsburgh was lost for research work in the field of polyphase currents. It is possible that this statement is close to the truth, but it is also possible that this year was the beginning of further creative success of the inventor. The discussion with the Westinghouse plant engineers did not go unnoticed. The justification of the 60-period alternating current frequency he proposed required a more thorough analysis of the economic efficiency of using both lower and higher frequencies. Tesla's scientific conscientiousness did not allow him to leave this question without a thorough examination.
Returning from Europe in 1889, he set about designing a high frequency alternator and soon created a machine whose stator consisted of 348 magnetic poles. This generator made it possible to receive alternating current with a frequency of 10 thousand periods per second. Soon he managed to create an even higher frequency generator and began to study various phenomena at a frequency of 20 thousand periods per second.
Studies have shown that as the frequency of alternating current increases, the amount of iron in electromagnetic motors can be significantly reduced, and starting from a certain frequency, it is possible to create electromagnets consisting of windings alone, without any iron in the coils. Motors made from such electromagnets without iron would be extremely light, but in many other respects uneconomical, and the reduction in metal costs would not pay off due to the significant increase in electricity consumption.
Exploring a wide range of alternating current frequencies, initially within the limits that could be applied in a polyphase system (25-200 periods per second), Tesla soon moved on to studying the properties and possibilities of practical use of increased currents (10-20 thousand periods per second) and high (20-100 thousand periods per second) frequencies. To obtain a significantly larger number of periods and significantly higher voltages than could be achieved by the high-frequency current generators he created, it was necessary to find and rely on other principles.
Well acquainted with the world literature on electrophysics and electrical engineering, Tesla studied the work of the famous American physicist Joseph Henry, who suggested as early as 1842 that in some electrical discharges (including the discharge of the Leyden jar) there are not only “main discharges”, but also counter, and each subsequent is somewhat weaker than the previous one. Thus, the existence of a damped two-sided electric discharge was first noticed.
Tesla also knew that eleven years after Henry, the English physicist Lord Kelvin experimentally proved that the electric discharge of a capacitor is a two-way process, continuing until its energy is spent on overcoming the resistance of the medium. The frequency of this two-way process reaches 100 million vibrations per second. The spark between the balls of the spark gap, which seems to be homogeneous, actually consists of several million sparks passing in a short period of time in both directions.
Kelvin gave a mathematical expression for the process of double-sided discharge of a capacitor. Later, Fedderson, Schiller, Kirchhoff, Helmtholtz and other researchers not only checked the correctness of this mathematical expression, but also significantly supplemented the theory of electric discharge.
Tesla was also familiar with the works of Anton Oberbank, who observed the phenomenon of electrical resonance, that is, the process of a sharp increase in the amplitude (range) of oscillations when the frequency of an external oscillation approaches the frequency of the system's own internal oscillations.
He was well aware of the experiments of Hertz and Lodge, who studied electromagnetic waves. Tesla was especially impressed by the experiments of Heinrich Hertz, which confirmed the theoretical assumptions of James K. Maxwell about the wave nature of electromagnetic phenomena. It should be noted that in the works of Hertz Tesla for the first time found an indication of the phenomenon of the so-called "standing electromagnetic waves", that is, waves that overlap one another so that in some places they reinforce each other, creating "antinodes", and in others they reduce to zero, creating "nodes".
Knowing all this, Nikola Tesla in 1891 completed the construction of a device that played an exceptional role in the further development of various branches of electrical engineering and especially radio engineering. To create high-frequency and high-voltage currents, he decided to use the well-known property of resonance, that is, the phenomenon of a sharp increase in the amplitude of natural oscillations of any system (mechanical or electrical) when external oscillations with the same frequency are applied to them. Based on this well-known phenomenon, Tesla created his resonance transformer.
The action of the resonance transformer is based on tuning its primary and secondary circuits to resonance. The primary circuit, containing both a capacitor and an induction coil, makes it possible to obtain alternating currents of very high voltage with frequencies of several million cycles per second. A spark between the balls of the spark gap causes rapid changes in the magnetic field around the primary coil of the vibrator. These changes in the magnetic field give rise to a corresponding high voltage in the winding of the secondary coil, which consists of a large number of turns of thin wire, and the frequency of the alternating current in it, corresponding to the number of spark discharges, reaches several million changes per second.
The frequency reaches its greatest value at the moment when the periods of the primary and secondary circuits coincide, that is, when the phenomenon of resonance is observed in these circuits.
Tesla developed a very simple methods automatically charging the capacitor from a low voltage current source and discharging it through an air-core transformer. The theoretical calculations of the inventor showed that even with the smallest values of capacitance and induction in the resonance transformer he created, with appropriate tuning, very high voltages and frequencies can be obtained by resonance.
The principles of electrical tuning of a resonance transformer discovered by him in 1890 and the ability to change the capacitance to change the wavelength of electromagnetic oscillations created by the transformer became one of the most important foundations of modern radio engineering, and Tesla's thoughts about the huge role of the capacitor and, in general, capacitance and self-induction in the development of electrical engineering were justified .
When creating a resonant transformer, one more practical problem had to be solved: to find insulation for ultrahigh voltage coils. Tesla took up the theory of insulation breakdown and, on the basis of this theory, found The best way insulate the turns of the coils - immerse them in paraffin, linseed or mineral oil, now called transformer oil. Later, Tesla once again returned to the development of electrical insulation issues and drew very important conclusions from his theory.
Having barely begun experiments with high-frequency currents, Nikola Tesla clearly imagined the enormous prospects that opened up to humanity with the widespread use of high-frequency currents. It would be a significant exaggeration to say that even then he saw all the particular cases of their application in the form in which it is currently taking place, but the very direction of Tesla's work testifies to the unusually versatile conclusions that he drew from his discovery.
First of all, he came to the conclusion that electromagnetic waves play an extremely important role in most natural phenomena. Interacting with each other, they either increase or weaken, or give rise to new phenomena, the origin of which we sometimes attribute to completely different reasons. But not only electromagnetic radiation plays a huge role in a variety of natural phenomena. Tesla, by the intuition of a great scientist, understood the significance of various radiations even before the remarkable discoveries of radioactive elements. When later, in 1896, Henri Becquerel and then Pierre and Marie Curie discovered this phenomenon, Tesla found in this a confirmation of his predictions, expressed by him back in 1890.
The enormous importance of alternating currents in the development of industry, which finally received the electric motor it needed, became clear to Nikola Tesla at the first acquaintance with the advantages of three-phase current, which requires only three wires to transmit it. For Tesla already at that time it was undeniable that a method of transmitting electricity should be discovered without wires at all, using electromagnetic waves. This problem attracted Tesla's attention and became the subject of his studies as early as the end of 1889.
However, the practical application of high-frequency currents for a wide variety of purposes required the study of at first glance the most diverse, unrelated issues. It was these experiments on a large scale that Nikola Tesla began to conduct in his laboratory.
Starting systematic experiments with currents of high frequency and high voltage, Tesla had first of all to develop measures to protect against the danger of electric shock. This private, auxiliary, but very important task led him to discoveries that laid the foundation for electrotherapy, a vast field of modern medicine.
The way of thought of Nikola Tesla was extremely original. It is known, he reasoned, that direct current of low voltage (up to 36 volts) does not have harmful effects on a person. As the voltage increases, the possibility of damage increases rapidly.
With an increase in voltage, since the resistance of the human body is practically unchanged, the current strength also increases and reaches an alarming value at 120 volts. Higher voltage becomes dangerous for human health and life.
Another thing is alternating current. For him, the limit of dangerous voltage is much higher than for constant, and this limit is pushed back with increasing frequency. It is known that electromagnetic waves of very high frequency do not have any painful effect on a person. An example of this is light perceived at normal brightness by a healthy eye without any painful sensations. Within what frequencies and voltages is alternating current dangerous? Where does the safe current zone begin?
Step by step Tesla investigated the action of the variable electric current per person at different frequencies and voltages. He experimented on himself. First, through the fingers of one hand, then through both hands, and finally through the whole body, he passed currents of high voltage and high frequency. Studies have shown that the effect of electric current on the human body consists of two components: the effect of current on tissues and cells by heating and the direct effect of current on nerve cells.
It turned out that heating does not always cause destructive and painful consequences, and the effect of current on nerve cells stops at a frequency of more than 700 periods, similar to how a person’s hearing does not respond to vibrations over 2 thousand per second, and the eye does not respond to vibrations beyond the visible spectrum colors.
Thus, the safety of high-frequency currents even at high voltages was established. Moreover, the thermal effects of these currents could be used in medicine, and this discovery of Nikola Tesla has found wide application: diathermy, UHF treatment and other methods of electrotherapy are a direct consequence of his research. Tesla himself developed a number of electrothermal devices and devices for medicine, which were widely used both in the USA and in Europe. His discovery was then developed by other eminent electricians and physicians.
Once, while experimenting with high-frequency currents and bringing their voltage to 2 million volts, Tesla accidentally brought a copper disk painted with black paint closer to the equipment. At the same moment, a thick black cloud enveloped the disk and immediately rose up, and the disk itself shone, as if some invisible hand had scraped off all the paint and polished it.
Surprised, Tesla repeated the experiment, and again the paint disappeared, and the disk shone, teasing the scientist. Having repeated experiments with different metals dozens of times, Tesla realized that he had discovered a way to clean them with high-frequency currents.
“It is curious,” he thought, “whether these currents will also affect human skin, whether it will be possible to remove various paints that are difficult to remove from it with their help.”
And this experience was a success. The skin of the hand, painted with paint, instantly became clean as soon as Tesla brought it into the field of high frequency currents. It turned out that these currents can remove a small rash from the skin of the face, clean the pores, and kill the microbes that always cover the surface of the human body in abundance.
Tesla believed that his lamps had a special beneficial effect not only on the retina, but also on the entire human nervous system. In addition, Tesla lamps cause air ozonation, which can also be used in the treatment of many diseases. Continuing to engage in electrotherapy, Tesla in 1898 made a detailed report on his work in this area at the regular congress of the American Electrotherapeutic Association in Buffalo.
In the laboratory, Tesla passed currents of 1 million volts through his body at a frequency of 100 thousand periods per second (the current reached a value of 0.8 amperes). But, operating with currents of high frequency and high voltage, Tesla was very careful and demanded that his assistants comply with all the safety rules he himself developed. So, when working with a voltage of 110-50 thousand volts at a frequency of 60-200 periods, he taught them to work with one hand in order to prevent the possibility of current flowing through the heart. Many other rules, first established by Tesla, have become firmly established in modern technology safety when working with high voltage.
Having created a variety of equipment for the production of experiments, Tesla in his laboratory began to study a huge range of issues related to a completely new field of science, in which he was most interested in the possibility of practical use of high frequency and high voltage currents. His works covered the whole variety of phenomena, ranging from the generation (creation) of high-frequency currents to a detailed study of various possibilities for their practical use. With each new discovery, more and more problems arose.
As one of the private tasks, Tesla was interested in the possibility of using the discovery by Maxwell and Hertz of the electromagnetic nature of light. He had an idea: if light is electromagnetic oscillations with a certain wavelength, is it possible to artificially obtain it not by heating the filament of an electric incandescent lamp (which makes it possible to use only 5 percent of the energy that turns into a luminous flux), but by creating such oscillations, which would cause the appearance of light waves? This problem became the subject of research in Tesla's laboratory at the beginning of 1890.
Soon he accumulated a huge amount of facts, which made it possible to proceed to generalizations. However, Tesla's caution forced him to check each of his statements dozens and hundreds of times. He repeated each experience hundreds of times before drawing any conclusions from it.
The unusualness of all the discoveries of Nikola Tesla and his enormous authority attracted the attention of the leaders of the American Institute of Electrical Engineers, who again, like three years ago, invited Tesla to give a lecture on his work. Tesla chose the topic: "Experiments with alternating currents of very high frequency and their use for artificial lighting."
According to the tradition that has been established since the first years of the institute's existence, a limited number of invitations were sent out only to the most outstanding electrical engineers. Before such a select audience on May 20, 1892, Tesla gave one of his most inspirational lectures and demonstrated the experiments he had already carried out in his laboratory.
There is nothing that could attract the attention of man to a greater extent and would deserve to be the subject of study than nature. To understand its huge mechanism, to discover its creative forces and to know the laws that govern it is the greatest goal of the human mind, - with these words Tesla began his speech.
And now he is already demonstrating to the audience the results of his research in a new, yet unstudied area of high-frequency currents.
The scattering of electromagnetic energy in the space surrounding the source of high-frequency currents makes it possible to use this energy for a variety of purposes, the scientist says with conviction and immediately shows a wonderful experience. He puts forward an ingenious position on the possibility of transmitting electricity without wires and, as proof, makes both ordinary incandescent lamps and lamps specially created by him without filaments glow inside, introducing them into an alternating high-frequency electromagnetic field. “Lighting with lamps of this kind,” says Tesla, “where the light does not arise from the heating of the filaments by the flowing current, but due to special vibrations of the molecules and atoms of the gas, will be easier than lighting with modern incandescent lamps. Illumination of the future, - emphasized the scientist, - is illumination by high-frequency currents.
Tesla dwelled in particular detail on the description of his resonance transformer as a source of waves of very high frequency and again emphasized the importance of the discharge of a capacitor in creating such oscillations. Tesla correctly assessed the great future of this most important part of modern radio equipment. He expressed this idea in the following words:
I think that the discharge of the capacitor will play an important role in the future, since it will not only present the possibility of receiving light more in a simple way in the sense indicated by the theory I have outlined, but will be important in many other respects.
After detailing the results of experiments with high-frequency currents obtained using a resonant transformer, Tesla concluded the lecture with words indicating his clear understanding of the value of further study of phenomena on which his work had barely lifted the veil of mystery:
We are passing with unfathomable speed through infinite space; everything around us is in motion, and energy is everywhere. There must be a more direct way to utilize this energy than currently known. And when light is obtained from the environment around us, and when all forms of energy are obtained effortlessly from their inexhaustible source in the same way, humanity will advance with gigantic strides.
The mere contemplation of this glorious prospect lifts our spirits, strengthens our hope, and fills our hearts with the greatest joy.
To thunderous applause, Tesla ended his remarkable performance. The extraordinary nature of everything shown and the particularly bold conclusions of the scientist, who saw the revolutionary consequences of his discoveries, amazed the audience, although not everyone understood the content of the lecture as deeply as Nikola Tesla would have liked.
related forum:
INVENTION
Patent Russian Federation RU2108649
METHOD FOR POWERING ELECTRICAL DEVICES
AND A DEVICE FOR ITS IMPLEMENTATION
Inventor's name:
Name of the patentee: Avramenko Stanislav Viktorovich
Address for correspondence:
Start date of the patent: 1995.04.11
The invention relates to methods for powering electrical devices and devices for their implementation. The invention is aimed at solving the problem of creating devices that are free from significant ohmic energy losses in the connecting wires. According to the method, an energy consumer is connected to one of the high-voltage terminals of a high-frequency transformer, the low-voltage winding of which is connected to an alternating voltage generator with a variable frequency. By changing the frequency of the generator, they achieve the occurrence of resonant oscillations, accompanied by the transfer of energy to the consumer. The device contains an alternating voltage generator with adjustable frequency, a high-frequency transformer, one of the outputs of the high-voltage winding of which is connected to one of the input terminals of the consumer, and the other end is insulated. The power-supplying output can be provided with means for matching with the consumer, made, for example, in the form of a rectifier unit or a transformer converter.
DESCRIPTION OF THE INVENTION
The invention relates to methods for powering electrical devices and devices for its implementation.
A known method of powering electrical devices by placing the powered device in an induction coil connected to an alternating current source.
The device that implements this method contains an alternating voltage source, an induction coil, and matching elements.
Although in this method and device, the energy exchange between the source and receiver is carried out using bias currents, conduction currents flow in a closed circuit in the power device itself, which is associated with ohmic losses in this circuit and, accordingly, heating of its elements.
The prototype of this proposal is a method of powering an electrical device and a device for its implementation by supplying electricity through a two-wire line, while depending on the parameters of the power source and the receiver, certain matching devices (transformers, amplifiers, etc.) are used.
The implementation of this method along a two-wire line forming a closed circuit is inevitably associated with ohmic losses in the connecting wires, as a result of which it is necessary to increase the intensity of the conductive lines.
This invention is aimed at solving the problem of creating a method for powering electrical devices and a device for its implementation, characterized by low ohmic losses in the connecting wires and the possibility of transmitting high energies through conductor transmission lines with a small cross-section of conductors.
This is achieved by the fact that the power supply of electrical devices is carried out by connecting one of its input terminals to one of the outputs of the high-voltage section of the high-frequency transformer of the converter connected to an alternating voltage source, while selecting the frequency of the alternating voltage source, the establishment of resonant oscillations in the formed electrical circuit is achieved.
The device that implements this method is an alternating voltage generator with an adjustable frequency, including a frequency changer, a high-frequency transformer, one output of the high-voltage section of which is isolated, and the second is designed to supply energy to the consumer.

In FIG. 1 shows a general diagram of a device that implements the proposed method of powering electrical devices; in fig. 2 - power supply circuit for AC receivers; in fig. 3 - options for powering receiving devices with alternating or direct current.
According to FIG. 1, a low-voltage winding 2 of a high-frequency transformer converter 3 is connected to an alternating voltage generator 1 with an adjustable frequency, which includes a means for changing the frequency (not shown). from the input terminals 7 consumer 8 electromagnetic energy. The second terminal 9 of the consumer is either grounded or connected to the container 10.
In the case of powering electrical devices with direct current, Fig. 2, output 5 is supplied with two diodes 11,12, which ensure the passage of unidirectional current in a closed circuit formed by diodes 11, 12 and the consumer. A capacitor 13 can be connected in parallel with the diodes. Referring to FIG. 3, output 5 is connected to the primary winding of the transformer converter 14, the secondary winding of which is connected to the consumer either directly or through a rectifier 15.
A high-frequency transformer converter can be either low-voltage (outside) and high-voltage (inside) windings wound coaxially on a common frame, while in both cases an open magnetic core can be used.
THE METHOD IS IMPLEMENTED AS FOLLOWS
The low-voltage winding of the transformer converter 3 is connected to the alternating voltage generator 1 with adjustable frequency, and one of the input terminals 7 of the consumer 8 of electricity is connected to one of the outputs of the high-voltage winding. The second output of the high-voltage winding is isolated. After that, the frequency of the alternating voltage generator is changed. At a certain frequency, which lies mainly in the range of 0.5-100 kHz, electrical resonant oscillations occur in the formed electrical circuit, which is immediately evident, for example, by lighting up an electric light bulb used as a consumer of electrical energy, or by rotating a DC motor connected according to fig. 2. The occurrence of electrical oscillations indicates the transfer of energy to the consumer. Since electricity consumers are powered by an open electrical circuit, it can be assumed that the process of electrical energy transmission is carried out according to the theoretical model described by Academician V.F. Mitkevich in his monograph "Magnetic flux and its transformations" - Publishing House of the USSR Academy of Sciences M-L, 1946.
A characteristic feature of this invention is that the energy transfer of the generator 1 in the mode of resonant oscillations is not accompanied by heat generation in the supply conductor 5, which makes it possible to use conductors of a small cross section without losing electricity to heat them.
It should be said that the transmission of energy over a single wire was demonstrated by Nikolai Tesla in 1894. However, no specific information about the implementation of this experiment has been preserved.
CLAIM
1. A method of powering electrical devices using an alternating voltage generator connected to a consumer, characterized in that the generator voltage is applied to the low-voltage winding of a high-frequency transformer converter, and one of the outputs of the high-voltage winding of this converter is connected to one of the output terminals of the powered electrical device, while by changing the frequency of the generator, they achieve the establishment of resonant oscillations in the formed electrical circuit.
2. A power supply device for electrical devices, containing an alternating voltage generator and a means of transmitting electricity to a consumer, characterized in that the means of transmitting electricity to a consumer is a high-frequency transformer converter, the primary low-voltage winding of which is connected to an alternating voltage generator, one of the terminals of the secondary high-voltage winding is provided with a connection means it with one of the input terminals of the consumer of electricity, and the other output of this winding is isolated, while the alternating voltage generator is equipped with a means for changing the frequency.
3. The device according to claim 2, characterized in that it is equipped with a matching unit made according to the diode circuit so that the non-isolated output of the high-voltage winding is connected to the common point of the anode of the first of the diodes and the cathode of the second diode, while the cathode of the first diode and the anode of the second diode are equipped with means of connection to the consumer of electricity.
4. The device according to claim 2, characterized in that it is equipped with a transformer converter, the primary winding of which is connected to the non-isolated output of the high-frequency winding, and the secondary is equipped with a means connected to the consumer of electricity.
EVERYONE WHO DID NOT SEE - WATCH!!!
Known methods of transmission of electrical energy are based on the transmission of active power using conduction currents in a closed circuit. Electromagnetic energy propagates along power lines (TL) in the form of traveling waves of an electromagnetic field or a field of charges ... Etc.
It is possible to transfer energy in a simpler way: In the works of N. Tesla and Russian scientists (and on my own behalf - also American ones, who will use sc. using the resonant properties of a single-wire line (OES) made of a metal conductor.
And it can be even simpler: without a conductor at all.
For those interested, taken from here:
Tesla, on the go, cooler than Einstein!
In one of the previous topics, we examined how the famous Serbian scientist Nikola Tesla transmitted electricity using his own invention - a resonant generator (Tesla coil), and how he did it is described in detail. Tesla managed to transmit current over very long distances, but in addition to the method proposed by Tesla, there is another one - induction. This method is certainly not intended for long-distance current transfers.
The induction method has not found mass application in science and technology due to the very large losses of the modulated current (losses reach 60%), moreover, it is not possible to transfer current by more than 1 meter using this method (theoretically, of course, it is possible, but it makes no sense because due to strong field scattering).

The device for such a transmission is very simple - two circuits, one of them is connected to a high-frequency generator (a few kilohertz). Such a device can be easily made at home, a simple multivibrator that is designed for 20-50 kilohertz is connected to an amplifying stage, a circuit is connected to the latter that contains from 10 to 100 turns, the second circuit is analogous to the first. The most important thing in the induction principle of current transfer is that the circuits do not have a magnetic core, that is, they are not connected to each other in any way, and the current is transmitted through the air by induction.
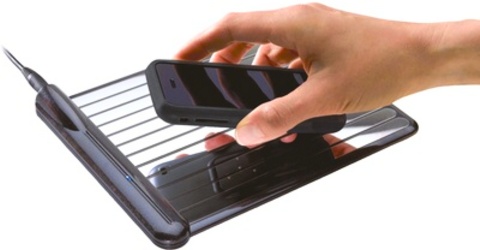
In practice, as mentioned above, this method is used very rarely. This transmission principle has been known for a long time - since the time of Michael Faraday (already 200 years). And now, in our time, Nokia Corporation decided to use this method and created the concept of a mobile phone that does not have a charging port, the phone is not yet mass-produced, but buyers will definitely like such a mobile phone. It has a built-in receiving circuit, and the transmitter is hidden in the stand. It all works very simply - we put the phone on delivery and the phone is charging.

But this is not all the advantages of a miracle phone. The phone can be charged in another way. It is known that TV and radio stations modulate radio waves, and the phone collects them with a receiver and turns them into a current with which the phone is charged. This principle, and the principle of induction current transfer, began to be used by other manufacturers of mobile phones and laptops, and now it has become possible to find such miracle devices on the market.
Discuss the article CURRENT TRANSMISSION WITHOUT WIRES BY THE INDUCTION METHOD