This article will give an example of creating a document in MS Office Word 2007, consisting of three pages, and specifying a landscape (horizontal) orientation for the second page.
We start the program, press and hold the Enter key so that 2 more blank sheets appear in the document. To change the orientation of only the second sheet, you will have to create two document breaks - before and after the desired sheet. This will split the document into three sections. Sections in Word allow you to define individual settings.
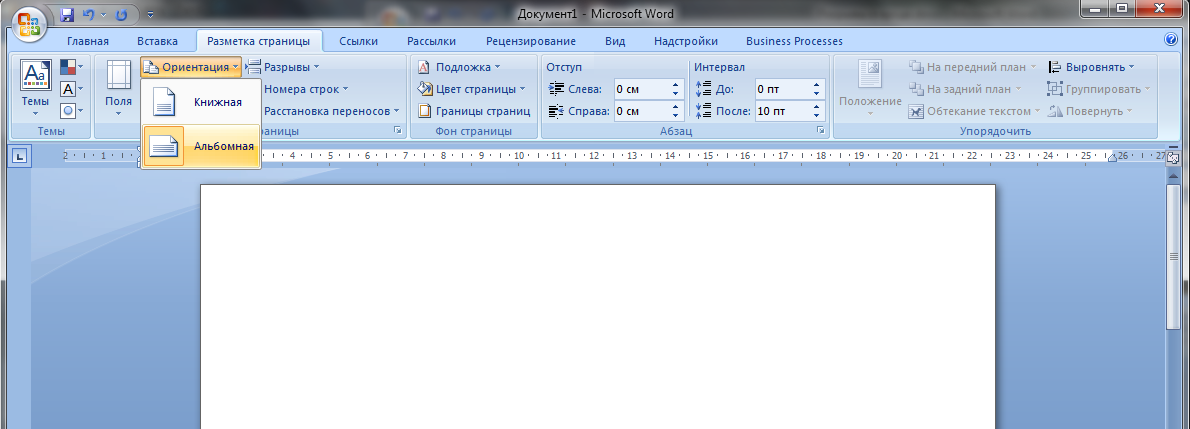
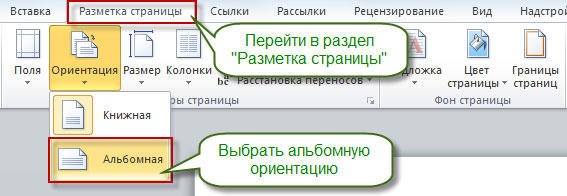
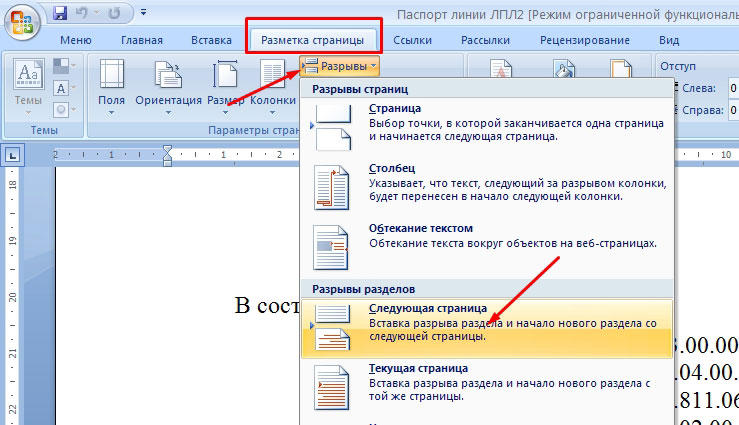
Now let's create a gap in front of the leaf we are interested in. To do this, set the cursor on the first page. Next, on the toolbar, open the tab "Page Layout" - "Breaks" - "Next Page" (Fig. 1).
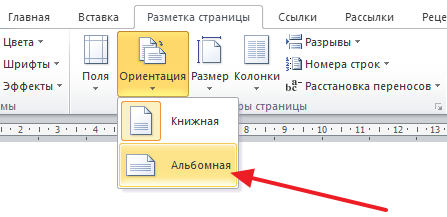
The first gap will be created. Now let's place the cursor on the second sheet and add another section as described above. As a result, we have three sections, one sheet in each. Now, without removing the cursor from the second sheet, on the "Page Layout" tab, select "Orientation" - "Landscape" (Fig. 2). Only one sheet of the document should be laid out horizontally.
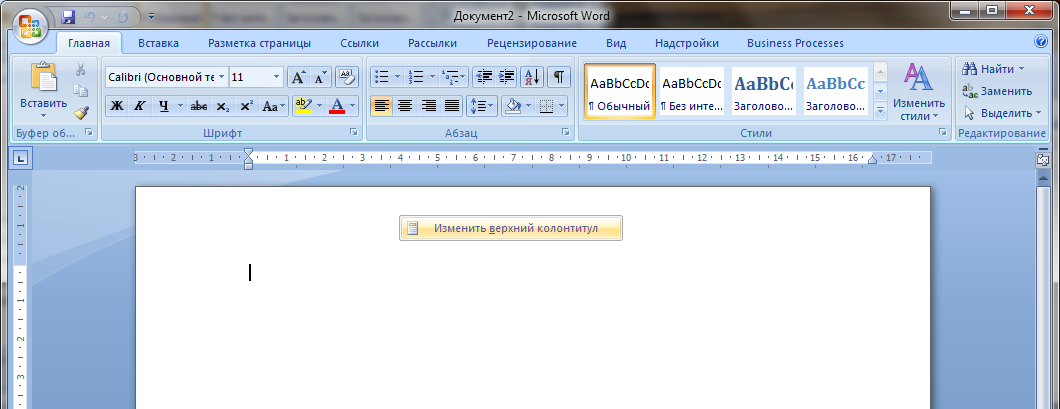
If something went wrong, it is most convenient to view the created sections in the mode of working with headers and footers. Headers and footers are the top and bottom areas of each page of a document. Most often they contain page numbers. To enter this mode, click on the top or bottom of any page of the document (1-2 cm from the edge) right click mouse and click "Edit page header”, or simply double-click the left mouse button on this area (Fig. 3).
Word will enter the header and footer editing mode. Working with headers and footers does not interest us now, however, section numbers are displayed in this mode (Fig. 4).
When working with text, it is often necessary to change the page orientation from portrait to landscape or vice versa. IN text editor Word, this is done in a few clicks and usually causes no problems for users.
But, if it is necessary in a document, but only on one specific page, then this is already much more complicated and not all users know how this is done.
In this article, we will consider just such an option. Here you will learn how to do it in Word 2007, 2010, 2013 or 2016.
Change the orientation of a single page using section breaks
If you only need to change the orientation of one page in Word document, then the easiest option is to use section breaks. Such a gap must be set before and after the page for which you want to change the orientation. After the page is separated from the rest of the document by breaks, you can change its orientation to landscape or portrait, depending on what you specifically need.
Now that you are familiar with the theory, let's get down to practice. Suppose you already have a text document ready and there is one of the pages for which you need to change the orientation. In order to do this, you must first place the cursor at the end of the previous page, that is, immediately above the page you need. After placing the cursor, you need to go to the "Page Layout" tab, click on the "Breaks" button and select "Next Page". This way you will set a section break before the page whose orientation you want to change.
Next, you need to place the cursor at the end of the next page, that is, at the end of the page whose orientation you want to change, and insert a section break again using the "Breaks - Next Page" button. Thus, you will separate the desired page from the rest of the document. In order to make sure that the gap is set and it is exactly where you want it, go to the "Home" tab and turn on the display of all signs there.
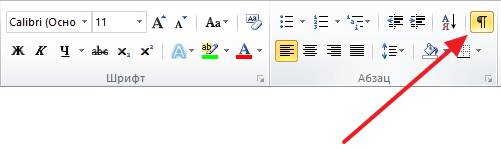
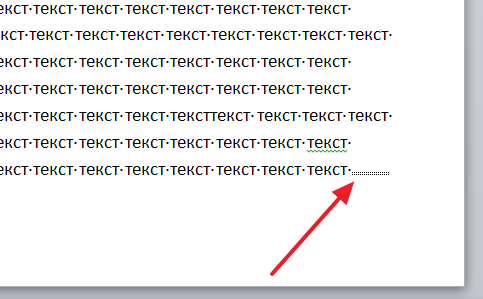
After enabling this feature, you will be able to see non-printable characters (spaces, indents, and section breaks). The screenshot below shows what the section break should look like. If breaks are installed incorrectly, you can remove them and reinstall them.
Once both section breaks are in place, you can start reorienting the page. To do this, place the cursor on the page whose orientation you want to change, go to the "Page Layout" tab, click on the "Orientation" button and select one of the options.
If you did everything right, then the orientation should change only for one of the pages. If the orientation has changed for several pages, then you need to check how the section breaks are placed.
Changing the orientation of a single page through page options
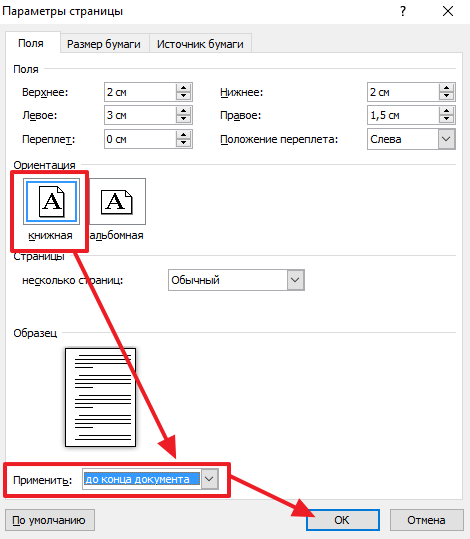
There is another way to change the orientation of one page in Word. To use this method, you need to place the cursor on the page that precedes the one whose orientation you want to change. In other words, the cursor needs to be set one page up. After the cursor is set, open the Page Layout tab and click on the Page Setup button (or open Page Setup by double-clicking on the document ruler).
This should open the Page Setup window. Here you need to change the orientation of the document, select the application option "To the end of the document" and save the settings using the "Ok" button.

As a result, all pages that are below the one where the cursor was placed will change their orientation. Next, you need to place the cursor on the page whose orientation you want to change, and again change the orientation of all sheets until the end of the document. Only this time you need to choose the initial orientation.
As a result of these manipulations, you will change the orientation of only one page of the Word document.
Typically, when creating text file the page is in portrait or portrait orientation. Sometimes when working with a document, you may encounter a problem when the information you need in the form of a table or chart is stretched and simply does not fit. The ideal solution to this problem would be to convert the individual page format.
The user has the option to choose between portrait and landscape spread.
The most obvious action might be to change the rotation of the sheet when setting print options. However, if you need to save the document and send it to another person, this option is not suitable, since the formatting will have to be done over again.
Position adjustment throughout the document
It is not difficult to guess that the least time-consuming process will be the flip of all the sheets in the document. To do this, you need to find the “Page Layout” area and select the desired format there from the drop-down menu, which contains 2 options - “Landscape” and “Portrait” scans. It is worth paying attention to the fact that once the adopted provision will be applied to subsequent pages of the document, which indicates their strong relationship with each other.
Changing the position of one sheet
It is obvious that various tables or high-resolution informative pictures can take up a lot of space. Moreover, they need to be organically inserted into the text.
To achieve this goal, select all the text on the page that needs to be repositioned. It is worth noting that if you do not select all the information, then the rest will be moved to the next or previous page. You can also assign an orientation transition location by placing the cursor in front of the text you wish to leave unchanged. Thus, the sheet will be torn, and the necessary information will be on the next one.
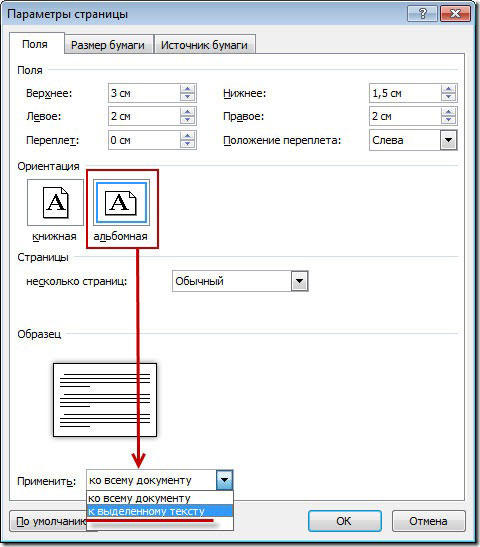
Then go to the "Page Layout" tab and select the "Margins" option, the "Custom Margins" item. In the menu that opens, we find the desired position and below we determine to which part of the document the selected parameters will be applied. In our case, select the item "To the selected text".
If you prefer the method of breaking the sheet, you need to go to the "Page Layout" tab in the same way, but select the "Breaks" item there, and in it - "Next Page". After that, it is necessary to assign the end place of the formatted sheet by placing the cursor on the position after the last word, and do the above procedure, indicating a different type of orientation.
Change the spread in Word 2003
If in relatively modern versions Word programs, released from 2007 to 2016, the settings of the parameters in question are not very different, then in earlier versions, for example, 2003, there are some nuances. The bottom line is that there is no habitual latest versions area programs, which may cause you some confusion. In fact, everything is simple. Select the "File" option and